AWS Physical AI Blog
Build a Spatial Object Tracking Pipeline with Create ML using Amazon EC2 Mac Instances
Introduction
Apple’s Create ML enables developers to train powerful machine learning models without deep machine learning expertise, simplifying the path from concept to production. A new feature with Apple’s Create ML tool enables object tracking to be trained directly from the command line, unlocking faster and more scalable workflows. This is especially valuable for teams building immersive experiences on Apple Vision Pro and iOS who need to reliably detect and track real-world objects as part of their spatial computing applications. By leveraging Amazon EC2 Mac instances, you can distribute multiple training jobs across Macs in the cloud, significantly reducing pipeline completion time and keeping your local machine free for other tasks.
Learn how to build an end-to-end spatial object tracking pipeline using Create ML and Amazon EC2 Mac instances. This post walks through creating a machine learning workflow that can detect and track objects in 3D space, leveraging the power of Apple’s Create ML framework and AWS cloud infrastructure. In this post you will learn how to:
-
- Train an object tracking model with Create ML using Amazon EC2 Mac instances
- Architect an object tracking training pipeline with Amazon S3 storage for assets
- Orchestrate and Monitor the ML workflow using AWS Step Functions, Amazon Simple Notification Service, and AWS Lambda
- Use the resulting reference object file to track an object in visionOS and iOS
Overview of Object Tracking in visionOS
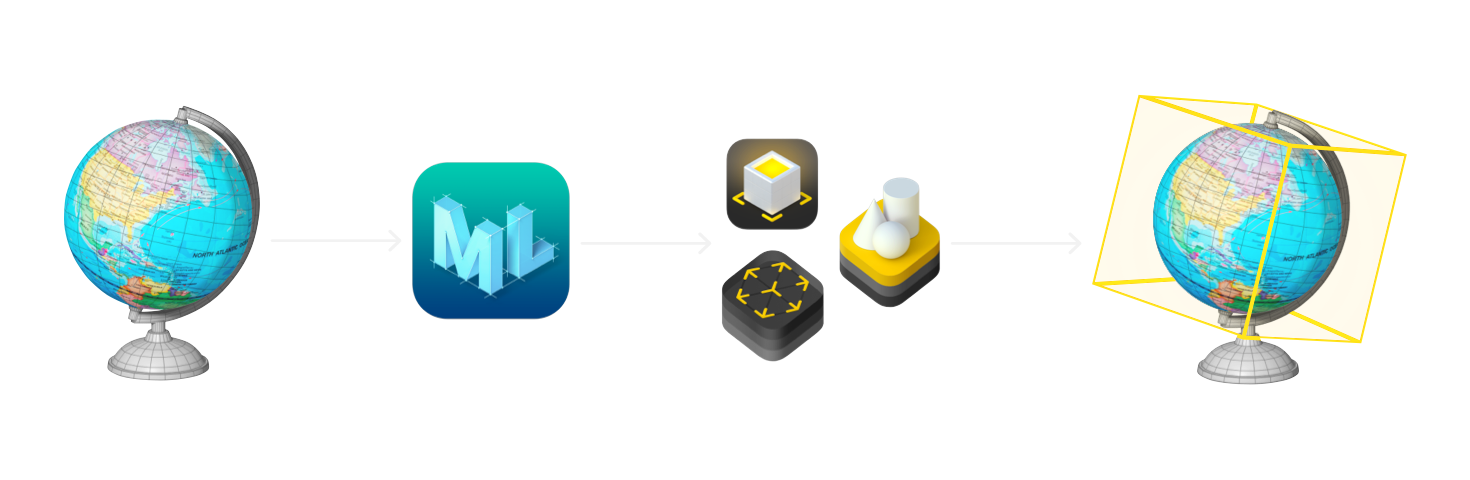
Figure 1: Apple’s Create ML workflow for Object Tracking
Here is how you can use Apple’s Create ML to implement object tracking in your app as illustrated by the diagram above:
- 3D Model Creation: The process begins with a USDZ (Universal Scene Description ZIP) file, which is a compressed 3D model format optimized for Apple’s spatial computing applications. This file represents the physical object you want to track, including its geometry, textures, and distinctive features.
- Model Training: Using Create ML, a machine learning model is trained on the USDZ file. This training process occurs on a Mac and teaches the model to recognize the object from various angles and in different lighting conditions.
- Reference Object Generation: The trained model produces a .referenceobject file, a specialized format for visionOS object tracking. This file contains the unique characteristics needed to identify and track the corresponding real-world object.
- Integration: The .referenceobject file is then integrated into your visionOS and iOS app, enabling it to recognize and track the physical object in real-time.
- Real-World Tracking: When the app runs on an Apple Vision Pro or iOS device, it uses the .referenceobject file to detect, track, and understand the position and orientation of the physical object in the user’s environment.
Prerequisites
To create an Amazon EC2 Mac Amazon Machine Image (AMI) for Create ML, you will need to have the following on your development Mac:
- AWS CLI installed and configured
- Homebrew (Package Manager)
- An Apple Developer Account
- Xcode 27 Beta
Obtaining your 3D Model

Figure 2: Example USDZ (Universal Scene Description ZIP) 3D model for Training
To create a 3D model for object tracking in visionOS, you need a USDZ file that accurately represents your real-world object. You can obtain this file through two primary methods: using computer-aided design (CAD) software or leveraging the Object Capture feature in the Reality Composer app on iOS/iPadOS. The CAD method allows for precise modeling and application of physically based rendering (PBR) materials, making it ideal for complex or reflective objects. Alternatively, Object Capture lets you use an iPhone or iPad to photograph an object from multiple angles, automatically generating a USDZ file. Whichever method you choose, it’s crucial that the resulting 3D model is as photorealistic and accurately scaled as possible, essentially serving as a digital twin of the physical object. The quality and precision of this model directly impact the effectiveness of object tracking in your visionOS app. To automate your 3D design workflow you can convert your models to USDZ using an AWS open-sourced architecture and cloud formation template called Visual Asset Management System (VAMS). VAMS can interject logic into your asset pipeline and track changes and version files. Find out more in the VAMS Github repository.
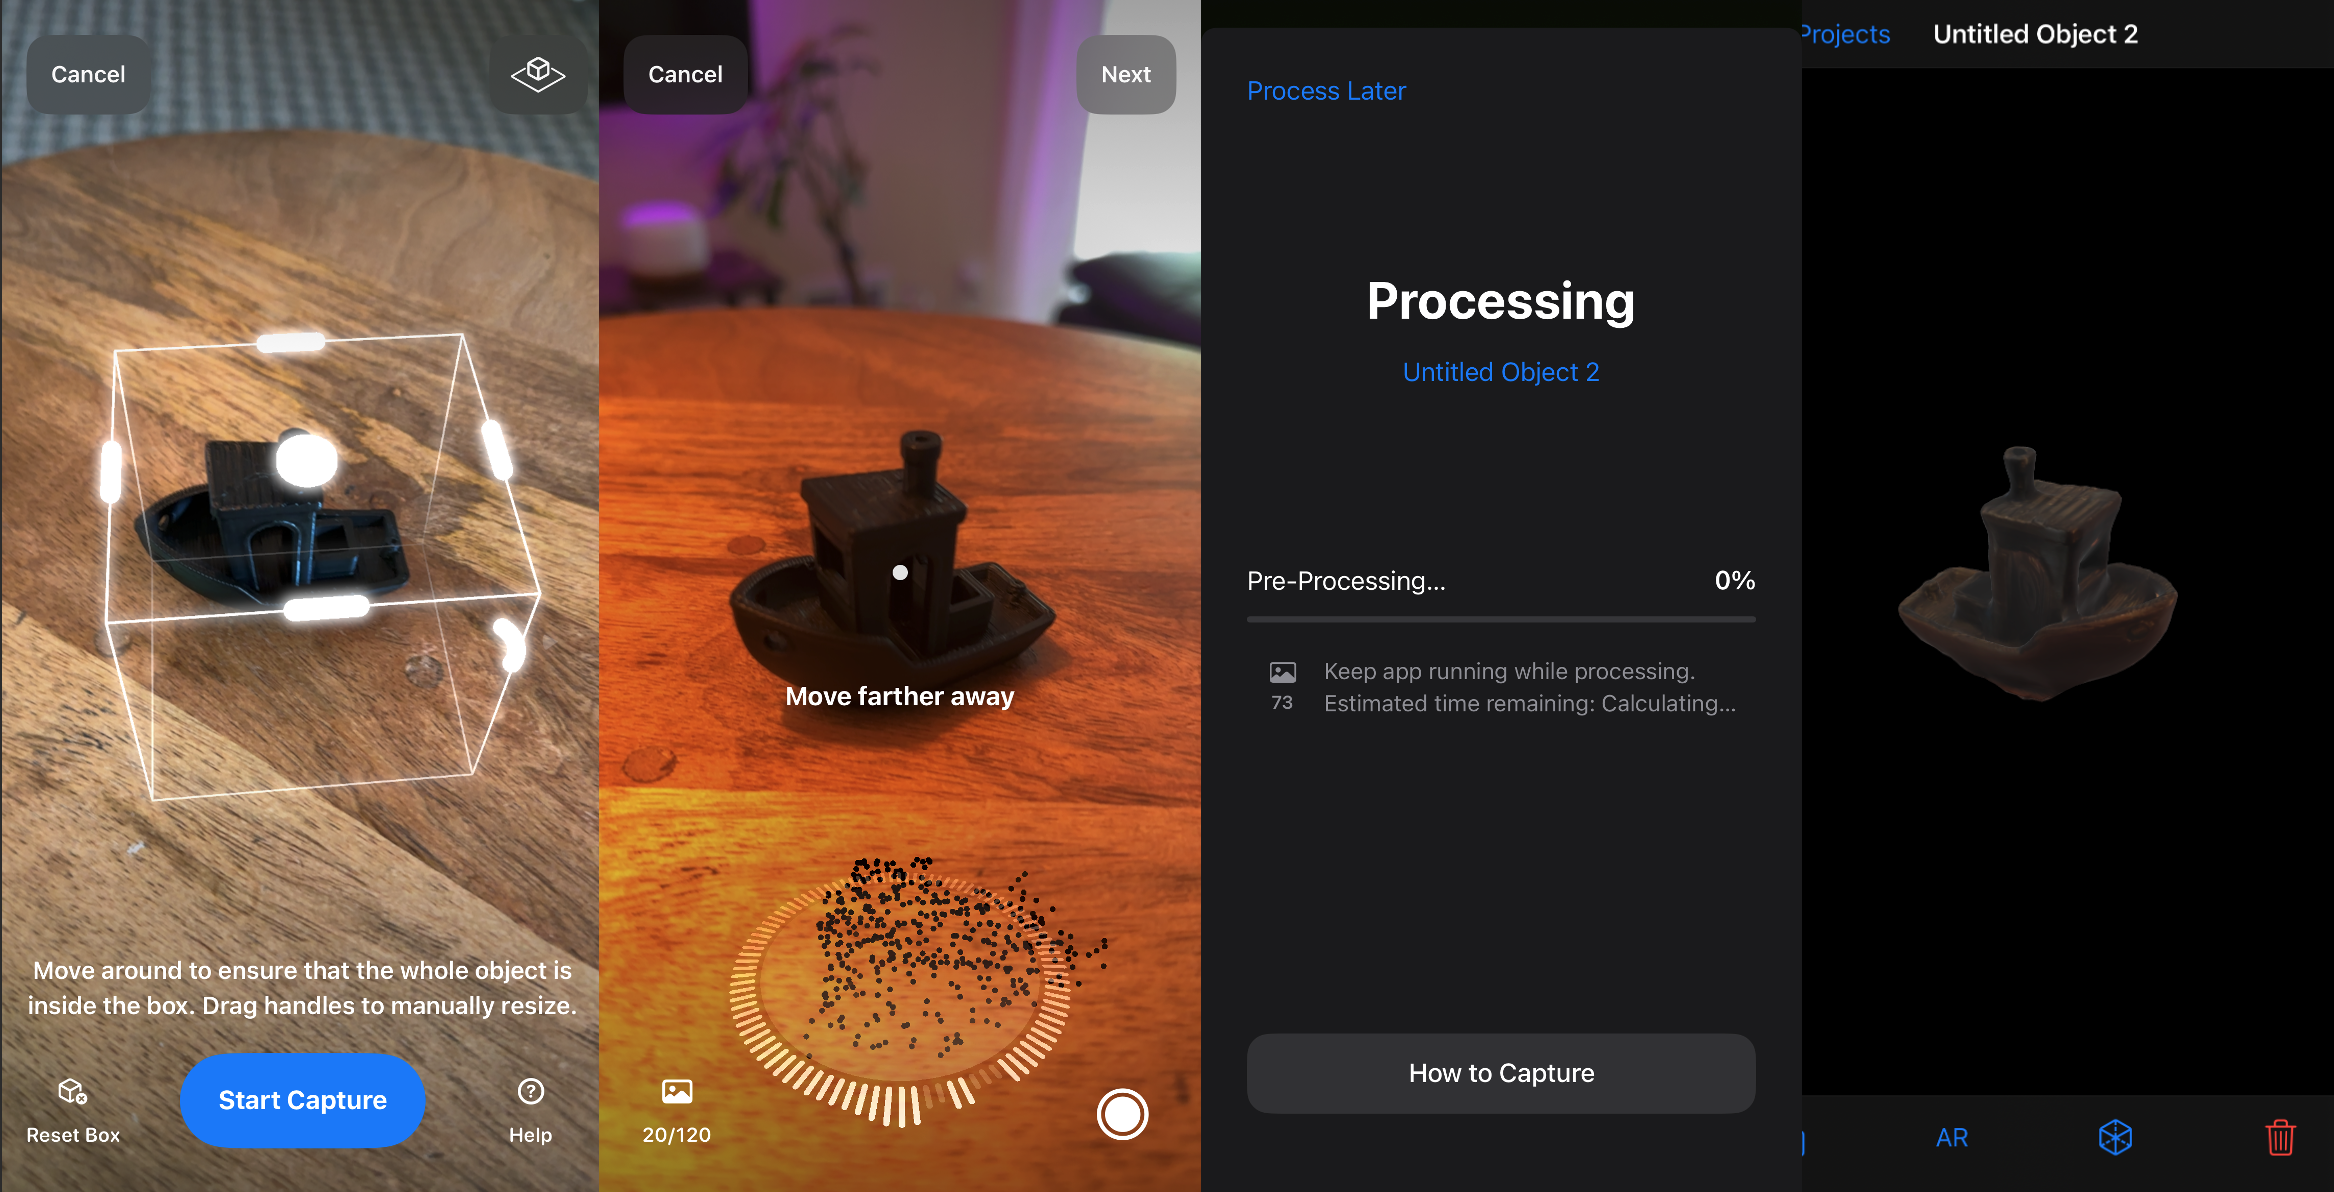
Figure 3: Example Object Capture in Reality Composer for IOS
Configuring Amazon EC2 Mac Instances to use Create ML
To use the Create ML command line utility on Amazon EC2 Mac, you will need to create an Amazon Machine Image (AMI) with macOS 26 or later and the Xcode 26.
1. Create a IAM role to create the AMI with permissions to create, list, and tag AMIs (do not forget to replace 000000000000 with your AWS Account ID):
# Create the IAM role
aws iam create-role --role-name XcodeAMIBuilder --assume-role-policy-document '{
  "Version": "2012-10-17",
  "Statement": [
    {
      "Effect": "Allow",
      "Principal": {
        "Service": "ec2.amazonaws.com"
      },
      "Action": "sts:AssumeRole"
    }
  ]
}'
# Attach inline policy to the role
aws iam put-role-policy --role-name XcodeAMIBuilder --policy-name XcodeAMIBuilderPolicy --policy-document '{
  "Version": "2012-10-17",
  "Statement": [
    {
      "Effect": "Allow",
      "Action": [
        "ec2:CreateImage",
        "ec2:DescribeImages",
        "ec2:CreateTags"
      ],
      "Resource": "*"
    },
    {
      "Sid": "xcodeinstall",
      "Effect": "Allow",
      "Action": [
        "secretsmanager:CreateSecret",
        "secretsmanager:GetSecretValue",
        "secretsmanager:PutSecretValue"
      ],
      "Resource": "arn:aws:secretsmanager:*:000000000000:secret:xcodeinstall-*"
    }
  ]
}'
2. Create the instance profile and add the role to it:
aws iam create-instance-profile --instance-profile-name XcodeAMIBuilder
aws iam add-role-to-instance-profile --instance-profile-name XcodeAMIBuilder --role-name XcodeAMIBuilder
3. Configure your desired region, Instance type, and AMI ID (you can use the console the latest macOS for the instance type you are using). This is the base AMI we will modify to include Xcode.
export EC2Region="ap-southeast-2" # Replace with your region
export EC2InstanceType="mac2-m2.metal" # Replace with your own
export EC2AMIID=ami-095ec9f091b23b49b # Replace with your own AMI
4. Authenticate with Apple Developer credentials and store credentials in AWS Secrets Manager
brew tap sebsto/macos
brew install xcodeinstall
xcodeinstall storesecrets -s $EC2Region
xcodeinstall authenticate -s $EC2Region
5. Create the User Data script. This script downloads Xcode 26 and creates the AMI
cat <<- EOS > ./EC2UserData.sh
#!/bin/bash

# Path variable to find location of awscli on x86 and Apple silicon Macs.


MDToken=\$(curl -X PUT "http://169.254.169.254/latest/api/token" -s -H "X-aws-ec2-metadata-token-ttl-seconds: 21600")
currentInstanceID=\$(curl -H "X-aws-ec2-metadata-token: \$MDToken" -s http://169.254.169.254/latest/meta-data/instance-id)
currentRegion=\$(curl -H "X-aws-ec2-metadata-token: \$MDToken" -s http://169.254.169.254/latest/meta-data/placement/region)

su ec2-user -c 'brew tap sebsto/macos'
su ec2-user -c 'brew install xcodeinstall'
su ec2-user -c 'xcodeinstall download --name "Xcode 26.xip" -s "ap-southeast-2"'
su ec2-user -c 'xcodeinstall install --name "Xcode 26.xip"'
su ec2-user -c 'sudo xcode-select -s /Applications/Xcode.app/Contents/Developer && sudo
xcodebuild -license accept'

# Create AMI
echo -e "Creating AMI from the instance..."
AMI_ID=\$(aws ec2 create-image \
  --instance-id \$currentInstanceID \
  --name "Xcode-AMI" \
  --description "Auto-created" \
  --no-reboot \
  --query 'ImageId' \
  --output text \
  --region \$currentRegion)

aws ec2 wait image-available --image-ids \$AMI_ID --region \$currentRegion
aws ec2 wait image-available --image-ids \$AMI_ID --region \$currentRegion
aws ec2 wait image-available --image-ids \$AMI_ID --region \$currentRegion
aws ec2 wait image-available --image-ids \$AMI_ID --region \$currentRegion
aws ec2 wait image-available --image-ids \$AMI_ID --region \$currentRegion
aws ec2 wait image-available --image-ids \$AMI_ID --region \$currentRegion

aws ec2 create-tags --region \$currentRegion --resources \$currentInstanceID --tags "Key=Name,Value=XCodeAMIBuilder-✅"

exit 0;

EOS
6. Allocate a dedicated host with the same instance type you chose in Step 3 (EC2InstanceType) and make sure to note down the Host ID
7. Launch the instance on the dedicated host. Replace $EC2HostID with the ID from the previous step
export EC2PlacementString="{\"Affinity\":\"host\", \"HostId\":\"$EC2HostID\", \"Tenancy\":\"host\"}"

export EC2VolumeInfo="{\"DeviceName\":\"/dev/sda1\", \"Ebs\":{\"Encrypted\":false, \"DeleteOnTermination\":true, \"Iops\":6000, \"VolumeSize\":200, \"VolumeType\":\"gp3\", \"Throughput\":250}}"

export EC2TagSpecs="{\"ResourceType\":\"instance\", \"Tags\":[{\"Key\":\"Name\", \"Value\":\"XCodeAMIBuilder\"}]}"

export EC2UserData=$(cat ./EC2UserData.sh)

aws ec2 run-instances --region $EC2Region \
   --image-id "$EC2AMIID" \
   --instance-type "$EC2InstanceType" \
   --user-data "$EC2UserData"\
   --block-device-mappings "$EC2VolumeInfo" \
   --tag-specifications "$EC2TagSpecs" \
   --placement "$EC2PlacementString" \
   --iam-instance-profile 'Name'="XcodeAMIBuilder" \
   --associate-public-ip-address
Wait for the instance to initialize. Once the process is complete and the User Data Script is complete, a green checkmark (✅) appears next to the Amazon EC2 Mac instance in the Amazon EC2 Console. There should also be an AMI named “Xcode-AMI” in your account. You can use this AMI in your pipelines to run the Create ML command line utility on Amazon EC2 Mac Instances:
xcrun createml objecttracker -s globe.usdz -o globe.referenceobjectUsing the macOS 27 Developer Beta on Amazon EC2 Mac
The AMI-based flow above is the stable approach and applies once macOS 27 is generally available on Amazon EC2 Mac. The latest Create ML object tracking capabilities, however, require the macOS 27 Developer Beta and the Xcode 27 Beta, and Amazon EC2 does not qualify a beta macOS release as a base image. This section shows how to use the Xcode 27 Beta with the macOS 27 Developer Beta by performing an in-place upgrade of an existing Apple silicon Amazon EC2 Mac instance.
1. Launch a macOS 26 (Tahoe) instance on a Dedicated Host and connect over SSH. Amazon EC2 Mac instances require a Dedicated Host. Create an SSH key pair, look up the latest generally available macOS 26 (Tahoe) AMI for your instance type, allocate a Dedicated Host, and launch the instance on it.
# Create an SSH key pair (or use an existing one) aws ec2 create-key-pair --key-name <key-name> --key-type ed25519 --region <region> \ --query 'KeyMaterial' --output text > <key-name>.pem chmod 400 <key-name>.pem
# Retrieve the latest macOS 26 (Tahoe) AMI for your instance type (SSM public parameter); # adjust the parameter path to the macOS 26 GA release name if different AMI_ID=$(aws ssm get-parameter \ --name /aws/service/ec2-macos/tahoe/arm64_mac/latest/image_id \ --region <region> --query 'Parameter.Value' --output text)
# Allocate a Dedicated Host for the Mac instance family, then note the Host ID aws ec2 allocate-hosts --region <region> \ --instance-type mac2-m2pro.metal --availability-zone <az> \ --auto-placement on --quantity 1
# Launch the instance on that Dedicated Host (tenancy host), with a security group that allows SSH aws ec2 run-instances --region <region> \ --instance-type mac2-m2pro.metal \ --placement "Tenancy=host,HostId=<host-id>,AvailabilityZone=<az>" \ --image-id "$AMI_ID" --key-name <key-name> \ --security-group-ids <sg-id> --subnet-id <subnet-id>
Wait for the instance to reach the running state and pass its status checks, then SSH in.
ssh -i <key-name>.pem ec2-user@<instance-public-ip>
2. Set the ec2-user password and confirm the secure token is enabled. Set a password for ec2-user, then confirm the secure token reports ENABLED.
sudo /usr/bin/dscl . -passwd /Users/ec2-user sysadminctl -oldPassword "<old>" -newPassword "<your-password>" sysadminctl -secureTokenStatus ec2-user # must say ENABLED
The secure token plus the delegated volume ownership in Step 5 are what authorize the operating system install. Without them, the upgrade will not apply.
3. Enable Screen Sharing and connect to the instance’s desktop (VNC over SSH). Selecting the beta seed happens on the instance’s desktop. Enable Screen Sharing over SSH, then reconnect with a forwarded VNC port and open the display from your local Mac.
sudo launchctl enable system/com.apple.screensharing
sudo launchctl load -w /System/Library/LaunchDaemons/com.apple.screensharing.plist exit
ssh -L 5900:localhost:5900 -i <key.pem> ec2-user@<instance-public-ip>
On your local Mac, choose Finder, Go, Connect to Server, and enter vnc://localhost:5900. Log in as ec2-user with <your-password>.
4. Sign in with an Apple ID and enroll the macOS 27 Developer Beta seed. In the desktop session, sign in with an Apple ID. Then open System Settings, General, Software Update, Beta Updates, and select macOS 27 Developer Beta so that “macOS 27 Beta” appears as an available update.

Figure 4a: System Settings, Software Update with the beta seed enrolled (personal account details redacted)
5. Delegate volume ownership before upgrading. From your local machine, hand root volume ownership to ec2-user so the operating system install is authorized. This is required, takes 30 to 90 minutes, and the instance is unreachable during it. Remove the plaintext credentials file afterward.
cat > creds.json <<'EOF' { "internalDiskPassword": "", "rootVolumeUsername": "ec2-user", "rootVolumepassword": "<your-password>" } EOF
aws ec2 create-delegate-mac-volume-ownership-task \ --instance-id <instance-id> \ --mac-credentials file://creds.json \ --region <region>
# poll until TaskState is successful aws ec2 describe-mac-modification-tasks \ --mac-modification-task-ids <task-id> --region <region> \ --query 'MacModificationTasks[0].TaskState'
rm creds.json # remove the plaintext password
The internalDiskPassword is blank when the default aws-managed-user password was never changed, and rootVolumepassword uses the documented lowercase spelling.
Note: the instance’s EC2 status checks report impaired while the delegation runs. That is expected during this task.
6. Install the macOS 27 beta update. Once the instance is reachable again, install the macOS 27 beta update. The instance reboots to apply the update.

Figure 4b: The instance reboots into the macOS 27 beta install
7. Verify the upgrade landed. After the reboot, reconnect over SSH and confirm the version before continuing.
sw_vers # ProductVersion should be 27.x (for example 27.0)
If it still shows 26.x, the upgrade did not apply: re-run the volume ownership delegation (Step 5) and the install (Step 6).
8. Download and install the Xcode 27 Beta from Apple (GUI). Because you are already connected to the instance’s desktop over Screen Sharing, download the Xcode 27 Beta directly from Apple in the browser. This handles Apple ID sign-in and two-factor authentication in Safari, which is simpler than the command line flow and avoids storing credentials in AWS Secrets Manager.
- In the Screen Sharing session, open Safari and go to the Apple Developer downloads page at developer.apple.com/download.
- Sign in with your Apple ID in Safari and complete two-factor authentication in the browser.
- Locate Xcode 27 Beta and download the .xip file.
- When the download completes, double-click the .xip in Finder to expand it into Xcode-beta.app.
- Move Xcode-beta.app into /Applications.
- Open Xcode-beta.app once to let it install its additional components.
- In Terminal on the instance, point the toolchain at the beta and accept the license:
sudo xcode-select -s /Applications/Xcode-beta.app/Contents/Developer sudo xcodebuild -license accept

Figure 4c: Xcode 27 Beta installed on the instance (Version 27.0 beta 4)
Note: the command line xcodeinstall tool (used in the stable section above) can also do this headlessly, but it requires an IAM instance profile with AWS Secrets Manager permissions and storing your Apple ID credentials there. For a single beta instance, the GUI download above is simpler.
9. Run Create ML on the beta instance. With macOS 27 and the Xcode 27 Beta in place, run the same Create ML command line utility to generate a reference object from your USDZ model.
xcrun createml objecttracker -s globe.usdz -o globe.referenceobject
With the Xcode 27 Beta, you can also use the extended training mode by passing -m extended (optionally with --all-angles), as described in Implementing object tracking in your app:
xcrun createml objecttracker -s globe.usdz -o globe.referenceobject -m extended --all-angles

Figure 4d: Create ML object tracking running on the macOS 27 beta instance (analysis complete, training started)
While macOS 27 is in beta, its AMI is not portable across Dedicated Hosts (the in-place update only updates the selected host’s firmware), so keep the upgraded instance on its host and use it directly. Once macOS 27 is generally available, the stable AMI flow above applies and you can reuse an AMI for the scalable architecture that follows.
Architecting a Pipeline for Apple’s Create ML Training using Amazon EC2 Mac Instances
The following diagram shows how this spatial object tracking workflow could be implemented using AWS services:

Figure 4: Example Spatial Object Tracking Workflow
- An admin deploys the solution using the AWS Cloud Development Kit (CDK)
- A user can access the solution through a web application hosted in Amazon Simple Storage Service (S3) and globally distributed with Amazon CloudFront.
- Amazon Cognito is used to authenticate the user and log in
- An authenticated user can initiate the workflow using by uploading the USDZ file to the web application. The user can also use the AWS Management Console and AWS CLI to upload the USDZ file along with JSON job specification directly to Amazon S3 using AWS IAM credentials.
- The upload to Amazon S3 triggers an AWS Lambda function that logs the job details in Amazon DynamoDB and triggers an AWS Step Functions workflow
- AWS Step Functions orchestrates the workflow using AWS Lambda to create an Amazon EC2 Mac Dedicated Host and Instance and start the Create ML job.
- Once complete the Amazon EC2 Mac instance uploads the referenceobject file to Amazon S3
- Once the job is complete, the user receives a notification of completion from Amazon Simple Notification Service (SNS) with a S3 presigned URL to Reference Object file.
Using the Reference Object File in Your App
You can use the reference object file in Reality Composer Pro and add it to your visionOS and iOS app.
1. Open your visionOS project on Xcode
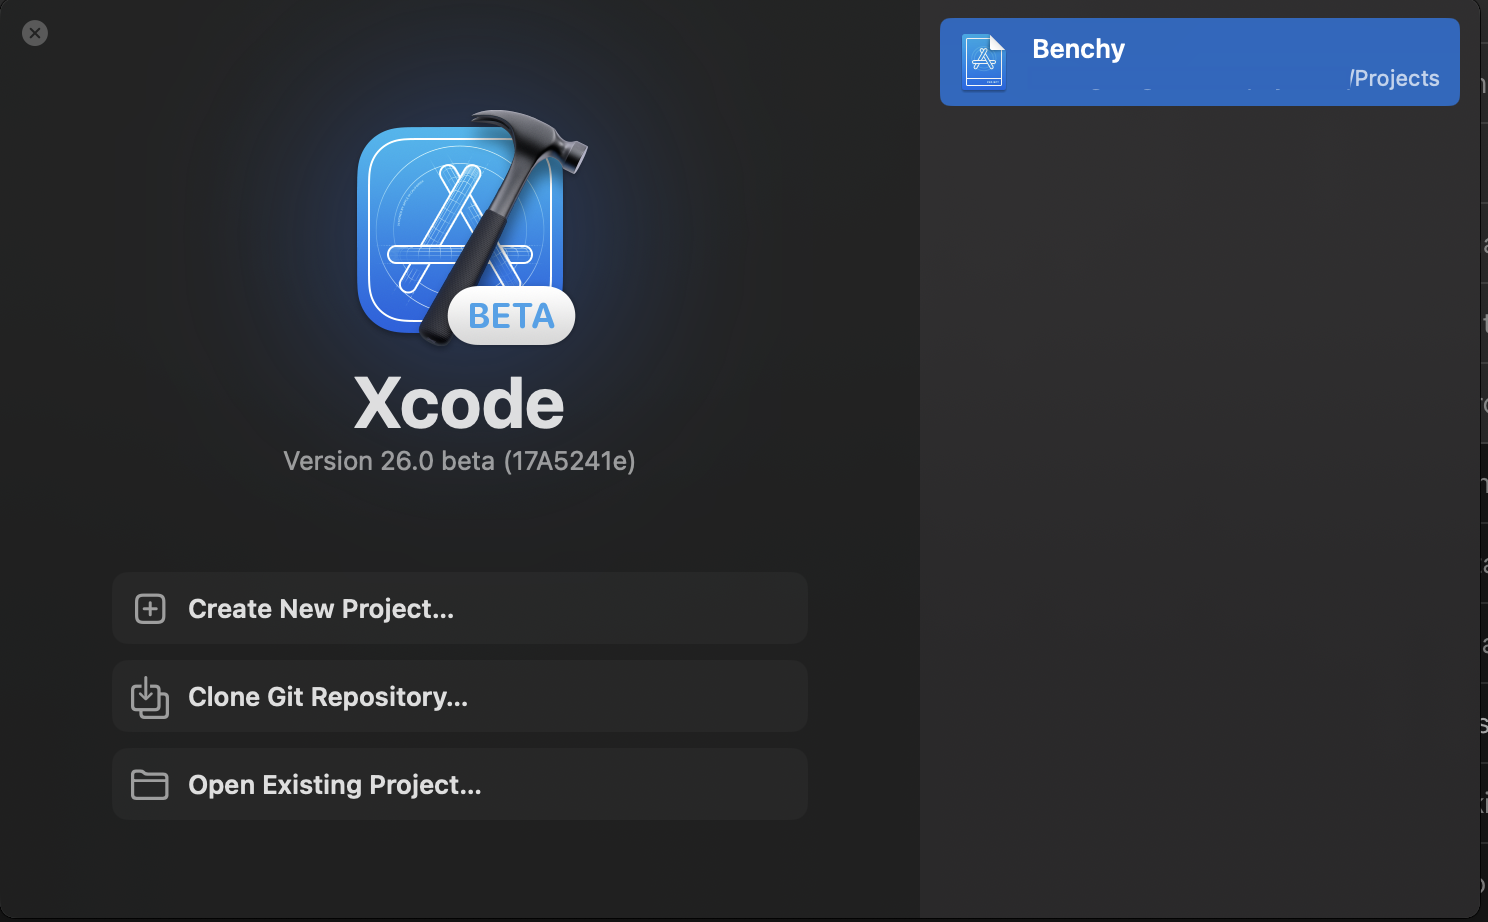
Figure 5: visionOS Project on Xcode
2. Open the default scene in Reality Composer Pro and delete the default sphere
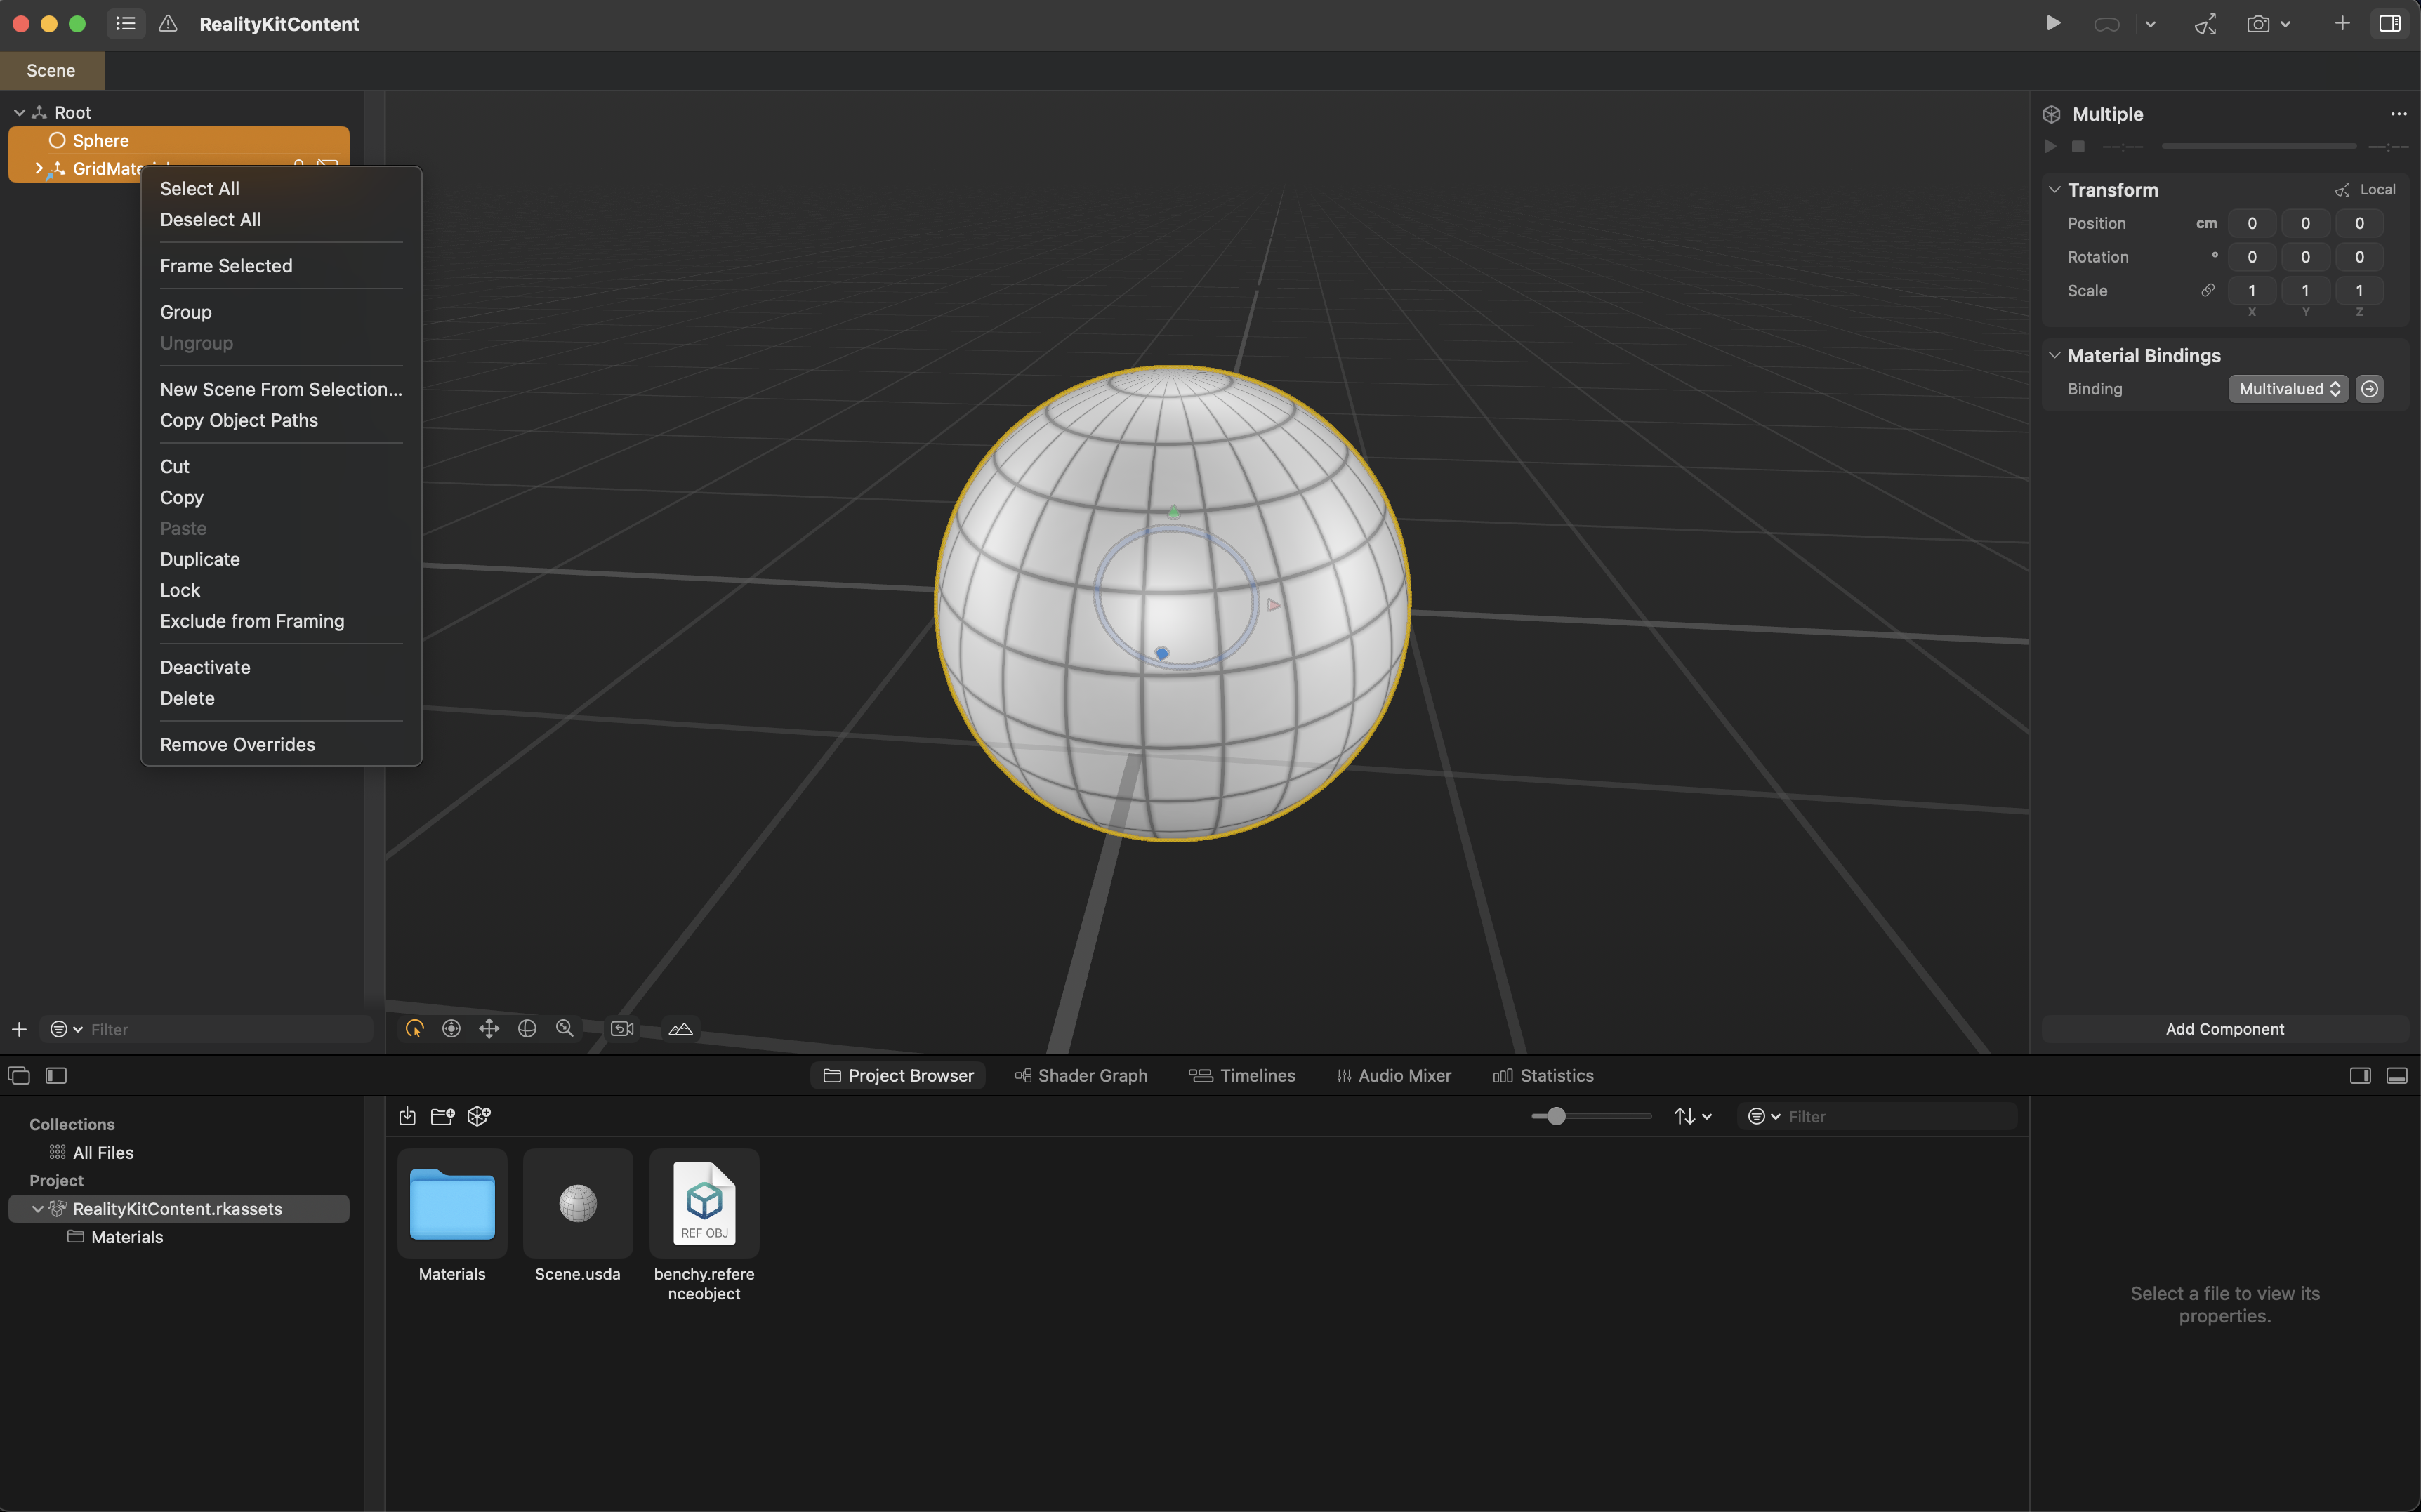
Figure 6: Default Scene in Reality Composer
3. Create an empty transform entity and add an anchoring component to it
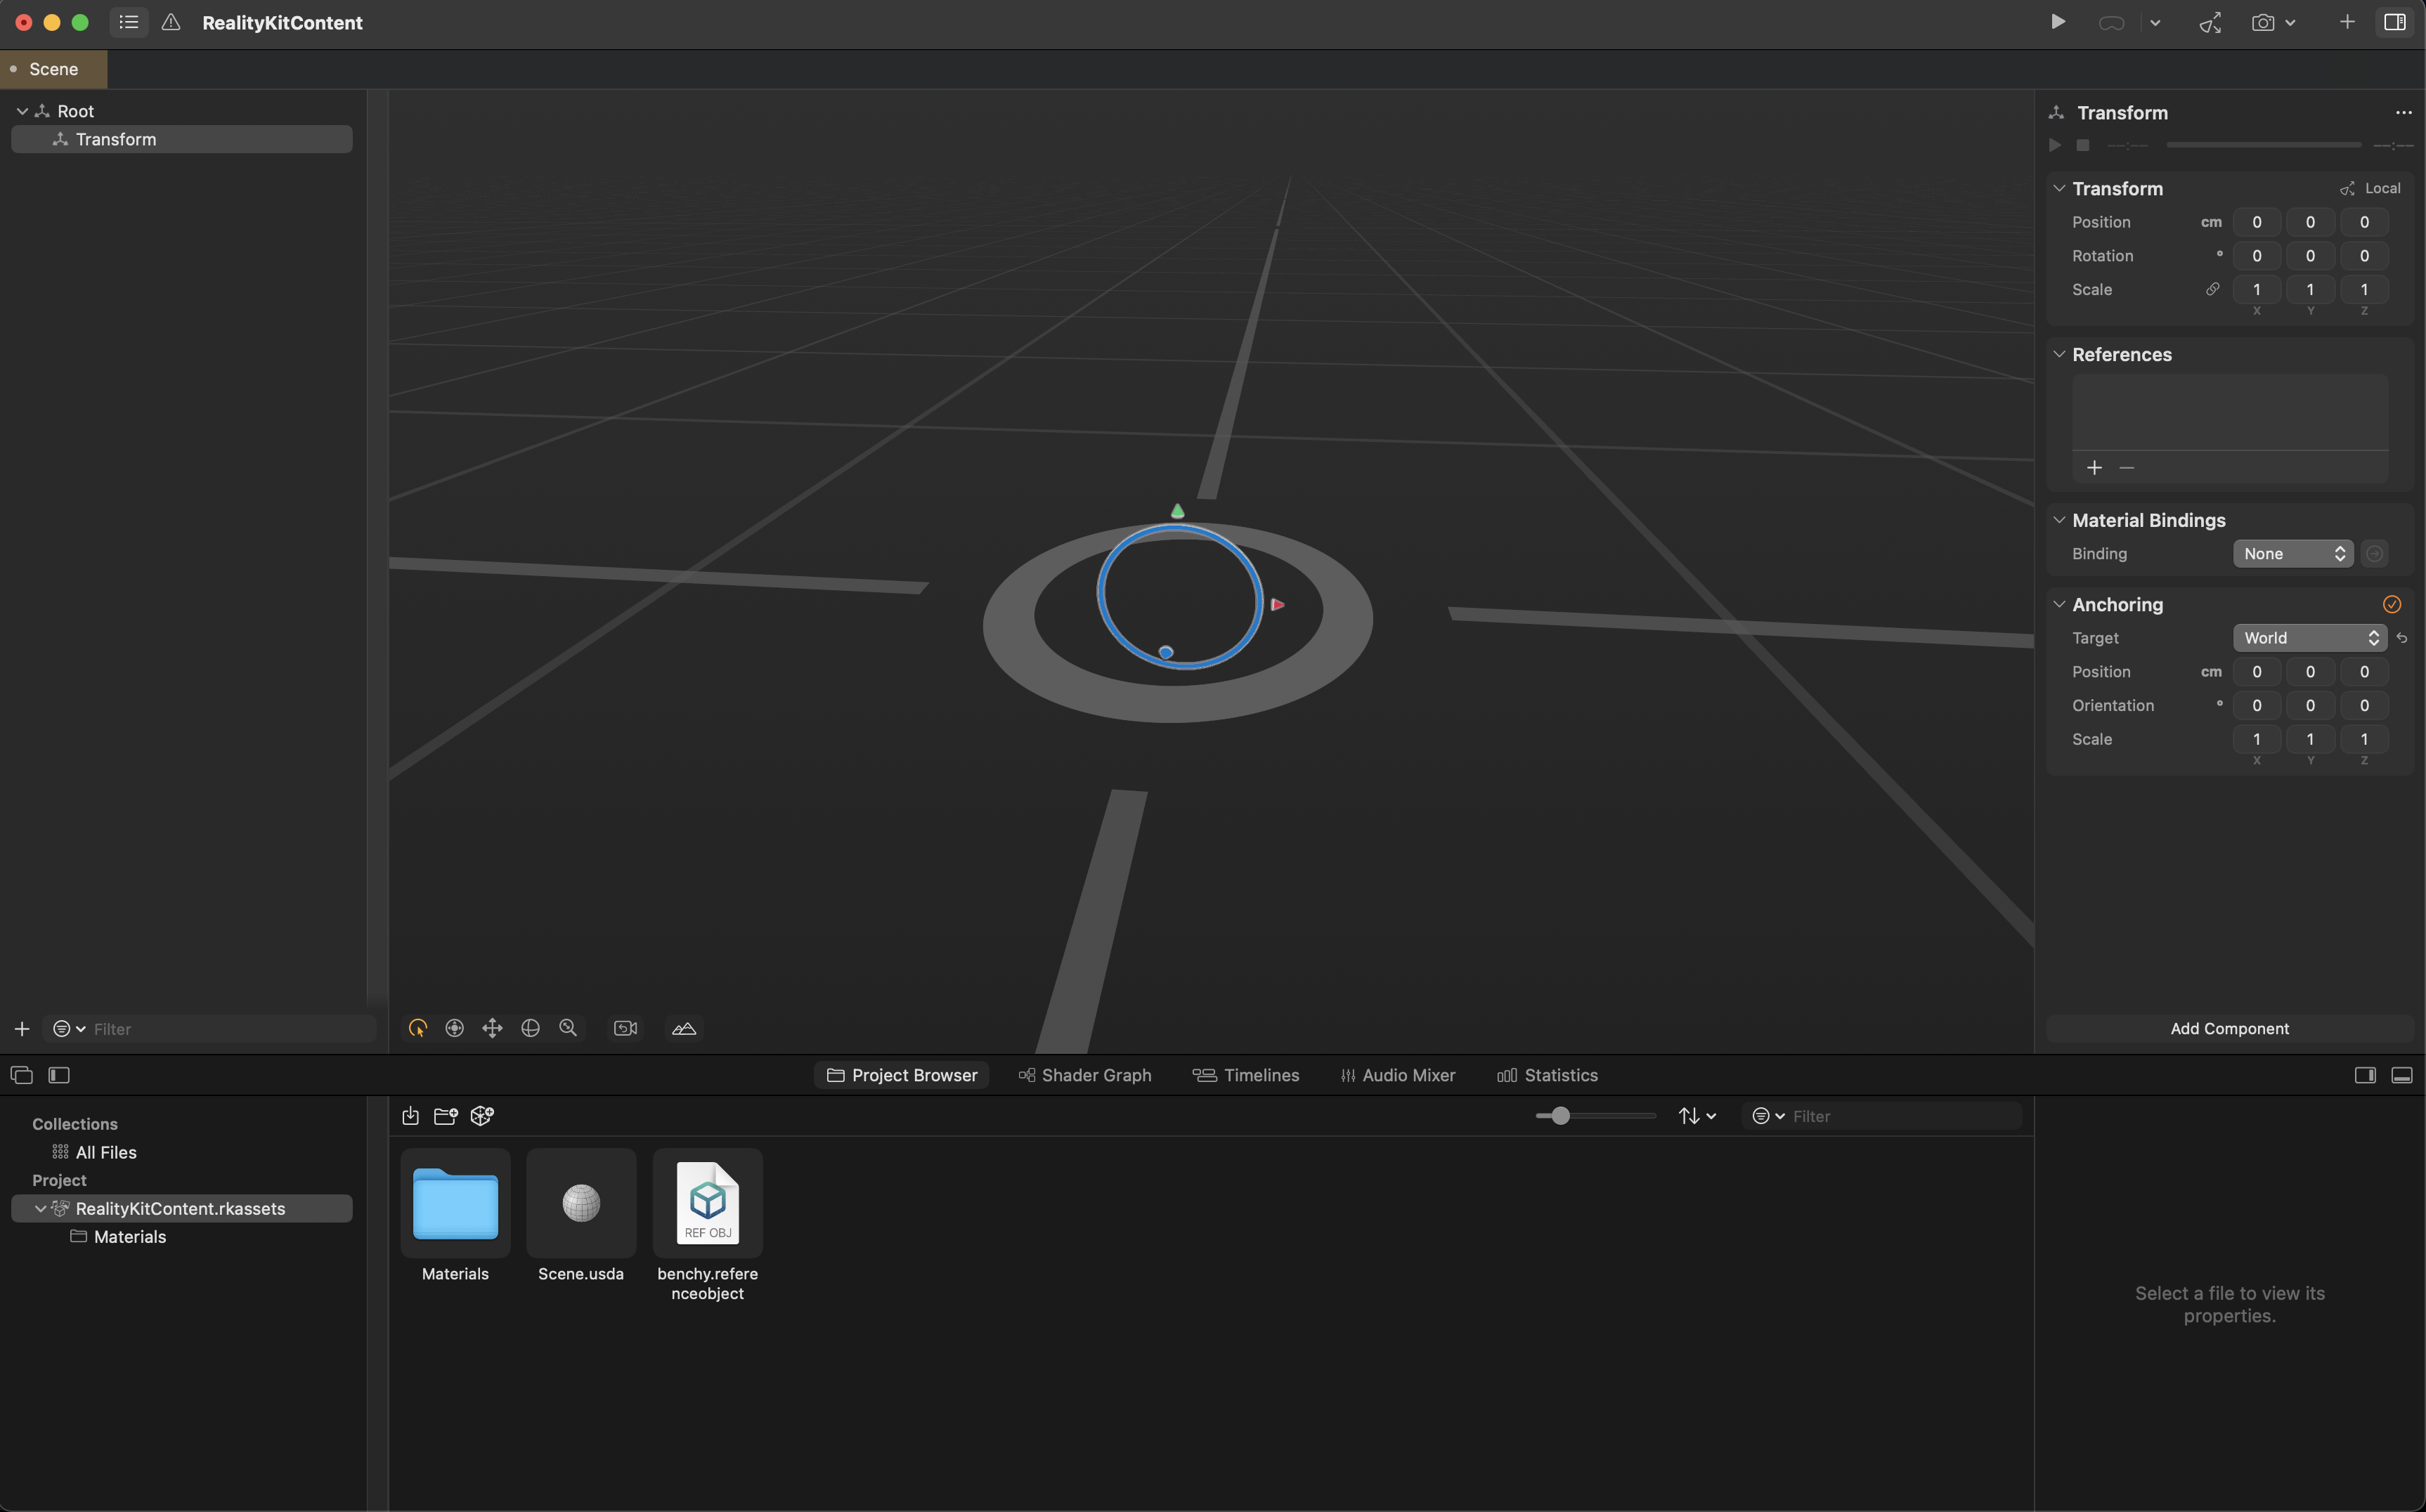
Figure 7: Creating an Empty Transform Entity and adding an Anchor Component
4. Import the reference object created with pipeline
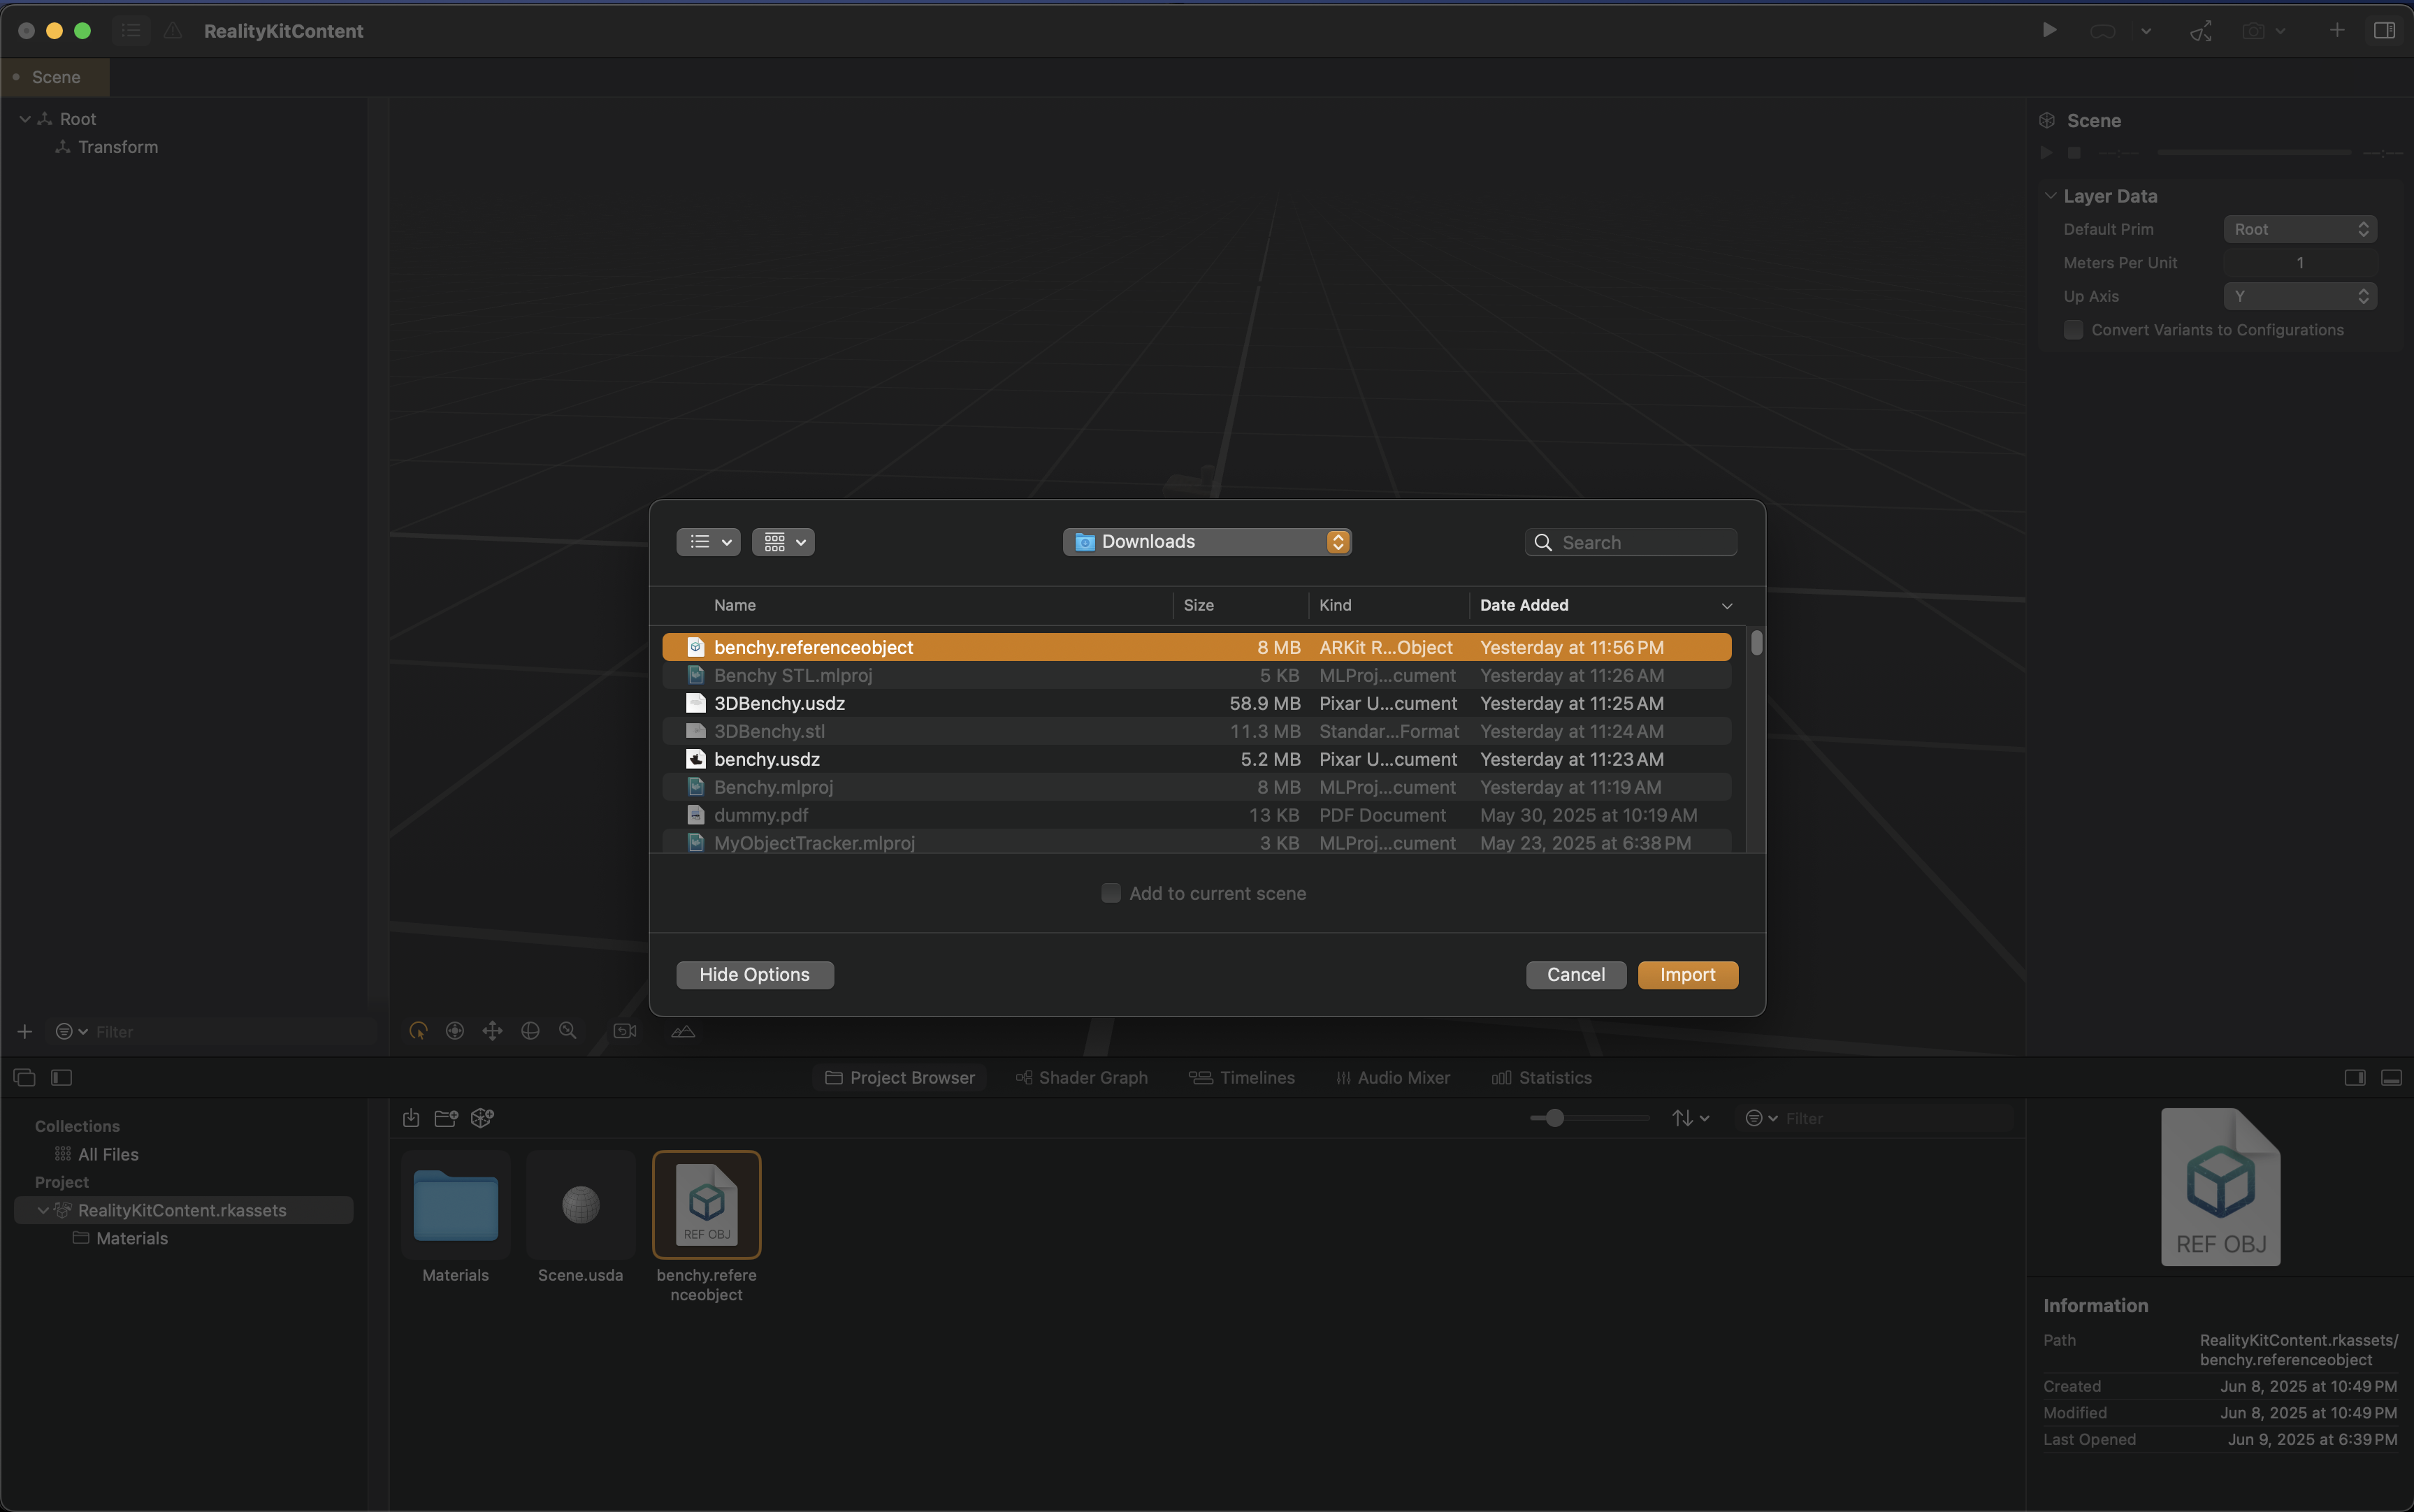
Figure 8: Importing Reference Object
5. You should see a semi-transparent view of the initial USDZ model you used, and you can place virtual content on top of your object. See more details in Using a reference object with Reality Composer Pro
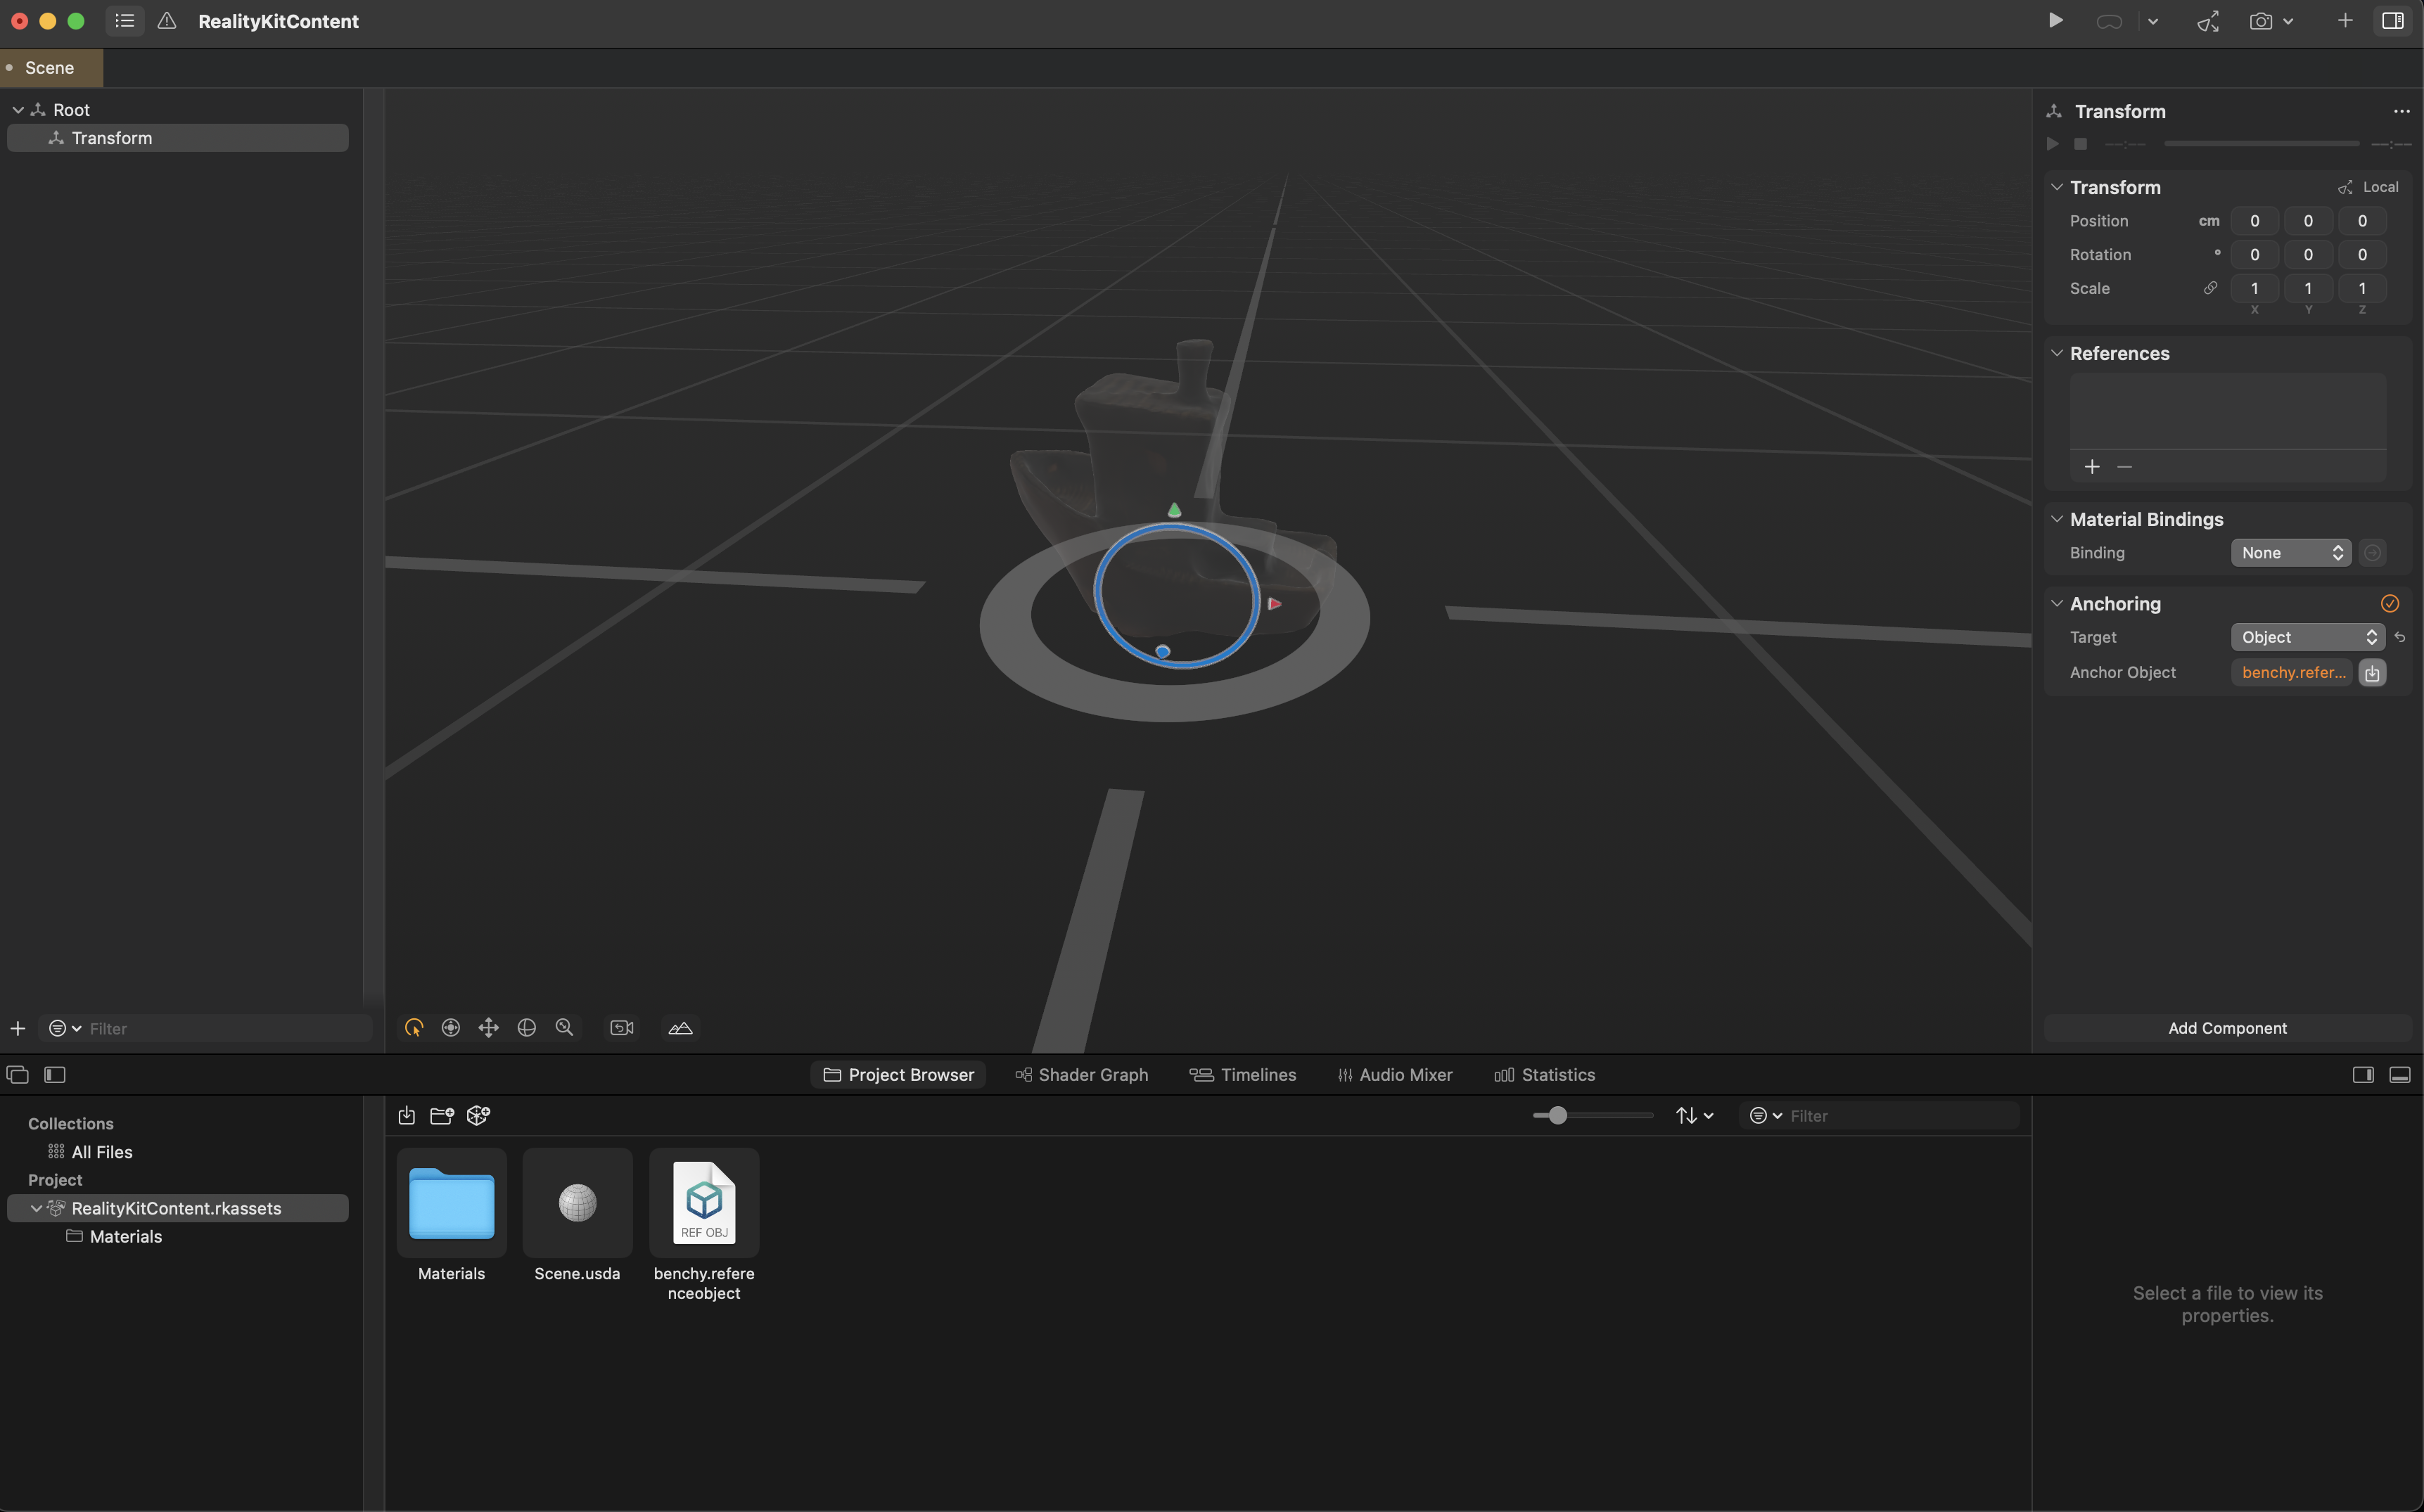
Figure 9: Semi Transparent View of Model
See more details on how to use the reference object in RealityKit and how to use the reference object in ARKit.
Clean Up
It is a good practice to delete any unused resources to avoid ongoing charges. To clean up resources from this walkthrough:
- Delete the IAM role and Instance profile. Please refer to Delete roles or instance profiles documentation for detailed instructions
- Delete Amazon EC2 Mac instances and Dedicated Hosts (Dedicated Hosts require a 24 minimum allocation time to align with Apple macOS EULA). Please refer to documentation on how to Stop or terminate your Amazon EC2 Mac instance for more details.
- Deregister the AMI. Please refer to documentation on how to Deregister an AMI.
- Delete secrets from AWS Secrets Manager. Please reference the documentation on how to Delete an AWS Secrets Manager secret for more detailed instructions.
Conclusion
This walkthrough demonstrates an object tracking pipeline using AWS services and Create ML, providing a foundation for spatial computing applications on Vision Pro. However, this is just the beginning. The future integration possibilities with Amazon Bedrock and Amazon Q could revolutionize field service applications. Imagine technicians using the Apple Vision Pro to not only track objects, but also receive real-time AI-powered assistance through Amazon Q, helping them identify parts, access repair manuals, and follow step-by-step maintenance procedures. By combining object tracking with generative AI through Amazon Bedrock, applications could provide contextual information, predictive maintenance insights, and interactive 3D guidance overlaid on tracked objects. We look forward to seeing how you'll leverage this pipeline and extend it with AWS's AI and machine learning services to create innovative spatial computing solutions.
Special thanks to Eric Cornwell for inspiration on the pipeline architecture and Dave Sieder on his contributions to Amazon EC2 Mac Instance configuration.