AWS Storage Blog
Analyzing Amazon S3 Metadata with Amazon Athena and Amazon QuickSight
UPDATE (1/27/2025): Amazon S3 Metadata is generally available.
UPDATE (7/15/2025): Amazon S3 Metadata releases live inventory tables. This blog post has been edited to reflect the current process.
Object storage provides virtually unlimited scalability, but managing billions, or even trillions, of objects can pose significant challenges. How do you know what data you have? How can you find the right datasets at the right time?
By implementing a robust metadata management strategy, you can answer these questions, gain better control over massive data lakes, improve data discoverability, accessibility, and extract more value from your data. AWS introduced Amazon S3 Metadata at re:Invent 2024, which delivers queryable object metadata in near real-time to organize your data and accelerate data discovery. S3 Metadata helps you to curate, identify, and use your S3 data for business analytics, real-time inference applications, and more.
In this post, we walk through how to set up and use S3 Metadata, how to derive actionable insights using simple SQL queries from Amazon Athena, and then how to visualize your data from Amazon QuickSight. We show you some example queries and dashboards that you can create to gain insights into and create visualizations of your S3 Metadata. You can use these queries, or create your own, to understand what data you have and to find the right datasets when you need them.
Amazon S3 Metadata
S3 Metadata delivers queryable object metadata in near real-time to organize your data and accelerate data discovery. S3 Metadata includes new fields which aren’t available today from other sources such as S3 Inventory reports or ListObjectsV2 API. For a detailed comparison, refer to the following table.
| Metadata | Available in S3 Inventory | Available in ListObjectsV2 | Available in S3 Metadata |
| bucket | Y | Y | Y |
| key | Y | Y | Y |
| sequence_number | N | N | Y |
| record_type | N | N | Y journal table only |
| record_timestamp | N | N | Y journal table only |
| version_id | Y | Y | Y |
| is_delete_marker | Y | N | Y |
| size | Y | Y | Y |
| last_modified_date | Y | Y | Y |
| e_tag | Y | Y | Y |
| storage_class | Y | Y | Y |
| is_multipart | Y | N | Y |
| encryption_status | Y | Y | Y |
| is_bucket_key_enabled | Y | N | Y |
| kms_key_arn | N | N | Y |
| checksum_algorithm | Y | Y | Y |
| object_tags | N | N | Y |
| user_metadata | N | N | Y |
| requester | N | N | Y journal table only |
| source_ip_address | N | N | Y journal table only |
| request_id | N | N | Y journal table only |
| object_lock_retain_until_date | Y | N | N |
| object_lock_mode | Y | N | N |
| object_lock_legal_hold_status | Y | N | N |
| intelligent_tiering_access_tier | Y | N | N |
| bucket_key_status | Y | N | N |
| object_access_control_list | Y | N | N |
| object_owner | N | Y | N |
| replication_status | Y | N | N |
| restore_status | N | Y | N |
S3 Metadata helps you track and find information about your objects in S3, making it easier to manage data for analytics, content retrieval, and AI/ML use cases. When you set up S3 Metadata for your bucket, you can work with two types of metadata tables:
1. A journal table (required):
- Provides queryable metadata for new objects and changes to existing objects
- Refreshed in near real time
- Required to enable live inventory tables
- Cannot be removed from your configuration
2. A live inventory table (optional):
- Provides queryable metadata of all objects in your bucket
- Updated on an hourly basis
- Backfills metadata for all existing objects
These metadata tables are stored in AWS managed S3 table buckets. By integrating with AWS analytics services, you can easily query your metadata using common tools like Athena, Amazon EMR, Amazon Redshift, Apache Spark, Trino, or any application compatible with the Apache Iceberg REST Catalog standard.
When you want to track information about your S3 objects, you need to create a metadata table configuration for your general purpose S3 bucket. Your new journal and live inventory tables will be created in an AWS managed S3 table bucket called aws-s3. The namespace for this table bucket will be b_<bucket name>, where bucket name is the general purpose S3 bucket that you have configured S3 Metadata for. After that, S3 automatically keeps your metadata tables up to date with any changes to your objects. You don’t need to manually update anything– it’s all managed for you. S3 continuously works in the background to optimize your metadata tables, keeping storage costs down, and helping your queries run faster. This automatic maintenance ensures your metadata stays current and efficient without requiring additional work from you.
Prerequisites
There are a few prerequisites before you get started:
1. Have or create an IAM role to use with S3, Glue, Lake Formation, Athena, and QuickSight. For more information, see IAM roles.
2. Ensure that you have access to Athena from your account.
3. Have or create an S3 general purpose bucket that has traffic. Since your S3 Metadata journal table collects mutations, you will need an S3 bucket that has PUT and/or DELETE traffic.
Walkthrough
From a high level, we:
1. Enable S3 Metadata on your general purpose S3 bucket
2. Run SQL queries on Athena to gain insights on S3 Metadata
3. Configure QuickSight to visualize S3 Metadata
1. Enable S3 Metadata on your general purpose S3 bucket
In this section, we walk through the following:
1.1. Verify that S3 Tables have the AWS analytics integration enabled in your Region.
1.2. Configure Key Management Service (AWS KMS) key for S3 Metadata (optional).
1.3. Configure S3 Metadata to collect data on a general purpose S3 bucket.
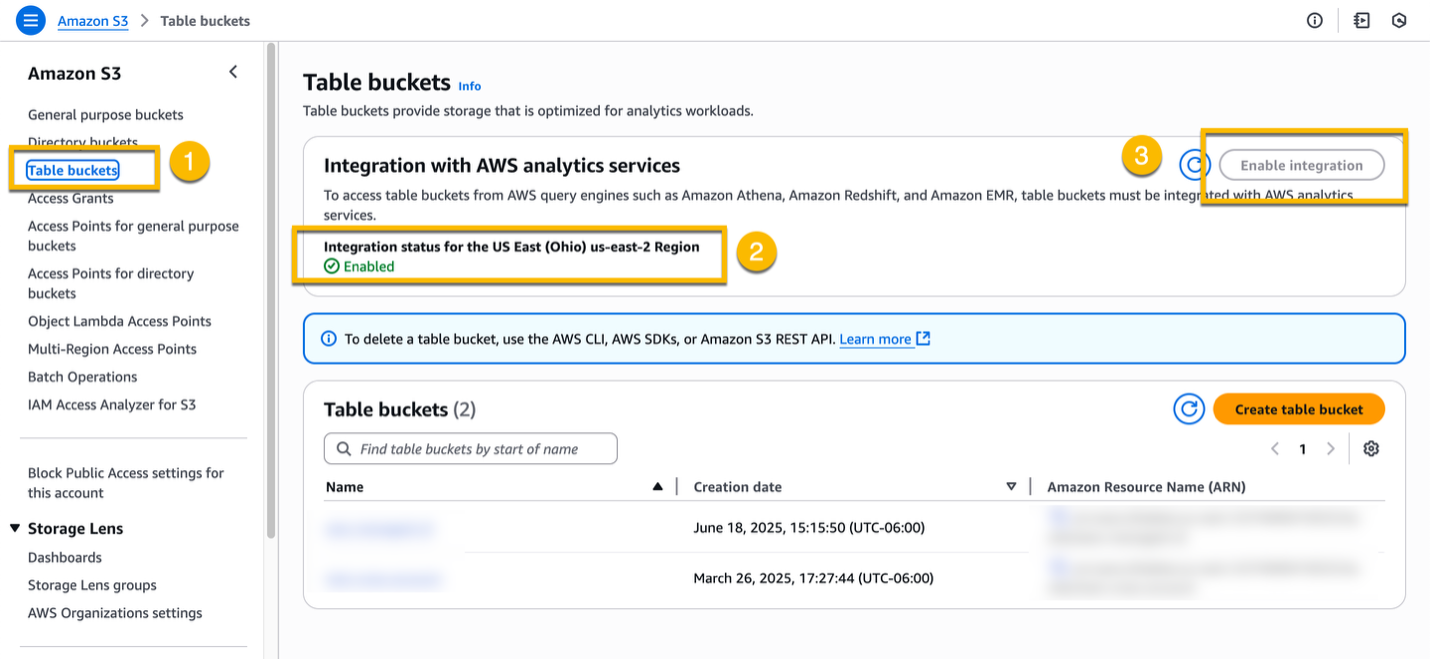
1.1. Enable integration with AWS analytics services
To get started, navigate to S3 in the AWS Management Console. On the left navigation menu, select Table buckets, and then verify that the Integration with AWS analytics services is Enabled. If not, select the Enable integration button.
1.2. Configure KMS key for S3 Metadata (optional)
Table buckets have a default encryption configuration that automatically encrypts tables by using server-side encryption with S3 managed keys (SSE-S3). If you need more control over your encryption keys, such as managing key rotation and access policy grants, you can configure your table buckets to use server-side encryption with KMS keys (SSE-KMS). If you do not want to use KMS, you may skip to section 1.3. When you use SSE-KMS with S3 Metadata, you need to grant permissions for different identities in your account. In this section, we walk through the following:
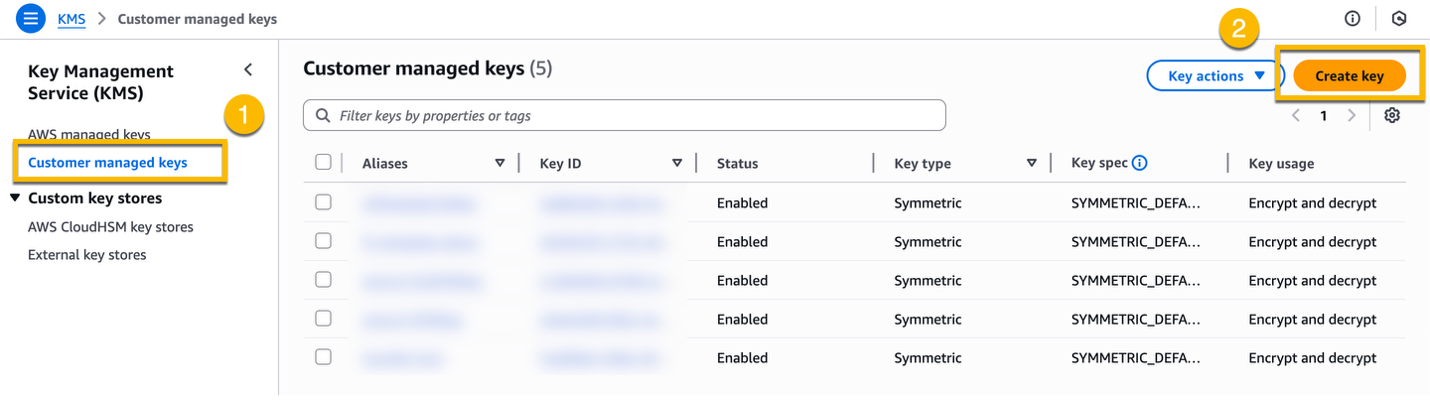
1.2.1 Create a new KMS key.
Navigate to the KMS in the AWS Management Console. On the left menu, select Customer managed key, and then Create key.
At Step 1 – Configure key, leave the defaults values, and then select Next.
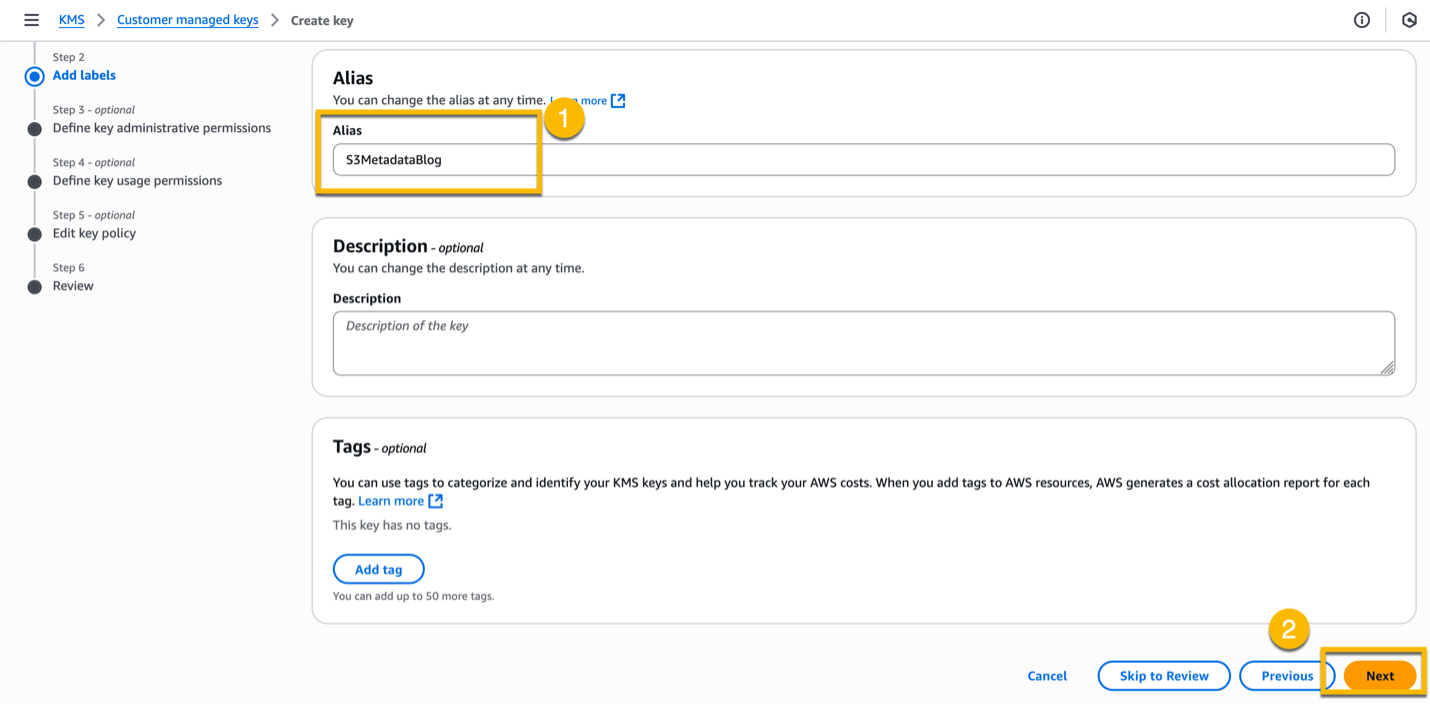
At Step 2 – Add labels, enter “S3MetadataBlog” as Alias, and then select Next.
In Step 3 – Define key administrative permissions, select the IAM user/role you are logged in with, and then select Next.
In Step 4 – Define key usage permissions, leave the default values and then select Next.
In Step 5 – Edit key policy, leave the default values and then select Next.
In Step 6 – Review, finally, review the configuration and select Next to create the KMS key.
1.2.2 Modify the KMS key policy.
When you use server-side encryption with AWS Key Management Service (AWS KMS) keys (SSE-KMS) for tables in S3 table buckets you need to grant permissions for different identities in your account:
-
- The S3 Tables maintenance principal (maintenance.s3tables.amazonaws.com)
- The S3 Metadata service principal (metadata.s3.amazonaws.com)
- Your service role for AWS analytics services (S3TablesRoleForLakeFormation)
Select the KMS key you just created (alias S3MetadataBlog), and then select Switch to policy view.
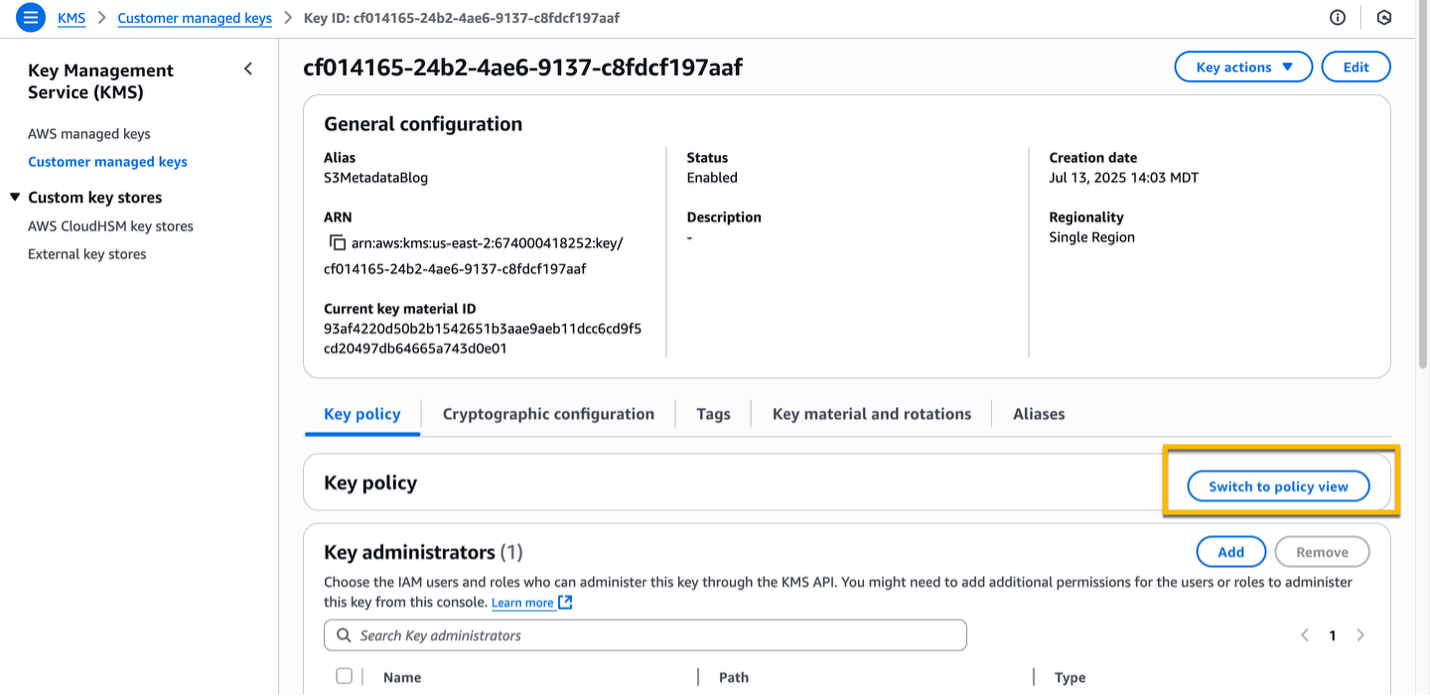
Select Edit, add the following two additional statements, and then select Save changes. Make sure to replace the placeholder values with the correct ones:
{
  "Sid": "EnableKeyUsage",
  "Effect": "Allow",
  "Principal": {
    "Service": [
      "maintenance.s3tables.amazonaws.com",
      "metadata.s3.amazonaws.com"
    ]
  },
  "Action": [
    "kms:GenerateDataKey",
    "kms:Decrypt"
  ],
  "Resource": "<KMS_KEY_ARN>",
  "Condition": {
    "StringLike": {
      "kms:EncryptionContext:aws:s3:arn": "arn:aws:s3tables:<AWS_REGION>:<AWS_ACCOUNT_ID>:bucket/aws-s3/*"
    }
  }
},
{
  "Sid": "AllowTableRoleAccess",
  "Effect": "Allow",
  "Principal": {
    "AWS": "arn:aws:iam::<AWS_ACCOUNT_ID>:role/service-role/S3TablesRoleForLakeFormation"
  },
  "Action": [
    "kms:GenerateDataKey",
    "kms:Decrypt"
  ],
  "Resource": "<KMS_KEY_ARN>"
}
1.3. Configure S3 Metadata to collect data on a general purpose S3 bucket
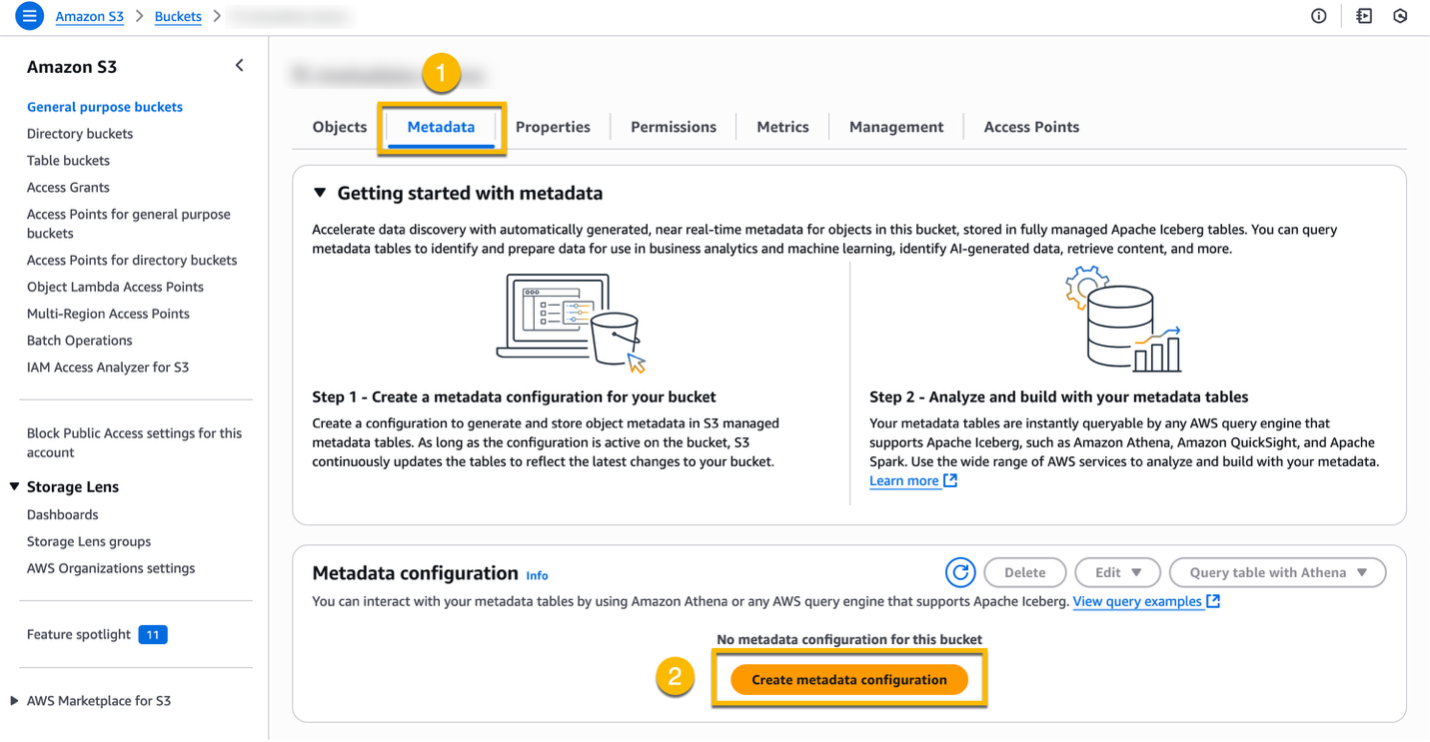
You can now navigate to a general purpose bucket to configure S3 Metadata to start producing a metadata table. You can now navigate to a general purpose S3 bucket to configure S3 Metadata to start producing a metadata table. This is the bucket that you are interested in having S3 Metadata automatically surface object metadata. Once you have navigated to the bucket in the S3 console, select the Metadata tab. Then, select Create metadata configuration.
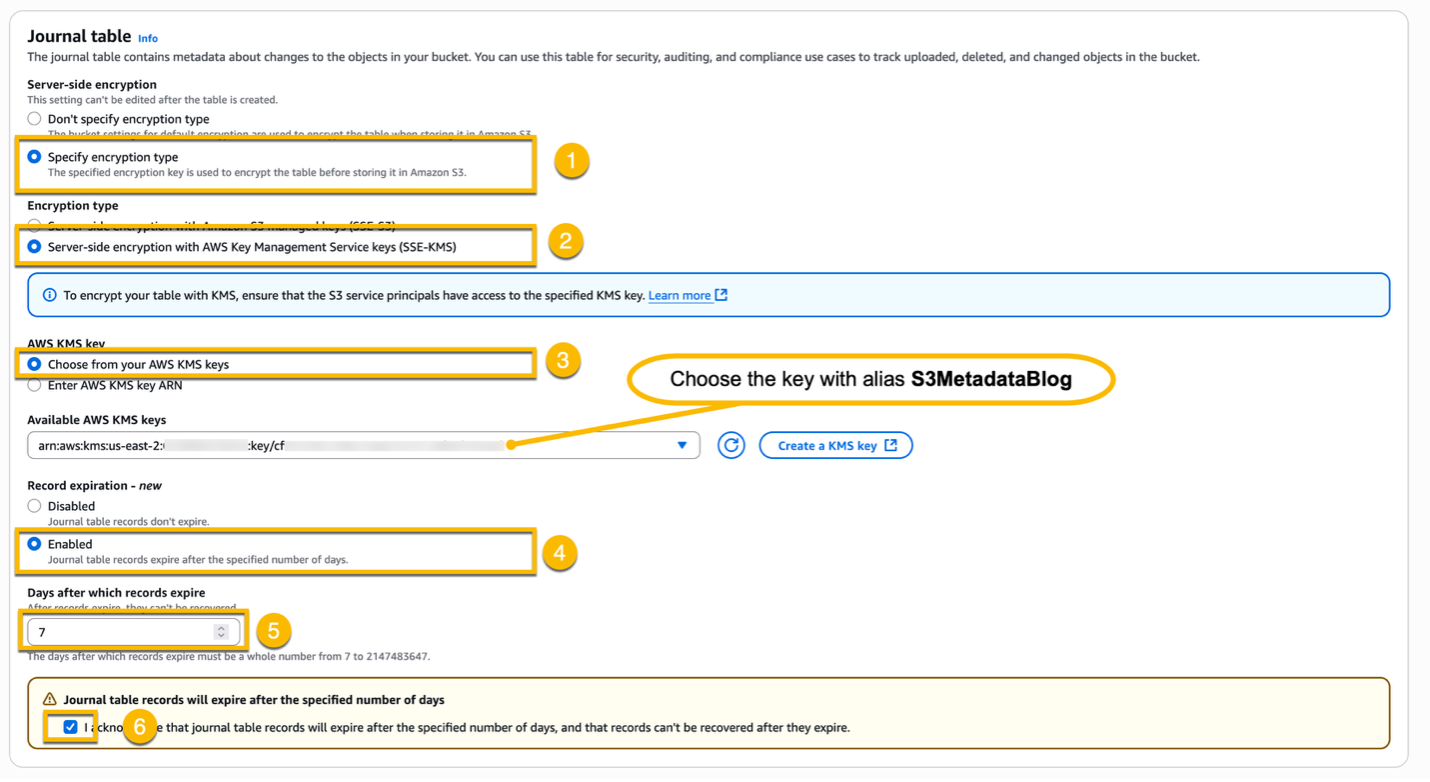
In the Journal table section, select Specify encryption type, select Server-side encryption with AWS Key Management Service keys (SSE-KMS), and then choose the key with alias S3MetadataBlog you created in the previous step. In the Record expiration – new section, enable the record expirations, set the expiration after 7 days, and acknowledge the warning about record expiration. By default, the records in the journal table don’t expire. To help minimize the storage costs for your journal table, you can enable journal table record expiration.
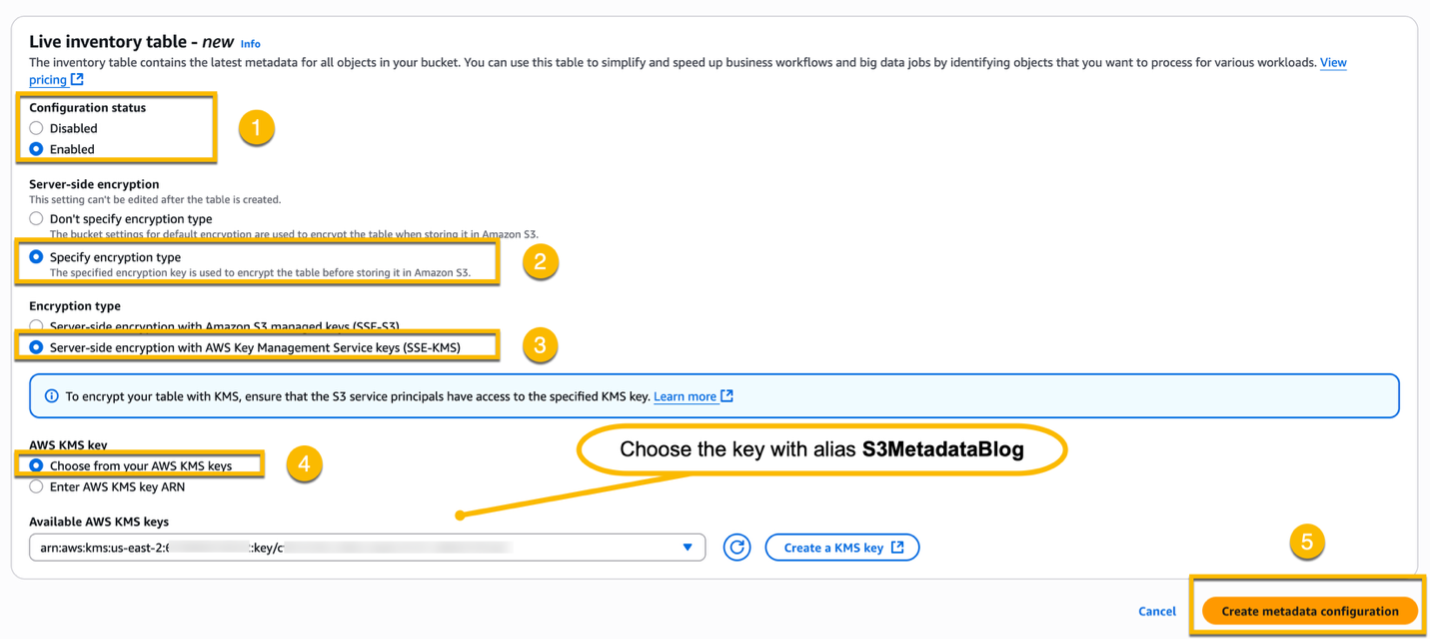
In the Live inventory table – new section, select Enabled for the Configuration status, and then follow the same steps to configure the server-side encryption. Finally, choose Create metadata configuration.
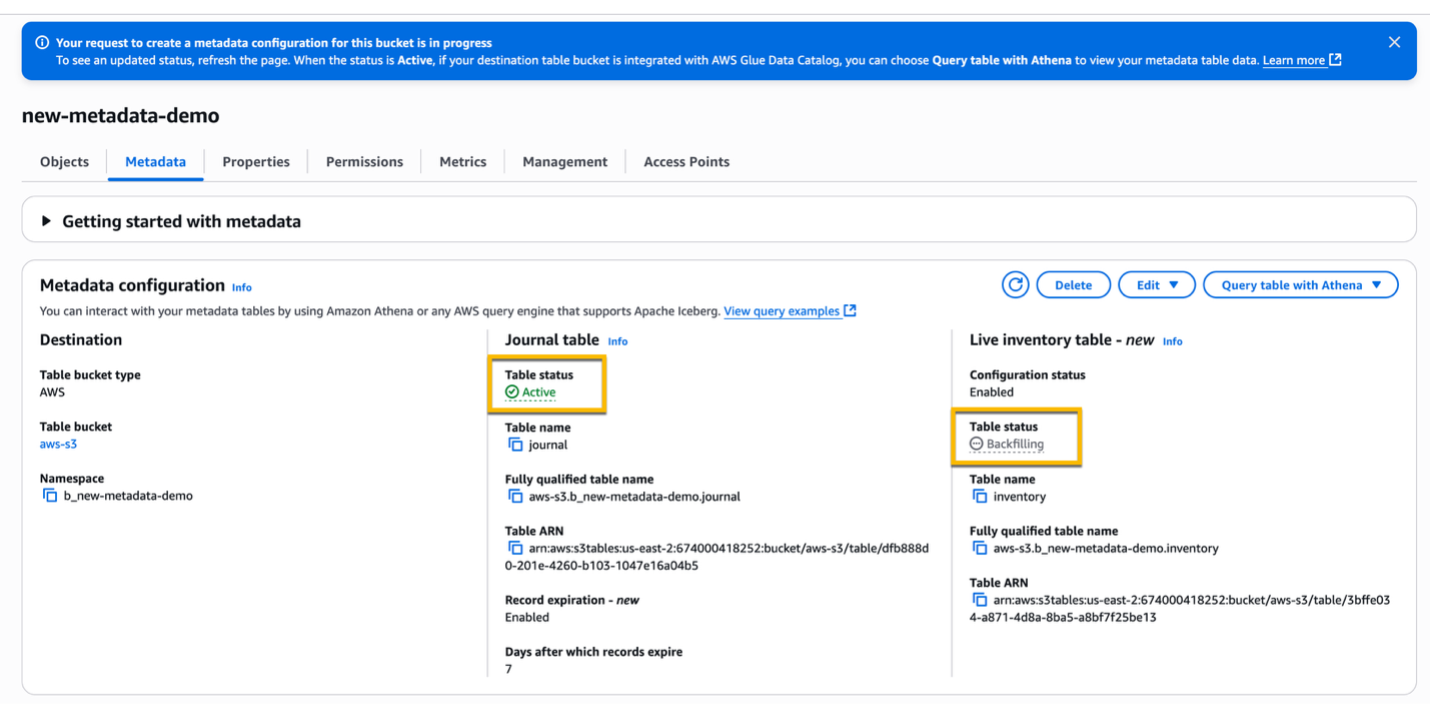
Initially, both Journal table and Live Inventory table will be in Creating status.
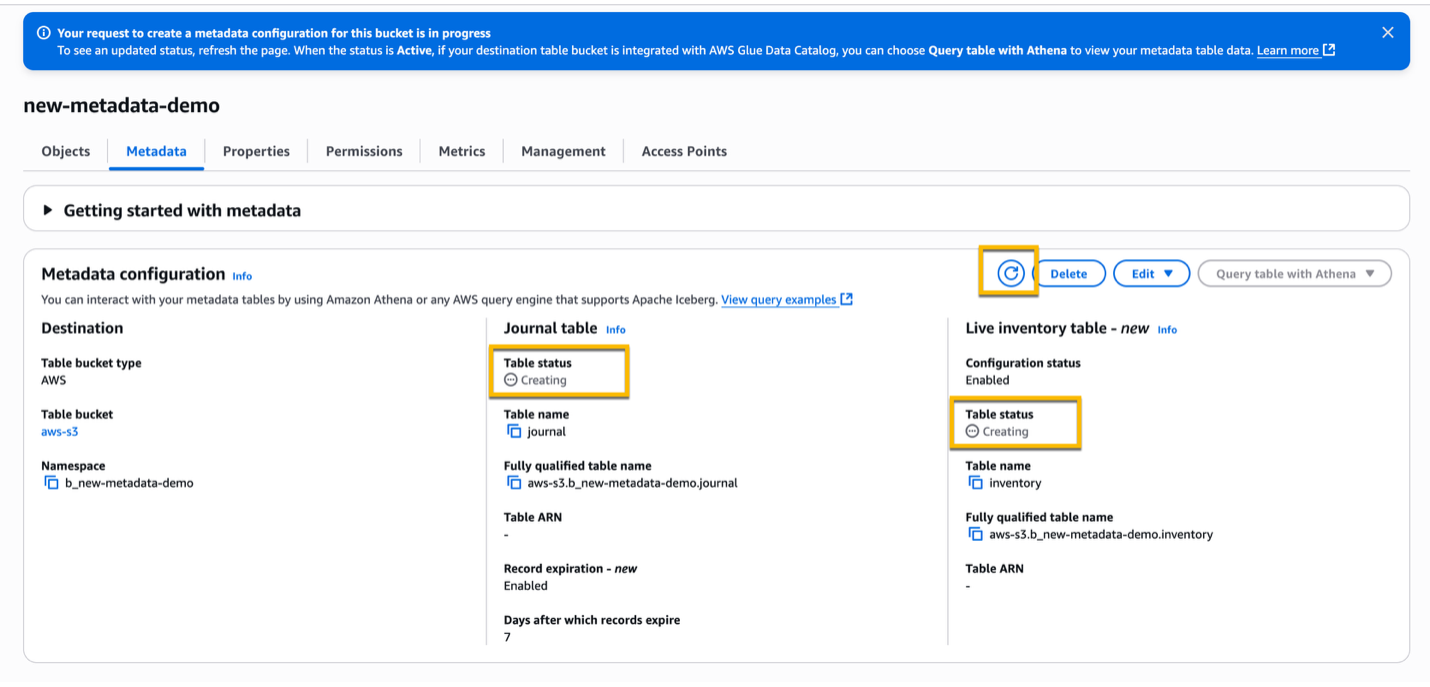
After a few minutes, the Journal table status should change to Active and the Live inventory table status should change to Backfilling. In this status, S3 scans your general purpose bucket to retrieve the initial metadata for all objects that exist in the bucket. Depending on the number of objects in your bucket, this process can take several hours.
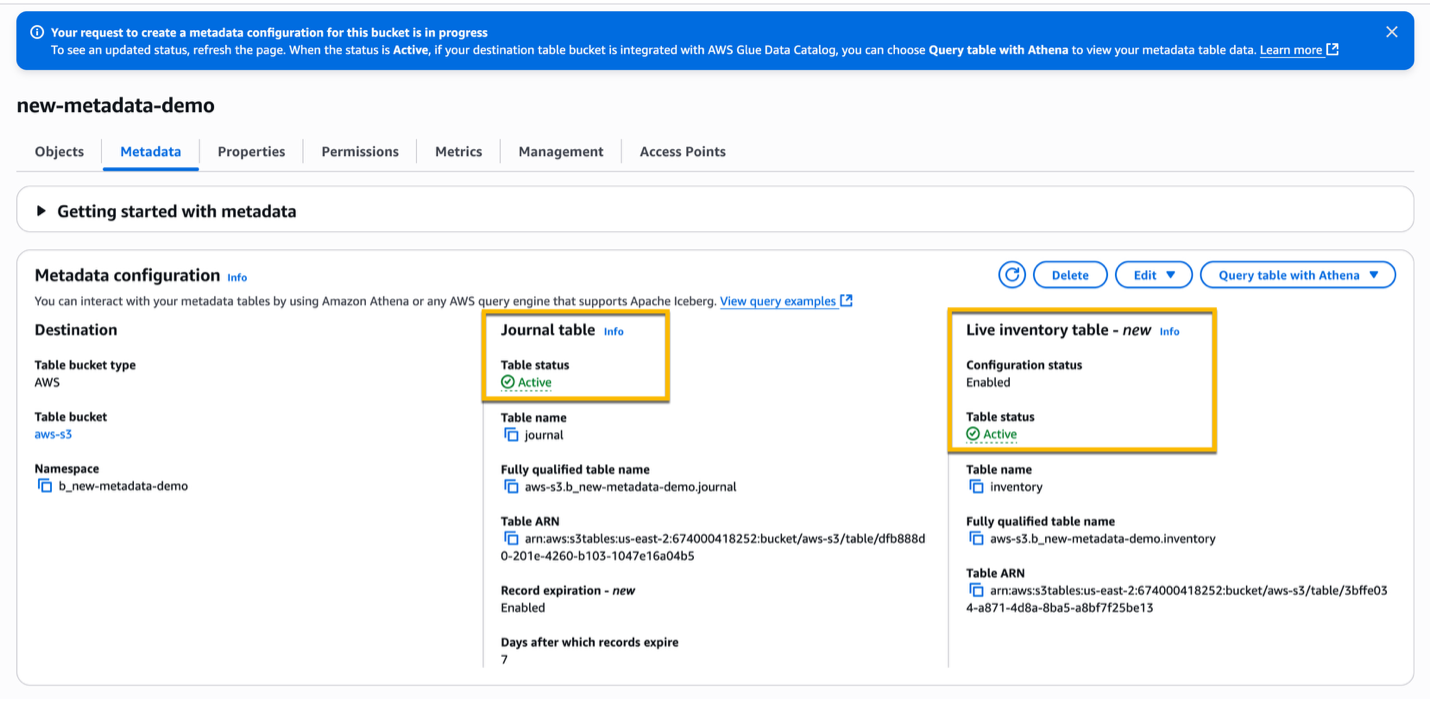
When the backfilling process is finished, the status of your Live inventory table changes from Backfilling to Active.
2. Run SQL queries on Amazon Athena to gain insights on S3 Metadata
In this section, we walk through the following:
2.1. Verify access to S3 Metadata in Athena.
2.2. Explore your S3 Metadata with Athena. You will try some sample queries to better understand what kinds of insights are possible.
2.1. Verify access to S3 Metadata in Athena
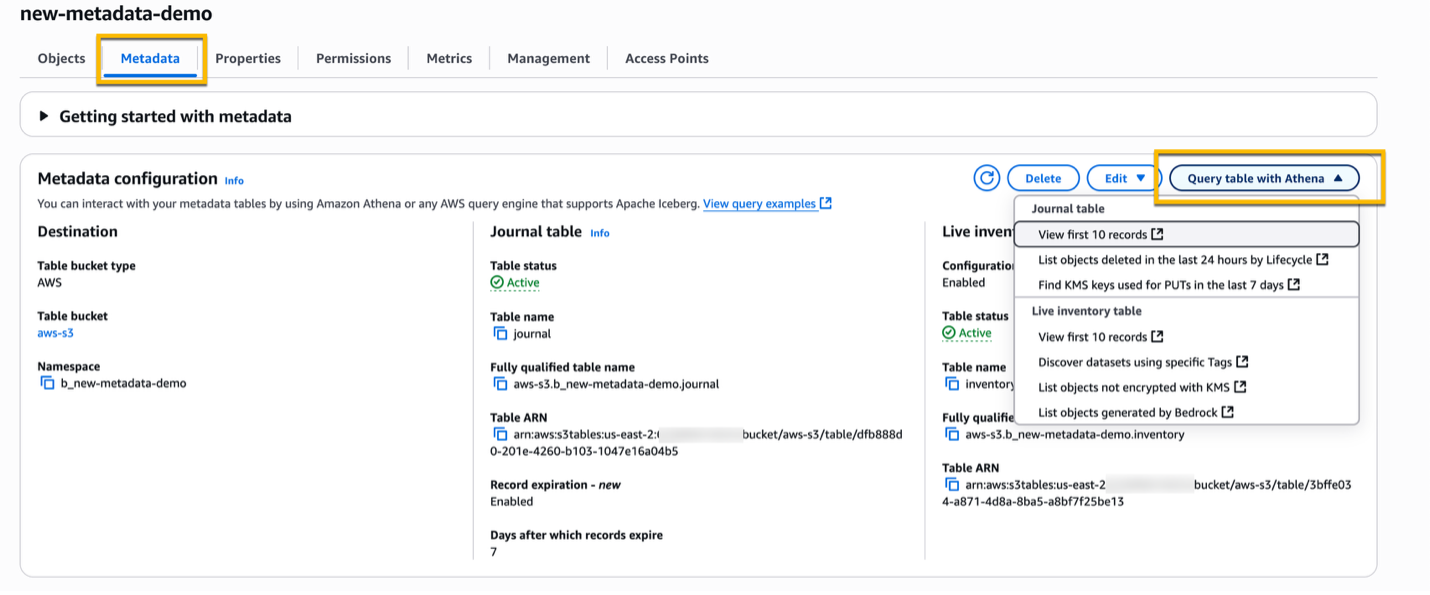
After you created the metadata configuration, from the Metadata tab, choose Query table with Athena, and then select one of the pre-configured queries.
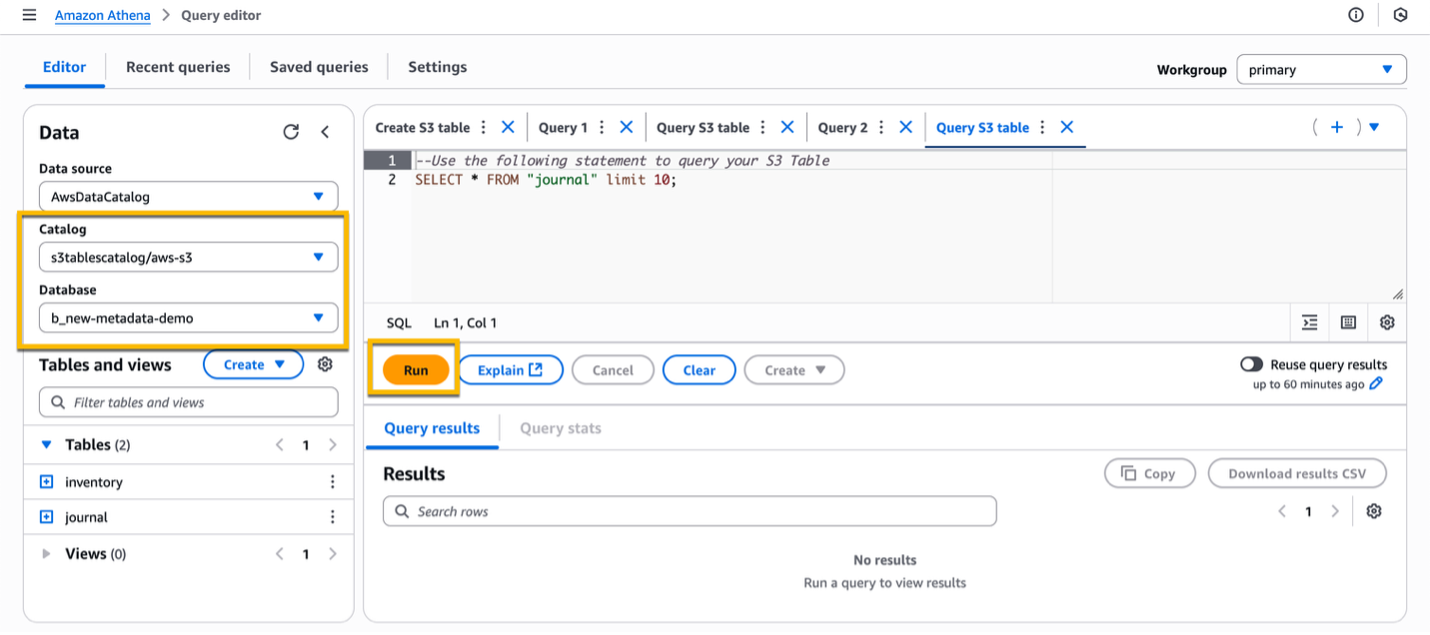
On the left side of the editor, in the Data section, review the configuration of the Catalog and Database, and then select the Run button to run the query to verify that everything is working correctly.
2.2. Explore your S3 Metadata with Athena
Athena is an interactive query service that makes it easy to analyze data in S3 using standard SQL. Here is a series of sample queries you can use to analyze your S3 Metadata from Athena. First, we perform queries on the journal table to analyze how things are changing in the S3 bucket.
Find objects that match a pattern.
SELECT key from "journal" where key LIKE ‘%.jpg’What objects were deleted in the last 24 hours?
SELECT bucket, key, version_id, last_modified_date, record_timestamp, requester
from "journal"
where requester = 's3.amazonaws.com'
and record_type = 'DELETE'
and record_timestamp > (current_date - interval '1' day)
How many objects has S3 Lifecycle expired in the last 7 days?
SELECT bucket, key, version_id, last_modified_date, record_timestamp from "journal" where requester = 's3.amazonaws.com' and record_type = 'DELETE' and record_timestamp > (current_date - interval '7' day);What IP address(es) have recent requests come from?
SELECT source_ip_address, count(source_ip_address) from "journal" group by source_ip_address;What KMS keys have been used for PUTs in the last 7 days?
SELECT DISTINCT kms_key_arn FROM s3_metadata_primary where record_timestamp > (current_date - interval '7' day);Now, let’s perform some queries on the live inventory table.
What objects are not encrypted with KMS?
SELECT key, encryption_status FROM "inventory" WHERE encryption_status != 'SSE-KMS';Create a distribution of object tags.
SELECT object_tags, count(object_tags)
FROM "inventory"
group by object_tags;
Are there any objects without tags?
SELECT key, last_modified_date, object_tags FROM "inventory" WHERE cardinality(object_tags) = 0 ORDER BY last_modified_date DESC;Find objects in a given prefix in the S3 Glacier Deep Archive storage class and create a CSV file that could be used for a batch job to restore those objects.
SELECT bucket, key, version_id FROM "inventory" where key LIKE ‘legal/%’ and storage_class = ‘DEEP_ARCHIVE’;What is the storage distribution among my S3 prefixes?
SELECT
    CASE
        WHEN STRPOS(key, '/') > 0 THEN SUBSTR(key, 1, STRPOS(key, '/') - 1)
        ELSE key
    END AS first_level_prefix,
    SUM(CAST(size AS BIGINT)) AS total_size_bytes,
    SUM(CAST(size AS BIGINT))/1024/1024 AS total_size_mb,
    SUM(CAST(size AS BIGINT))/1024/1024/1024 AS total_size_gb,
    COUNT(*) AS object_count
FROM
    inventory
GROUP BY
    CASE
        WHEN STRPOS(key, '/') > 0 THEN SUBSTR(key, 1, STRPOS(key, '/') - 1)
        ELSE key
    END
ORDER BY
    total_size_bytes DESC;
3. Visualize your S3 Metadata in QuickSight
Amazon QuickSight is a powerful cloud-based business intelligence (BI) service that empowers organizations of all sizes to unlock the value of their data. You can use QuickSight to create dashboards and visualizations using data stored in S3 Metadata tables. The following are some examples of dashboards you can create:
- What percentage of your storage data is small objects compared to large object?
- What is the percentage of object uploads compared to deletions?
- What percentage of images files are in my bucket?
In this section, we walk through the following:
3.1. Configure permissions for the QuickSight service role. You need to give the QuickSight service role the Glue:GetCatalog permission.
3.2. Configure Lake Formation permissions to the QuickSight admin user. You will grant your QuickSight user with permissions to your database and the tables within your database.
3.3. Create a QuickSight dashboard. You will use custom SQL to load your S3 Metadata table into QuickSight. This will allow you visualize your S3 Metadata in customer Amazon QuickSight dashboards.
3.1. Configure permissions for the QuickSight service role
1. Navigate to Identity and Access Management (IAM) from the AWS Management Console.
2. Under Roles, identify the QuickSight service role, i.e., aws-quicksight-service-role-v0.
3. Under the Permissions tab, add an inline policy for the Glue GetCatalog permission to access the S3 table catalog from QuickSight. Use the following JSON to add the inline policy.
{
    "Version": "2012-10-17",
    "Statement": [
        {
            "Sid": "VisualEditor0",
            "Effect": "Allow",
            "Action": "glue:GetCatalog",
            "Resource": "*"
        }
    ]
}
3.2. Configure permissions for the QuickSight admin user
Identify the QuickSight admin user and its Amazon Resource Name (ARN) to grant Lake Formation permissions to access the S3 table catalog. Run the following CLI command from AWS CloudShell (or any terminal you choose) and note down the QuickSight admin user’s ARN.
$aws quicksight list-users --aws-account-id <AWS Account ID> --namespace default --region <AWS Region>

Navigate to the Lake Formation service from the AWS Management Console. Select Data permissions > Grant.

In the Principals section, select SAML users and groups and add the QuickSight admin user’s ARN. Then, select the Named Data Catalog Resources and grant the database permission and table permissions separately, as shown in the following pictures.
First, we will add permissions at the database level.

Select Named Data Catalog resources and choose the S3 Tables catalog and database.
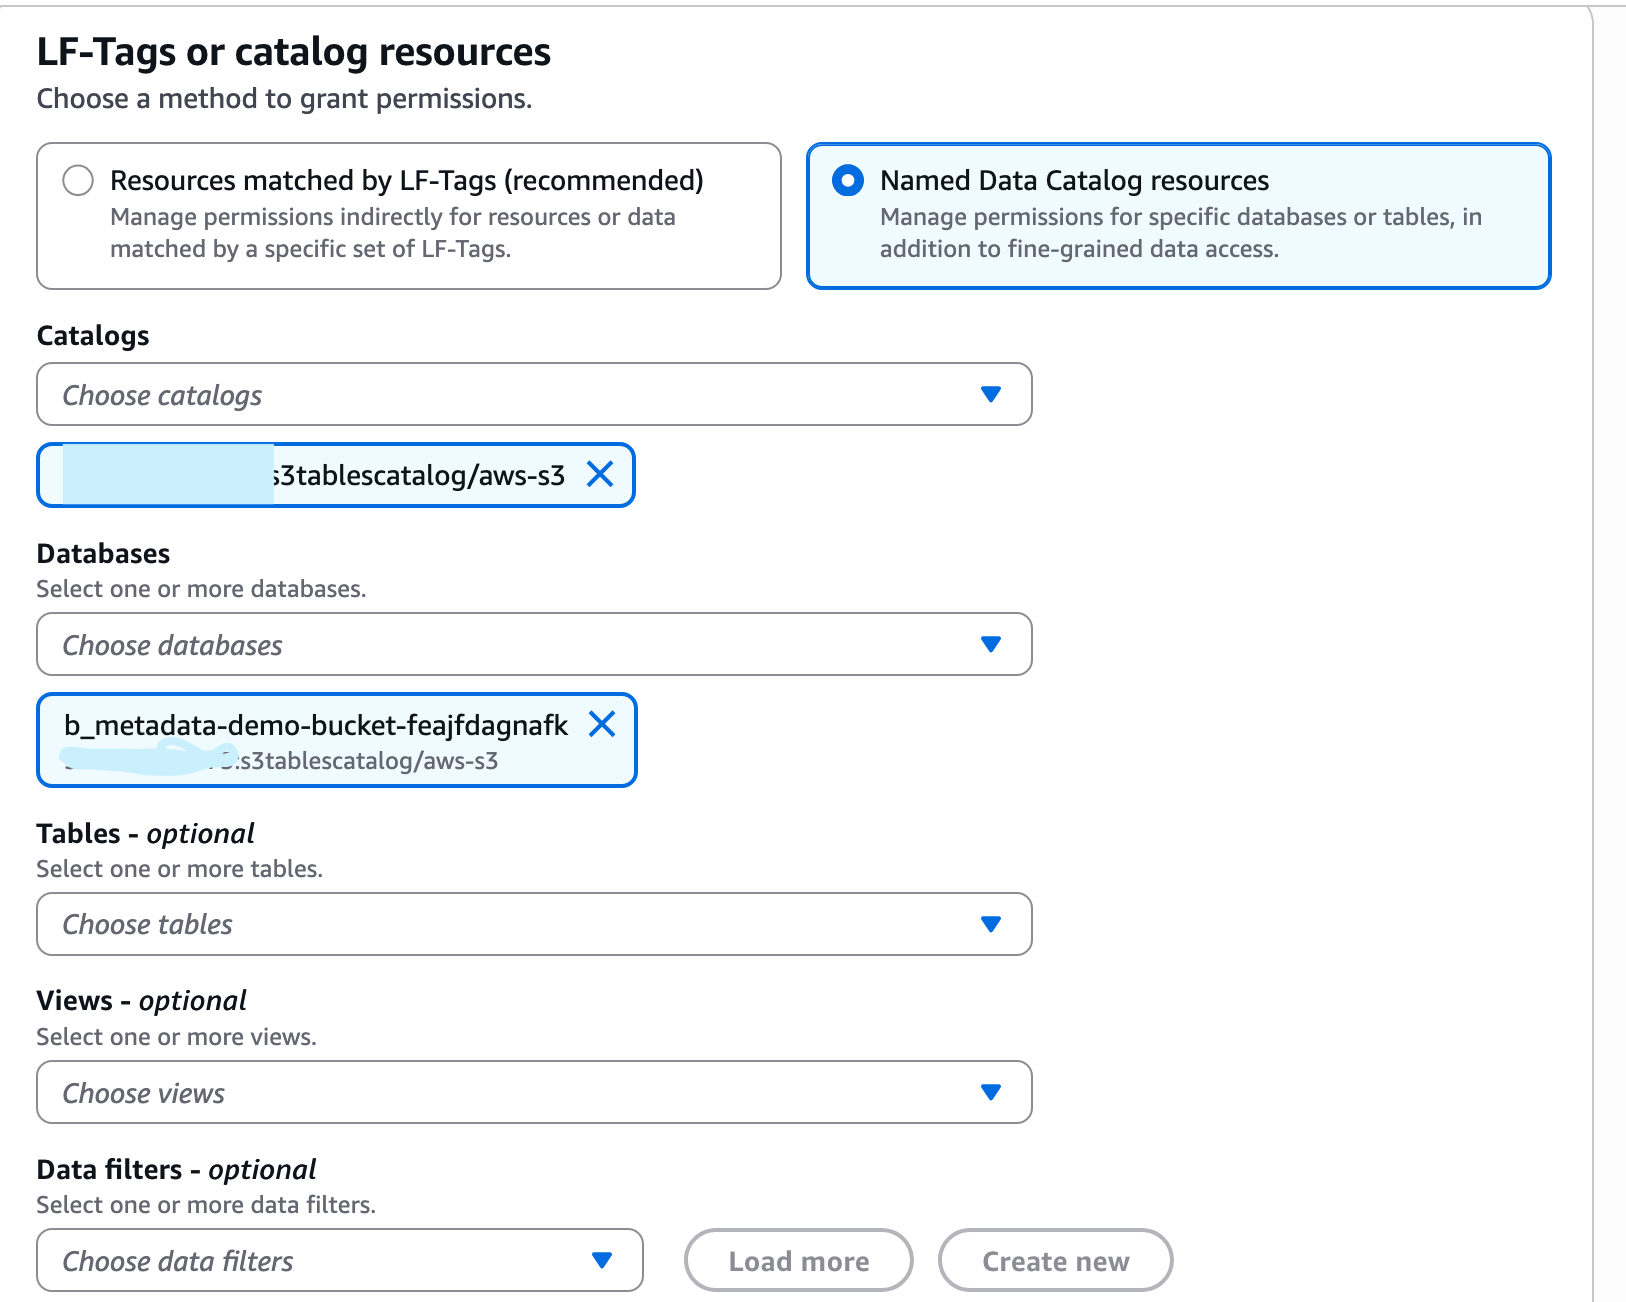
Select the database permissions.

We now need to do the same thing, but this time at the table level. From the Lake Formation Console, select Data Permissions > Grant again.

Select Named Data Catalog resources and choose the S3 Tables catalog, database, and table.

Select the table permissions.

Navigate to the AWS Lake Formation service from the AWS Management Console. Select Data Permissions and verify that you have the permissions on the database, table, and column resources.

3.3. Create a QuickSight dashboard
Use the following steps to create a dashboard:
1. Sign in to the QuickSight console. From the user profile on the top right of the QuickSight console, choose the same AWS Region where you have created the S3 table bucket. For example, if you created the S3 table bucket in the Ohio (us-east-2) Region, select the same Region in QuickSight.

2. In the QuickSight dashboard, click on New analysis. On the New analysis page, click on New dataset.
3. In the Create a Dataset modal, select Athena as the data source, enter a name for your dataset, and click Create data source.

4. On the Choose your table session, select Use custom SQL. Please note, you will not be able to see the table in the dropdown list.

5. Enter a custom SQL query based on the columns you would like to visualize, and then select Confirm Query. In this example, you have selected all the columns by providing the following query. Replace <bucket-name> with your general purpose S3 bucket where you configured S3 Metadata.
SELECT * from "s3tablescatalog/aws-s3"."b_<bucket-name>"."inventory";SELECT * from "s3tablescatalog/aws-s3"."b_<bucket-name>"."journal";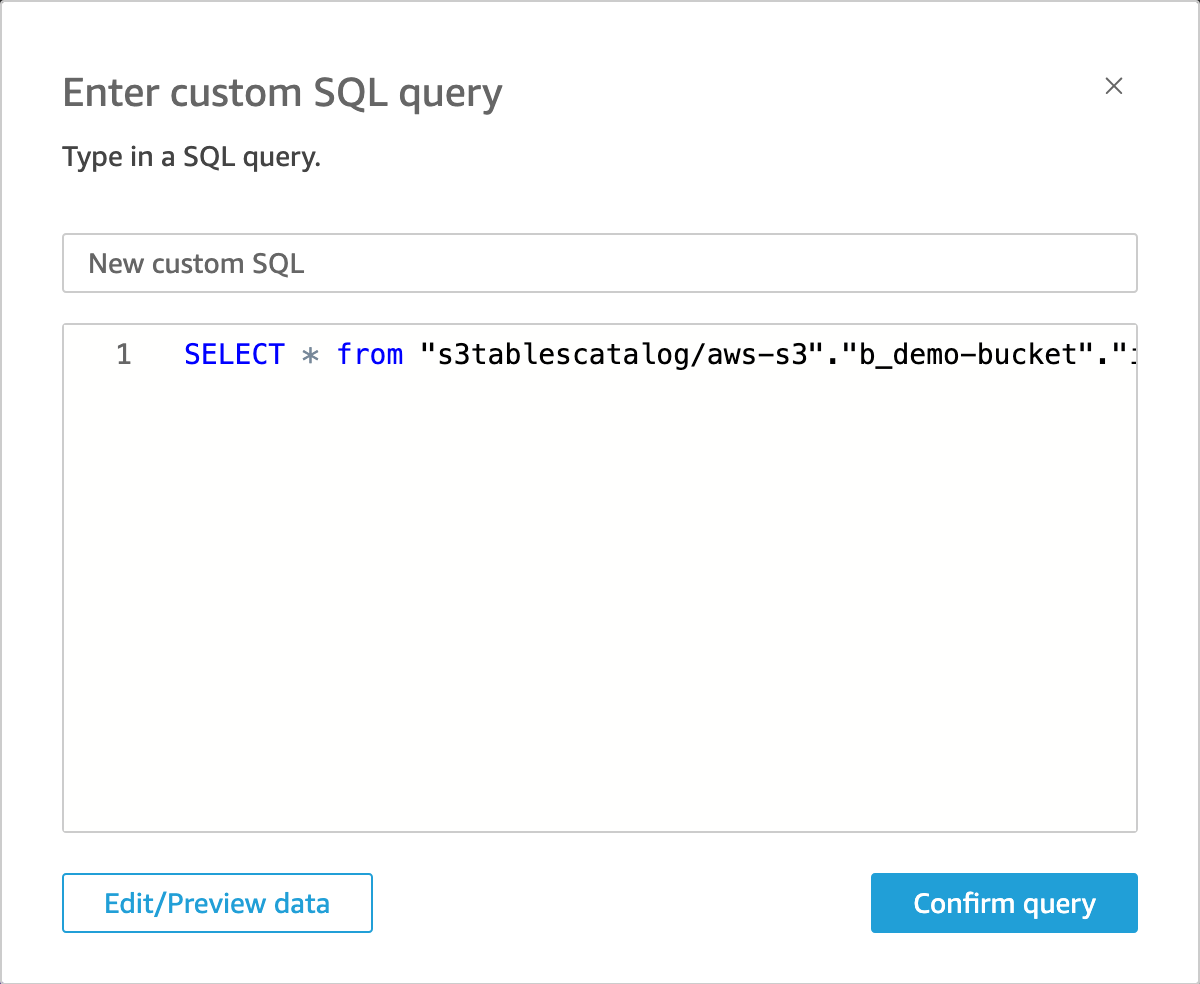
6. Click Visualize to analyze data and creating dashboards. Please note, you won’t see the ‘s3tablecatalog’ and ‘aws_s3_metadata’ as databases. The data source will be the same name that you have given in step 3.

7. Select Create in the QuickSight to get started. To analyze and create dashboards, refer to the Visualizing data and Exploring dashboards sections in the QuickSight User Guide.

8. Select the columns you would like to analyze and create dashboards.

Examples of QuickSight dashboards:

Cleaning up
When your work is complete in Athena and QuickSight, make sure you disable the S3 Metadata configuration and delete the table to ensure you do not continue to incur costs. To delete the S3 Metadata configuration, go to the S3 Metadata table for the bucket you created the configuration for and click Delete.

To delete the tables, go to the Athena console as you did previous and run the follow queries to delete the tables:
DROP "journal";
DROP "inventory";
Conclusion
In this post, we walked through a step-by-step process to configure S3 Metadata and enable integration with Athena and QuickSight. We provided examples of SQL queries that you can use to find data insights into your S3 data.
Amazon S3 gives you the ability to store virtually unlimited objects in a single bucket for use cases like archive, analytics and, data lakes. While this makes it a powerful tool for storing data, there are situations where you want to manage individual files intelligently for reporting and automation to achieve business goals. Typical business goals are to understand usage, verify security, increase efficiency, drive down costs, or migrate data to other environments selectively. By bringing in AWS Analytics services to help analyze your object metadata, you can manage your data and achieve your business objectives.
To learn more about S3 Metadata, read the AWS News Blog.
Thanks for taking the time to read this post. If you have any feedback or questions, please don’t hesitate to leave them in the comments section.