Networking & Content Delivery
Streamlining multi-VPC DNS management with Amazon Route 53 Profiles and interface VPC endpoint integration
Managing DNS configurations across multiple VPCs and accounts requires thoughtful architectural planning, especially for organizations leveraging AWS PrivateLink interface endpoints for various AWS services. Organizations are continuously looking for ways to streamline these configurations while maintaining operational efficiency and security.
For enterprises using Amazon Web Services (AWS) PrivateLink interface endpoints (such as AWS Lambda, Amazon Simple Storage Service (Amazon S3), or Amazon CloudWatch) or other supported services, a common architectural pattern is to centralize endpoint deployment in a shared services VPC and share them across multiple VPCs and on-premises environments. When implemented using AWS Transit Gateway and Amazon Route 53 Resolver, this design reduces operational overhead and optimize costs by minimizing the number of necessary endpoints.
To further improve DNS resolution in such architectures, AWS has introduced integration between Route 53 Profiles and interface VPC endpoints. This new capability simplifies DNS management across multiple VPCs and accounts by allowing DNS configurations to be managed centrally through Route 53 Profiles, eliminating the need for per-VPC PHZ associations.
Throughout this post, we’ll guide you through creating an Amazon Route 53 Profile and associating it with a VPC endpoint. You’ll learn practical migration strategies to transition from your existing DNS architectures to the new Route 53 Profile–based approach, which integrates directly with VPC interface endpoints. Along the way, we’ll provide step-by-step guidance for implementation, highlight operational benefits, and show how the updated architecture can improve DNS governance while maintaining security across your AWS infrastructure.
Solution overview
In this section we examine how interface VPC endpoint deployments were typically managed prior to recent enhancements. In traditional implementations, organizations would deploy an interface VPC endpoint in a shared services VPC, but enabling DNS resolution from other VPCs necessitated more manual steps. This involved disabling Private DNS to prevent the automatic creation of AWS-managed Private Hosted Zones (PHZs), then manually creating and attaching self-managed PHZs to the shared services VPC, with alias records pointing to the endpoint service. Before Route 53 Profiles, these self-managed PHZs had to be attached individually to each VPC, with cross-account sharing for multi-account setups. Route 53 Profiles allow organizations to attach self-managed PHZs to a profile once, and then associate multiple VPCs with that profile—streamlining and centralizing DNS management, especially in multi-account environments.
The latest enhancement of attaching interface VPC endpoints directly to Route 53 Profiles allows us to streamline DNS management even further by eliminating the need for creating self-managed PHZs while keeping “Private DNS” enabled on the endpoint. This enhancement allows Route 53 Profiles to enable you to create and associate VPC endpoints directly with a profile. Services behind those endpoints become resolvable from any VPC attached to the profile. This streamlines DNS management for VPC endpoints in multi-VPC architectures by eliminating the need for separate workflows to create and associate your own PHZs and alias records.
The following diagram shows this streamlined approach, demonstrating how a VPC endpoint for AWS Lambda in the Shared Services Account is directly associated with a Route 53 Profile.
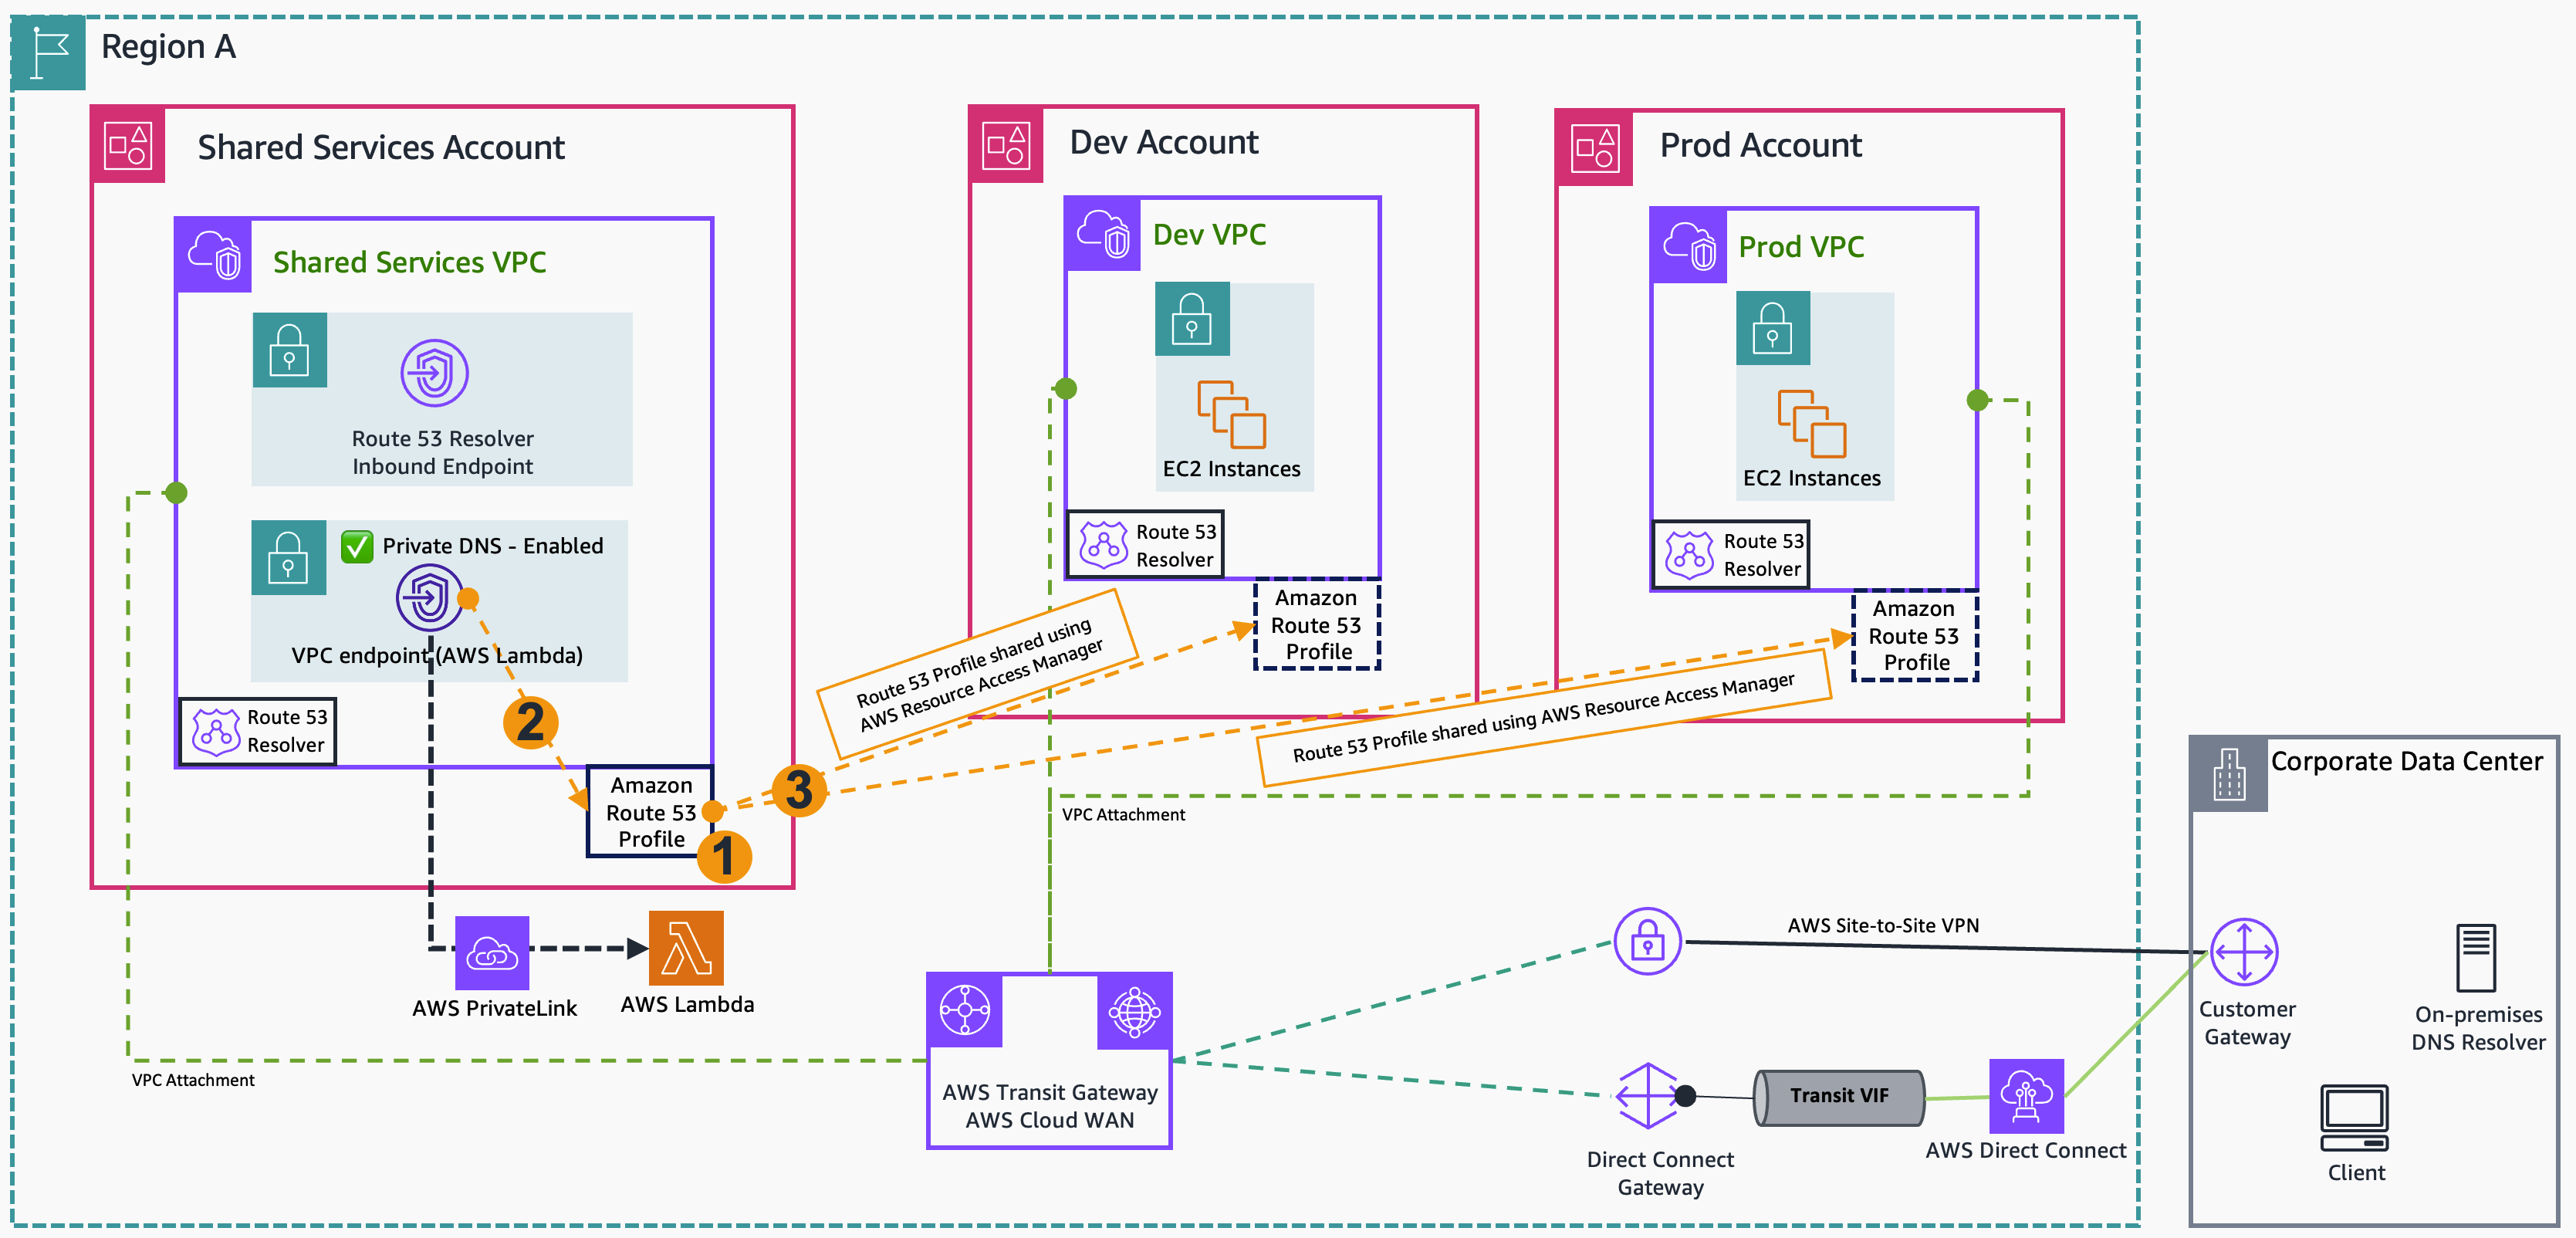
Figure 1: Architecture showing the integration between Route 53 Profiles and interface VPC endpoint
The AWS-managed PHZ for interface VPC endpoint is now handled automatically by Route 53 Profiles, reducing administrative overhead. The diagram also shows on-premises connectivity components, but we are focusing our discussion on the interface VPC endpoint and Route 53 Profile integration, because DNS resolution for on-premises resources continues to be handled by the existing Route 53 Resolver inbound endpoint.
Network connectivity between the VPCs must be pre-configured using either Transit Gateway or AWS Cloud WAN.
- In the Shared Services Account, create a Route 53 Profile.
- Create an interface VPC endpoint for Lambda in the Shared Services VPC with Private DNS enabled and associate it with the Route 53 Profile.
- Use AWS Resource Access Manager (AWS RAM) to share the Route 53 Profile with other accounts, then associate their VPCs with the shared Route 53 Profile. If the VPC and Route 53 Profile are in the same AWS account, then you can create a direct association between them.
The native association of interface VPC endpoints for AWS services with Route 53 Profiles significantly streamlines deployment. In the following sections, we guide you through migrating from two previous architectural approaches as described in these posts:
- Integrating AWS Transit Gateway with AWS PrivateLink and Amazon Route 53 Resolver: This post showed a “Centralized interface VPC endpoints with direct VPCs association of self-managed PHZs”.
- Streamline DNS management for AWS PrivateLink deployment with Amazon Route 53 Profiles: This post showed a “Centralized interface VPC endpoints using Route 53 Profiles with self-managed PHZ associations”.
In the following sections we show you how to transition from these existing implementations to use the new native association between interface VPC endpoints and Route 53 Profiles.
Migration process
1. Centralized interface VPC endpoints with the direct VPC association of self-managed PHZs
The deployment model, shown in the following figure, outlines two important steps: (1) disabling Private DNS on the interface VPC endpoint and (2) manually configuring self-managed PHZs that were associated with individual VPCs. Although we demonstrate this architecture with a single interface VPC endpoint, enterprise environments typically deploy multiple endpoints for various AWS services.

Figure 2: Architecture showing self-managed PHZ associated with VPCs
To begin the migration from architecture shown in Figure 2, follow the steps shown in the accompanying sequence diagrams.
Make sure that you have an Amazon Elastic Compute Cloud (Amazon EC2) instance in a Dev VPC and another in the Shared Services VPC to test DNS resolution during the migration process. Use the following example command while migrating each interface VPC endpoint to the new architecture: watch -n 1 dig lambda.[REGION].amazonaws.com
We recommend performing the following steps during a maintenance window because you may have a partial downtime during the migration process.
Current state

Figure 3: Current state – Architecture showing self-managed PHZ and VPCs association
Private DNS is disabled, as shown in the following figure.
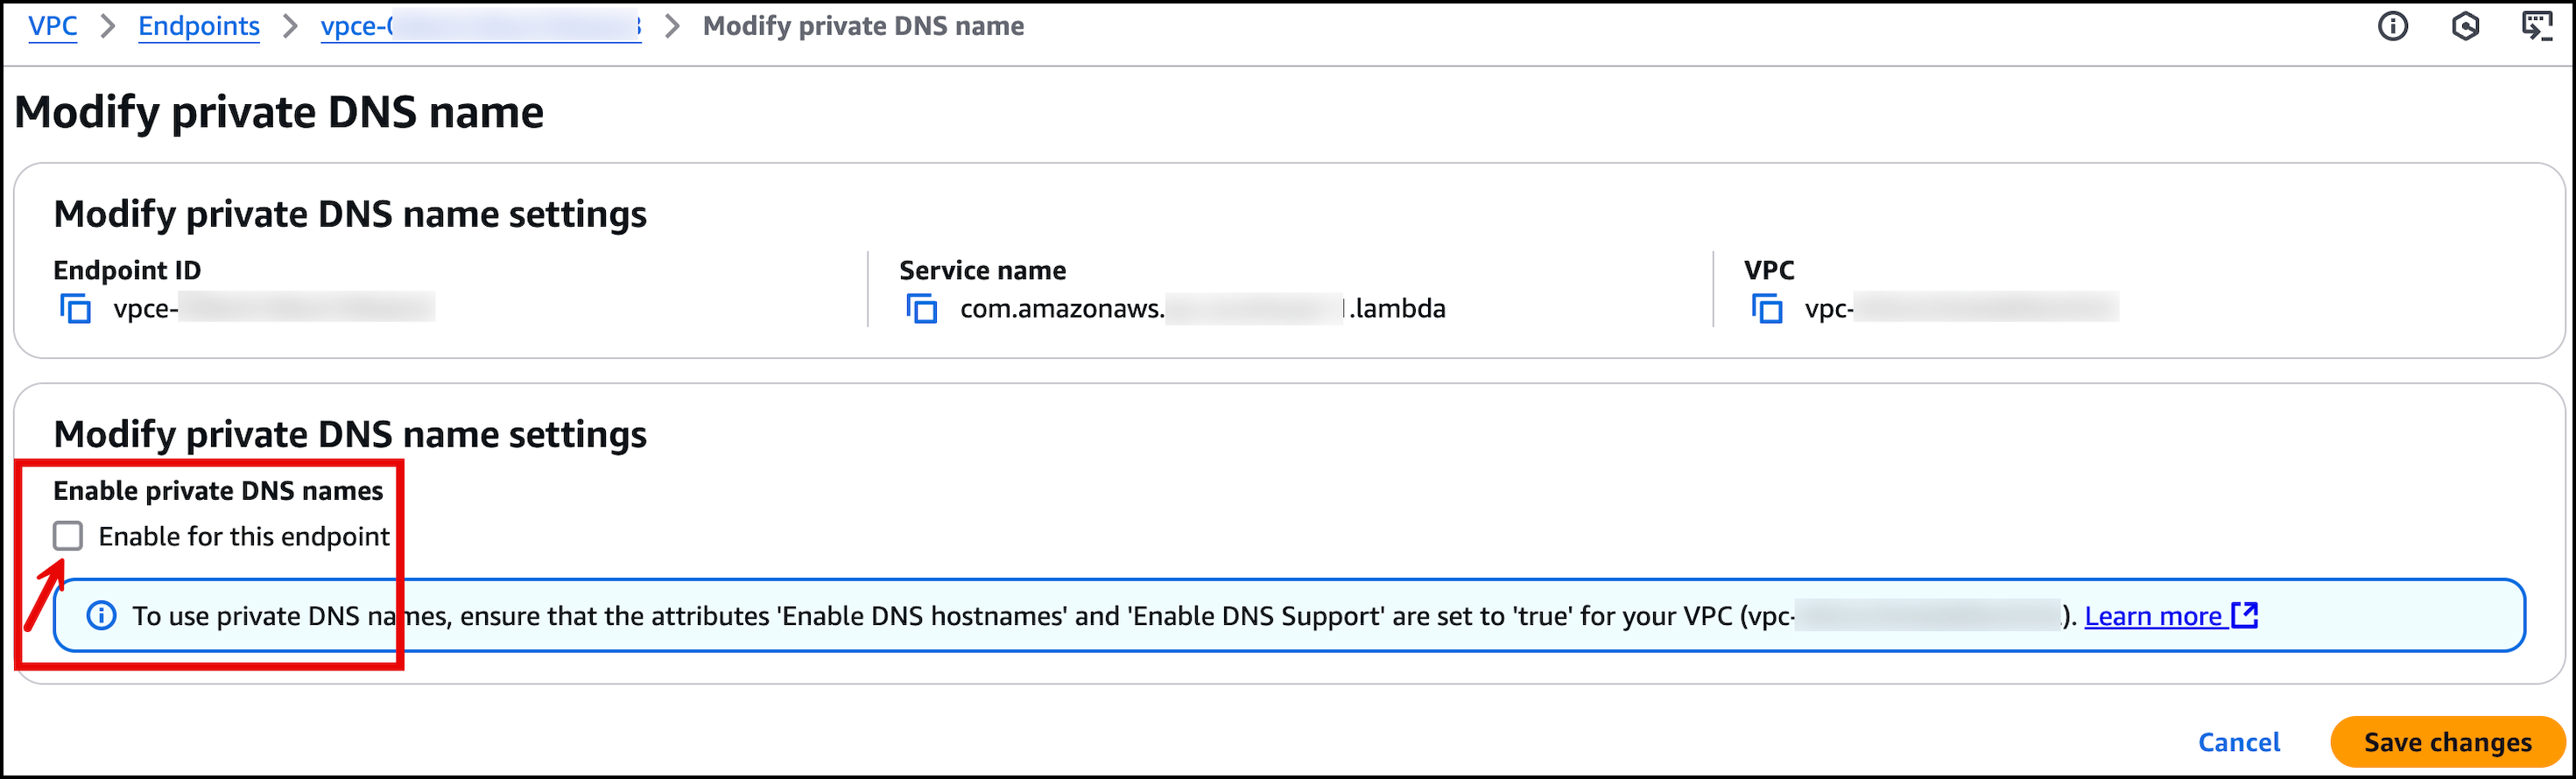
Figure 4: Private DNS name settings as shown in the AWS management console
A self-managed PHZ contains the alias record pointing to the VPC endpoint service is present, as shown in the following figure.

Figure 5: Self-managed PHZ as shown in the AWS management console
All three VPCs (Dev, Prod, and Shared Services) are associated with the self-managed PHZ as shown in Figure 2.
Step 1: Associate your VPCs and self-managed PHZ with Route 53 Profile

Figure 6: Step 1 of the migration process – Dev, Prod, and Shared Services VPCs, all being associated to a Route 53 Profile
- Create a Route 53 Profile
- Associate all three VPCs with the profile
- Associate the self-managed PHZ with the profile
Now that you have configured your Route 53 Profile with all associated VPCs and the self-managed PHZ, make sure that the VPC association and PHZ association are complete. When it’s confirmed, you can proceed with the next steps as shown in the following figure.
Step 2: Disassociate Shared Services VPC from self-managed PHZ
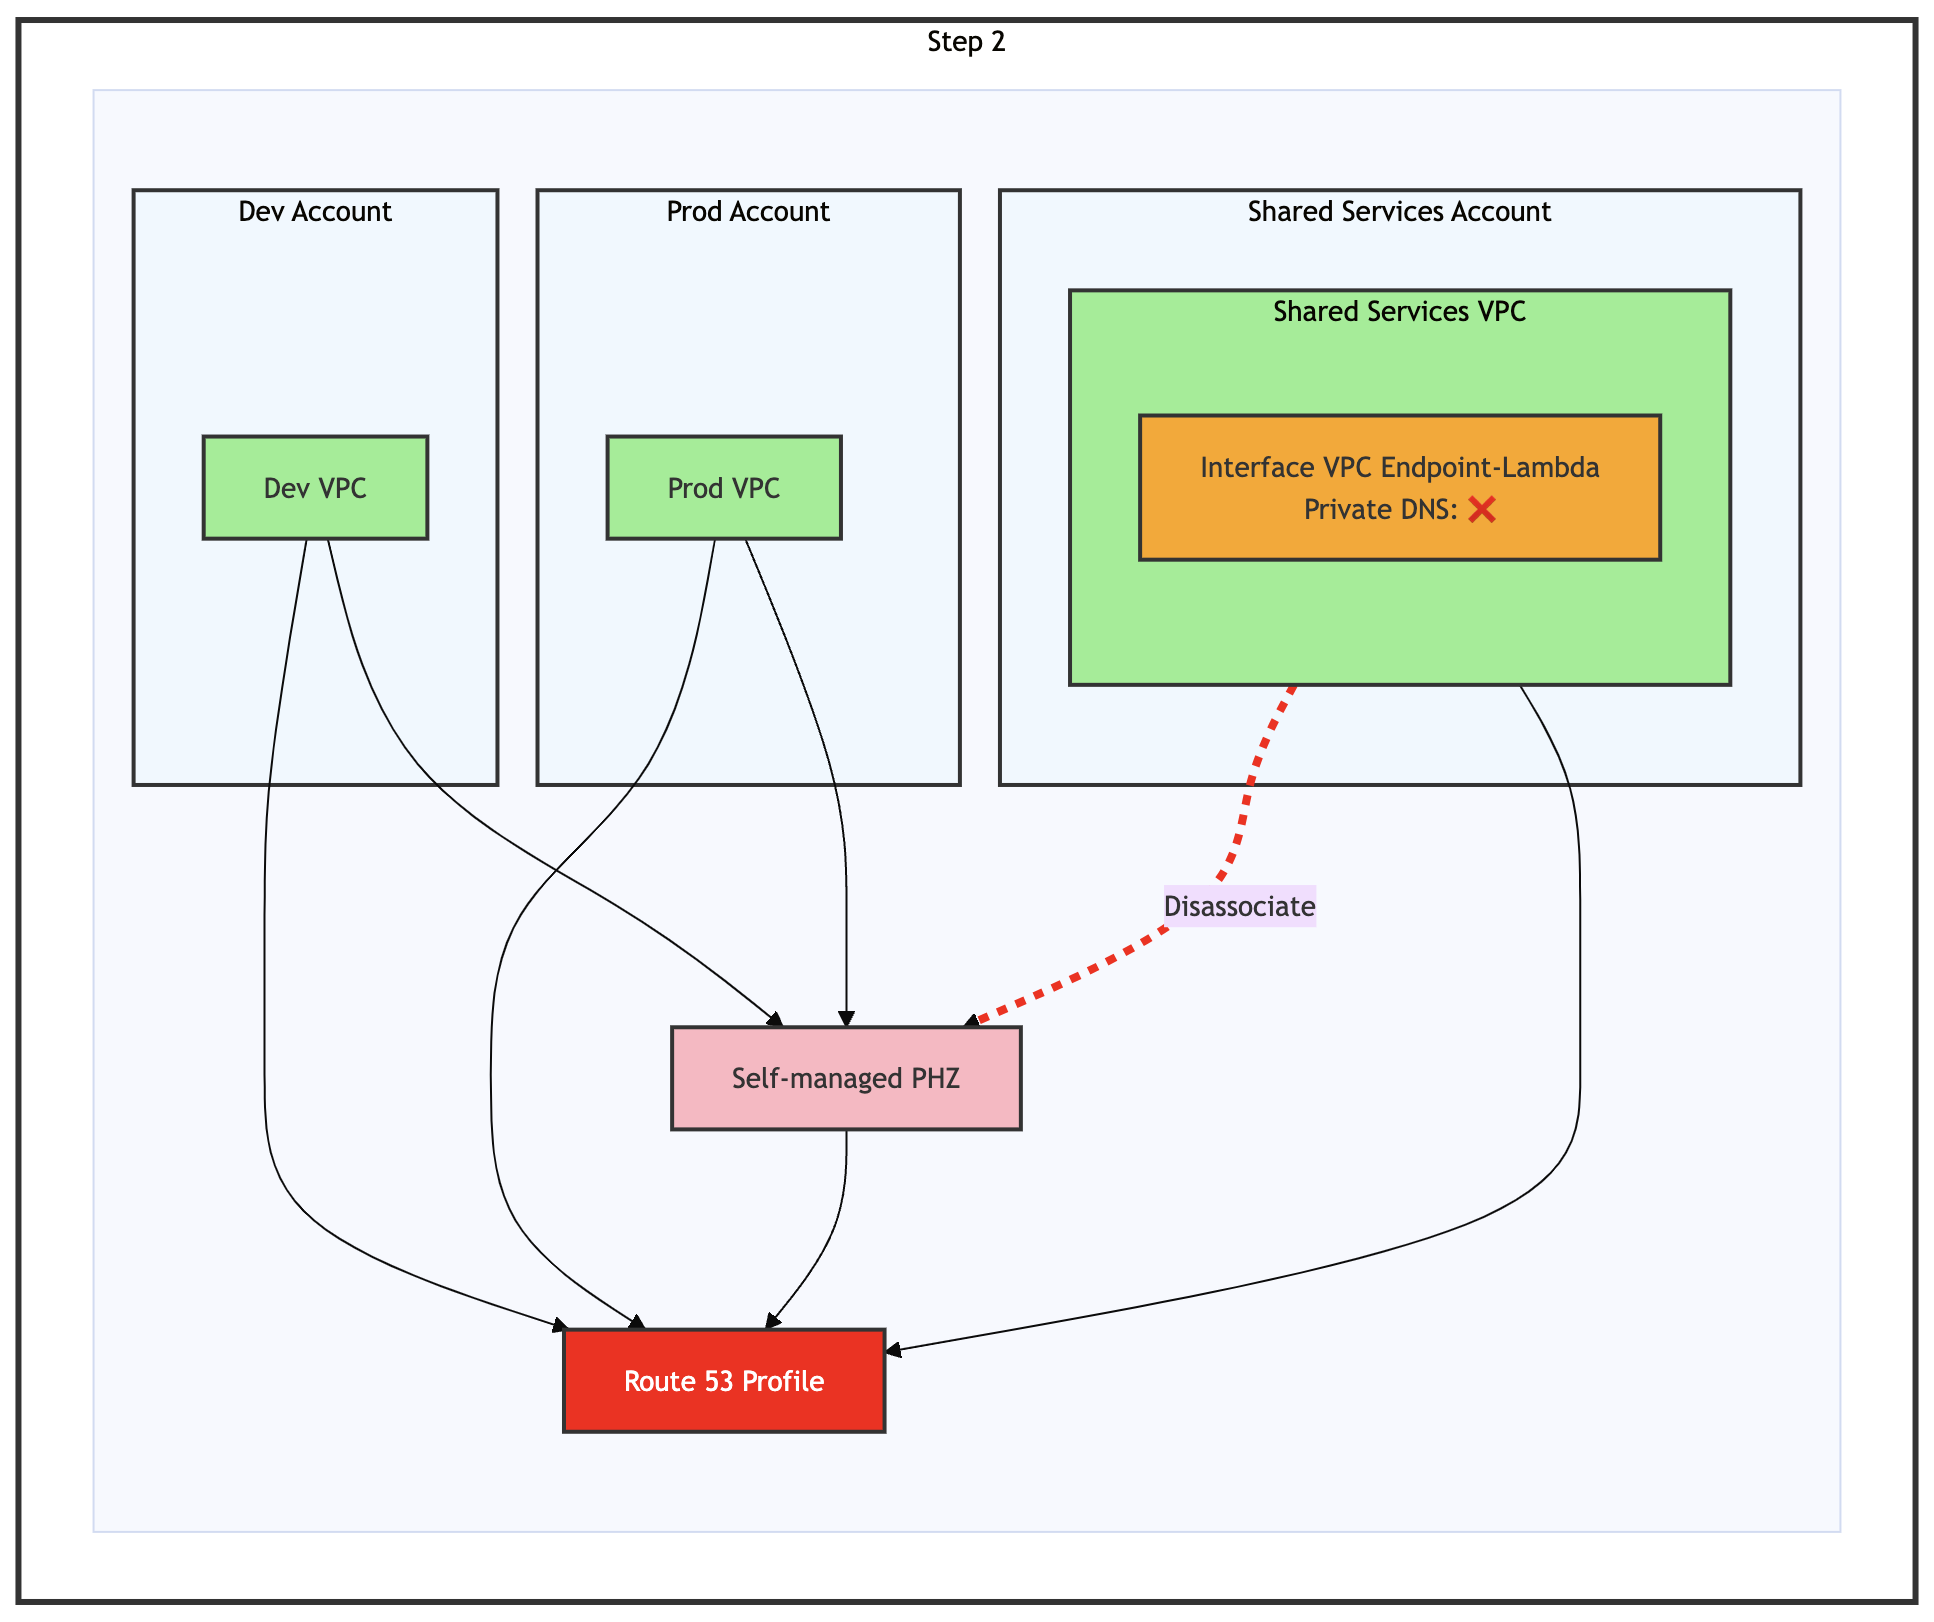
Figure 7: Step 2 of the migration process – Disassociate of Shared Services VPC from self-managed PHZ
Disassociate the Shared Services VPC from the self-managed PHZ, as shown in the preceding figure. DNS resolution continues functioning because the Shared Services VPC remains associated with the Route 53 Profile, which maintains its connection to the self-managed PHZ.
Step 3: Enable Private DNS for Interface VPC Endpoint

Figure 8: Step 3 of the migration process – Enable Private DNS for interface VPC endpoint
Enable Private DNS for the interface VPC endpoint, as shown in the preceding figure. Enabling private DNS automatically creates an AWS-managed PHZ for the endpoint, which becomes accessible to the Shared Services VPC. The endpoint briefly shows Pending before returning to the Active state.
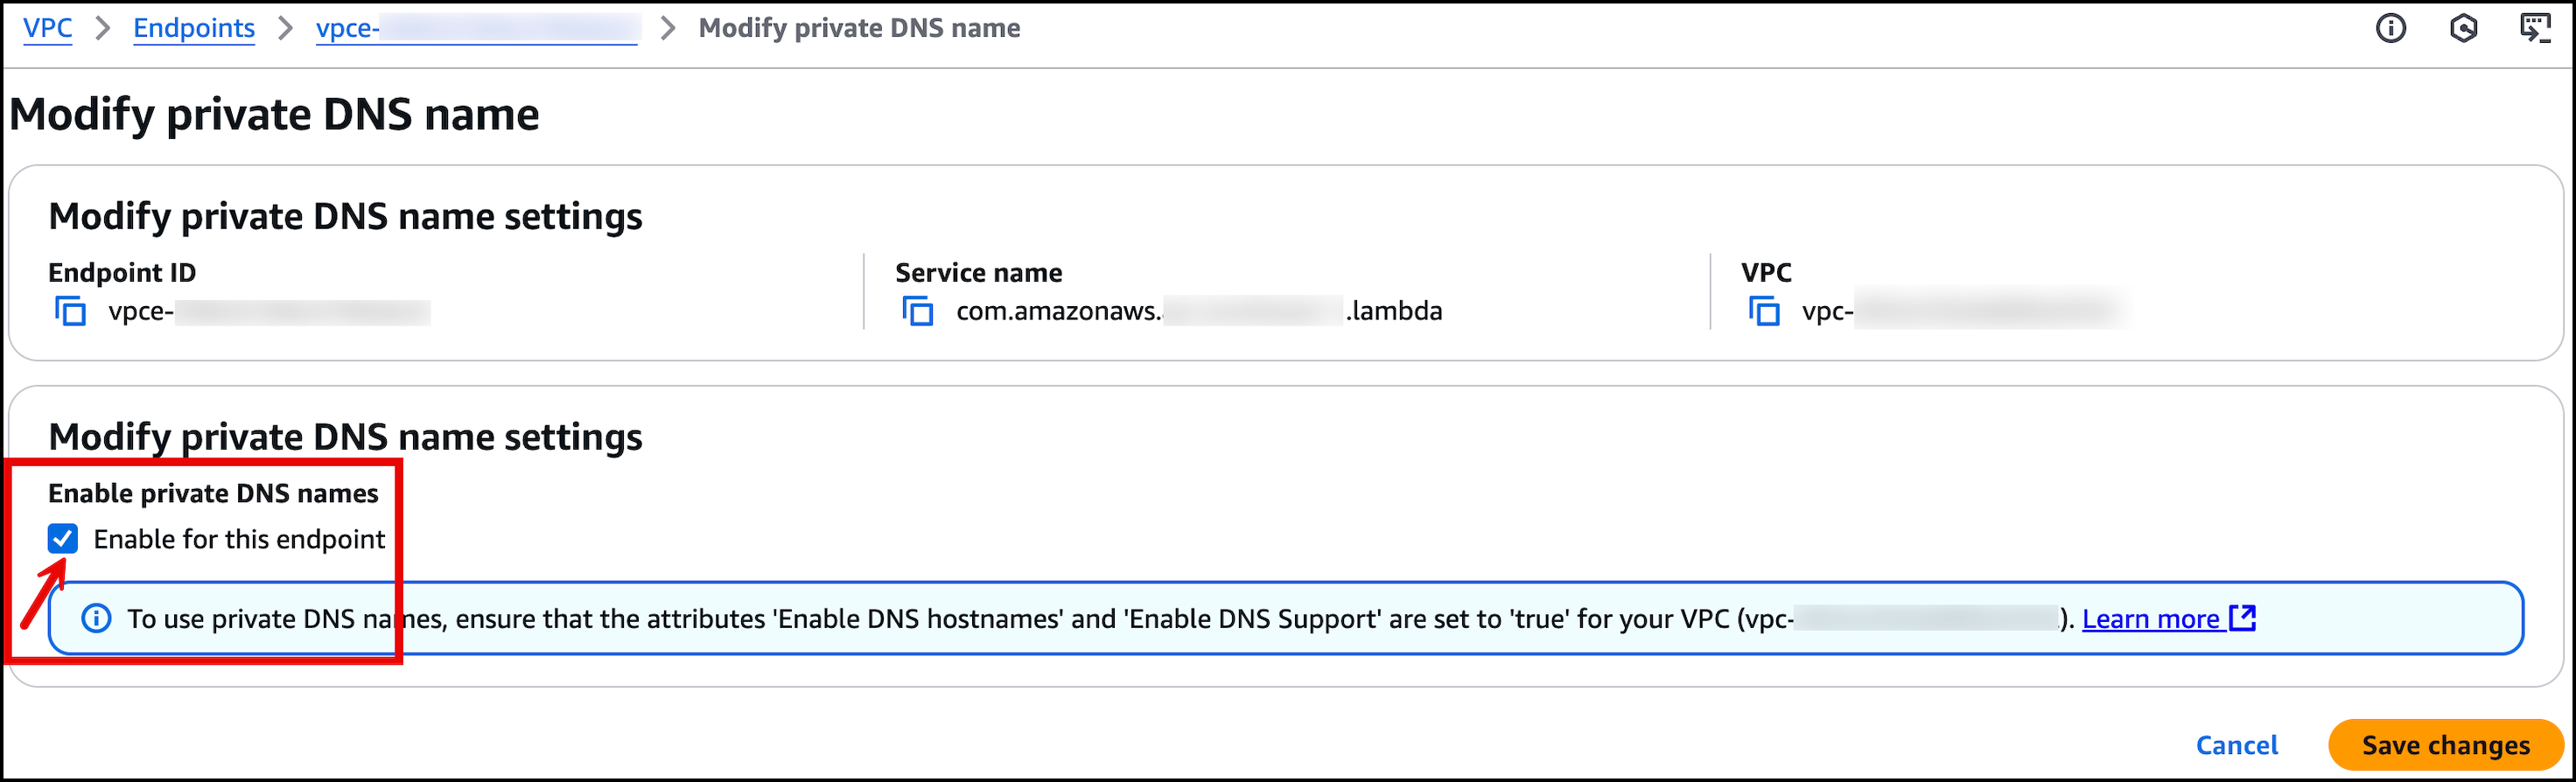
Figure 9: Enable private DNS name settings as shown in the AWS management console
After disassociating the Shared Services VPC from the self-managed PHZ and enabling Private DNS on the interface VPC endpoint, DNS resolution now functions in two ways. The Shared Services VPC resolves through its AWS-managed PHZ (which runs in the background), while the Prod and Dev VPCs continue DNS resolution through direct association with self-managed PHZ. Proceed with the steps as shown in the following diagram.
Step 4: Disassociate self-managed PHZ from Route 53 Profile

Figure 10: Step 4 of the migration process – Disassociate the self-managed PHZ from Route 53 profile
Disassociate the self-managed PHZ from the Route 53 Profile and make sure the dissociation process is complete before proceeding to the next step, as shown in the preceding figure. Self-managed PHZ should remain associated with other VPCs individually for now to allow them to perform the DNS resolution.
Step 5: Associate Interface VPC endpoint with Route 53 Profile

Figure 11: Step 5 of the migration process – Associate interface the VPC endpoint with Route 53 profile
Associate the interface VPC endpoint with your Route 53 Profile, as shown in the preceding figure. The endpoint briefly shows Pending before returning to the Active state, as shown in the following figure.

Figure 12: Associate VPC endpoint with Route 53 Profile as shown in the AWS management console
Step 6: Disassociate VPCs one at a time from self-managed PHZ

Figure 13: Step 6 of the migration process – Disassociate the Prod VPC from self-managed PHZ
Begin by disassociating the Prod VPC from the self-managed PHZ, as shown in the preceding figure. When it is removed, the DNS resolution automatically transitions to using Route 53 Profile and its associated interface VPC endpoint. Continue the migration process by systematically removing other VPCs one at a time from the self-managed PHZ. Depending on your environment, you can choose to perform these disassociations in any order you prefer. As you proceed, each VPC shifts its DNS resolution to the Route 53 Profile. Continue the process until you are left with only the Dev VPC attached to the self-managed PHZ. It’s crucial to maintain this final VPC association (Dev VPC) as a self-managed PHZ can’t exist without at least one VPC attachment.
Step 7: Delete the A record in the self-managed PHZ, then delete the self-managed PHZ

Figure 14: Step 7 of the migration process – Delete A Record and PHZ which triggers disassociating of the PHZ from the VPC automatically
Delete the A record from your self-managed PHZ, then immediately delete the PHZ, as shown in the preceding figure. The Dev VPC association is automatically removed during this process.
Final state

Figure 15: Final State – Dev, Prod, Shared Services VPC and interface VPC endpoint are all associated with Route 53 profile
In conclusion the migration path we just discussed allows you to move from the initial architecture described in Figure 3 to a streamlined design, as shown in the preceding figure, Figure 15. Going forward, it reduces operational overhead when adding new VPCs. Instead of managing individual PHZ associations, you only need to associate the new VPCs with the Route 53 Profile to enable DNS resolution.
2. Centralized interface VPC endpoints using Route 53 Profiles with self-managed PHZ associations
The deployment model, shown in the following diagram, outlines two important steps: (1) disabling Private DNS on the interface VPC endpoint and (2) manually configuring and maintaining self-managed PHZ.
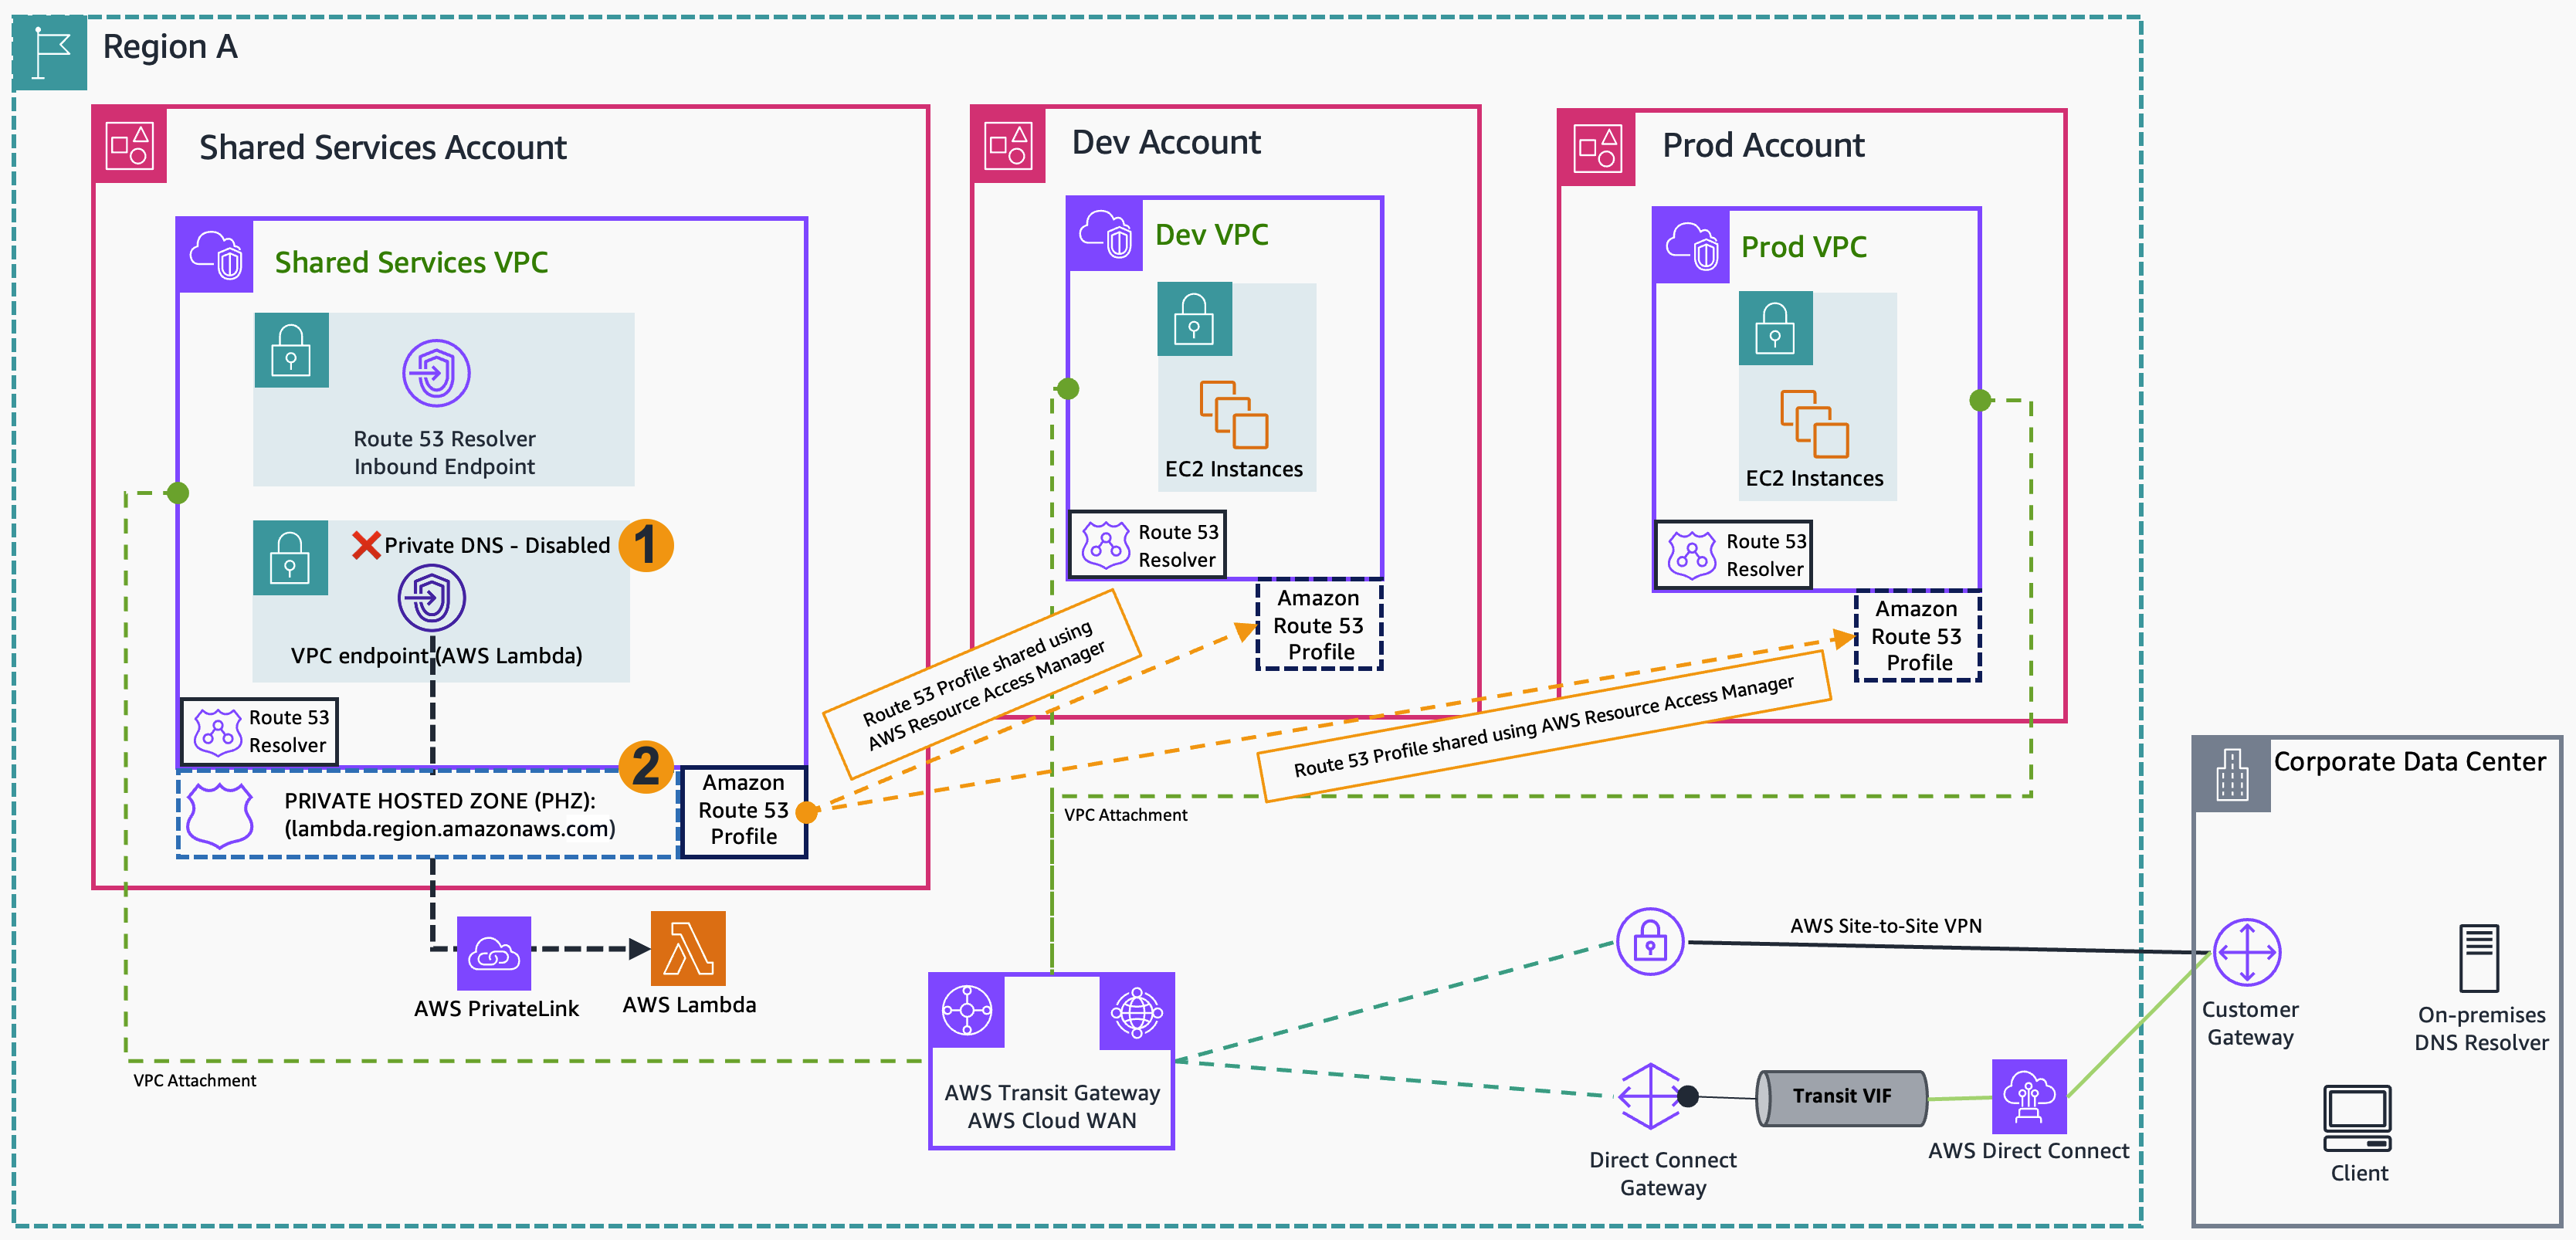
Figure 16: Architecture showing self-managed PHZ associated with Route 53 Profile and Route 53 Profile associated with the VPCs
To begin the migration from architecture shown in Figure 16, follow the steps shown in the accompanying sequence diagrams.
Make sure that you have an EC2 instance in a Dev VPC and another in the Shared Services VPC to test the DNS resolution during the migration process. Use the following example command while migrating each interface VPC endpoint to the new architecture: watch -n 1 dig lambda.[REGION].amazonaws.com
We recommend performing the following steps during a maintenance window because you may have a partial downtime during the migration process.
Current state

Figure 17: Current state – Architecture showing self-managed PHZ associated with Shared Services VPC and Route 53 Profile including Dev, Prod and Shared Services VPC also associated with Route 53 Profile
Private DNS is disabled. A self-managed PHZ contains the alias record pointing to the VPC endpoint service and is attached to the Shared Services VPC. All VPCs (Dev, Prod, and Shared Services) are associated with Route 53 Profile and the self-managed PHZ is also associated with the Profile.
Step 1: Associate Dev and Prod VPCs to self-managed PHZ
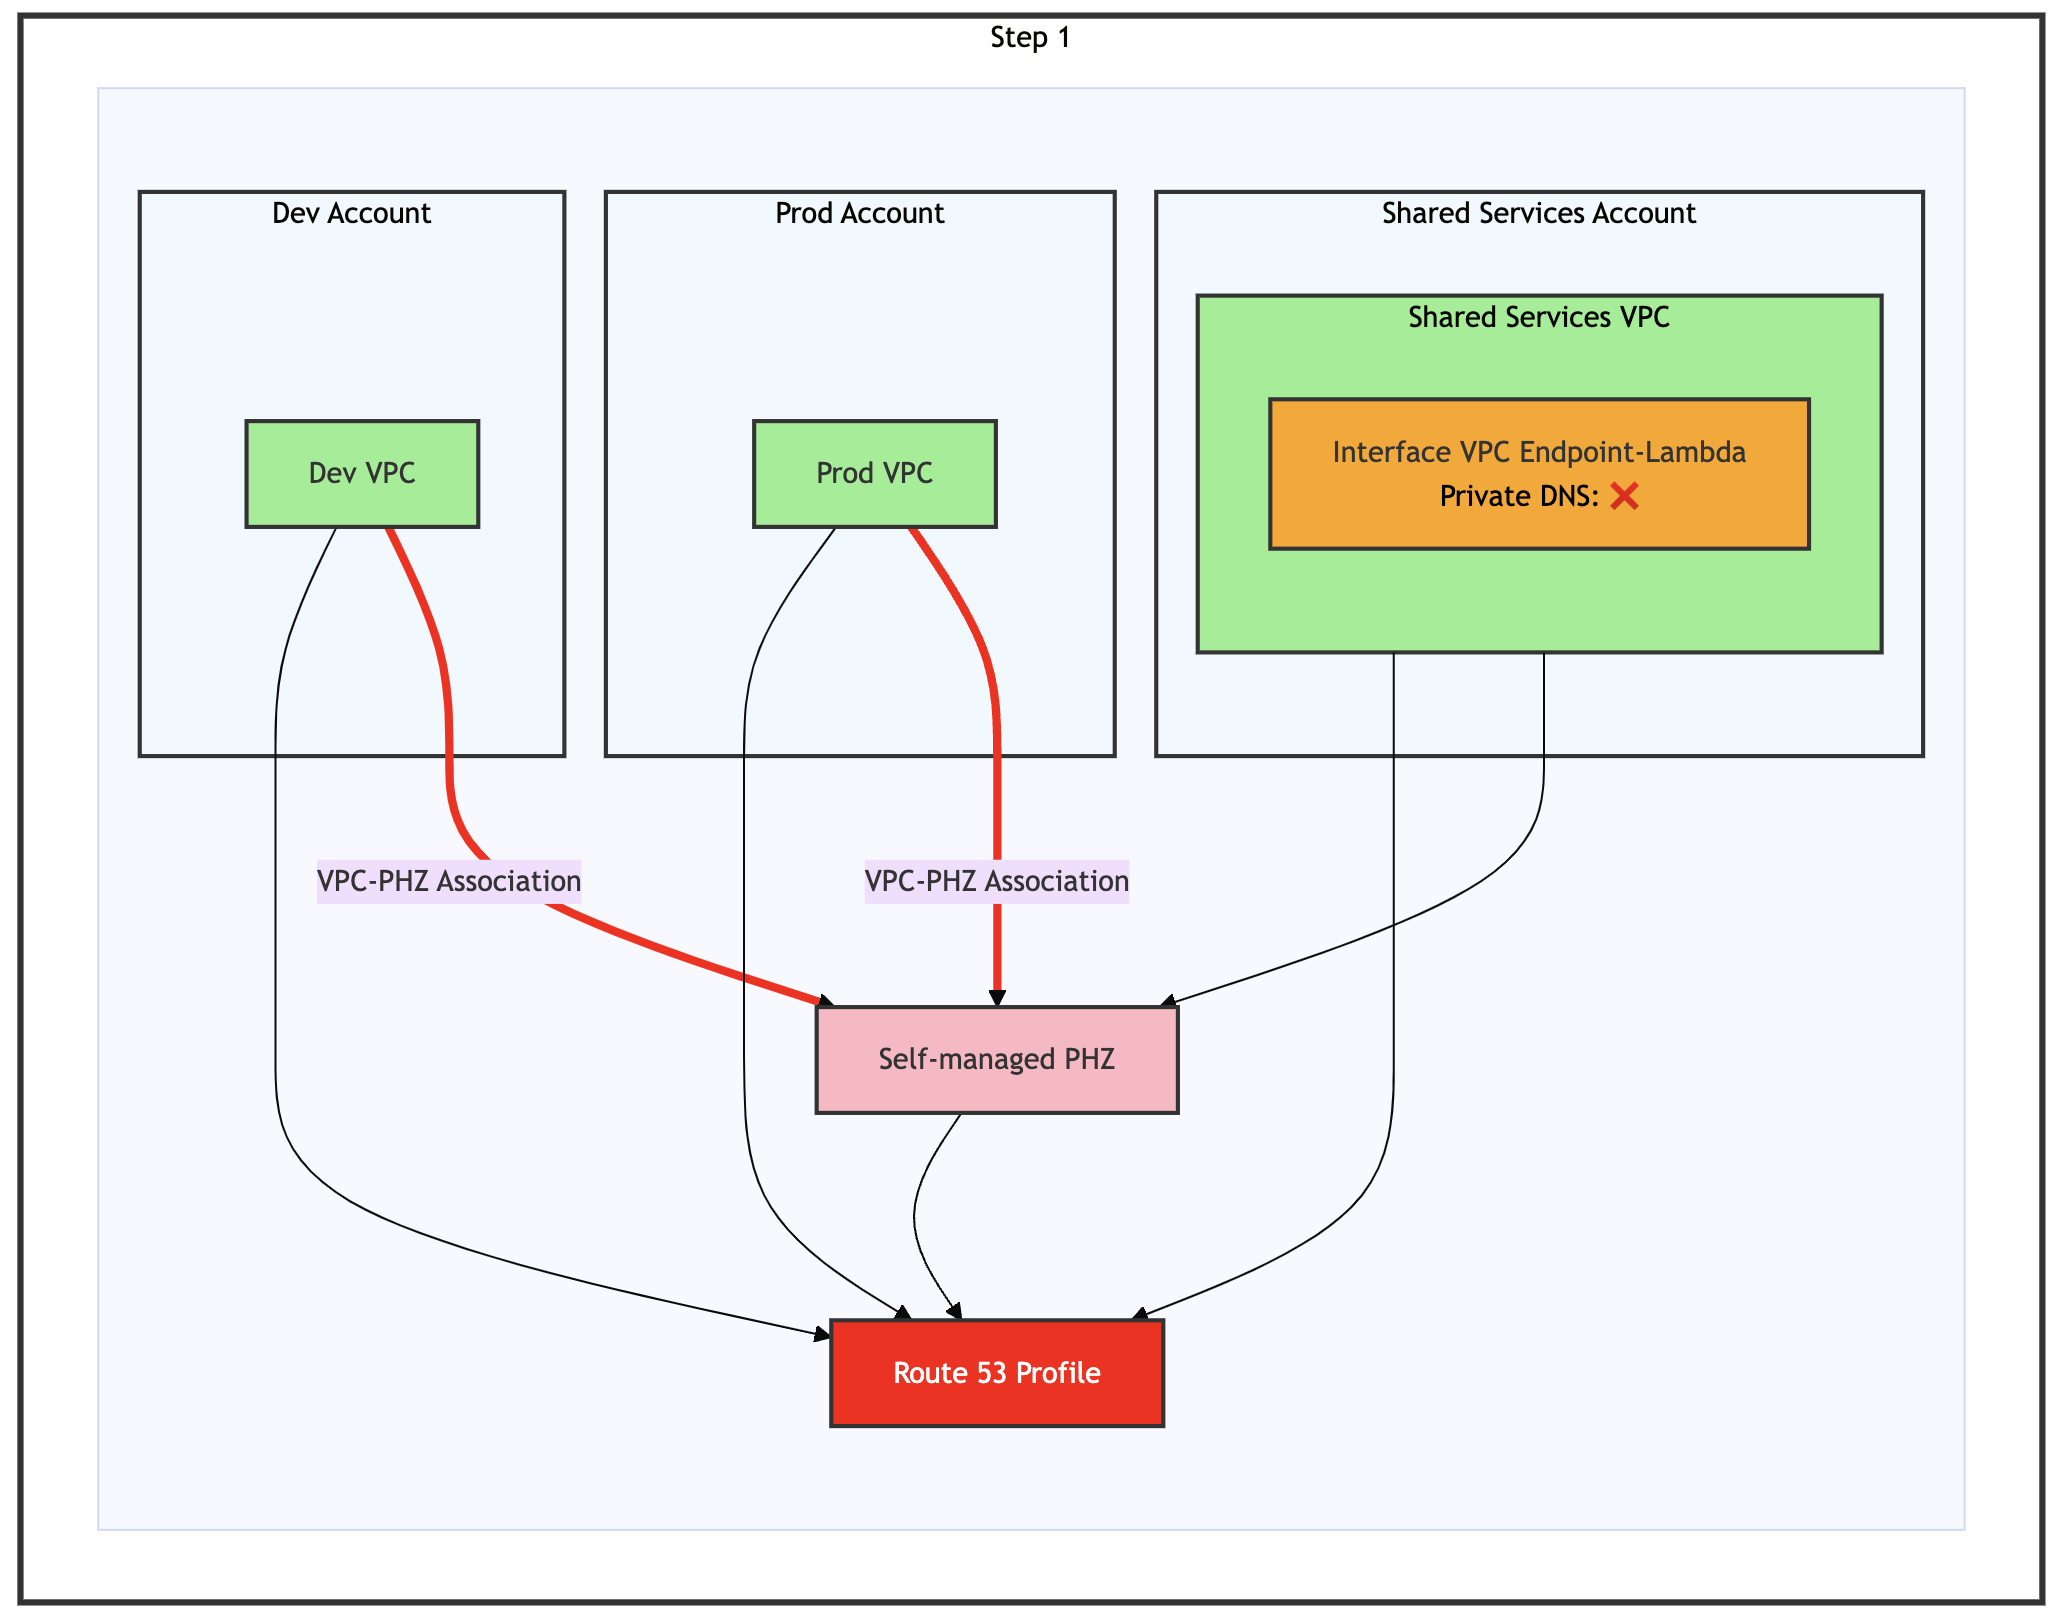
Figure 18: Step 1 of the migration process – Dev and Prod VPC are associated to the self-managed PHZ
Associate the self-managed PHZ with Prod and Dev VPCs, as shown in the preceding figure. This step is necessary, as in the next step you disassociate self-managed PHZ from the Shared Services VPC.
Step 2: Disassociate Shared Services VPC from self-managed PHZ
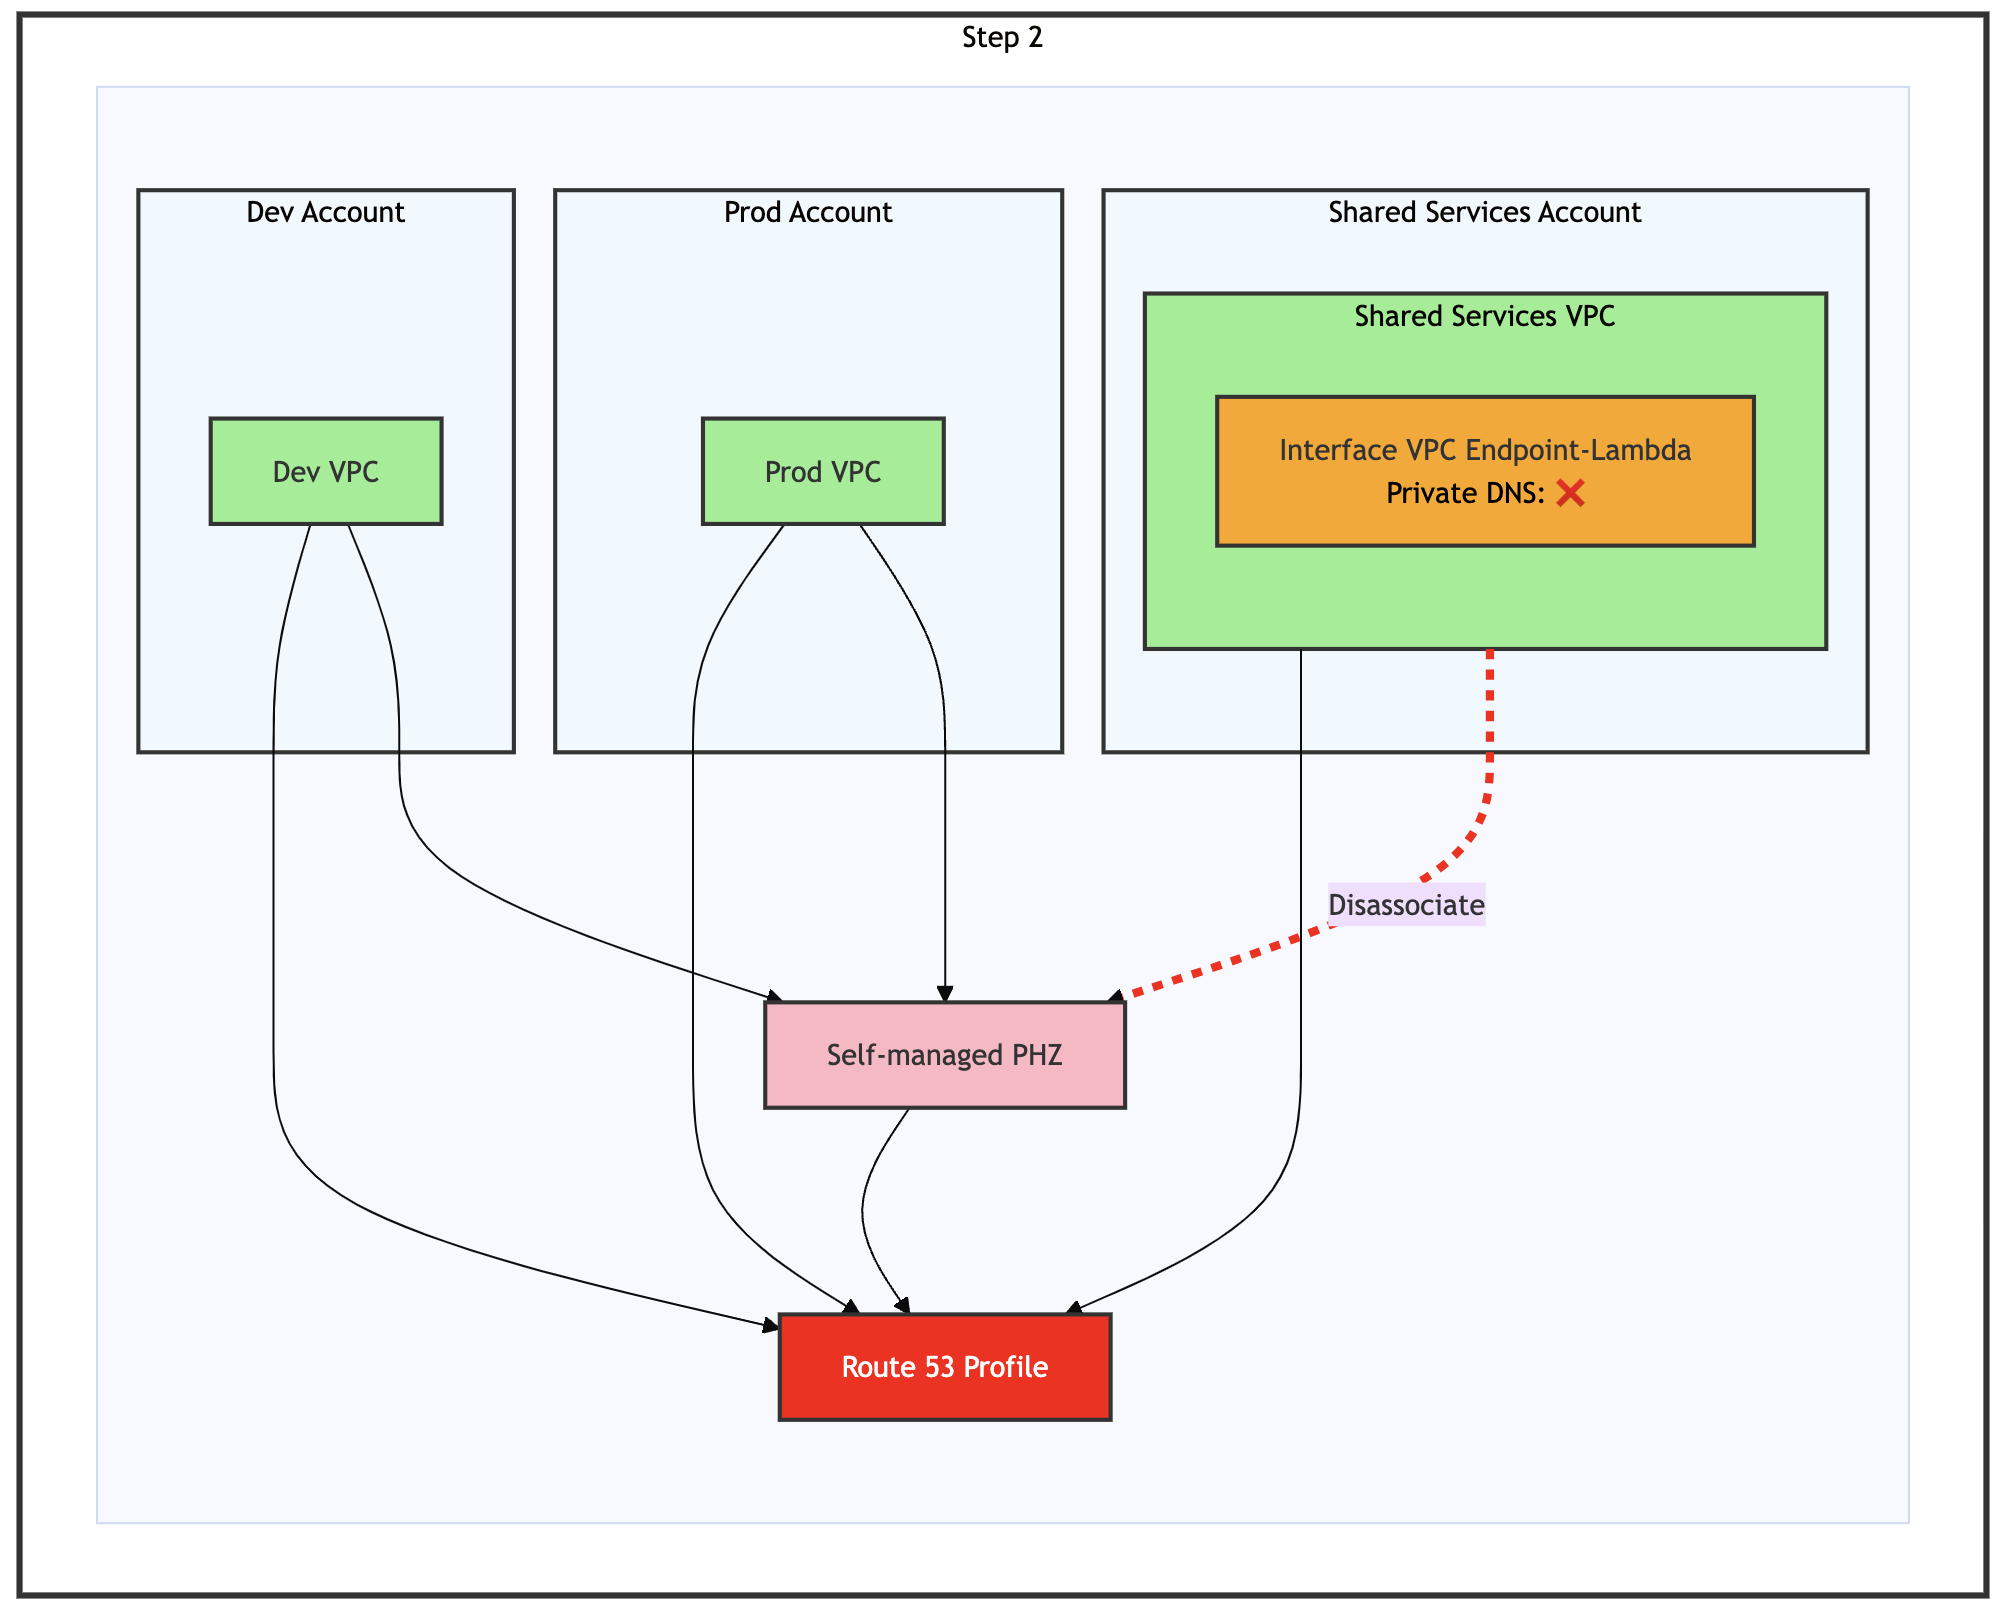
Figure 19: Step 2 of the migration process – Disassociate Shared Services VPC from self-managed PHZ
Disassociate the Shared Services VPC from the self-managed PHZ, as shown in the preceding figure. The DNS resolution continues functioning because the Shared Services VPC remains associated with the Route 53 Profile, which maintains its connection to the self-managed PHZ.
Step 3: Enable Private DNS for interface VPC endpoint
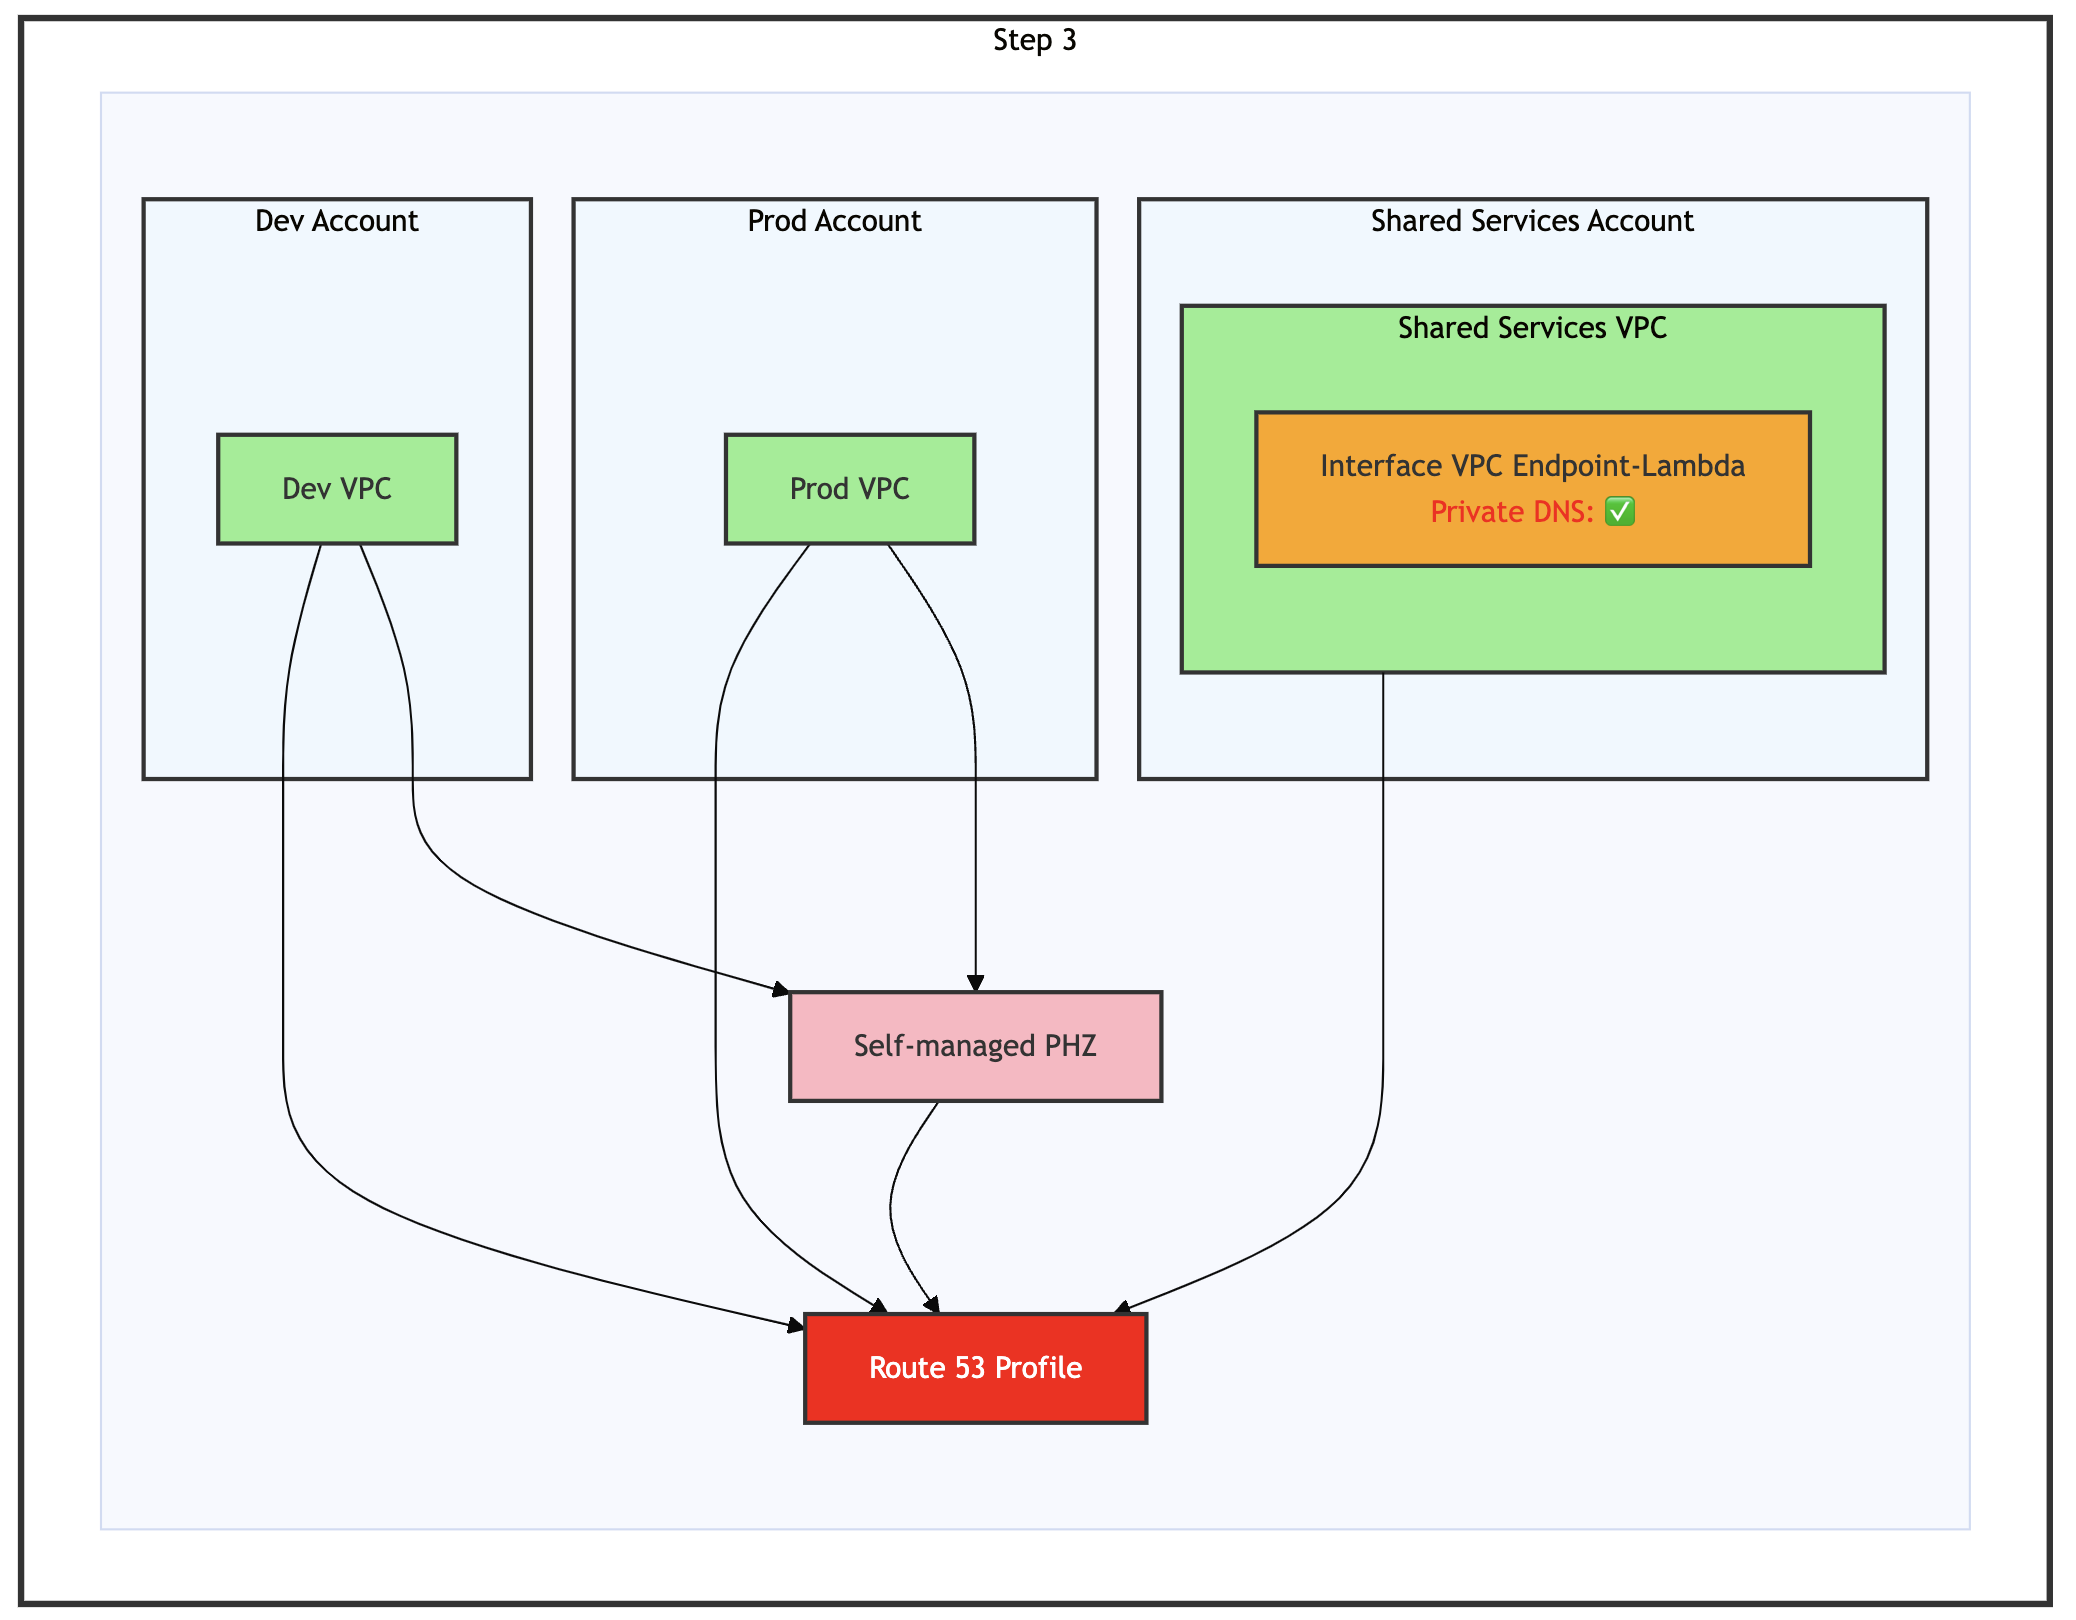
Figure 20: Step 3 of the migration process – Enable Private DNS for interface VPC endpoint
Enable Private DNS for the interface VPC endpoint, as shown in the preceding figure. Enabling private DNS automatically creates an AWS-managed PHZ for the endpoint, which becomes accessible to the Shared Services VPC. The endpoint briefly shows Pending before returning to Active state.
Step 4: Disassociate self-managed PHZ from Route 53 Profile
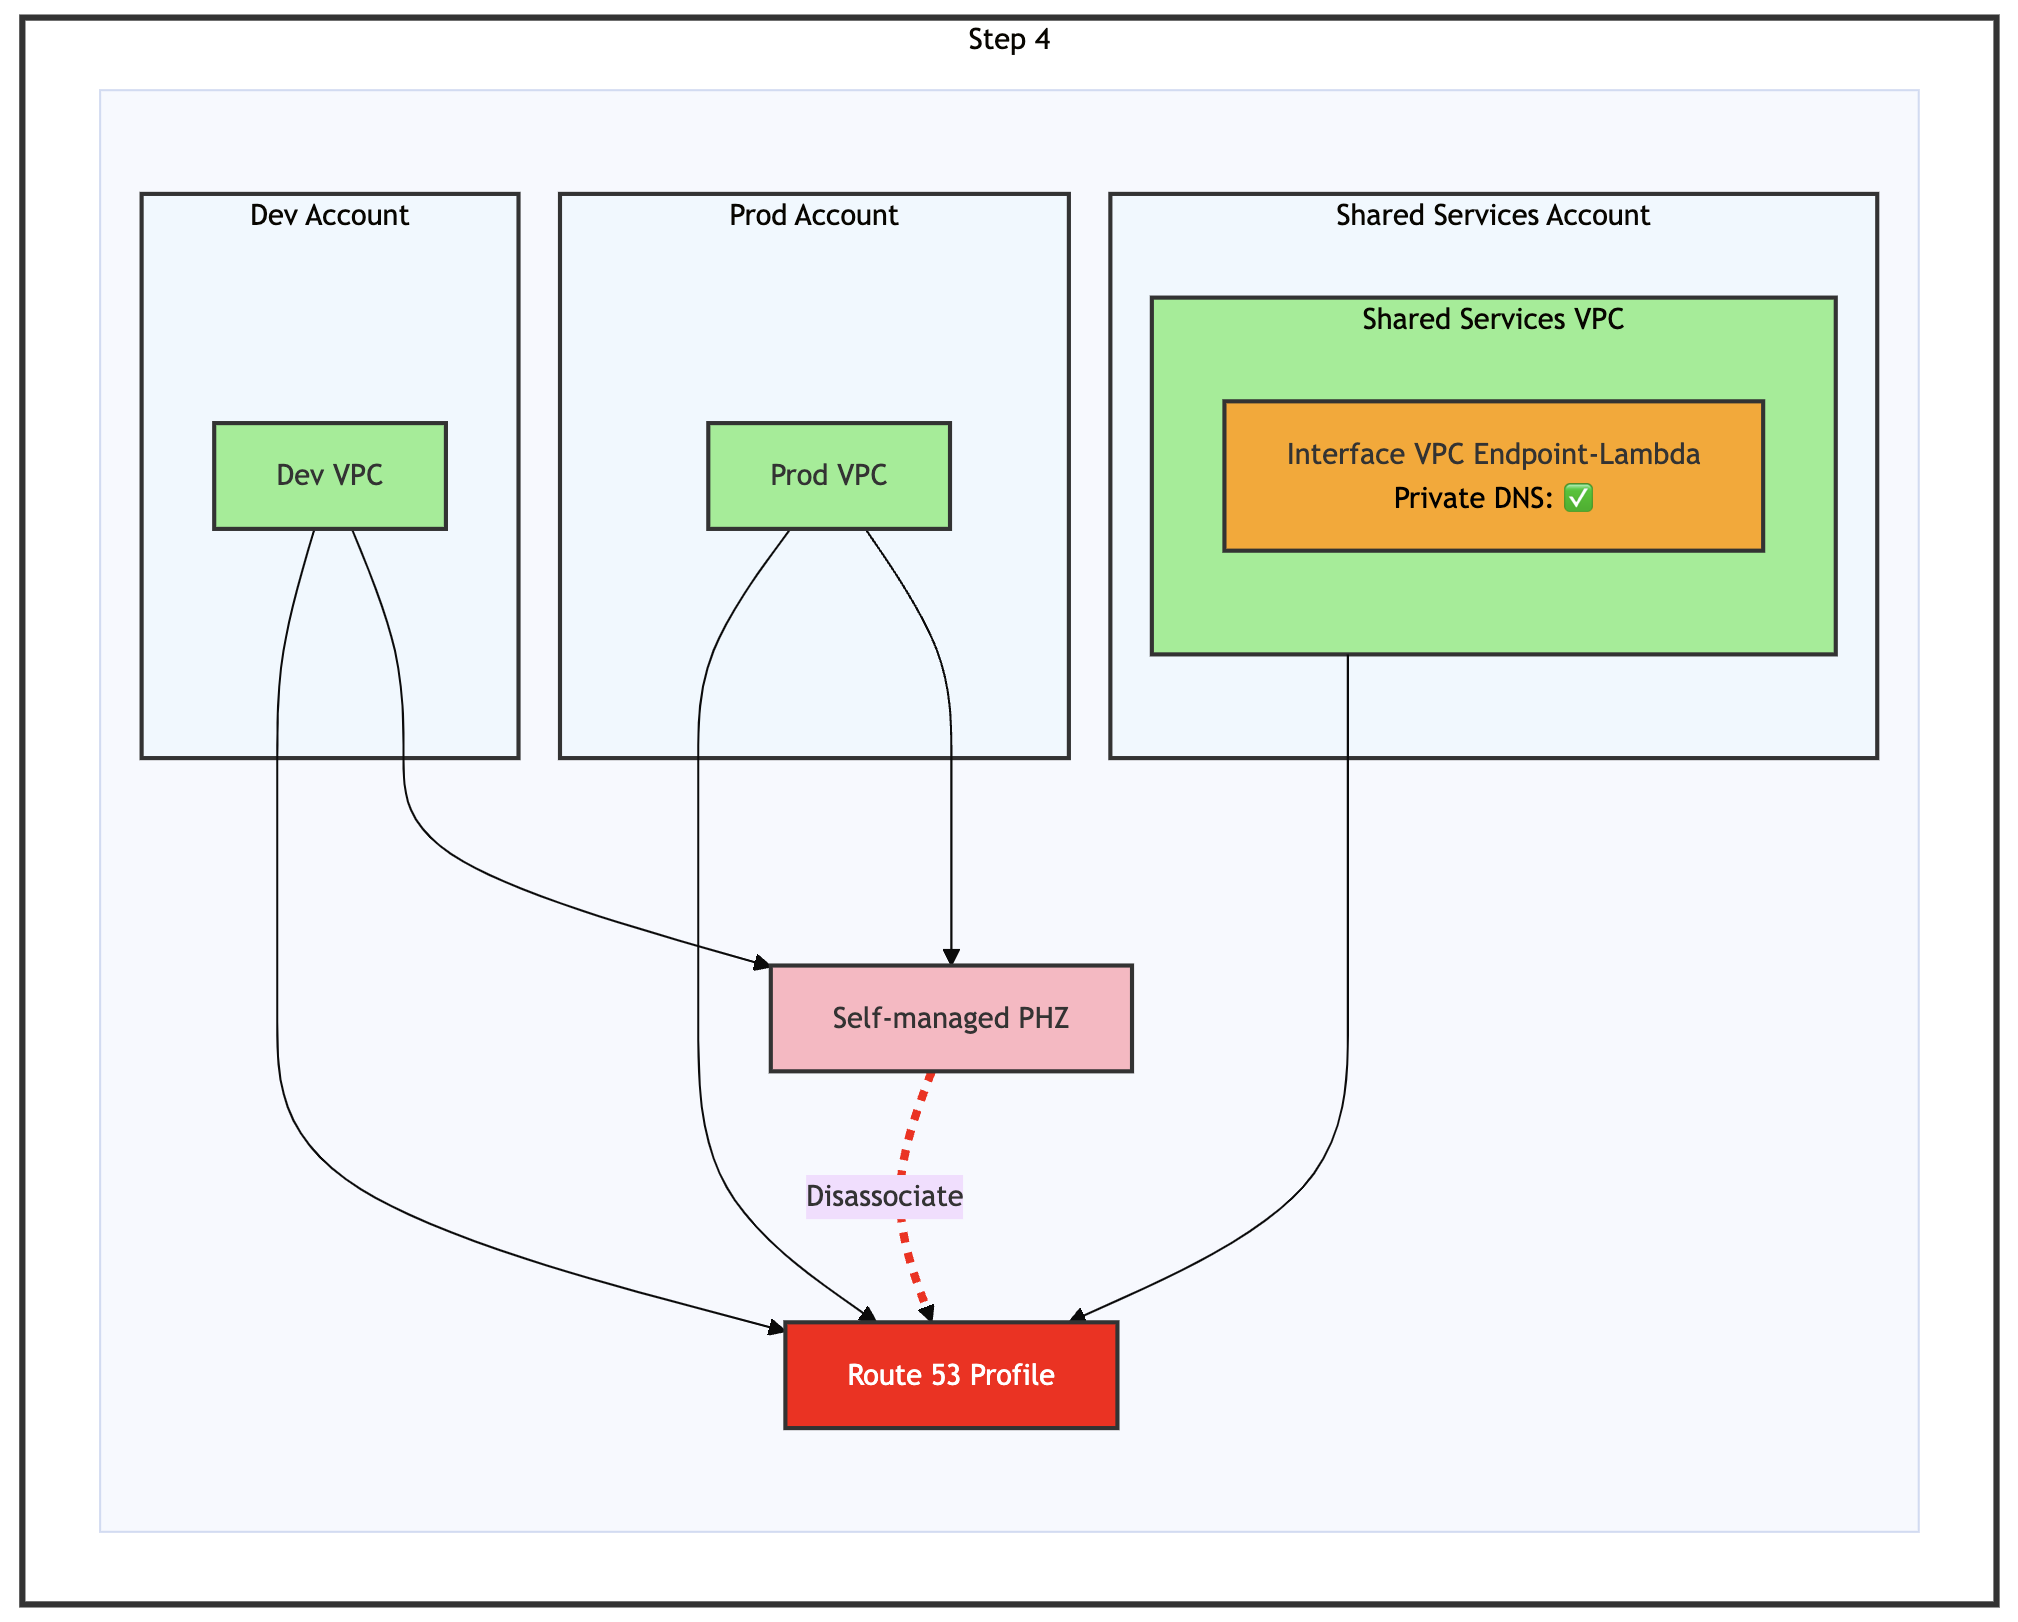
Figure 21: Step 4 of the migration process – Disassociate self-managed PHZ from Route 53 Profile
Disassociate the self-managed PHZ from the Route 53 Profile and make sure that the dissociation process is complete before proceeding to the next step, as shown in the preceding figure. Self-managed PHZ should remain associated with other VPCs individually for now to allow them to perform the DNS resolution.
Step 5: Associate interface VPC endpoint with Route 53 Profile
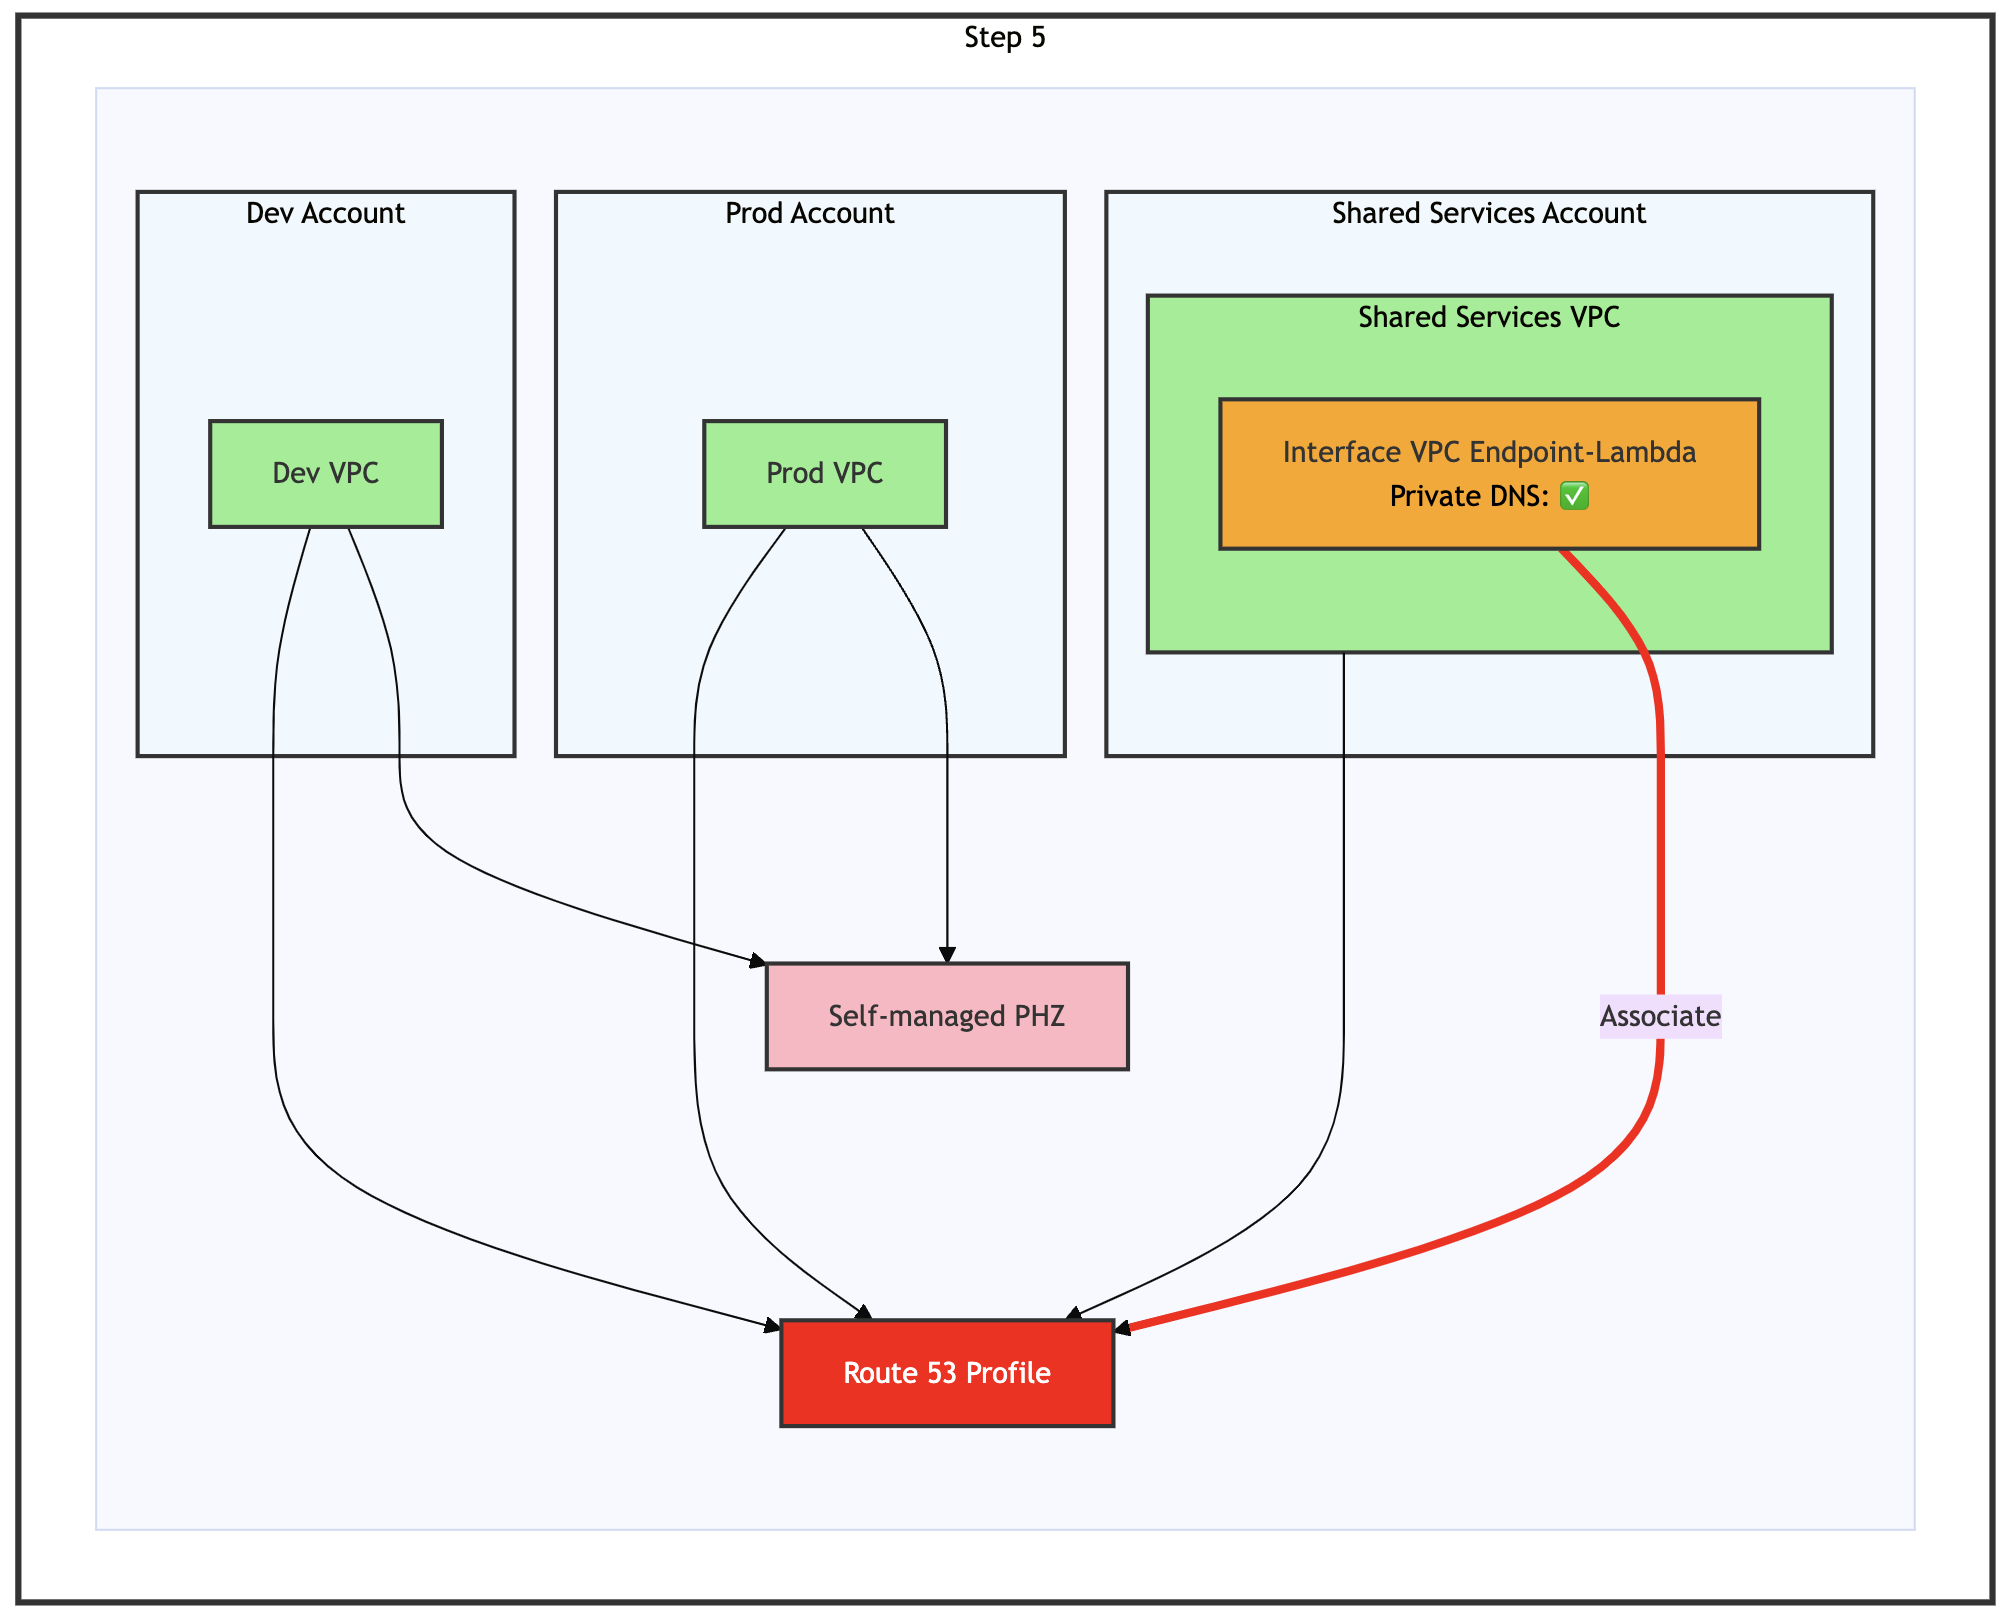
Figure 22: Step 5 of the migration process – Associate interface VPC endpoint with Route 53 Profile
Associate the interface VPC endpoint with your Route 53 Profile, as shown in the preceding figure. The endpoint briefly shows Pending before returning to Active state
Step 6: Disassociate VPCs one at a time from self-managed PHZ

Figure 23: Step 6 of the migration process – Disassociate Prod VPC from self-managed PHZ
Begin by disassociating the Prod VPC from the self-managed PHZ, as shown in the preceding figure. When it is removed, the DNS resolution automatically transitions to using Route 53 Profile and its associated interface VPC endpoint. Continue the migration process by systematically removing other VPCs one at a time from the self-managed PHZ. Depending on your environment, you can choose to perform these disassociations in any order you prefer. As you proceed, each VPC shifts its DNS resolution to the Route 53 Profile. Continue the process until you are left with only the Dev VPC attached to the self-managed PHZ. It’s crucial to maintain this final VPC association (Dev VPC) because a self-managed PHZ can’t exist without at least one VPC attachment.
Step 7: Delete the A record in the self-managed PHZ and then delete the self-managed PHZ
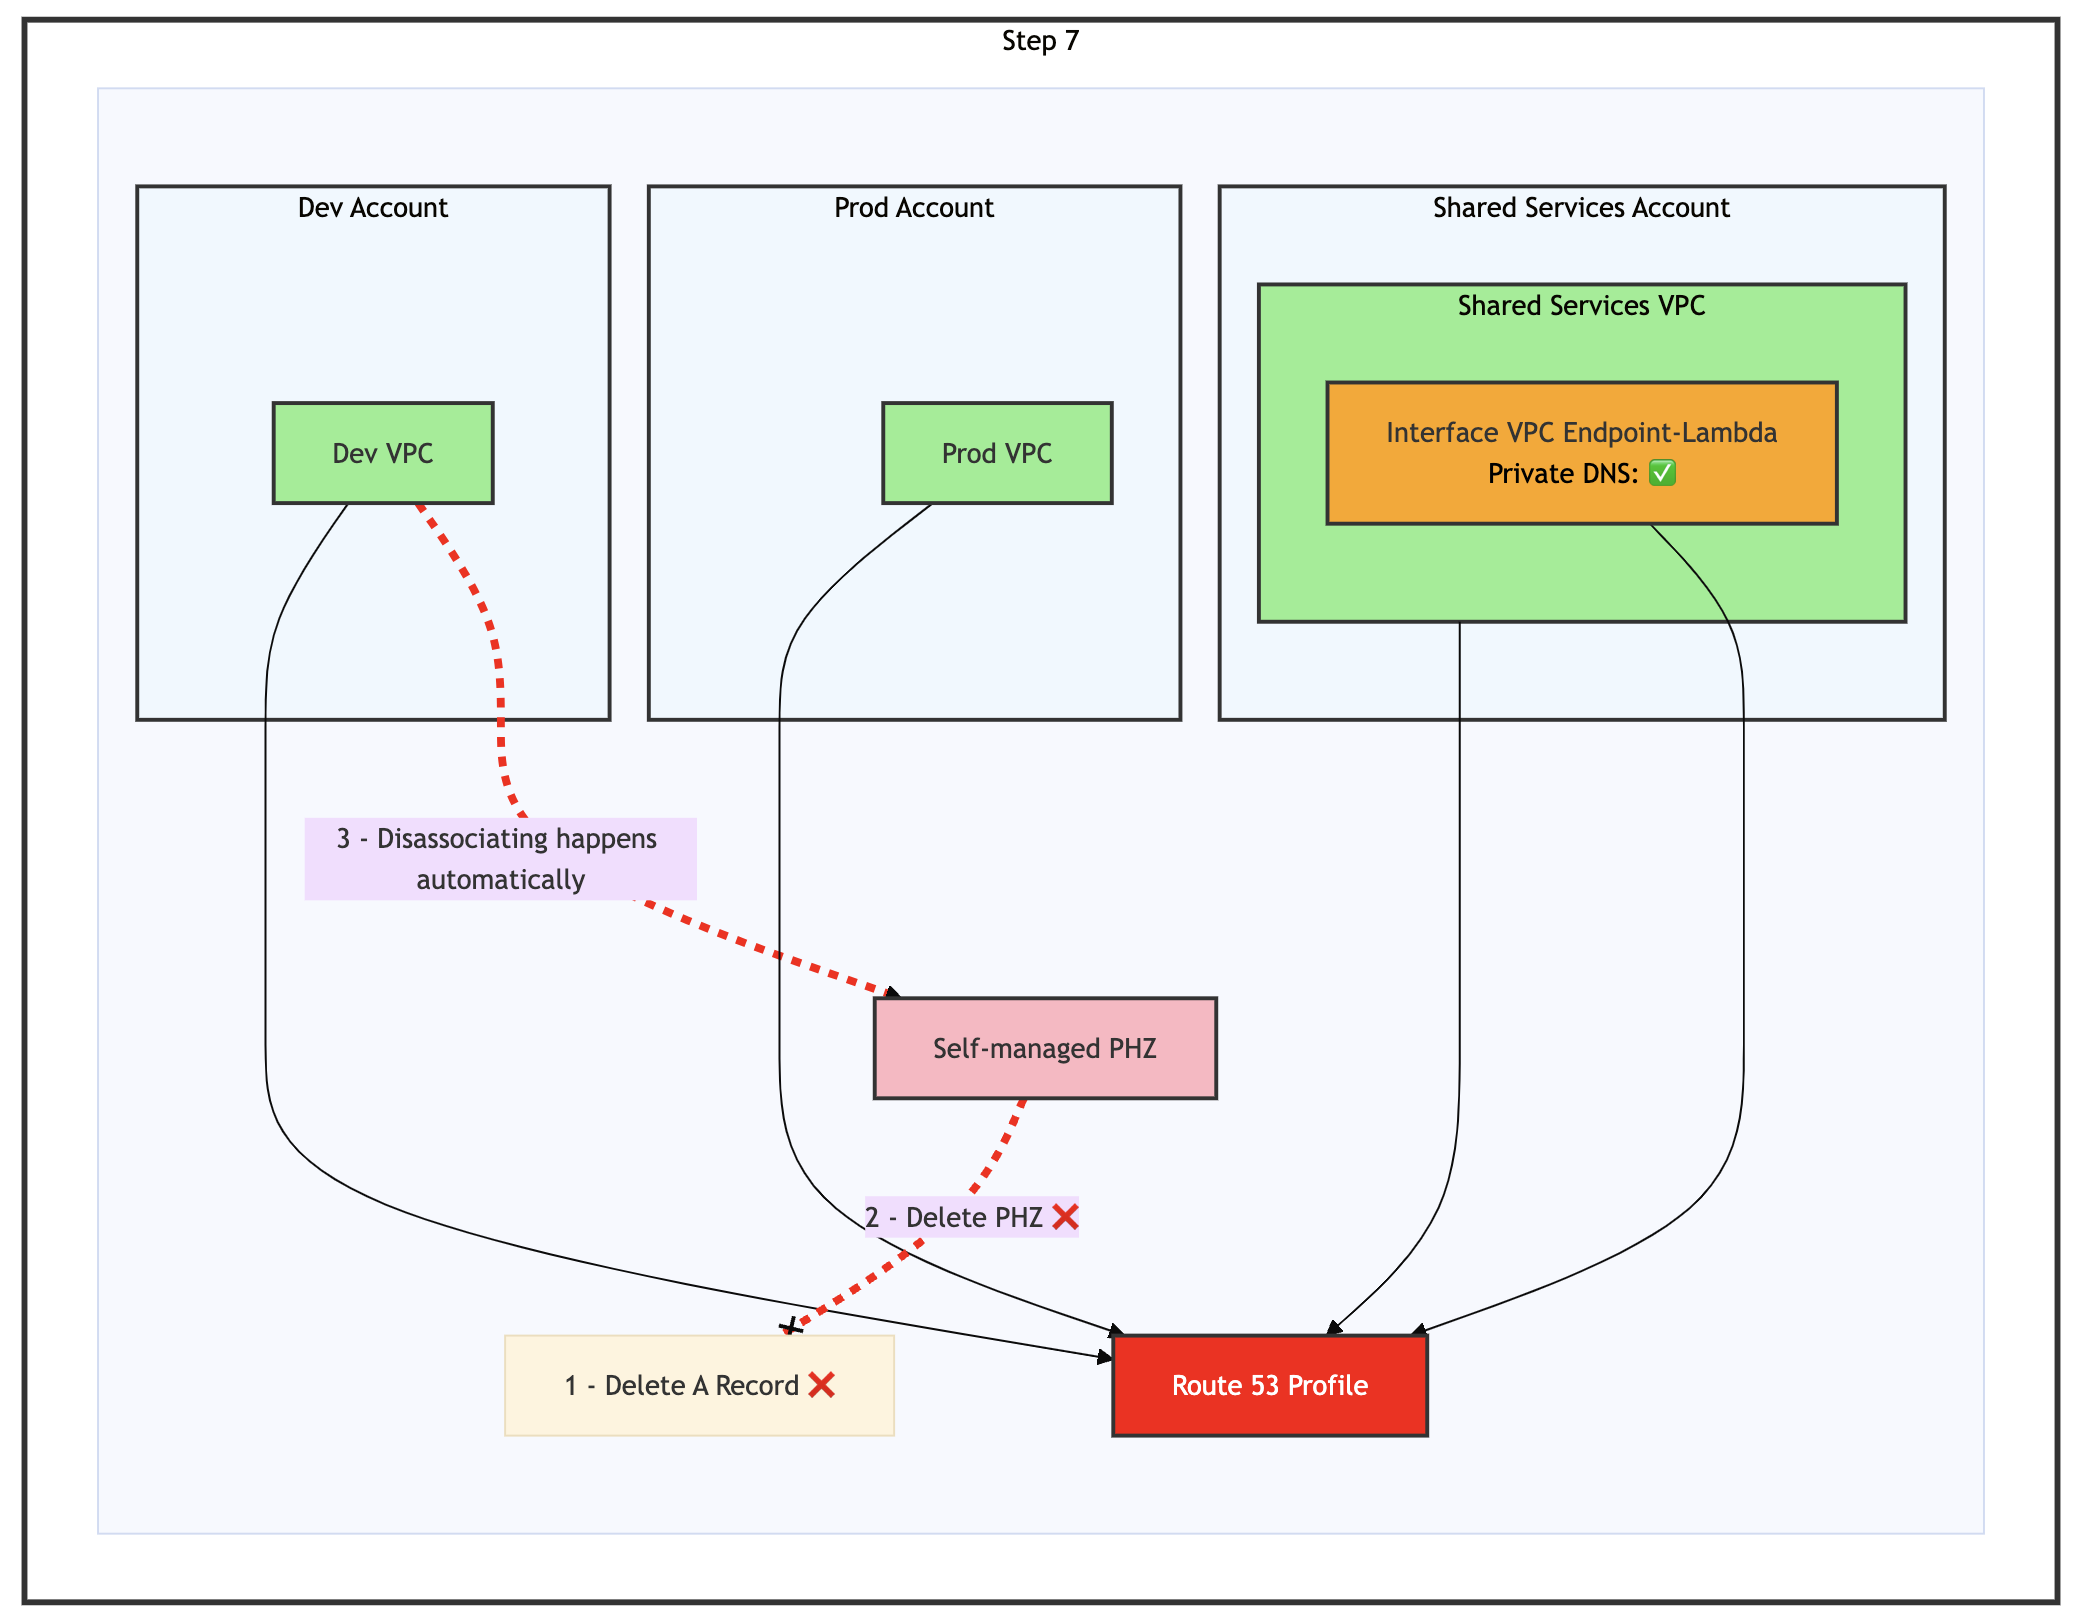
Figure 24: Step 7 of the migration process – Delete A Record and PHZ which triggers disassociating of the PHZ from the VPC automatically
Delete the A record from your self-managed PHZ, then immediately delete the PHZ, as shown in the preceding figure. The Dev VPC association is automatically removed during this process.
Final state
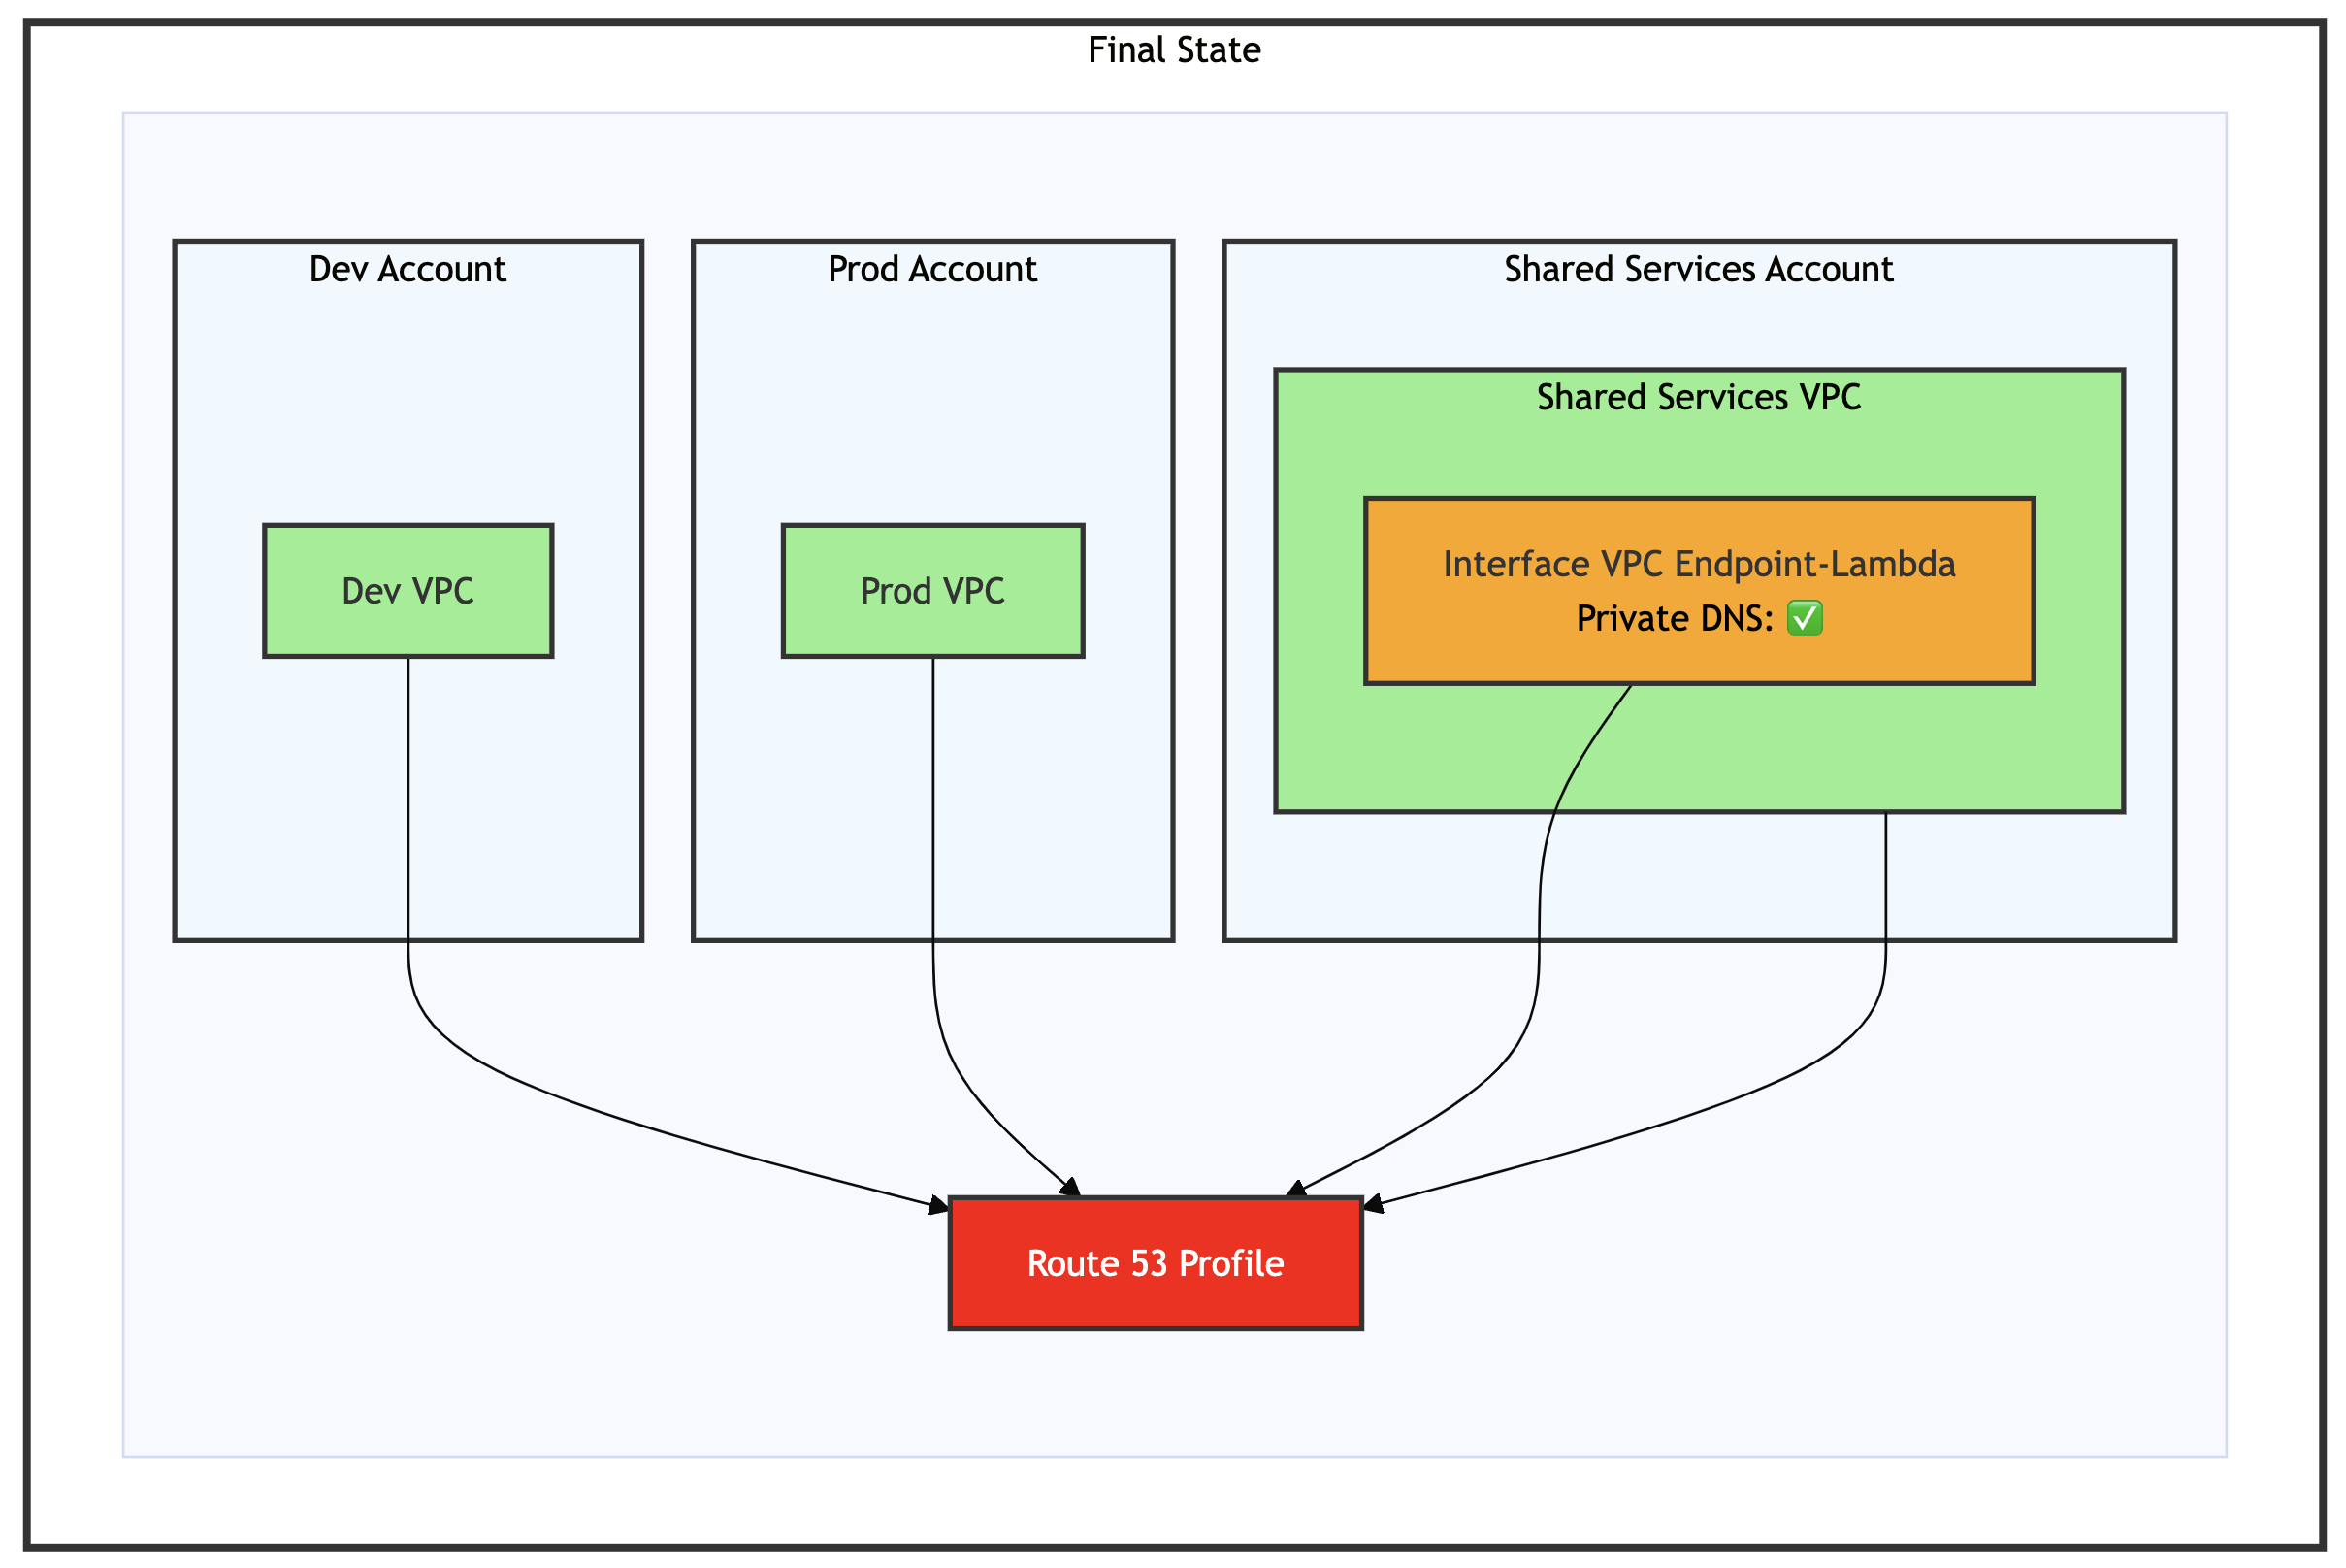
Figure 25: Final state – Dev, Prod, Shared Services VPC and interface VPC endpoint are all associated with Route 53 profile
In conclusion the migration path we just discussed allows you to move from the initial architecture described in Figure 17 to a streamlined design, as shown in the preceding figure, Figure 25. Going forward, it reduces operational overhead when adding new VPCs. Instead of managing individual PHZ associations, you only need to associate the new VPCs with the Route 53 Profile to enable DNS resolution
Conclusion
Amazon Route 53 Profiles streamlines the way organizations manage DNS resolution for interface VPC endpoints across multi-account and hybrid environments. Reducing the need for manual PHZ configuration and enabling scalable, centralized DNS management allows this feature to significantly improve operational efficiency and network design consistency.
Whether you’re building a new environment or modernizing an existing AWS PrivateLink deployment, Route 53 Profiles offer a powerful way to streamline and scale your architecture.
This post demonstrated how to implement direct association between interface VPC endpoint and Route 53 Profile and provided migration guidance for organizations using legacy architectures. We explored the step-by-step process and best practices for transitioning from traditional manual PHZ management to the Route 53 Profile-based DNS management. To dive deeper, explore the following resources:
About the authors

Salman Ahmed
Salman Ahmed is a Senior Technical Account Manager in AWS Enterprise Support. He specializes in guiding customers through the design, implementation, and support of AWS solutions. Combining his networking expertise with a drive to explore new technologies, he helps organizations successfully navigate their cloud journey. Outside of work, he enjoys photography, traveling, and watching his favorite sports teams.

Ankush Goyal
Ankush Goyal is a Senior Technical Account Manager at AWS Enterprise Support, specializing in helping customers in the travel and hospitality industries optimize their cloud infrastructure. With over 20 years of IT experience, he focuses on leveraging AWS networking services to drive operational efficiency and cloud adoption. Ankush is passionate about delivering impactful solutions and enabling clients to streamline their cloud operations.

Kunj Thacker
Kunj is a Technical Account Manager at AWS and is based out of Vancouver, Canada. He has an extensive background in Network and Infrastructure engineering prior to this role. He is passionate about new technologies and enjoys helping customers build, implement, and optimize their cloud infrastructure on AWS.