AWS for M&E Blog
Democratizing VFX bidding: Amazon Q Business transforms cost estimation
Visual Effects (VFX) bidding represents one of the most critical, yet time-consuming, processes in the entertainment industry. Traditionally, this complex task falls on the shoulders of one or more individuals who must draw upon years of accumulated knowledge to accurately estimate project costs, timelines, and resource requirements. They consider countless variables, from the intricacy of character assets and environmental builds to the complexity of effects simulations and the nuances of shot-specific challenges. Their expertise, while invaluable, often creates a bottleneck in the bidding process as they balance these responsibilities with their day-to-day production oversight.
The democratization of this bidding knowledge through AI-powered services (such as Amazon Q Business AI Assistant) represents a significant shift in how VFX companies can approach cost estimation. By analyzing historical bids (which include artist and resource allocation, completion times, asset and shot breakdowns, and so on) companies can enable less experienced team members to prepare initial bid assessments with a degree of accuracy previously requiring years of experience. This helps alleviate the pressure on senior staff, while also accelerating the bidding process cycles and providing a consistent framework for cost estimation across the organization.
Consider a junior producer preparing a bid for a new project featuring a complex character asset. Instead of waiting for supervisor availability, they can query the system about similar past projects. They can understand typical timeframes for each department’s involvement, potential technical challenges, and historical cost variations. This democratizes access to institutional knowledge by empowering junior team members, while helping companies maintain competitiveness. It facilitates bid accuracy based on an actual track record rather than rough estimations.
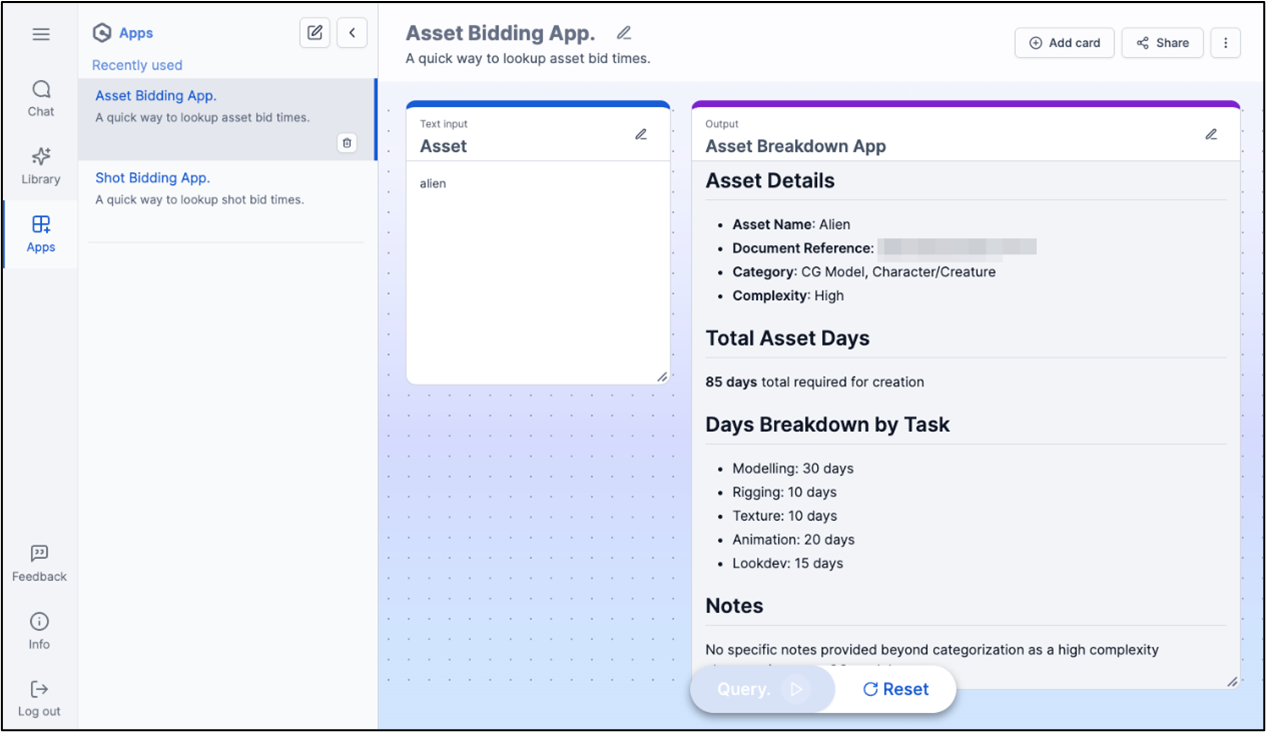
Figure 1: Example of an Amazon Q app assistant for VFX bidding.
Choosing the right AI service for your needs
VFX studios have unique needs. Here’s how different Amazon Web Services (AWS) AI services can help meet them, depending on your technical capabilities and specific needs.
Amazon Q Business excels in day-to-day production operations where immediate insights are essential. It’s designed to analyze historical bid data and project completion times, helping teams to extract valuable insights from years of production reports and documentation. Its greatest strength lies in the potential to democratize access to institutional knowledge—junior staff can independently research past project performance and prepare initial bid estimates. The ability to create standardized bidding templates would provide consistency across teams, while maintaining the nuanced understanding that typically comes only with years of experience.
For studios looking to develop more sophisticated solutions, try Amazon Bedrock. This service can power custom client-facing bidding applications and enable automated script analysis tools to assist in bid preparation. It’s particularly valuable when studios need more control over which AI model they use and its configuration, but want to avoid managing complex machine learning (ML) infrastructure, as it makes many large language models accessible through an API. Amazon Bedrock supports the development of intelligent project scheduling systems and automated bid validation tools, striking a balance between sophistication and ease of implementation.
Amazon SageMaker AI provides options for larger studios or production companies with more complex requirements and dedicated technical teams. This service supports the development of proprietary machine learning models for cost prediction and enables the creation of sophisticated pipeline tools, while taking away the heavy lifting of bringing these models to production. This is particularly valuable when considering the analysis of vast amounts of production data across multiple projects or the implementation of advanced forecasting systems for long-term planning. While it requires more technical expertise, SageMaker AI offers unparalleled flexibility in building custom solutions that can provide significant competitive advantages in bidding accuracy and resource allocation.
For this guide, we’ll focus on Amazon Q Business, as it offers the most straightforward path to leveraging AI for business analytics. Its ability to understand natural language queries and provide structured insights makes it an excellent starting point for organizations beginning their AI journey.
Building your AI-powered bidding foundation
The journey into AI-powered bidding analytics begins with understanding a key advantage: the inherently structured nature of bidding data. While many VFX production workflows involve wrestling with unstructured data (for example, parsing render farm logs with their varied formats, error messages, and system-specific outputs) bidding documents present a more approachable starting point.
Bid sheets, whether created in Excel, Google Sheets, or exported from production management systems, typically follow consistent patterns. They contain clear categories: asset types, shot counts, department breakdowns, and time estimations. This structured format, often built around standardized templates and common industry practices, makes them ideal candidates for AI analysis. Unlike the challenging task of extracting meaningful patterns from disparate production logs or trying to analyze artist notes in various formats, bidding documents speak a common language of numbers, categories, and time allocations.
The journey to transforming your bidding process begins with proper data organization and system setup. While the technical implementation might seem daunting at first, AWS has designed Amazon Q Business with accessibility in mind, providing even non-technical teams a way to get started quickly. The steps can be broken down into three phases.
Phase one: Data foundation
Start by centralizing your historical project data in a secure Amazon Simple Storage Service (Amazon S3) bucket. This isn’t just about dumping files into storage—it’s about capturing the wealth of knowledge hidden in past project reports, time tracking sheets, and delivery documentation. Think of it as creating a digital library of your studio’s production history, ready to be analyzed and learned from.
Phase two: Knowledge access
With Amazon Q Business as your interface to this data, configure your organizational access through AWS IAM Identity Center. This confirms your bidding insights remain secure, while being accessible to the right team members. The service becomes your institutional memory, so Associate Producers and Production Coordinators can tap into years of production experience through natural language questions.
Phase three: Template creation
Here’s where your bidding process becomes truly systematic. Create standardized templates that capture your studio’s proven estimation methodology. These templates can analyze asset builds, break down shot complexity, or estimate entire sequence costs based on historical data. By incorporating actual production data, these templates transform from guidelines into powerful predictive assets.
The first step is gathering this data into a format that Amazon Q Business can analyze. This might include project completion reports, time tracking sheets, or asset build breakdowns—all of which can be stored in text, CSV, or Excel formats.
Setting up your data foundation
Amazon Q Business has many ways to connect to data (such as Jira, Google Drives, Confluence, and so on). For our example we will be using Amazon Simple Storage Service (Amazon S3). Think of Amazon S3 as your digital filing cabinet, but one that’s secure, scalable, and accessible from anywhere.
Note: Amazon Q Business is currently available in the US East (N. Virginia), US West (Oregon), Europe (Ireland) and Asia Pacific (Sydney) AWS Regions. Throughout our example we will be using the US East (N. Virginia): us-east-1.
To keep cost, configuration and latency down, we will be creating an S3 bucket in the same us-east-1 region and uploading your files directly to this bucket—keeping things straightforward. There’s no need for complex folder structures.
- Log into the AWS Management Console (here in referred to as the console).
- In the top right of the console, select Virginia (us-east-1).
- Search for S3 and choose the S3 console page link.
- Choose Create bucket to create a new bucket.
- Make certain that General Purpose is selected under Bucket type.
- Under Bucket name enter your new bucket’s name (note this must be a globally unique name).
- Keep the remaining settings as default (for example, block public access).
- Choose Create bucket to generate the bucket.
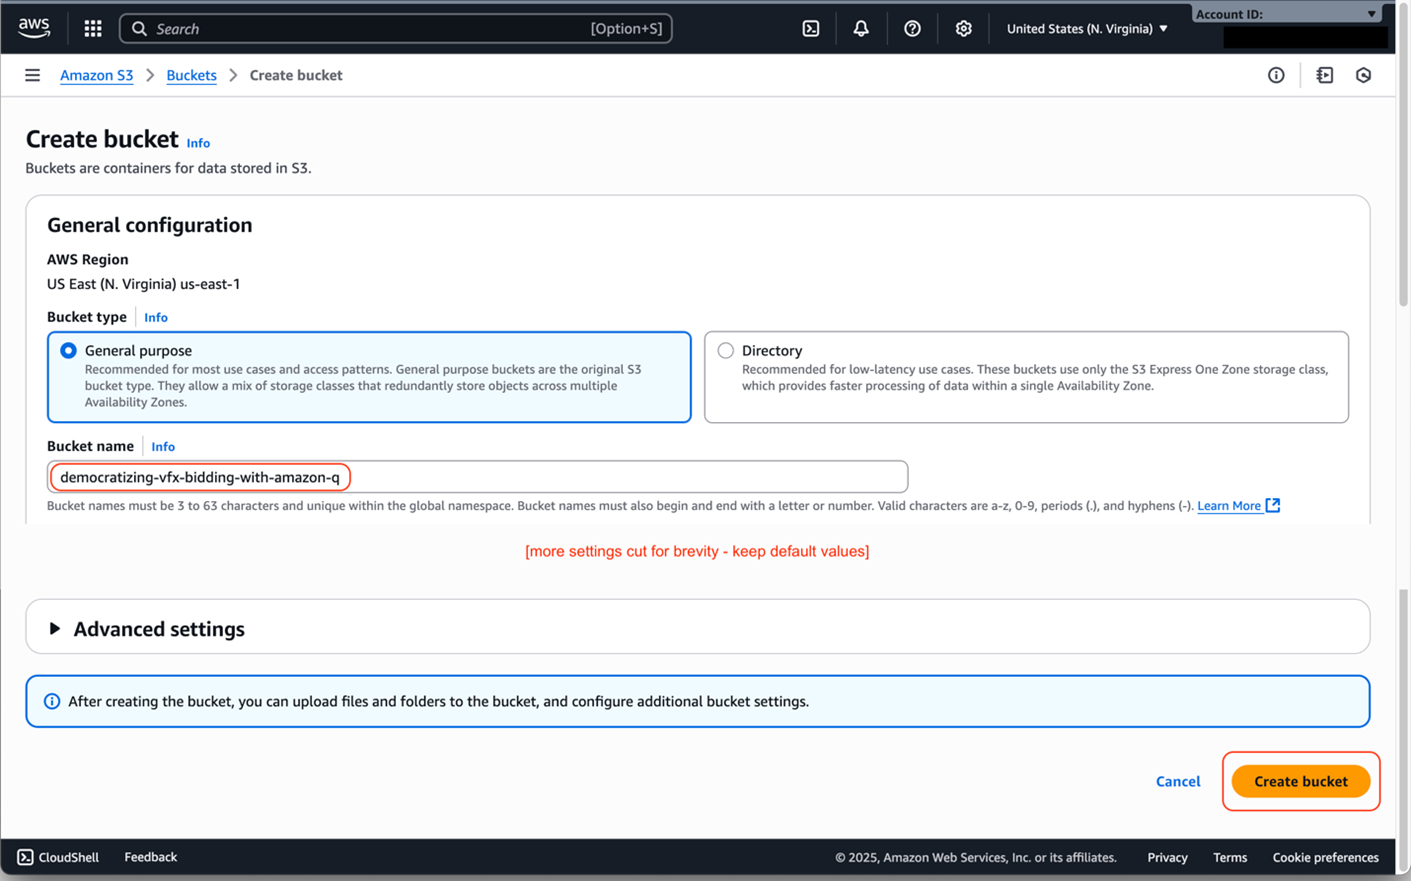
Figure 2: Creating an S3 bucket.
The next step is to upload the historic bidding information to this bucket.
- The screen should show a link to the newly created bucket from Step 5. Choose it.
- Choose Upload and then Add files to open the file upload browser.
- Select the bidding documents you wish to upload and click Open in the browser.
- Choose Upload to finalize the upload process and begin uploading the data.

Figure 3: Uploading bidding data to the S3 bucket.
Establishing secure access
VFX studios need strong security. Amazon Q Business provides this with straightforward identity management. Think of it as creating a secure office building where different teams have appropriate access levels to different areas. The IAM Identity Center acts as your building’s security desk, managing who can access what information. By establishing this in your primary Region and connecting it to your existing identity provider (whether that’s AWS or third-party services such as Okta), you can verify that sensitive bid data remains accessible only to authorized team members.
IAM Identity Center, set up in your organization’s top-level payee account, serves as a centralized hub for managing user access across multiple AWS accounts and applications, confirming secure and streamlined identity management for your entire AWS Organization. For more information about AWS IAM Identity Center read: Getting started with IAM Identity Center.
Following is how to set up an AWS IAM Identity Center account:
- In the console, chose a Region that encapsulates your services, or user-base.
- we will be using N. Virginia – us-east-1 Region.
- Search for IAM Identity Center and choose the IAM Identity Center console page link.
- Choose Enable to enable the IAM Identity Center (confirming your Region).
- In the IAM Identity Center dashboard you can add users to your environment.
- This is typically done through stipulating usernames, passwords and email addresses. When a user is granted access the service sends an invitation to them. From these invitations users can update their password, and access two-factor authentication setup.
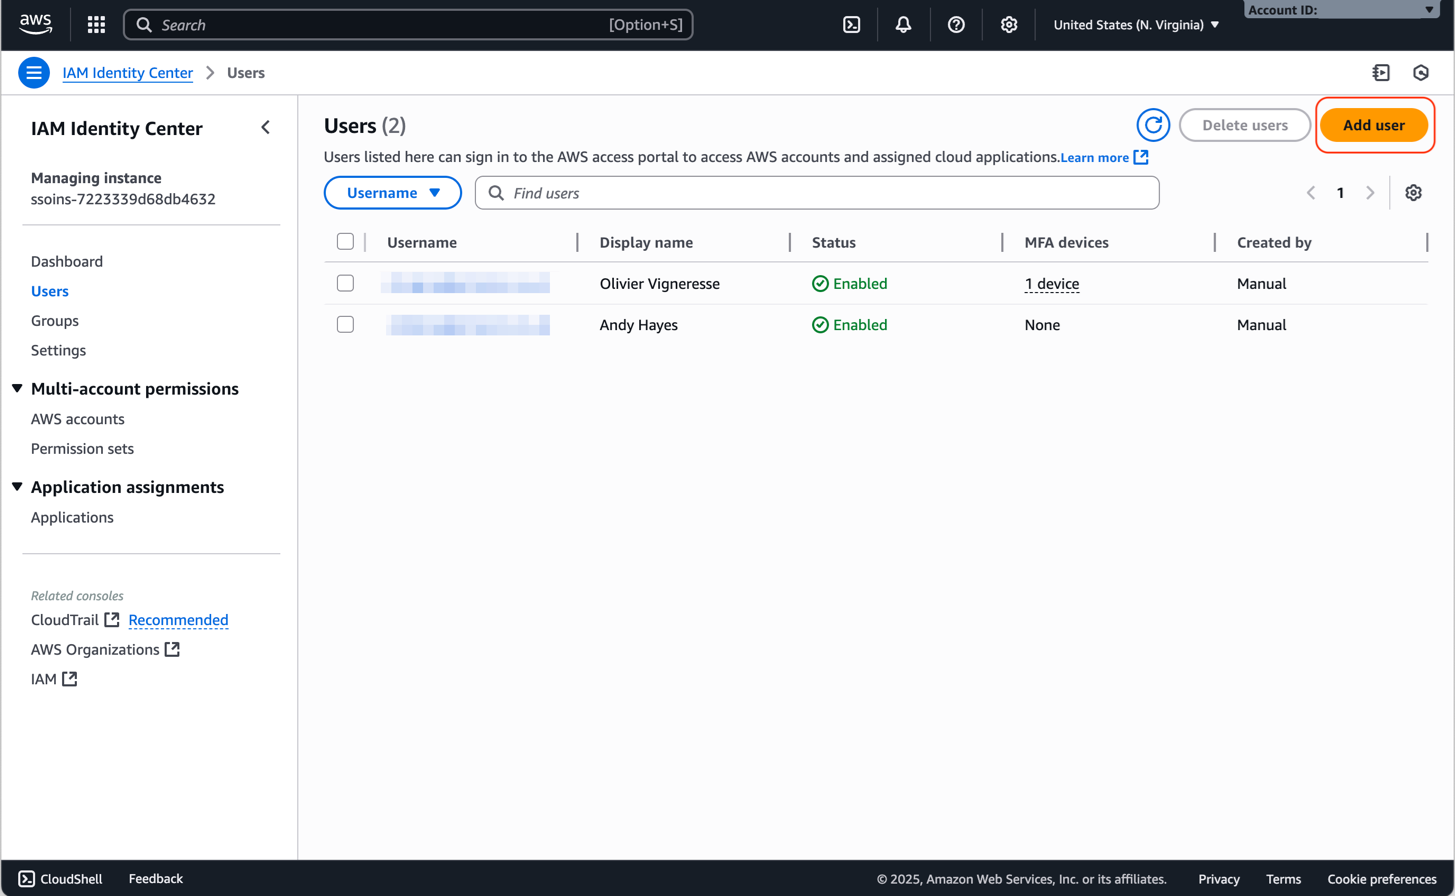
Figure 4: Viewing and adding users to IAM Identity Center.
Creating your digital bidding assistant
With your foundation in place, setting up the Amazon Q Business application itself becomes straightforward. Through the console, you’ll create an application that serves as your team’s bidding knowledge base.
- In the console, search for Amazon Q Business and choose the Amazon Q Business console page link; alternatively, you can select Machine Learning then Amazon Q Business from the service icons.
- Choose the three horizontal lines icon on the top left to open the dashboard.
- Choose Applications to start building your bidding application.
- Choose Create application:
- Provide a name for the application, for example, visual-computing-business-app.
- Select AWS IAM Identity Center.
- Add initial application users from under Select users.
You will now be presented with a choice of subscription models: Q Business Lite or Q Business Pro. Amazon Q Business Lite offers fundamental data querying and chat interactions with your business data, while Amazon Q Business Pro extends these capabilities. It adds enterprise features (such as natural language report generation, and custom dashboard creation) and the ability to create custom applications tailored to your workflows (like bid estimations). For our example, we will be using Q Business Pro to author applications.
-
- Choose Q Business Pro.
- Choose Create to build the application.
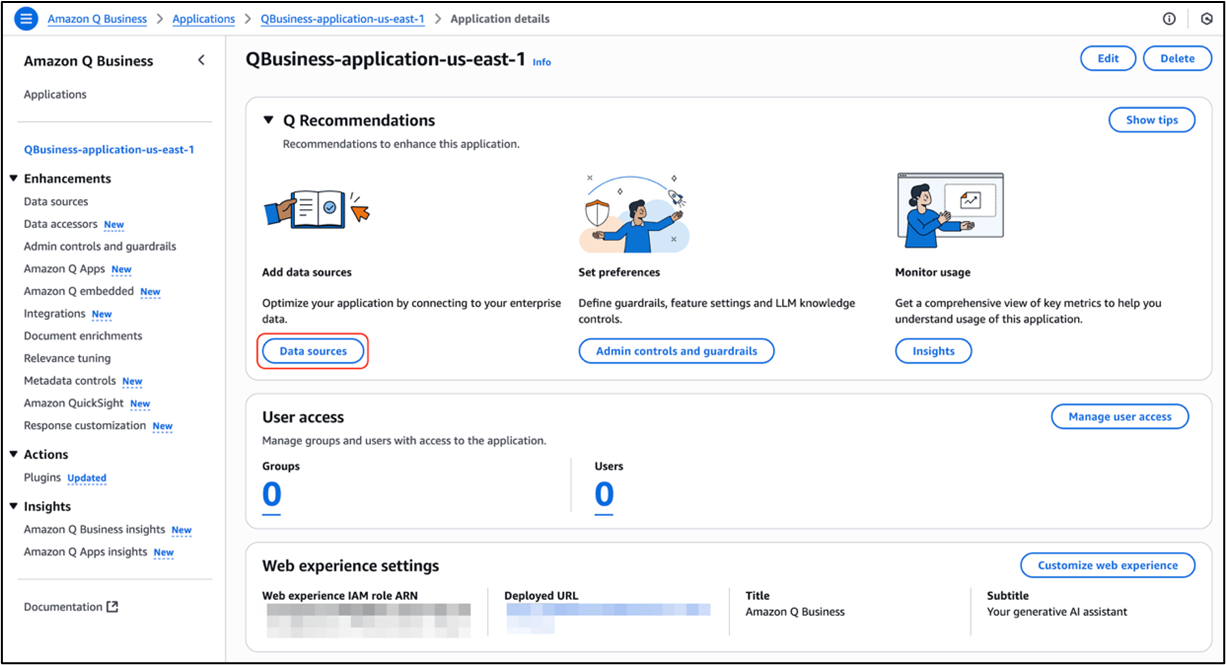
Figure 5: Building the Q Business Lite application.
Once the application has been built, we need to add our data to it:
- Navigate to the application (you should be automatically taken to it, but if not)
- Choose Applications from the left-hand side menu.
- Choose the blue linked application that you just made in Step 4 of this section, in the Applications left-hand side menu.
- Choose Data sources from within the Q Recommendations pane to open the Data sources UI.
- Choose Add an index from within the Data sources info pane, to add a source.
- Choose Starter provisioning and leave it as 1 single unit (our data is small, and it is a test).
- Under Data sources, choose Add data source.
- Choose the plus sign [+] next to Amazon S3.
- Give your source a name and description.
- Under IAM role, select the recommended option to Create a new service role.
- Under Sync scope, choose Browse S3 and pick your S3 bucket made at the start of this example.
- Under Sync run schedule, chose a frequency, we chose Run on demand for this example.
- Choose Add data source.
- Wait until the Index has been created successfully before leaving the page.
- Connect your data sources to begin building your knowledge base.
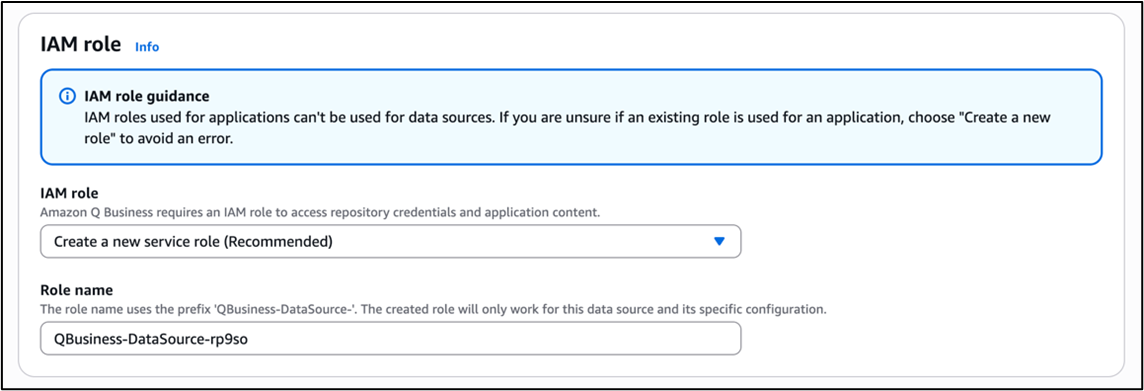
Figure 6: Choosing an IAM role for the data source.
The solution then begins learning from your historical data, creating connections between projects, understanding time patterns, and identifying relationships between different types of work. This transforms years of project history into an accessible, queryable knowledge base.
Testing the bidding assistant:
Open the application to begin testing the assistant:
- On the left-hand menu, choose the name of your application.
- In the center pane, choose the Deployed URL.
- When prompted, enter your Identity credentials.
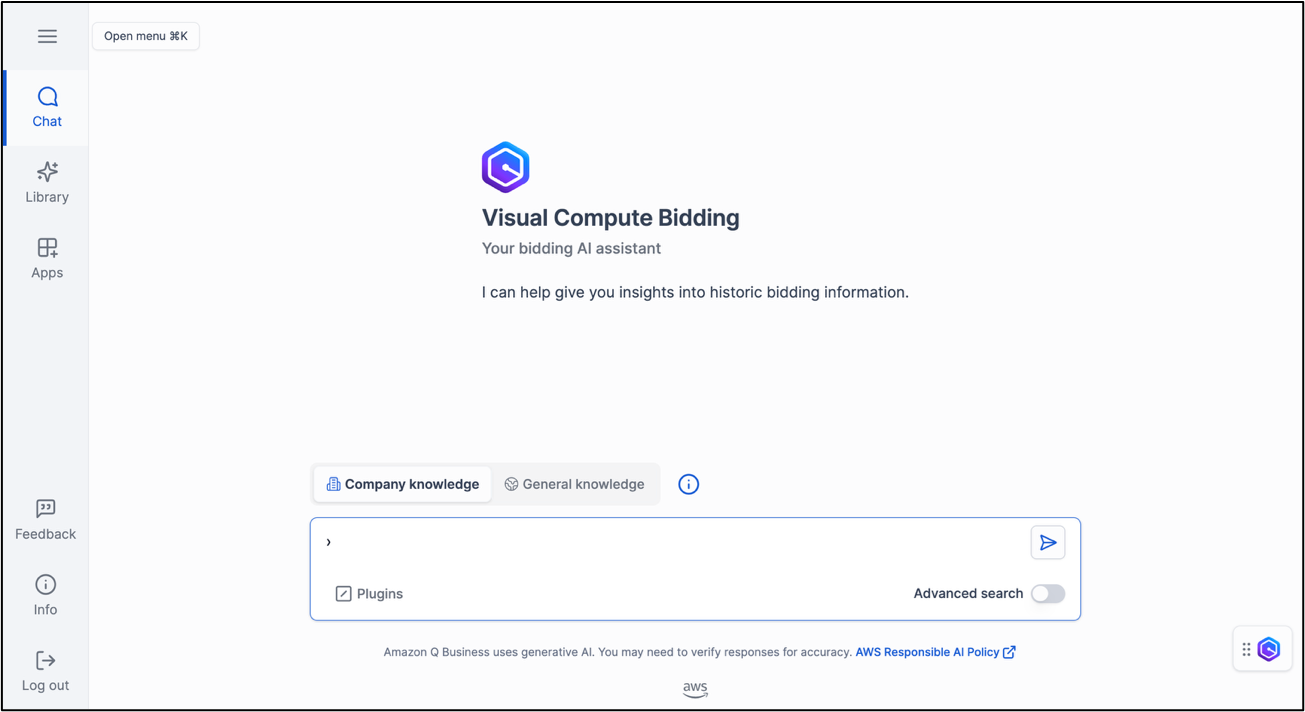
Figure 7: The Visual Compute Bidding application.
Chatting with the assistant is a great way for you to ask information about the knowledge base:
- Choose Chat from the left-hand side menu.
- Enter a question into the prompt, for example: How long does it take to make a character asset?
- The answer will be displayed, along with references to support the answer (displayed in numeric links for explicit review).
Chatting is also a great way to probe the assistant’s knowledge and ask specific questions about assets. For example, you could ask it: Do you know about dog assets?
This can then open more specific lines of questions. For example, the application might know about Fido, a dog asset produced in a production. Rather than have broader questions around dogs, you can now ask specific questions around the Fido asset in production to reduce ambiguity.
Standardizing analysis with application prompts
Chatting can be productive in determining the scope of knowledge, however, like many aspects of AI the quality of the results can be proportional to the quality of the prompt given to the AI tool. In this case you will want to create a standardized prompt that produces detailed results. Then users of the assistant will require only minimal training to use it without needing to know prompt engineering. Amazon Q for Business provides the ability to define Apps that consolidate prompts. You can tailor queries for topics, such as asset analysis, shot analysis, and so on.
We will start by making an asset query App.
- Choose Amazon Q Apps on the left-hand side of assistant.
- At this point you can elect to use a provided template, however, we are going to build a custom template, so choose Create blank app at the lower of the screen.
You will now be presented with a text input field (called a card), titled Enter your input, and an output field called Generate output. We are to reduce the work required of the user to only providing the basic names of assets, so let’s refine the input to reflect this.
- Click the Edit icon, located next to Enter your input, to edit the input attribute.

Figure 8: Edit icon.
- Change the Title to Asset.
- Choose Save.
You can now reference this parameter in the prompt for the output.
- Click on the Edit icon next to Generate Output to edit the output attribute.
- Change the Title to Asset Breakdown App.
- In the Prompt area we can enter a prompt, to refer to the new Asset input variable use:
@Asset. Paste the following into the prompt text field:
Given the asset @Asset:
1. Calculate the total asset days required to create this asset
2. Provide a breakdown of those asset days by task (Camera Track, Body Track, Modelling, Rigging, Texture, Layout, Animation, CFX, FX, Fur, Env, Lookdev, DMP, PaintRoto, Comp)
3. Any related notes around the assets.
4. provide the asset name, document name for references.
The result should be presented a clear fashion.
- To confirm Amazon Q for Business understands that @Asset should be referencing a card, click on
@Assetin the UI: the UI will alert you that this text is referencing the Asset Text input card. Choose the Asset Text input card, and the prompt will now display @Asset in a rounded box, reflecting it as an input. - Choose Save.
Finally, name your app:
- Click on the Edit icon next Example App at the top of the screen.
- Change the Title to Asset Bidding App.
- Customize the UI:
- Change the Description to A quick way to lookup asset bid times.
- Change the App run label to Query.
- Choose Save.
To use the Asset Bidding App, type an asset name into the input, and the prompt will generate a standardized detailed output for that asset.
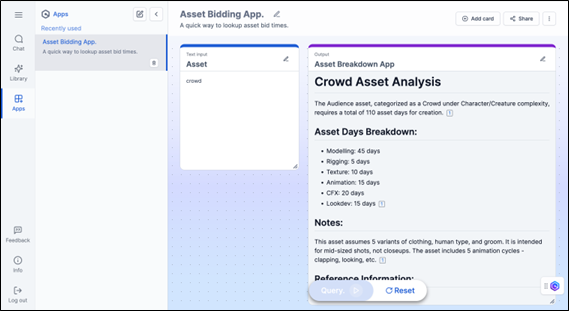
Figure 9: Example analysis for a Crowd asset.
A similar app can be made for shot analysis of assets:
- Click on the New Amazon Q App

Figure 10: Amazon Q app icon.
- To make another app, with a similar
@Assetentry card enter the following prompt:
Given the asset @Asset:
1.Provide the min, max and average days for shots that have this asset included in them.
2.Provide a breakdown of those shots by team (Cam Track, Body Track, Modelling, Rigging, Texture, Layout, Animation, CFX, FX, Fur, Env, Lookdev, DMP, PaintRoto, Comp) with the min, max and average days for each team.
3. Provide the sequence name, shot name, and document name for references.
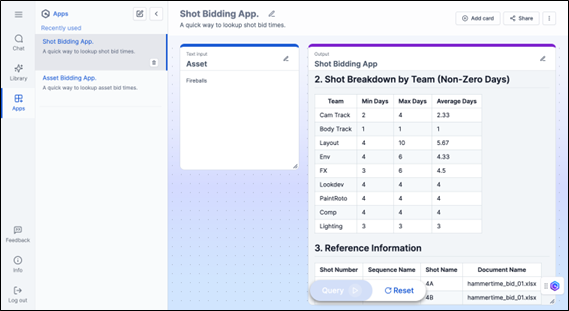
Figure 11: Shot breakdown by team.
Further customization to the app can be made in the layout of the cards, and also to the interface itself. From within the Web Experience settings pane (where you previously deployed your Application URL) you can customize the web experience to refine aesthetic settings.
Further exploration
The Chat and App features can be used together so users can fully explore the knowledge available to the assistant. App prompts can quickly produce standardized results for specific assets, however, understanding what assets you can query from your historical documents should be done through Chat.
The following is an example of a typical discovery process mixing Q Business App and Q Business Chat: at first the App does not find relevant information about a Dog asset; then Chat is asked whether is knows about this asset and replies that it has found an asset named “Rover” with some technical information attached. Going back to App with the name Rover triggers the Analysis (Figure 11).
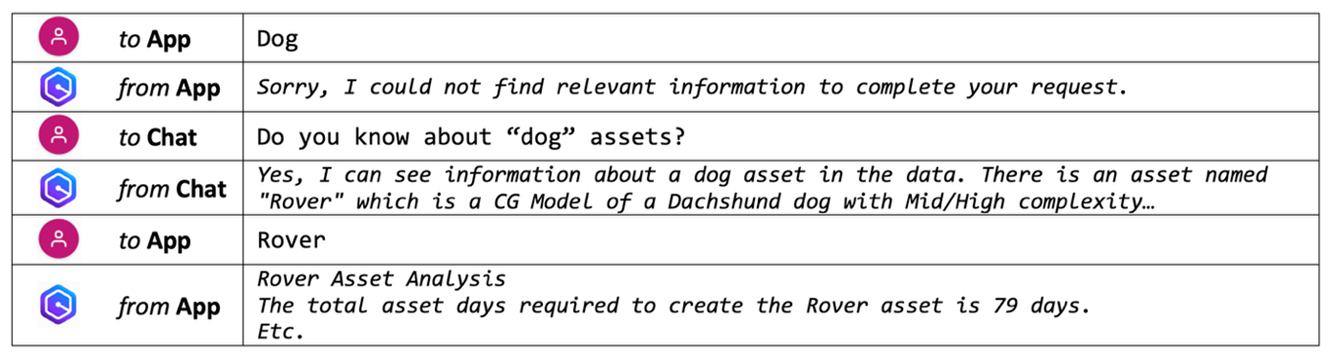
Figure 12: Typical Chat discovery process.
Prompts can also include methods to produce data that can be readily copied into external applications. This can take the form of additional prompts that present data in various formats (such as YAML, JSON or CSV).
Following is an example of an additional prompt that outputs a CSV structure, formatting the values in line with an already determined structure of columns.
4. Provide the average days for the following departments (Asset Name, Camera Track, Body Track, Modelling, Rigging, Texture, Layout, Animation, CFX, FX, Fur, Env, Lookdev, DMP, PaintRoto, Comp). The output must be a comma delimited CSV string in a separate code block using triple backticks (```) that does not include the department names, only the day values.
This example can be copied and pasted into an existing spreadsheet (utilizing the native text-to-column functions inherent in most spreadsheet applications to verify the values are placed in correct columns).
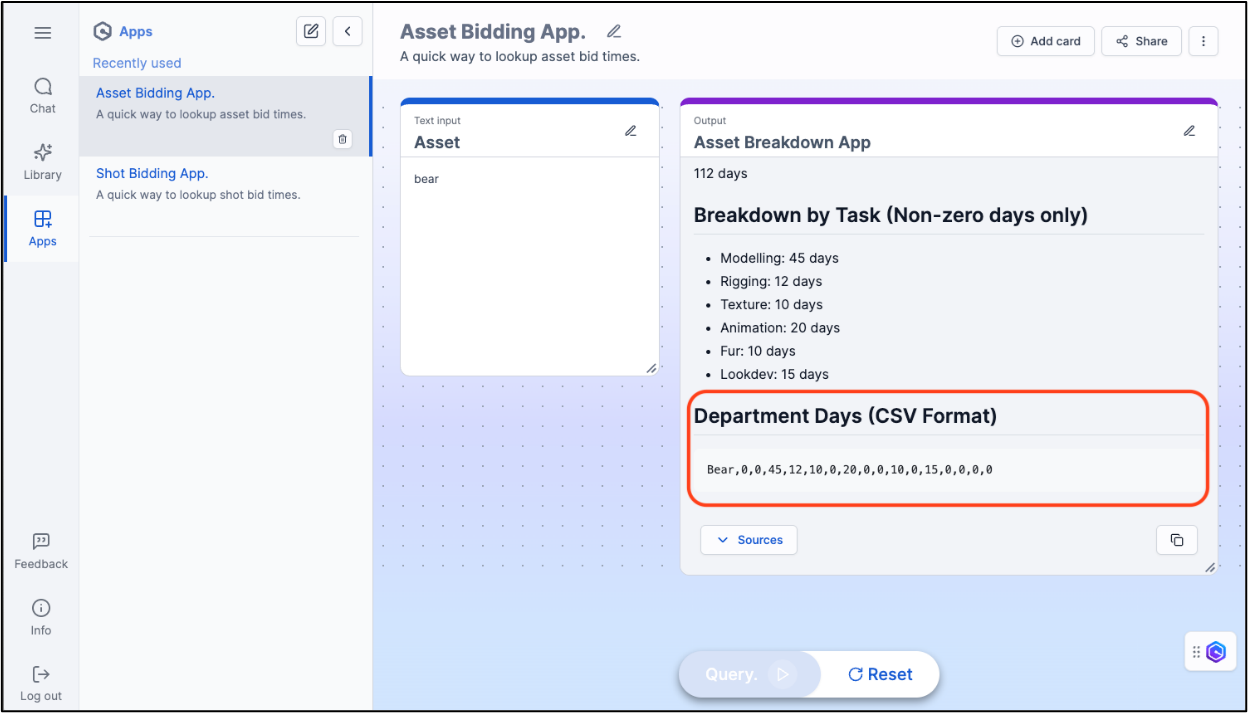
Figure 13: Example of data in alternate formats.
You can also use Chat to determine the strength of your bidding data regarding things such as time variations across specific asset types.
It is common for bid times to reduce as technology and production optimizations evolve. We recommend you keep only relevant data and not your entire bidding history for more accurate estimates.
Conclusion
We have shown how VFX studios can quickly use services such as Amazon Q Business (which is an AI assistant) to democratize access to historical bid data. Less experienced team members can then prepare initial bid assessments with a degree of accuracy that previously requiring years of experience. This alleviates the pressure on senior staff as it accelerates the bidding process—improving accuracy and providing a consistent framework for cost estimation across the organization.
If you need any further information, contact: aws-visual-compute-interest@amazon.com or your account team.