AWS Database Blog
Accelerate SQL Server to Amazon Aurora migrations with a customizable solution
Migrating from SQL Server to Amazon Aurora can significantly reduce database licensing costs and modernize your data infrastructure, but organizations often face challenges with complex schema transformations during the migration process. To accelerate your migration journey, we have developed a migration solution that offers ease and flexibility. You can use this migration accelerator to achieve fast data migration and minimum downtime while customizing it to meet your specific business requirements, such as complex data transformations, distributed data sources, and minimal impact on live systems.
In this post, we showcase the core features of the migration accelerator, demonstrated through a complex use case of consolidating 32 SQL Server databases into a single Amazon Aurora instance with near-zero downtime, while addressing technical debt through refactoring. We walk you through the step-by-step solution implementation that you can use to reinvent your data infrastructure. Finally, we discuss the solution benefits, including flexibility, scalability, observability, reusability, and resilience.
Solution overview
Our migration accelerator provides a robust pathway for migrating large-scale SQL Server databases to Amazon Aurora PostgreSQL-Compatible Edition, with built-in support for handling distributed data sources, complex transformations, and schema conversions. The solution is designed with several key features that provide reliable, efficient, and configurable migrations while maintaining data consistency in live environments.
The solution implements three critical capabilities:
- Re-entrant points allow jobs to resume from where they are left off after interruptions, making the migration process resilient to failures.
- The decoupled execution model separates export, transform, and import operations into independent components that can run in parallel, significantly improving throughput for large-scale migrations.
- The solution offers extensive configurability through configurable parameters and mapping files, enabling you to define custom transformations and control execution parameters without modifying the core migration logic.
The following diagram outlines the solution architecture.
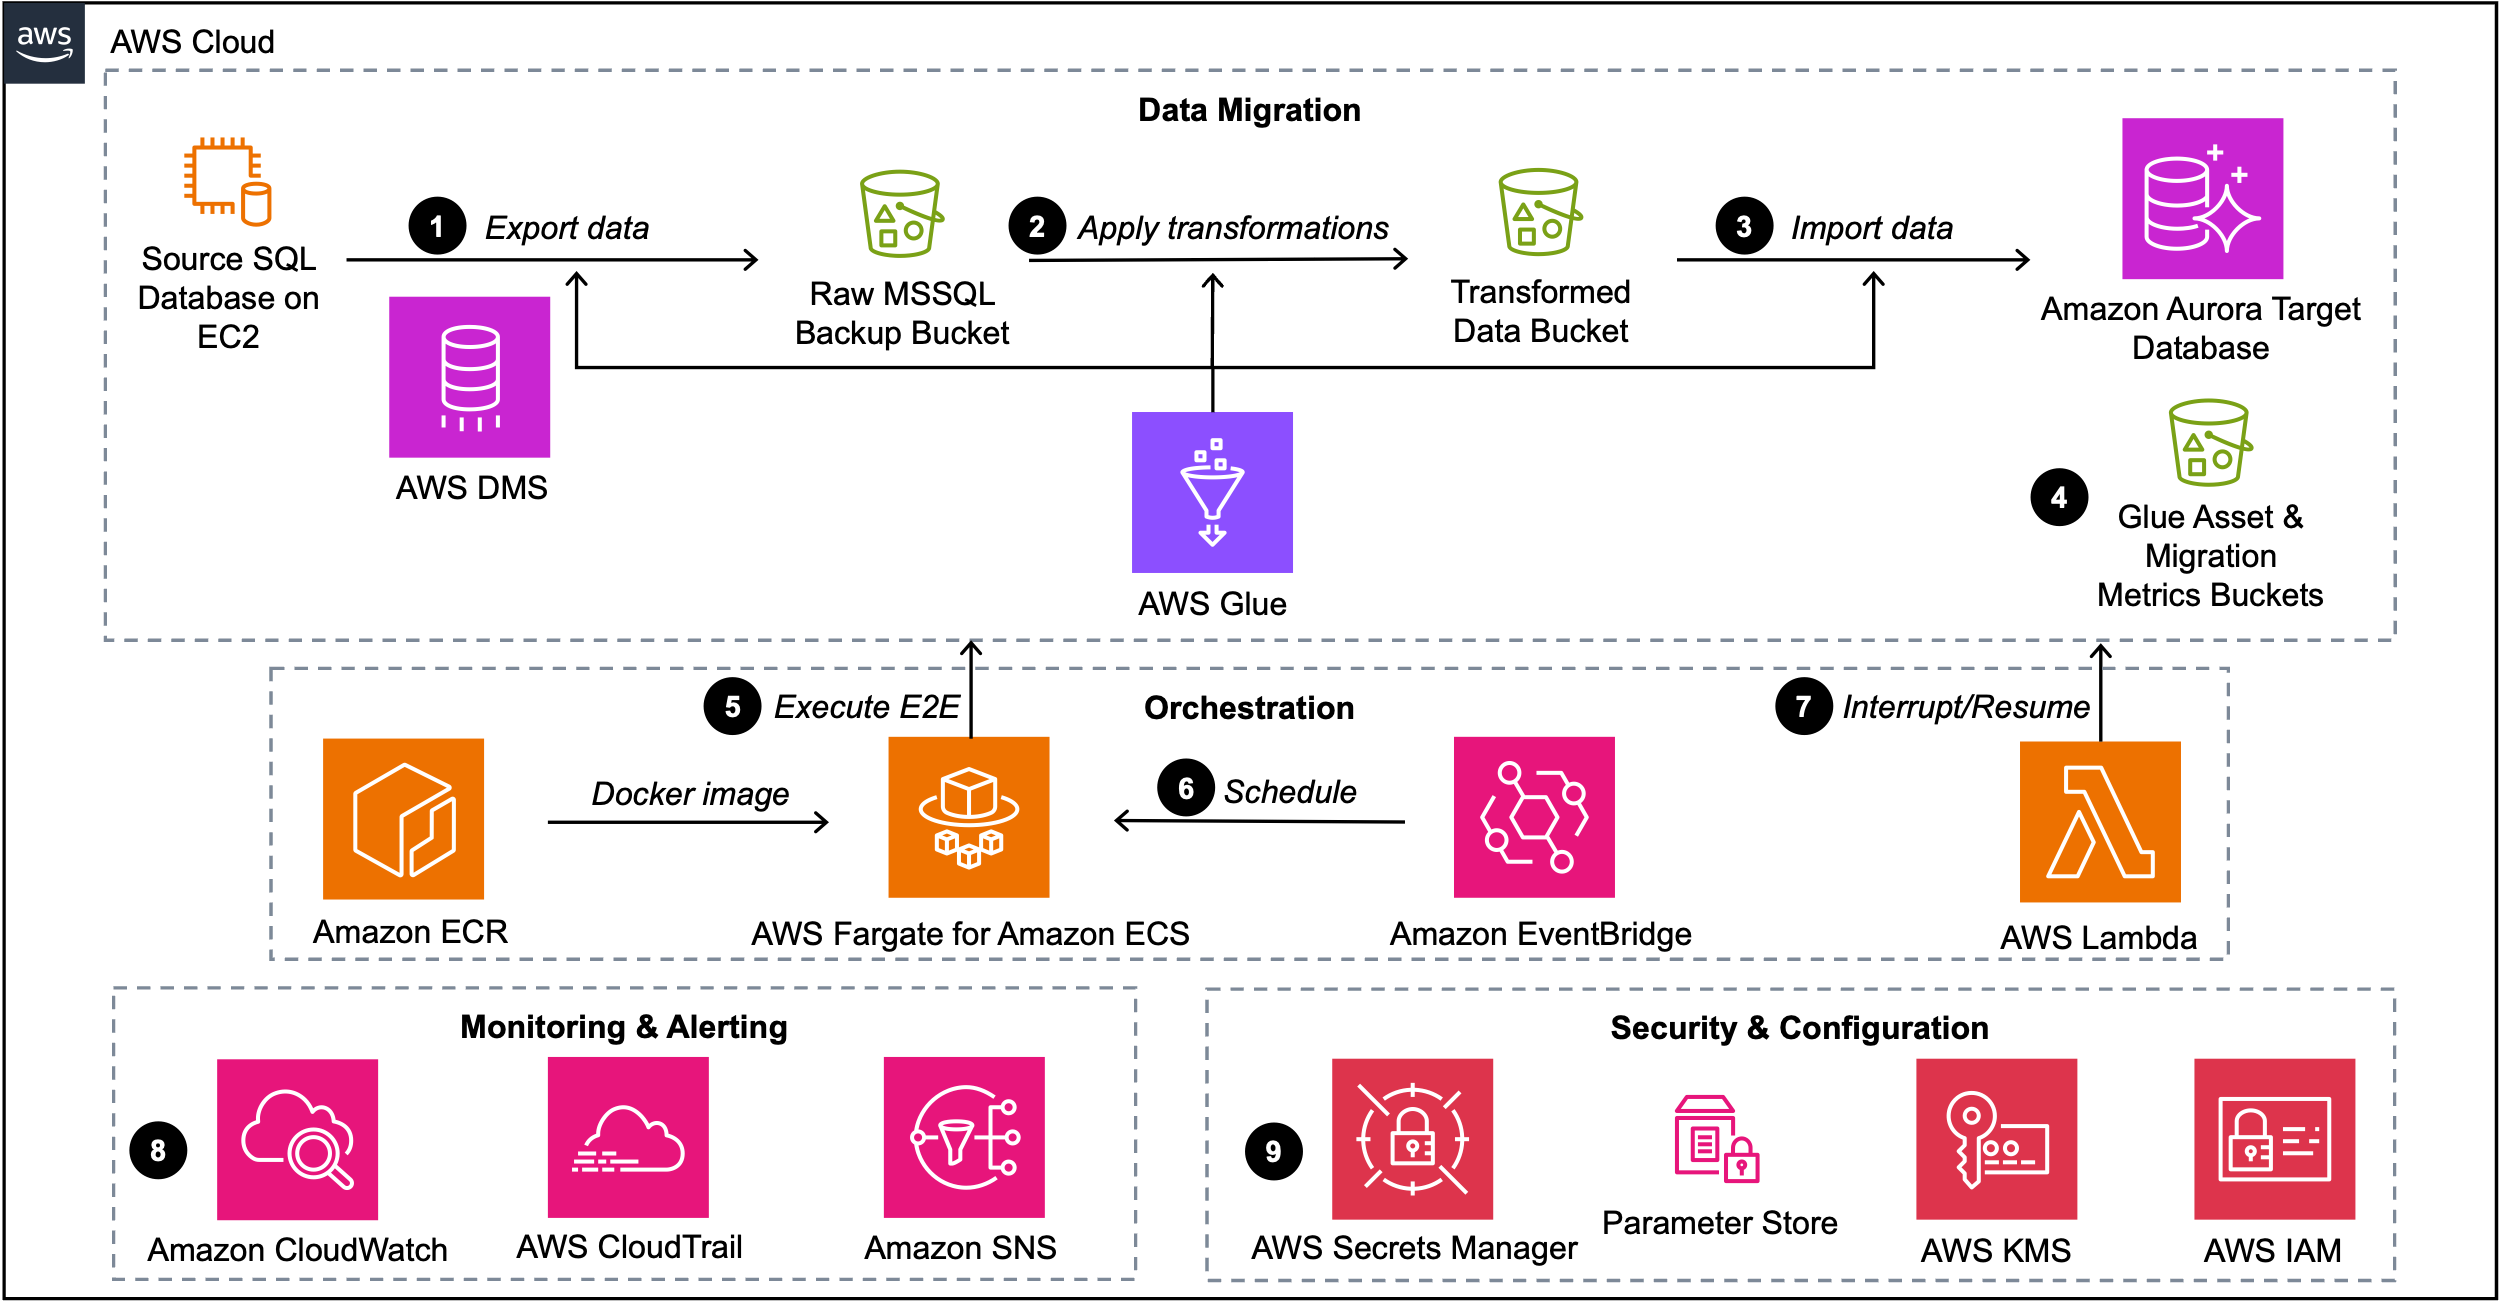
The diagram illustrates the data migration flow from a source SQL Server database to Amazon Aurora using Amazon Simple Storage Service (Amazon S3) for bulk export, transform, and import. The process follows these steps:
- AWS Database Migration Service (AWS DMS) or AWS Glue export jobs can be used to extract data from source databases into an S3 raw bucket.
- AWS Glue jobs process the raw data, applying necessary transformations defined in the mapping files. The transformed data is stored in a separate S3 bucket as load-ready files (LRFs).
- An AWS Glue cleanup job manages target table preparation. An AWS Glue import job loads the LRFs into Aurora PostgreSQL staging tables. A final AWS Glue job runs stored procedures to switch the partitions between staging and base tables in the target database.
- AWS Glue scripts and comprehensive migration statistics such as execution duration, row counts, and processing data are stored in S3 Glue asset and migration metrics buckets to support data migration processes and enable performance analysis.
- The entire process is orchestrated by an end-to-end wrapper script running on AWS Fargate for Amazon Elastic Container Service (Amazon ECS), with the Docker image registered in Amazon Elastic Container Registry (Amazon ECR).
- Amazon EventBridge automates the execution of the end-to-end wrapper script by scheduling it to run at user-defined intervals, providing timely and consistent database migration operations.
- An AWS Lambda function enables operational control by allowing administrators to stop AWS DMS, AWS Glue, or end-to-end wrapper jobs on demand and perform targeted cleanup of S3 objects when needed.
- Amazon CloudWatch and AWS CloudTrail provide end-to-end visibility into the migration process, and Amazon Simple Notification Service (Amazon SNS) delivers real-time alerts for failures, enabling immediate attention to issues.
- AWS Secrets Manager securely stores database credentials, and Parameter Store, a capability of AWS Systems Manager, maintains configuration parameters for migration jobs, supporting secure and flexible deployment across environments. AWS Key Management Service (AWS KMS) and AWS Identity and Access Management (IAM) provide fine-grained access control and permission policies for AWS resources.
Data migration between heterogeneous database systems, where the source and target databases differ in database engine, data structure, and data format, is a common challenge in enterprise environments. This solution offers a flexible approach that can handle both straightforward 1:1 source-to-target table mappings and more complex scenarios involving data transformations and table joins. For simple migrations where the source and target table structures are identical or very similar, this solution can directly map and transfer data with minimal transformation. This is particularly useful for large-scale migrations where maintaining data integrity and structure is paramount. However, the real power of this solution lies in its ability to handle more complex migration scenarios. It can perform data transformations, combine data from multiple source tables, and create new consolidated target tables. This is especially valuable when migrating from legacy systems to modern databases, where data restructuring is often necessary to optimize for new business requirements. To demonstrate this capability, let’s consider a more complex example. Let’s say we have two tables (cell_performance_data and ue_statistics_data) in the source SQL Server database, and we want to perform a heterogeneous migration of these tables to the target PostgreSQL database. Instead of simply copying these tables as-is, we want to create a new, consolidated target table called cell_perf_stats by joining the two source tables. This join operation allows us to:
- Combine related data from multiple sources.
- Potentially reduce data redundancy.
- Create a more comprehensive view of the data for analysis in the target system.
Here’s how we might approach this join operation:
One of the ways to achieve this is to perform the join in the source database and then move the joined data to the target database, but this approach has some major drawbacks:
- With a table containing billions of records, joining on the source database, which is serving live queries, is going to negatively impact the database performance.
- You would need a considerable amount of database space, which could be costly.
- If you have these tables distributed between several source servers or databases, it will be lot of manual and time-consuming work to perform this join across all the databases and then move all those to the target database.
The solution described in the following sections helps mitigate these issues.
Prerequisites
For this walkthrough, you should have the following prerequisites:
- AWS account
- Git
- Python 3.7 or higher
- AWS CLI
- SQL Server database (source)
- Aurora PostgreSQL database (target)
Clone the code repository
Clone the GitHub repo with the following code:
Set up source and target databases
Complete the following steps to set up your source and target databases:
- Create 2 tables in the source SQL Server database using the following SQL commands:
- Create the target table in Aurora PostgreSQL-Compatible database using:
Our solution supports schema modifications during migration, as demonstrated in our example where two source tables with complex schemas (cell_performance_data with 12 columns and ue_statistics_data with 12 columns) are consolidated into a simplified target table (cell_perf_stats with 10 essential columns), eliminating redundant fields while preserving critical business data.
Set up AWS Glue ETL
Complete the following steps to set up AWS Glue extract, transform, and load (ETL) jobs:
- Using the Amazon S3 console, create four S3 buckets:
<your-raw-data-bucket>: For exported data from SQL Server<your-transformed-data-bucket>: For transformed data<your-migration-stats-bucket>: For job run statistics<your-glue-asset-bucket>: For storing glue scripts
- Navigate to the AWS Secrets Manager console and create a secret for SQL Server authentication with following format:
- Go to the IAM console to create an IAM role for AWS Glue jobs.
- Create a new role with AWS Glue as the trusted entity
- Attach the
AWSGlueServiceRolepolicy - Add permissions for accessing your S3 buckets and Secrets Manager
- In the AWS Glue console, import the following AWS Glue jobs from your cloned repository’s directory. Use the “Import job” option in the AWS Glue console to upload each JSON file:
ue_statistics_data_ExportMssqlToRaw.jsoncell_performance_data_ExportMssqlToRaw.jsoncellPerfStats_rawToTransformed.jsontruncate_stageTableAurora.jsoncellPerfStats_transformedToAurora.json
- Still in the AWS Glue console, for each imported job:
- Select the job from the list
- Go to the job details tab and update the job parameters with your specific S3 bucket names, Secrets Manager secret, and other details.
Set up the orchestration script and Fargate
In the following code examples, replace <ACC-ID> with the your 12-digit AWS account number where you are deploying this solution:
- Navigate to AWS Systems Manager Parameter Store console and create two parameters:
- Create the migration control parameter:
- Create the server mappings parameter:
Now you’re ready to set up Amazon ECR and Amazon ECS. The following steps 2 to 11 in this section are performed in your local environment using AWS CLI.
- Navigate to your cloned repository directory and create a new file named “
Dockerfile“. Copy the provided Docker configuration that includes system packages, AWS CLI installation, and Python environment setup. - Ensure you are in the repository directory and build the Docker image using:
- Create a new Amazon ECR repository to store your Docker image using:
- Authenticate your Docker client to your Amazon ECR registry using:
- Tag your local Docker image and push it to your Amazon ECR repository using:
- Create an ECS task execution role to allow ECS to execute tasks on your behalf using:
- Create a new file named “
task-definition.json” in your repository directory. Copy the provided task definition that specifies container configurations, including environment variables and resource requirements. Update the environment variables in the following task according to your environment: - Register the task definition with Amazon ECS using:
- Create a new ECS cluster to host your Fargate tasks using:
- Create a service with a Fargate task in your ECS cluster. Replace the subnets and security groups placeholders with your actual configurations based on your account setup:
Launch the ECS migration task
In your local terminal, execute the ECS task with the following command. Replace the subnets and security groups according to your account setup:
Complete the data migration using a stored procedure
Create the stored procedure in Aurora PostgreSQL-Compatible using the script stage.stage_ctas_null_upd_cell_perf_stats.sql found in your cloned repository. Once the stored procedure is created, execute it with the following command:
This stored procedure handles the final data transfer from staging tables to the target production table in your Aurora PostgreSQL database.
Monitor the migration
You can monitor migration progress through multiple AWS services.
- Use the AWS Glue console to track the status and performance of your ETL jobs.
- For comprehensive operational visibility, utilize Amazon CloudWatch and AWS CloudTrail to monitor the end-to-end migration process.
- Set up Amazon SNS to receive real-time alerts for any failures, enabling immediate response to potential issues.
- Review detailed migration statistics including execution duration, row counts, and processing statistics in the designated S3 bucket (
<your-migration-stats-bucket>). - Verify the migration results by checking the summaries of completed partitions in your statistics S3 bucket.
Abort/Resume the migration
If you notice any discrepancies during monitoring, you can abort the migration using the AWS Lambda function, which enables operational control by allowing administrators to stop AWS DMS, AWS Glue, or end-to-end wrapper jobs on demand. The solution’s re-entrant points feature allows you to resume the migration from where it is left off after interruptions, making the process resilient to failures. You can control this through the ‘job_mode‘ parameter in the Parameter Store, setting it to ‘resume‘ when ready to continue the migration.
Optional: Set up AWS DMS for small tables
For straightforward migrations of small tables (less than 10 GB or 10 million records) that don’t require table joins, you can use AWS DMS to migrate the data between the databases. For detailed instructions on setting up AWS DMS, refer to the AWS DMS documentation.
Clean up
To avoid incurring future charges, delete the following resources used in the solution deployment:
- Database resources
- Delete the Amazon Aurora PostgreSQL cluster and its associated instances.
- Delete the SQL Server instances by terminating the EC2 instances.
- AWS Glue resources
- Navigate to AWS Glue console and delete the imported Glue jobs.
- Delete any AWS glue connections created.
- Amazon ECS resources
- Delete the Fargate service and ECS cluster from the Amazon ECS console.
- Amazon ECR resources
- Delete the repository named “
data-mig-app” from the Amazon ECR console.
- Delete the repository named “
- IAM roles
- Delete the ECS task execution role.
- Delete the AWS Glue service role.
- S3 resources
- Delete the raw data bucket.
- Delete the transformed data bucket.
- Delete the migration statistics bucket.
- Delete the Glue asset bucket.
- Parameter Store parameters
- Delete the migration control parameter.
- Delete the server mappings parameter.
- Secrets Manager secret
- Delete the SQL Server authentication secret.
- Monitoring resources
- Delete CloudWatch log groups created for the migration.
- Delete any CloudWatch alarms or metrics created.
- Delete any trails in AWS CloudTrail created for migration monitoring.
- Delete SNS topics and subscriptions created for migration alerts.
Conclusion
In this post, we demonstrated a comprehensive solution for migrating SQL Server databases to Amazon Aurora PostgreSQL-Compatible that addresses the challenges of handling large-scale, distributed data migrations. Our solution provides an automated, reliable pathway for database modernization while maintaining minimal disruption to live environments.
The solution follows the guidelines provided by the AWS Well-Architected Framework. It delivers several key benefits for organizations looking to modernize their database infrastructure:
- Flexibility – The solution accommodates various migration scenarios through configurable parameters and mapping files, allowing you to customize transformations without modifying core code.
- Scalability – With support for chunking data at day/month levels and parallel processing capabilities, the solution efficiently handles multi-terabyte databases distributed across multiple servers.
- Observability – Comprehensive monitoring and reporting mechanisms provide clear visibility into the migration progress, with statistics captured for each phase and notifications for any failures.
- Reusability – The solution’s modular design means it can be quickly adapted for different database migration projects across your organization.
- Resilience – Re-entrant jobs and the ability to pause and resume migrations make sure that even complex migrations can recover gracefully from interruptions.
We invite you to try this database migration solution available in the following GitHub repo to accelerate your journey to a more scalable, cost-effective database solution on Amazon Aurora.