Containers
Enhancing container security in Amazon EKS Auto Mode with KubeArmor
This post was written with Rahul Jadhav from Accuknox.
As organizations adopt Amazon Elastic Kubernetes Service (Amazon EKS) Auto Mode for its streamlined Kubernetes cluster management, security remains a shared responsibility. Although EKS Auto Mode automates control plane operations, container runtime security needs more attention. In this post, we explore how KubeArmor, an open source container-aware security enforcement system, enhances the security posture of containerized workloads running on EKS Auto Mode clusters.
Although EKS Auto Mode significantly streamlines cluster management by automating control plane and node operations, securing the workloads running within the cluster remains a critical user responsibility. Traditional security tools often struggle to provide granular visibility and control at the container runtime level, leaving potential gaps for sophisticated attacks.
Container runtime security presents unique challenges that traditional security approaches don’t fully address. KubeArmor addresses this crucial gap by providing deep, system-call-level runtime protection using Linux Security Modules (LSMs), offering fine-grained policy enforcement that complements the infrastructure security provided by EKS Auto Mode.
This post explores how integrating KubeArmor with EKS Auto Mode helps security engineers and Kubernetes operators overcome common runtime security challenges and enhance the protection of their cloud-native applications.
The runtime security challenge in Kubernetes
As organizations increasingly migrate critical workloads to Kubernetes, managing the security of containerized applications at scale presents unique challenges. Although Kubernetes offers powerful orchestration capabilities, the dynamic and ephemeral nature of containers introduces new attack surfaces.Security teams often grapple with the following:
- Limited runtime visibility: Understanding exactly what processes are running, files are accessed, or network connections are made inside of a container can be difficult with standard tools.
- Zero-day exploits: Signature-based scanning can miss novel threats or vulnerabilities in dependencies discovered after deployment.
- Privilege escalation and container escapes: Compromised containers might attempt to gain access to the underlying host or other containers, necessitating defense mechanisms beyond network policies.
- Compliance enforcement: Meeting strict regulatory requirements (such as PCI-DSS and HIPAA) necessitates granular control and detailed audit trails for container activity.
- Operational complexity: Implementing and managing security policies across numerous microservices can become burdensome.
Furthermore, approaches such as using custom-hardened Amazon Machine Images (AMIs) to embed security tooling are not directly applicable in EKS Auto Mode, which manages node configuration and AMIs automatically. This necessitates a different approach to workload security.
Organizations need solutions that provide deep runtime protection, integrate seamlessly with the Kubernetes ecosystem, and operate efficiently without hindering development velocity.
Architecture
The KubeArmor and EKS Auto Mode integration creates a multi-layered defense architecture, as shown in the following figure.
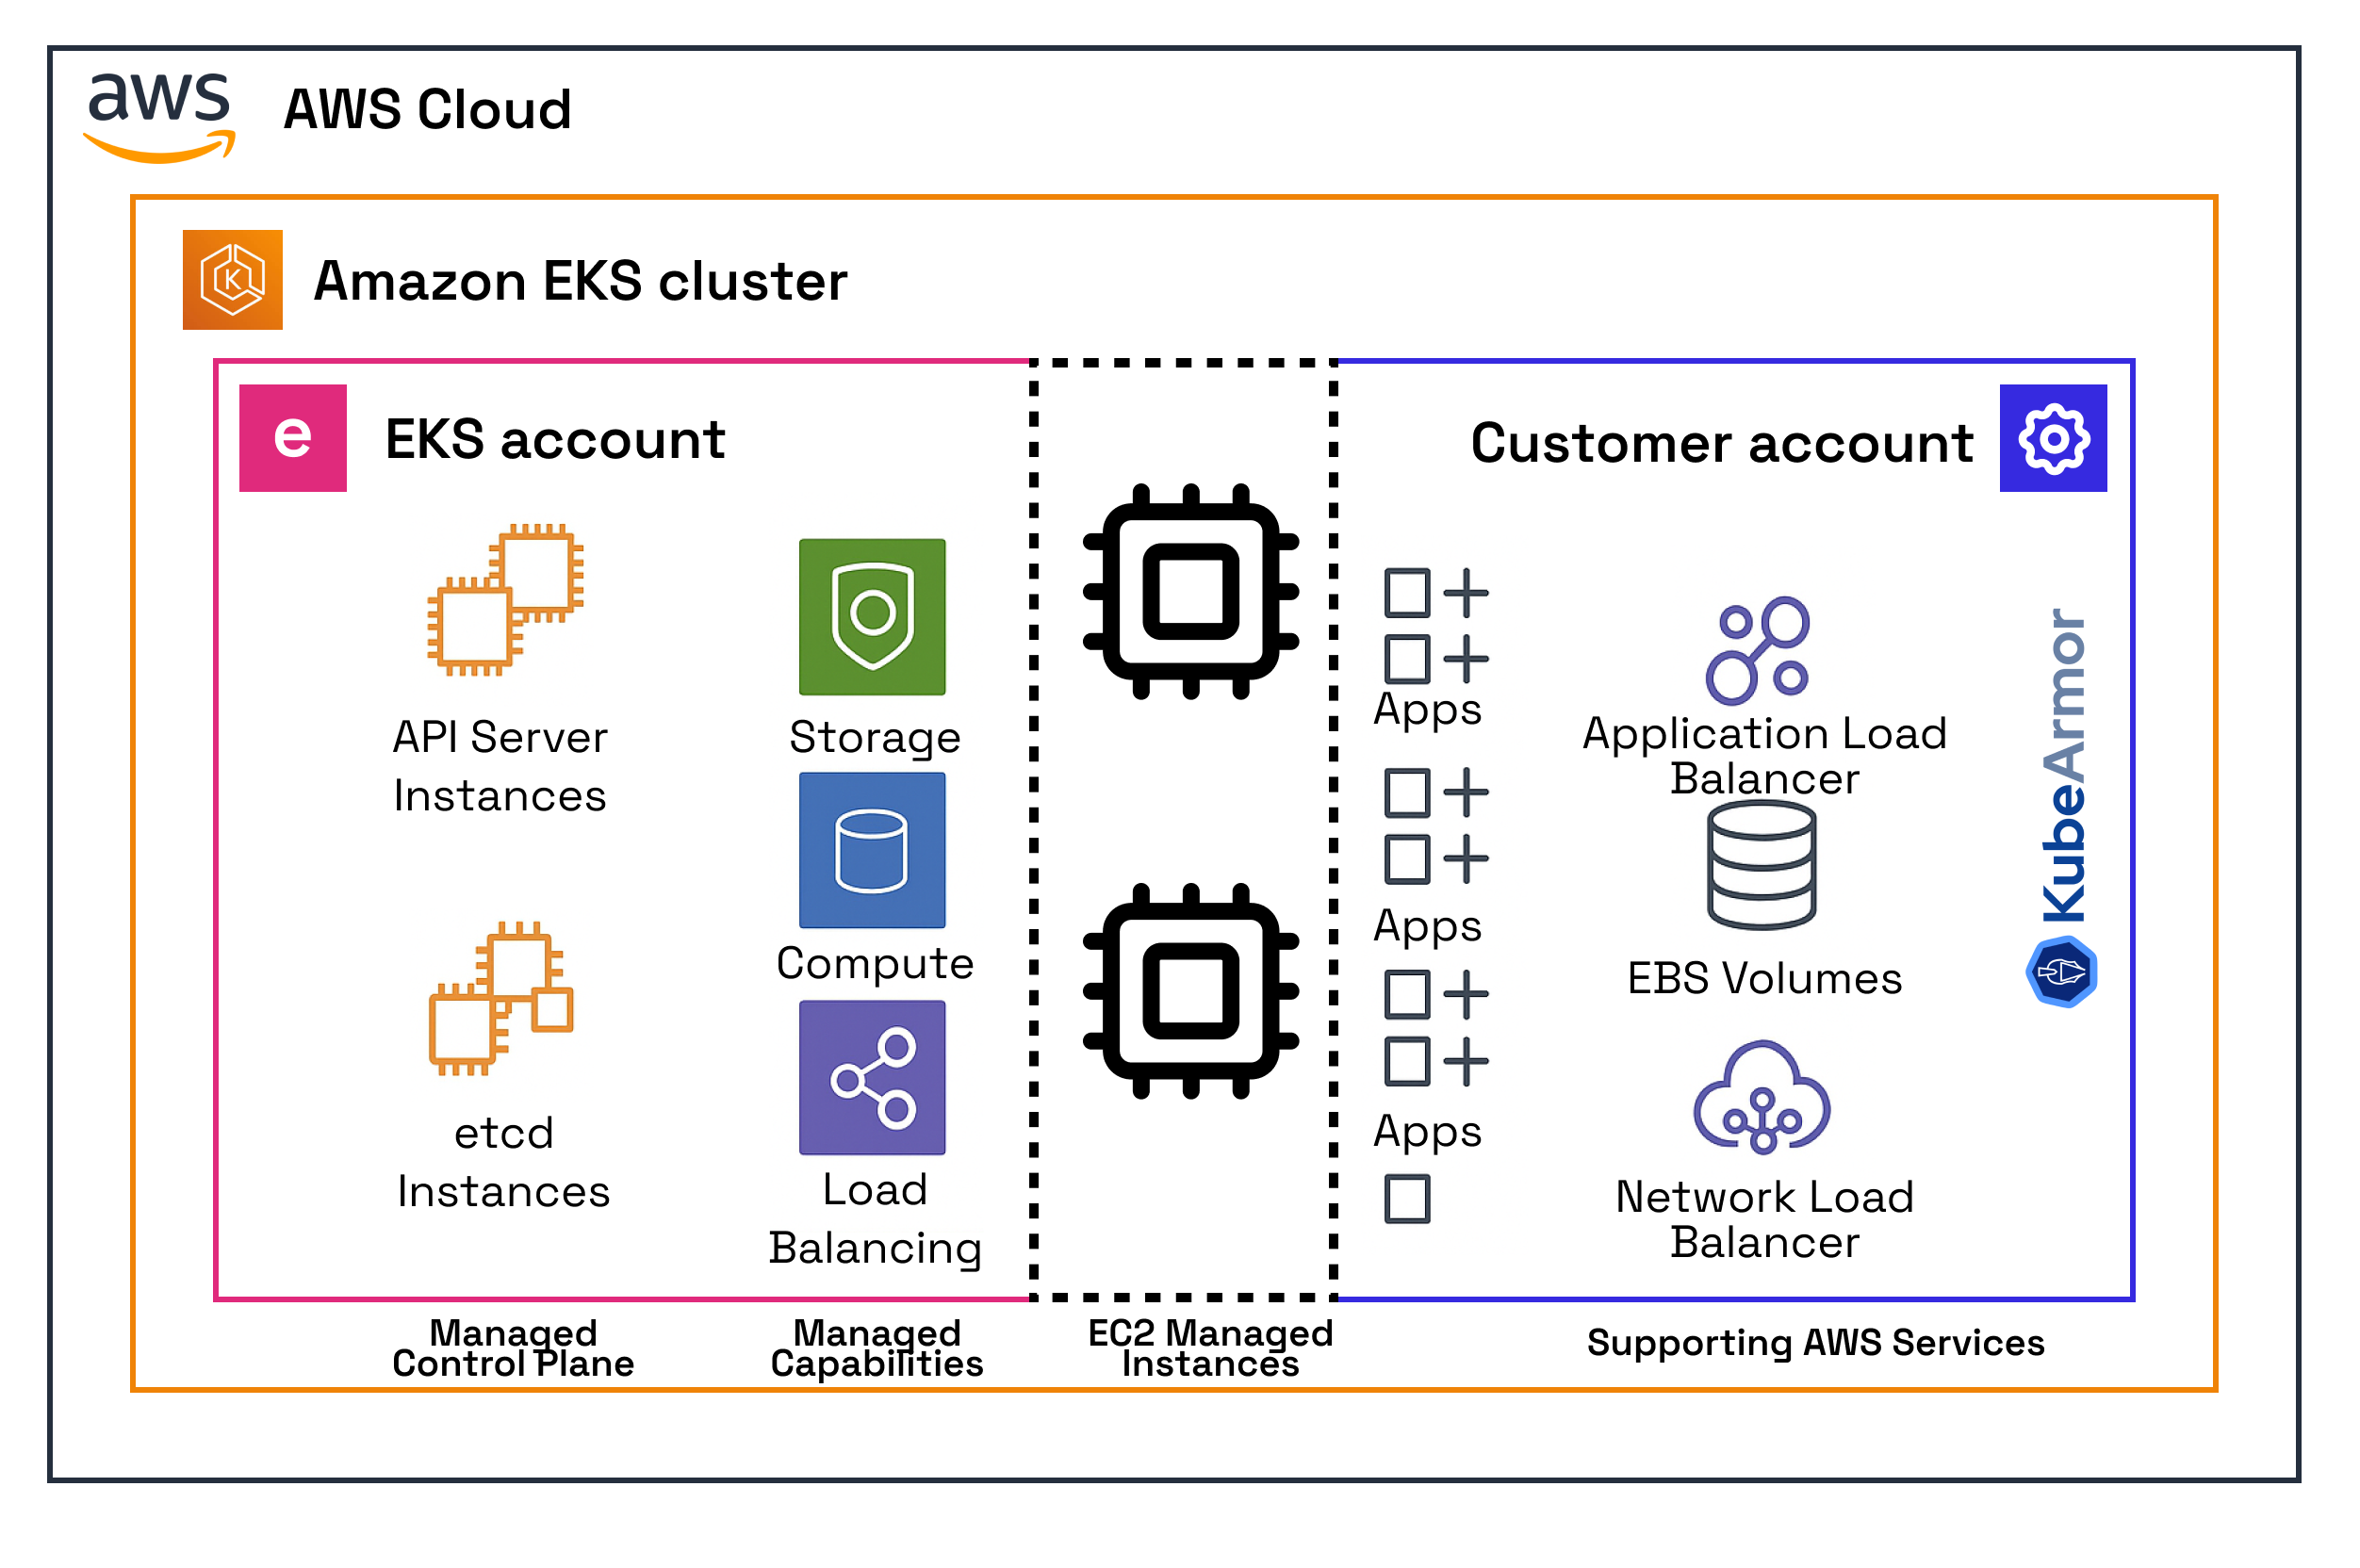
To demonstrate the shared responsibility model under EKS Auto Mode, refer to the following image, which shows how KubeArmor improves EKS Auto Mode security:

Key components
- EKS Auto Mode control plane: Fully managed by AWS, handling all Kubernetes API operations and core services.
- Amazon EKS managed node groups: Worker nodes that run application containers, automatically scaled and managed.
- KubeArmor components:
- KubeArmor Agent: DaemonSet running on each node that enforces security policies.
- KubeArmor Operator: Manages deployment and configuration of KubeArmor resources.
- KubeArmor Relay: Collects and forwards security events from all of the nodes in Amazon EKS to the monitoring systems.
- KubeArmor policies: Custom resources that define security rules for containers.
The architecture provides defense-in-depth by combining the EKS Auto Mode infrastructure security with the KubeArmor container runtime protection.
The workflow is as follows:
- A user deploys workloads on an Amazon EKS Auto Mode cluster, where AWS manages the control plane, node lifecycle, and core infrastructure.
- KubeArmor is installed as a DaemonSet and Operator on worker nodes, automatically enforcing security policies at the container runtime.
- Security policies (KubeArmorPolicy CRDs) are applied to workloads, defining allowed and blocked process, file, and network behaviors.
- KubeArmor monitors system calls and container activities in real time, blocking unauthorized actions such as privilege escalation, crypto-mining, or zero-day exploits.
- Security events are forwarded to AWS services like CloudWatch or GuardDuty for centralized monitoring, compliance reporting, and automated remediation.
Prerequisites
You need to have the following prerequisites in place in order to implement this solution:
- An Amazon EKS cluster (version 1.33 or later)
- Pod Identity enabled on your cluster
- Access to two AWS accounts (for cross-account access)
- AWS CLI installed
- kubectl installed
- Helm installed
In addition to the above you’ll also need IAM permissions for deploying CRDs and AWS integrations, a dedicated namespace with RBAC, outbound access to pull KubeArmor images, Linux nodes with LSM (AppArmor/SELinux) and a compatible kernel for eBPF, plus optional monitoring integration with CloudWatch, Prometheus, or GuardDuty.
How does KubeArmor improve EKS Auto Mode security?
EKS Auto Mode streamlines Kubernetes management, but KubeArmor adds the following critical security capabilities.
1. System call-level protection
KubeArmor monitors and controls system calls made by containers using LSMs such as AppArmor. This prevents unauthorized actions such as privilege escalation, unexpected process execution, or container escape attempts—threats that network policies and RBAC alone cannot fully mitigate. For example, a compromised container might attempt to use the mount system call to escape isolation. KubeArmor can block this specific system call even if the container has broad RBAC permissions.
2. Granular process and file access control
KubeArmor enables:
- Strictly define which binaries can execute within a container (for example preventing shells in production).
- Control file system access precisely (for example restricting write access to sensitive configuration files).
- Limit network activity based on the specific process initiating it.
- Restrict potentially dangerous Linux capabilities on a per-container basis.
This granularity implements least-privilege at the process level, not just the pod level. In turn, this implements true least-privilege at the application process level, which significantly reduces the blast radius of a potential compromise.
3. Supply chain security enhancement
Unlike image scanning, which detects known vulnerabilities before deployment, KubeArmor adds runtime protection that:
- Prevents execution of unexpected binaries, even in trusted images
- Limits the impact of compromised dependencies
- Enforces behavioral boundaries regardless of image content
4. Zero-day vulnerability mitigation
When new container vulnerabilities emerge, KubeArmor can restrict access to vulnerable components even before patches are available, effectively implementing virtual patches through security policies.
5. Compliance support
KubeArmor helps meet regulatory requirements by:
- Enforcing mandatory access controls needed by standards such as PCI-DSS
- Providing audit logs for all file and process activities
- Implementing technical controls for the separation of duties
A modern alternative to custom AMIs: For environments such as EKS Auto Mode, where custom AMIs aren’t supported, KubeArmor provides essential runtime hardening capabilities directly at the workload level, offering similar protective outcomes without needing node-level customization.
Real world use case
Consider a financial services company running a payment processing API on EKS Auto Mode. They face several challenges:
- PCI-DSS compliance needs strict isolation of cardholder data
- Risk from third-party dependencies in their microservices
- Need for rapid detection and containment of security breaches
The company deployed KubeArmor with policies tailored to their payment service:
This policy implementation resulted in the following:
- Containment of the Log4Shell vulnerability by blocking unexpected Java class loading while teams worked on patching
- 60% reduction in PCI-DSS audit preparation time due to detailed process logs
- Significant decrease in mean time to detect (MTTD) for suspicious activities
- Maintained development velocity with minimal false positives
Deployment steps
In this section we walk through deploying KubeArmor on an EKS Auto Mode cluster. Optionally, use the following commands to set environment variables:
Step 1: Create an EKS Auto Mode cluster
Step 2: Install KubeArmor using Helm
Step 3: Verify KubeArmor installation
Step 4: Apply file integrity monitoring/protection policy
The selector labels have to be changed to match the workload labels for which the security policy applied.
Implementing security policies with KubeArmor
KubeArmor policies are defined as Kubernetes Custom Resources, enabling GitOps workflows and integration with existing continuous integration/continuous development (CI/CD) pipelines. In this section, we examine practical policies for a common use cases.
Use case 1: Web application hardening
This policy implements least privilege for a web application using Nginx:
Use case 2: Crypto mining prevention
This policy blocks crypto mining activities across the cluster:
Progressive policy implementation
For safe policy development, follow this workflow:
- Start with audit mode: Deploy policies with action: Audit first to understand application behavior without disruption.
- Analyze logs: Review KubeArmor logs to identify false positives before enforcing blocks:
This shows all of the alerts/policy violations for the given namespace.
- Refine policies: Adjust policies based on audit findings.
- Enable enforcement: Gradually change actions from Audit to Block as confidence increases.
- Use learning mode: For complex applications, use the KubeArmor learning capabilities to generate baseline policies.
Integrating with AWS security services
KubeArmor can be integrated with AWS security services to create a comprehensive security monitoring solution.
- Amazon CloudWatch: KubeArmor security events are sent to Amazon CloudWatch for centralized logging. This is configured by enabling and setting up
fluentdwithin KubeArmor to forward logs to a specified CloudWatch log group. - AWS GuardDuty: The integration creates a closed-loop security system. An Amazon EventBridge rule can use findings from GuardDuty to trigger a KubeArmor policy enforcement. This allows threat intelligence from GuardDuty to directly enhance container protection in real-time.
Benefits of integration
The key benefits of integrating KubeArmor with these AWS services are:
- Automated Remediation: It allows for automatic actions against detected threats, which reduces the Mean Time to Respond (MTTR).
- Targeted Response: Precise KubeArmor controls can be applied based on the specific threat GuardDuty detects, minimizing disruption.
- Improved Security Posture: Workloads are proactively hardened based on real-time threat intelligence.
- Unified Visibility: You can create unified security dashboards in CloudWatch to combine metrics from KubeArmor and other services for comprehensive monitoring.
While this post describes how to connect KubeArmor to Amazon CloudWatch, it only introduces the concept of a more advanced integration with AWS GuardDuty for automated remediation.
Building this closed-loop security system requires a few extra steps. You’ll need to write an AWS Lambda function that can apply a KubeArmor policy and create an Amazon EventBridge rule to trigger that function based on specific GuardDuty findings.
To get started, refer to the official documentation:
Amazon CloudWatch integration
Send KubeArmor security events to Amazon CloudWatch for centralized logging:
Enhanced threat response with AWS GuardDuty integration
It is possible to use an AWS Lambda function to forward KubeArmor events to AWS Security Hub, or even create an Amazon EventBridge rule to trigger a KubeArmor policy enforcement based on Amazon GuardDuty findings. This creates a closed loop security system where the GuardDuty threat intelligence can enhance container protection through KubeArmor.
Value proposition:
- Automated remediation: Automatically take action against detected threats, reducing Mean Time to Respond (MTTR).
- Closed-loop security: Threat intelligence directly informs and enhances container runtime protection policies.
- Targeted response: Apply precise KubeArmor controls based on the specific threat detected by GuardDuty, thus minimizing disruption.
- Improved security posture: Proactively harden workloads based on real-time threat intelligence, as shown in the following figure.

Unified security dashboard
Create CloudWatch dashboards that combine KubeArmor metrics with other security services for comprehensive visibility:
Cleaning up
When you’re finished experimenting with KubeArmor and EKS Auto Mode, follow these steps to clean up resources and avoid incurring unnecessary AWS charges.
Step 1: Remove KubeArmor policies
Before uninstalling KubeArmor, remove any policies that you’ve created:
Step 2: Uninstall KubeArmor components
Use Helm to remove KubeArmor components from your cluster:
Step 3: Remove CloudWatch integration resources
If you set up CloudWatch integration, then clean up those resources:
Step 4: Delete the EKS Auto Mode cluster
When KubeArmor is removed, delete the EKS cluster:
Step 5: Remove IAM resources (if created)
Clean up any AWS Identity and Access Management (IAM) resources that you created for the demo:
Step 6: Remove local configuration
Finally, clean up your local environment:
You can follow these cleanup steps to make sure that all resources are properly removed, preventing unexpected charges and keeping your AWS environment tidy.
Security Best Practices to consider
While KubeArmor secures the container runtime, it’s equally important to harden the surrounding EKS environment. Here are a few additional best practices that complement the solution described in this post:
- Enforce the Principle of Least Privilege: When creating your EKS cluster, ensure the IAM principal (user or role) that creates the cluster does not have ongoing administrative access. EKS automatically grants this principal
system:masterspermissions in the Kubernetes RBAC configuration. It’s better to create a dedicated IAM role for cluster administration and assign it to a group, following the principle of least privilege for all users and services. - Manage access via the Kubernetes API: Once the cluster is created, the initial “cluster-creator” access is no longer needed for day-to-day operations. You should remove this direct mapping and manage all user access centrally through the Kubernetes API server, ideally by integrating with an identity provider. This ensures all actions are auditable and controlled through Kubernetes RBAC.
- Isolate system and security resources: Use Kubernetes Network Policies to create a secure perimeter around critical components within your cluster. You should isolate system-level resources (like
kube-system) and security tools (like thekubearmornamespace) from application workloads, allowing only necessary and explicitly defined communication between them. This reduces the risk of lateral movement in case a workload is compromised.
Conclusion
Implementing KubeArmor on Amazon EKS Auto Mode clusters provides significant security benefits:
- Enhanced runtime protection: KubeArmor adds system call-level security controls that complement the EKS Auto Mode infrastructure security features.
- Defense-in-depth: The integration creates multiple security layers spanning from AWS infrastructure controls to container process-level restrictions.
- Operational efficiency: Both EKS Auto Mode and KubeArmor reduce operational overhead, allowing teams to focus on application development rather than infrastructure management.
- Compliance support: The detailed controls and audit trails of KubeArmor help meet regulatory requirements for containerized applications.
- Supply chain security: Runtime protection helps mitigate risks from compromised dependencies and vulnerable packages.
As container adoption continues to accelerate, combining the EKS Auto Mode operational clarity with the security capabilities of KubeArmor enables organizations to achieve both agility and robust protection for their containerized applications.
Resources
- KubeArmor GitHub repository
- KubeArmor documentation
- KubeArmor use cases
- Amazon EKS Auto Mode documentation
- Amazon CloudWatch documentation
- Amazon EKS best practices guide
About the authors
 Raj Seshadri is a Senior Partner Solutions Architect at AWS, specializing in containers and blockchain. With a rich background that includes roles at Aqua Security, Red Hat, Docker, Dell, and EMC, Raj brings a wealth of experience to his work. When he’s not helping partners build on AWS, he can be found on the tennis court or traveling the world. You can connect with him on X at @texanraj.
 Rahul Jadhav is a systems engineer working on solutions involving security and performance optimizations of cloud-native technologies. He has contributed towards several open sources including Linux Kernel and associated with IETF Standards Groups and Linux Foundation Groups. Taken several projects from conception to market and is an active maintainer for CNCF Sandbox project, “KubeArmor”. He cofounded Accuknox where they are enabling runtime, zero-trust security by leveraging Linux-LSM/eBPF based security for k8s and containerized/cloud-native workloads.