AWS Big Data Blog
Build data pipelines with dbt in Amazon Redshift using Amazon MWAA and Cosmos
Effective collaboration and scalability are essential for building efficient data pipelines. However, data modeling teams often face challenges with complex extract, transform, and load (ETL) tools, requiring programming expertise and a deep understanding of infrastructure. This complexity can lead to operational inefficiencies and challenges in maintaining data quality at scale.
dbt addresses these challenges by providing a simpler approach where data teams can build robust data models using SQL, a language they’re already familiar with. When integrated with modern development practices, dbt projects can use version control for collaboration, incorporate testing for data quality, and utilize reusable components through macros. dbt also automatically manages dependencies, making sure data transformations execute in the correct sequence.
In this post, we explore a streamlined, configuration-driven approach to orchestrate dbt Core jobs using Amazon Managed Workflows for Apache Airflow (Amazon MWAA) and Cosmos, an open source package. These jobs run transformations on Amazon Redshift, a fully managed data warehouse that enables fast, scalable analytics using standard SQL. With this setup, teams can collaborate effectively while maintaining data quality, operational efficiency, and observability. Key steps covered include:
- Creating a sample dbt project
- Enabling auditing within the dbt project to capture runtime metrics for each model
- Creating a GitHub Actions workflow to automate deployments
- Setting up Amazon Simple Notification Service (Amazon SNS) to proactively alert on failures
These enhancements enable model-level auditing, automated deployments, and real-time failure alerts. By the end of this post, you will have a practical and scalable framework for running dbt Core jobs with Cosmos on Amazon MWAA, so your team can ship reliable data workflows faster.
Solution overview
The following diagram illustrates the solution architecture.
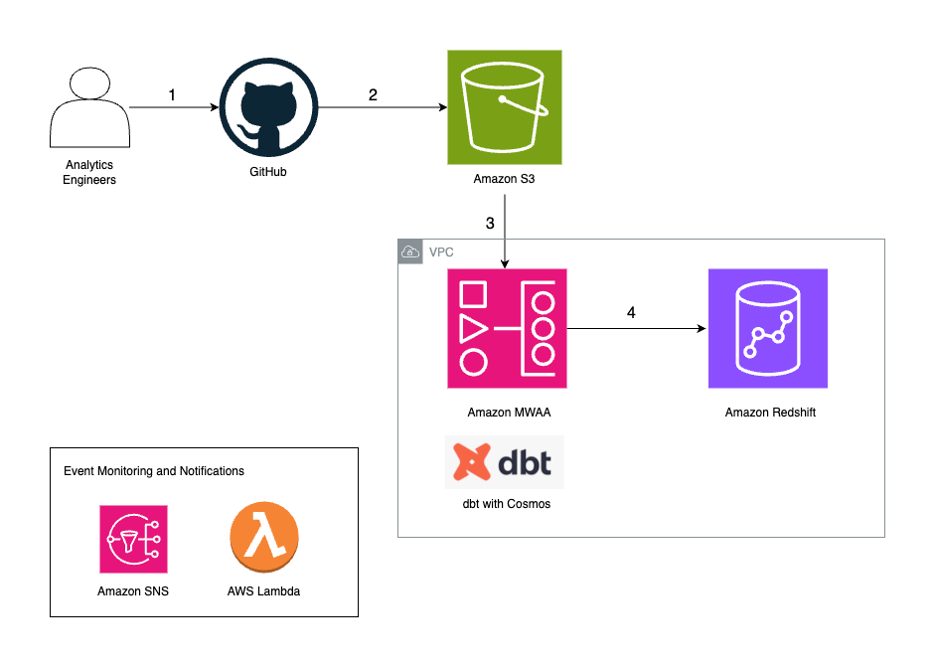
The workflow contains the following steps:
- Analytics engineers manage their dbt project in their version control tool. In this post, we use GitHub as an example.
- We configure an Apache Airflow Directed Acyclic Graph (DAG) to use the Cosmos library to create an Airflow task group that contains all the dbt models as part of the dbt project.
- We use a GitHub Actions workflow to sync the dbt project files and the DAG to an Amazon Simple Storage Service (Amazon S3) bucket.
- During the DAG run, dbt converts the models, tests, and macros to Amazon Redshift SQL statements, which run directly on the Redshift cluster.
- If a task in the DAG fails, the DAG invokes an AWS Lambda function to send out a notification using Amazon SNS.
Prerequisites
You must have the following prerequisites:
- A Redshift provisioned cluster or a Redshift serverless workgroup. For creation instructions, refer to the Amazon Redshift Management Guide.
- An S3 bucket to store dbt project files and DAGs.
- An Amazon MWAA environment. For creation instructions, refer to Create an Amazon MWAA Environment.
- Network connectivity from Amazon MWAA to Amazon Redshift. Deploy Amazon MWAA and your Redshift cluster in the same virtual private cloud (VPC). Add an Amazon MWAA security group as a source for the Redshift security group inbound rule.
- An AWS Identity and Access Management (IAM) role to connect GitHub Actions to actions in AWS. For creation instructions, refer to Use IAM roles to connect GitHub Actions to actions in AWS and Security best practices in IAM.
Create a dbt project
A dbt project is structured to facilitate modular, scalable, and maintainable data transformations. The following code is a sample dbt project structure that this post will follow:
MY_SAMPLE_DBT_PROJECT
├── .github
│   └── workflows
│       └── publish_assets.yml
└── src
    ├── dags
    │   └── dbt_sample_dag.py
    └── my_sample_dbt_project
        ├── macros
        ├── models
        └── dbt_project.yml
dbt uses the following YAML files:
- dbt_project.yml – Serves as the main configuration for your project. Objects in this project will inherit settings defined here unless overridden at the model level. For example:
- sources.yml – Defines the external data sources that your dbt models will reference. For example:
- schema.yml – Outlines the schema of your models and data quality tests. In the following example, we have defined two columns,
full_namefor the modelmodel1andsales_idformodel2. We have declared them as the primary key and defined data quality tests to check if the two columns are unique and not null.
Enable auditing within dbt project
Enabling auditing within your dbt project is crucial for facilitating transparency, traceability, and operational oversight across your data pipeline. You can capture run metrics at the model level for each execution in an audit table. By capturing detailed run metrics such as load identifier, runtime, and number of rows affected, teams can systematically monitor the health and performance of each load, quickly identify issues, and trace changes back to specific runs.
The audit table consists of the following attributes:
- load_id – An identifier for each model run executed as part of the load
- database_name – The name of the database within which data is being loaded
- schema_name – The name of the schema within which data is being loaded
- name – The name of the object within which data is being loaded
- resource_type – The type of object to which data is being loaded
- execution_time – The time duration taken for each dbt model to complete execution as part of each load
- rows_affected – The number of rows affected in the dbt model as part of the load
Complete the following steps to enable auditing within your dbt project:
- Navigate to the
modelsdirectory (src/my_sample_dbt_project/models) and create theaudit_table.sqlmodel file:
- Navigate to the
macrosdirectory (src/my_sample_dbt_project/macros) and create theparse_dbt_results.sqlmacro file:
- Navigate to the
macrosdirectory (src/my_sample_dbt_project/macros) and create thelog_audit_table.sqlmacro file:
- Append the following lines to the
dbt_project.ymlfile:
Create a GitHub Actions workflow
This step is optional. If you prefer, you can skip it and instead upload your files directly to your S3 bucket.
The following GitHub Actions workflow automates the deployment of dbt project files and DAG file to Amazon S3. Replace the placeholders {s3_bucket_name}, {account_id}, {role_name}, and {region} with your S3 bucket name, account ID, IAM role name, and AWS Region in the workflow file.
To enhance security, it’s recommended to use OpenID Connect (OIDC) for authentication with IAM roles in GitHub Actions instead of relying on long-lived access keys.
GitHub has the following security requirements:
- Branch protection rules – Before proceeding with the GitHub Actions workflow, make sure branch protection rules are in place. These rules enforce required status checks before merging code into protected branches (such as
main). - Code review guidelines – Implement code review processes to make sure changes undergo review. This can include requiring at least one approving review before code is merged into the protected branch.
- Incorporate security scanning tools – This can help detect vulnerabilities in your repository.
Make sure you are also adhering to dbt-specific security best practices:
- Pay attention to dbt macros with variables and validate their inputs.
- When adding new packages to your dbt project, evaluate their security, compatibility, and maintenance status to make sure they don’t introduce vulnerabilities or conflicts into your project.
- Review dynamically generated SQL to safeguard against issues like SQL injection.
Update the Amazon MWAA instance
Complete the following steps to update the Amazon MWAA instance:
- Install the Cosmos library on Amazon MWAA by adding
astronomer-cosmosin therequirements.txtfile. Make sure to check for version compatibility for Amazon MWAA and the Cosmos library. - Add the following entries in your
startup.shscript:- In the following code,
DBT_VENV_PATHspecifies the location where the Python virtual environment for dbt will be created.DBT_PROJECT_PATHpoints to the location of your dbt project inside Amazon MWAA. - The following code creates a Python virtual environment at the path
${DBT_VENV_PATH}and installs thedbt-redshiftadapter to run dbt transformations on Amazon Redshift:
- In the following code,
Create a dbt user in Amazon Redshift and store credentials
To create dbt models in Amazon Redshift, you must set up a native Redshift user with the necessary permissions to access source tables and create new tables. It is essential to create separate database users with minimal permissions to follow the principle of least privilege. The dbt user should not be granted admin privileges, instead, it should only have access to the specific schemas required for its tasks.
Complete the following steps:
- Open the Amazon Redshift console and connect as an admin (for more details, refer to Connecting to an Amazon Redshift database).
- Run the following command in the query editor v2 to create a native user, and note down the values for
dbt_user_nameandpassword_value: - Run the following commands in the query editor v2 to grant permissions to the native user:
- Connect to the database where you want to source tables from and run the following commands:
- To allow the user to create tables within a schema, run the following command:
- Optionally, create a secret in AWS Secrets Manager and store the values for
dbt_user_nameandpassword_valuefrom the previous step as plaintext:
Creating a Secrets Manager entry is optional, but recommended for securely storing your credentials instead of hardcoding them. To learn more, refer to AWS Secrets Manager best practices.
Create a Redshift connection in Amazon MWAA
We create one Redshift connection in Amazon MWAA for each Redshift database, making sure that each data pipeline (DAG) can only access one database. This approach provides distinct access controls for each pipeline, helping prevent unauthorized access to data. Complete the following steps:
- Log in to the Amazon MWAA UI.
- On the Admin menu, choose Connections.
- Choose Add a new record.
- For Connection Id, enter a name for this connection.
- For Connection Type, choose Amazon Redshift.
- For Host, enter the endpoint of the Redshift cluster without the port and database name (for example,
redshift-cluster-1.xxxxxx.us-east-1.redshift.amazonaws.com). - For Database, enter the database of the Redshift cluster.
- For Port, enter the port of the Redshift cluster.

Set up an SNS notification
Setting up SNS notifications is optional, but they can be a useful enhancement to receive alerts on failures. Complete the following steps:
- Create an SNS topic.
- Create a subscription to the SNS topic.
- Create a Lambda function with the Python runtime.
- Modify the function code in your Lambda function, and replace
{topic_arn}with your SNS topic Amazon Resource Name (ARN):
Configure a DAG
The following sample DAG orchestrates a dbt workflow for processing and auditing data models in Amazon Redshift. It retrieves credentials from Secrets Manager, runs dbt tasks in a virtual environment, and sends an SNS notification if a failure occurs. The workflow consists of the following steps:
- It starts with the
audit_dbt_tasktask group, which creates the audit model. - The
transform_datatask group executes the other dbt models, excluding theaudit-tagged one. Inside thetransform_datagroup, there are two dbt models,model1andmodel2, and each is followed by a corresponding test task that runs data quality tests defined in theschema.ymlfile. - To properly detect and handle failures, the DAG includes a
dbt_checkPython task that runs a custom function,check_dbt_failures. This is important because when usingDbtTaskGroup, individual model-level failures inside the group don’t automatically propagate to the task group level. As a result, downstream tasks (such as the Lambda operatorsns_notification_for_failure) configured withtrigger_rule='one_failed'will not be triggered unless a failure is explicitly raised.
The check_dbt_failures function addresses this by inspecting the results of each dbt model and test, and raising an AirflowException if a failure is found. When an AirflowException is raised, the sns_notification_for_failure task is triggered.
- If a failure occurs, the
sns_notification_for_failuretask invokes a Lambda function to send an SNS notification. If no failures are detected, this task is skipped.
The following diagram illustrates this workflow.

Configure DAG variables
To customize this DAG for your environment, configure the following variables:
- project_name – Make sure the
project_namematches the S3 prefix of your dbt project - secret_name – Provide the name of the secret that stores dbt user credentials
- target_database and target_schema – Update these variables to reflect where you want to land your dbt models in Amazon Redshift
- redshift_connection_id – Set this to match the connection configured in Amazon MWAA for this Redshift database
- sns_lambda_function_name – Provide the Lambda function name to send SNS notifications
- dag_name – Provide the DAG name that will be passed to the SNS notification Lambda function
Incorporate DAG components
After setting the variables, you can now incorporate the following components to complete the DAG.
Secrets Manager
The DAG retrieves dbt user credentials from Secrets Manager:
Redshift connection configuration
It uses RedshiftUserPasswordProfileMapping to authenticate:
dbt execution setup
This code contains the following variables:
- dbt executable path – Uses a virtual environment
- dbt project path – Is located in the environment variable
DBT_PROJECT_PATHunder your project
Tasks and execution flow
This step includes the following components:
- Audit dbt task group (audit_dbt_task) – Runs the dbt model tagged with
audit - dbt task group (transform_data) – Runs the dbt models tagged with operations, excluding the audit model
In dbt, tags are labels that you can assign to models, tests, seeds, and other dbt resources to organize and selectively run subsets of your dbt project. In your render_config, you have exclude=["tag:audit"]. This means dbt will exclude models that have the tag audit, because the audit model runs separately.
- Failure check (dbt_check) – Checks for dbt model failures, raises an
AirflowExceptionif upstream dbt tasks fail - SNS notification on failure (sns_notification_for_failure) – Invokes a Lambda function to send an SNS notification upon a dbt task failure (for example, a dbt model in the task group)
The sample dbt orchestrates a dbt workflow in Amazon Redshift, starting with an audit task and followed by a task group that processes data models. It includes a failure handling mechanism that checks for failures and raises an exception to trigger an SNS notification using Lambda if a failure occurs. If no failures are detected, the SNS notification task is skipped.
Clean up
If you no longer need the resources you created, delete them to avoid additional charges. This includes the following:
- Amazon MWAA environment
- S3 bucket
- IAM role
- Redshift cluster or serverless workgroup
- Secrets Manager secret
- SNS topic
- Lambda function
Conclusion
By integrating dbt with Amazon Redshift and orchestrating workflows using Amazon MWAA and the Cosmos library, you can simplify data transformation workflows while maintaining robust engineering practices. The sample dbt project structure, combined with automated deployments through GitHub Actions and proactive monitoring using Amazon SNS, provides a foundation for building reliable data pipelines. The addition of audit logging facilitates transparency across your transformations, so teams can maintain high data quality standards.
You can use this solution as a starting point for your own dbt implementation on Amazon MWAA. The approach we outlined emphasizes SQL-based transformations while incorporating essential operational capabilities like deployment automation and failure alerting. Get started by adapting the configuration to your environment, and build upon these practices as your data needs evolve.
For more resources, refer to Manage data transformations with dbt in Amazon Redshift and Redshift setup.
About the authors
 Cindy Li is an Associate Cloud Architect at AWS Professional Services, specialising in Data Analytics. Cindy works with customers to design and implement scalable data analytics solutions on AWS. When Cindy is not diving into tech, you can find her out on walks with her playful toy poodle Mocha.
 Akhil B is a Data Analytics Consultant at AWS Professional Services, specializing in cloud-based data solutions. He partners with customers to design and implement scalable data analytics platforms, helping organizations transform their traditional data infrastructure into modern, cloud-based solutions on AWS. His expertise helps organizations optimize their data ecosystems and maximize business value through modern analytics capabilities.
 Joao Palma is a Senior Data Architect at Amazon Web Services, where he partners with enterprise customers to design and implement comprehensive data platform solutions. He specializes in helping organizations transform their data into strategic business assets and enabling data-driven decision making.
 Harshana Nanayakkara is a Delivery Consultant at AWS Professional Services, where he helps customers tackle complex business challenges using AWS Cloud technology. He specializes in data and analytics, data governance, and AI/ML implementations.