AWS Cloud Financial Management
Simplify Departmental Cost Allocation with AWS Organizations and Lambda
Background and Challenge
Managing cloud costs across multiple departments, and AWS accounts, can be challenging. While AWS Organizations offers a solid foundation for account and billing consolidation, you might struggle to efficiently track departmental spending across your AWS footprint. Cost allocation tags provide granular visibility into spend, but implementing an effective tagging strategy requires a level of operational maturity that might not be present. This is especially true if you are in the early stages of your cloud journey. In this blog, we’ll explore a straightforward, automated approach to departmental cost allocation using AWS Organizations and AWS Lambda. The solution eliminates manual tracking and gives you clear visibility into departmental spending.
Solution Overview
In AWS Organizations, the accounts for each department can be grouped together into an organizational unit (OU). To understand the costs for given department, you could report on the aggregate cost for all of the accounts contained in each department’s OU. However, organizational unit is not one of the available reporting dimensions in AWS Cost Explorer. That’s where AWS Cost Categories are useful. Cost categories is a feature that allows you to group costs into categories based on dimensions such as account, service, or region. Using the architecture below, you will automate the process of creating and maintaining cost categories for each OU in your AWS Organization.
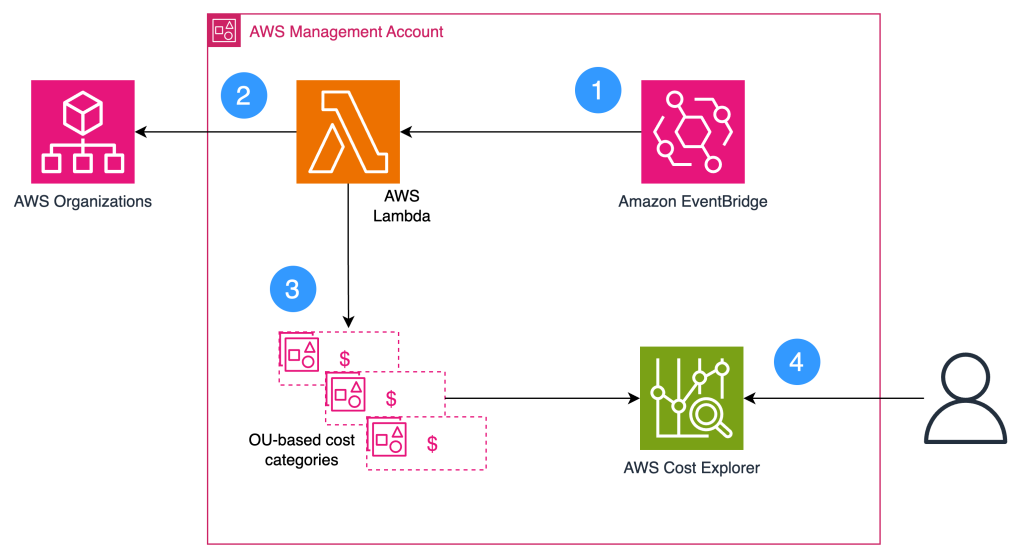
- Amazon EventBridge is configured to run the cost category update process on the last day of each month. This ensures that when the invoice for that month is received, a few days later, the Cost Categories will contain up-to-date cost data.
- When triggered by the EventBridge schedule, Lambda enumerates the OUs in the AWS Organization and the AWS accounts contained within each OU.
- Lambda creates a cost category for each OU named in the format OU-<OU_name>. Each cost category is configured with a rule that matches all of the accounts in the respective OU. If a cost category already exists, it is updated to reflect the current list of accounts.
- You define reports in AWS Cost Explorer using the OU-based cost categories. You can save these reports and run them each month as the basis for chargebacks to each department.
Solution Prerequisites
To use this solution, you will need an AWS Organization configured with an organizational unit (OU) for each department. The accounts managed by each department should be grouped into that department’s OU. To learn how to build an organization see, Tutorial: Creating and configuring an organization.
Implementation Details
The solution is deployed into the management account of your organization. There are six high-level steps, each of which is covered in the sections below.
- Create the Lambda function
- Configure Lambda
- Update the Lambda execution role
- Schedule the execution time in EventBridge
- Validate Cost Categories
- Configure reports
Step 1 – Create the Lambda function
- Sign in to the AWS Management Console and open the Lambda console
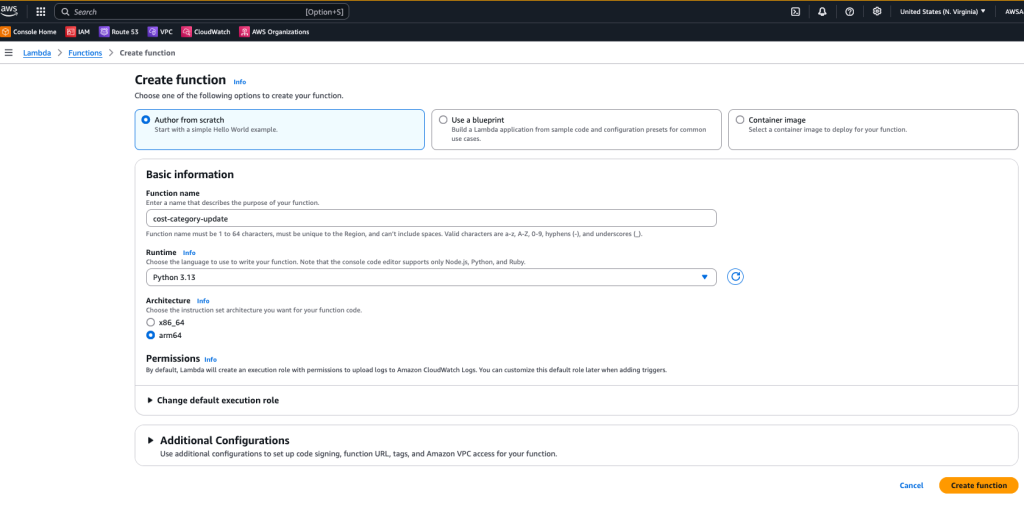
- Choose Create function.
- Select the Author from scratch option.
- Give the function a descriptive name.
- For Runtime, select the latest Python version.
- For Architecture, select arm64.
- Choose Create function.
Step 2 – Configure Lambda
- Once the function is created, choose it from the list of functions to view the configuration details.
- On the Code tab, replace the contents of the Code source window with the sample Python script, which you can find here.
- Choose Deploy.
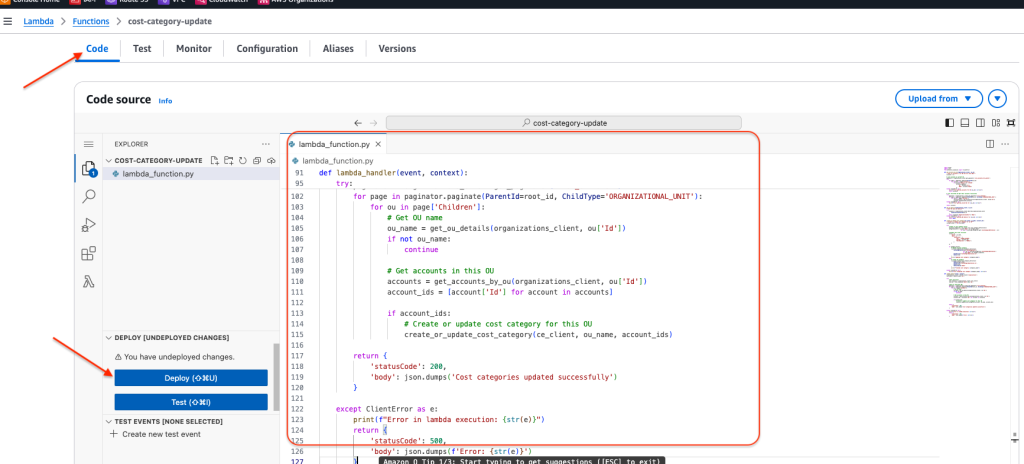 When the deployment is complete, choose the Configuration tab.
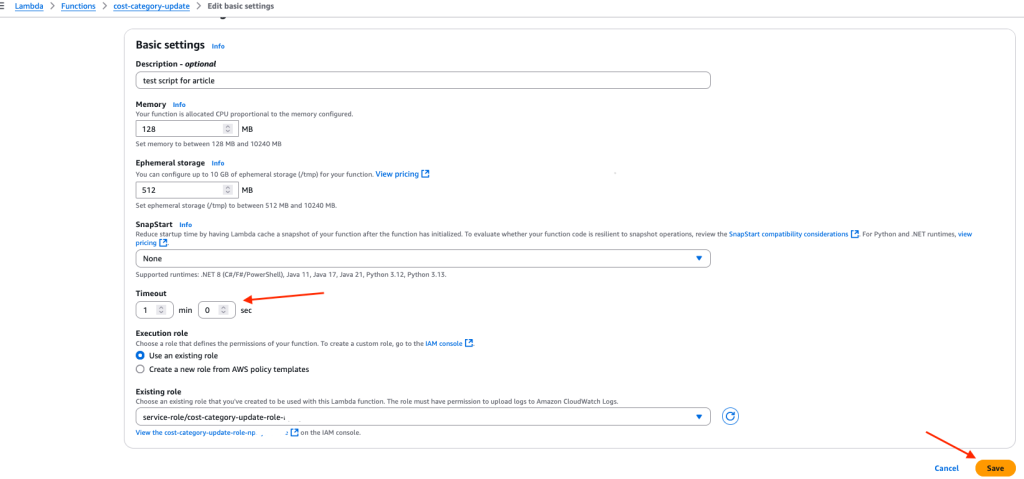
- On the left pane menu, choose General configuration.
- Choose Edit.

- Set the Timeout to one minute
- Choose Save.
Step 3 – Update the Lambda execution role
Next, you’ll need to add permissions to the execution role that was created with the function. These permissions will allow Lambda to read the organization details and create the cost categories.
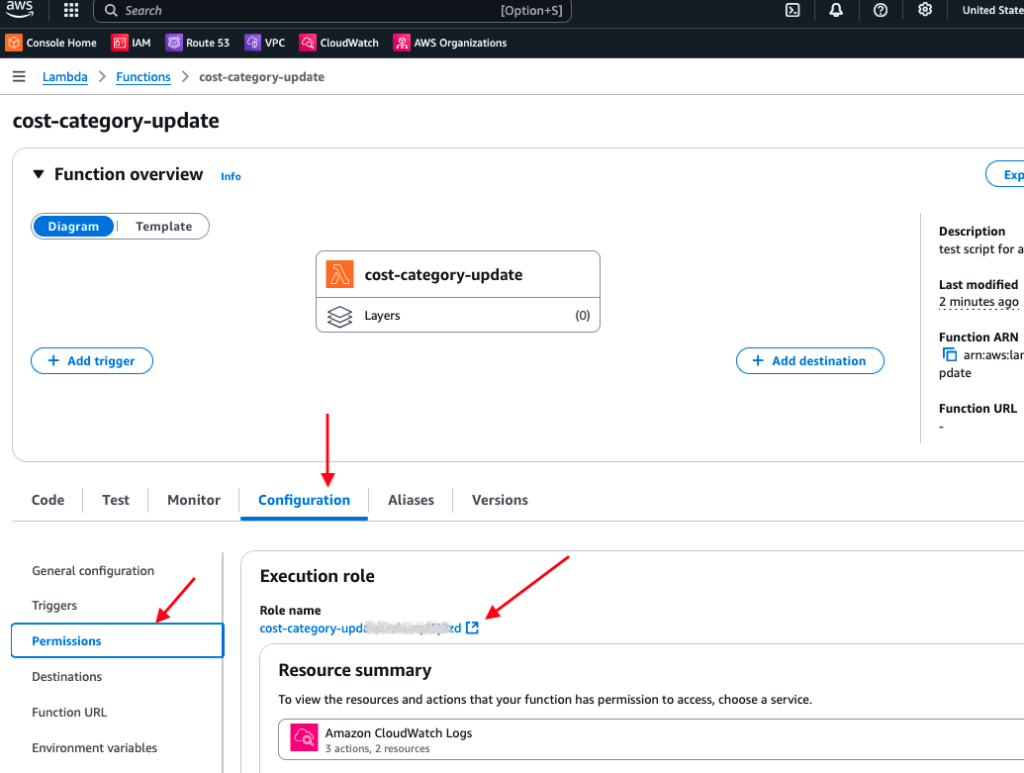
- While still on the configuration tab, choose Permissions on the left menu.
- Under Role name, you’ll see a link to the role that was created for the function. Choose the link to open the role configuration in a new browser tab.
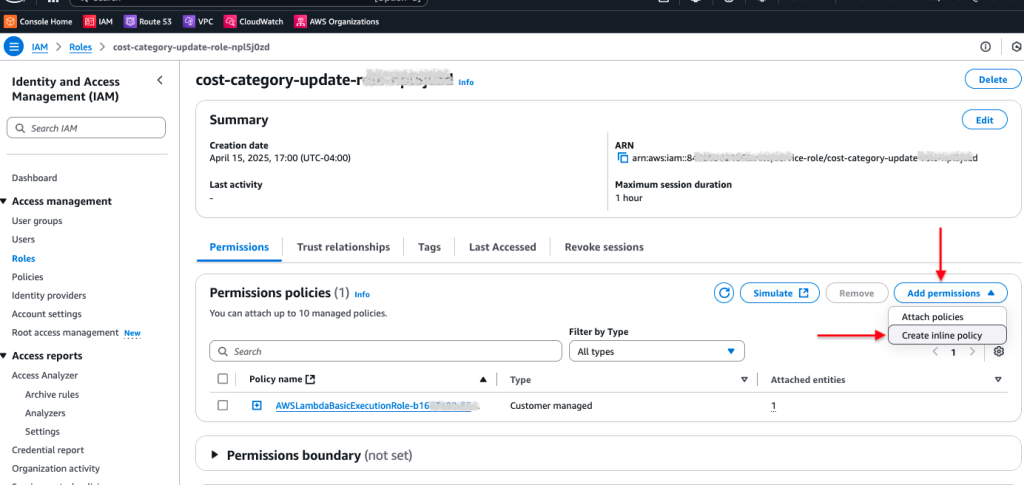
- Choose Add permissions, Create inline policy.
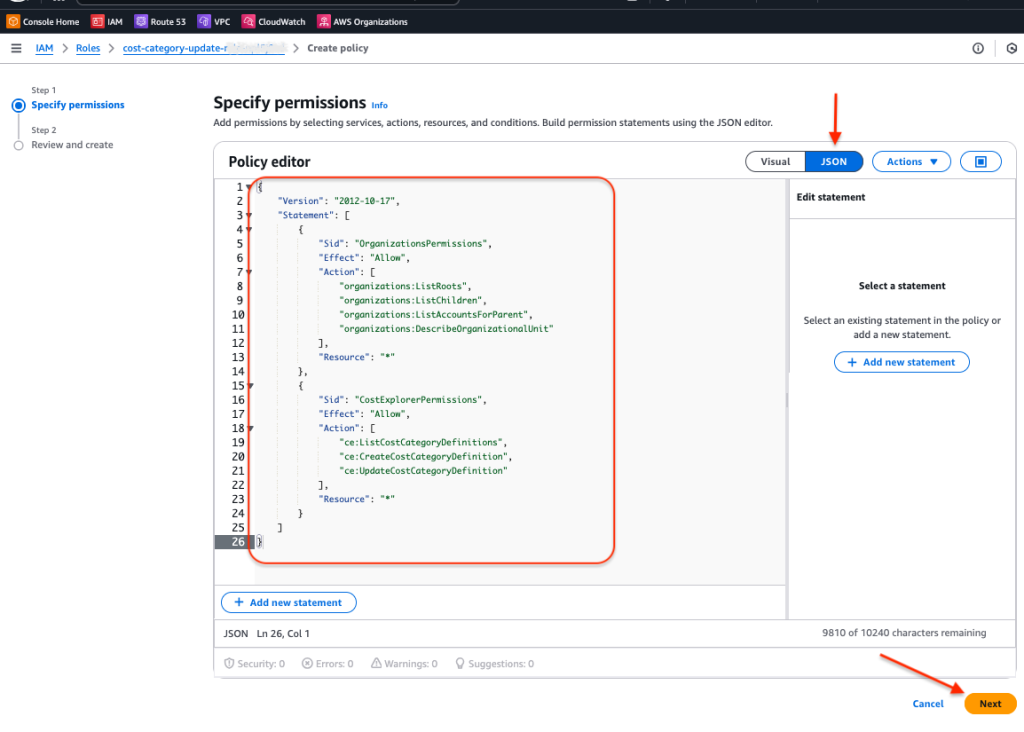
- Choose JSON to set the policy editor to JSON mode. Replace the contents of the Policy editor window with the following code block as shown in the screenshot.
{ "Version": "2012-10-17", "Statement": [ { "Sid": "OrganizationsPermissions", "Effect": "Allow", "Action": [ "organizations:ListRoots", "organizations:ListChildren", "organizations:ListAccountsForParent", "organizations:DescribeOrganizationalUnit" ], "Resource": "*" }, { "Sid": "CostExplorerPermissions", "Effect": "Allow", "Action": [ "ce:ListCostCategoryDefinitions", "ce:CreateCostCategoryDefinition", "ce:UpdateCostCategoryDefinition" ], "Resource": "*" } ] } - Choose Next.
- For Policy name, enter a descriptive name.
- Choose Create policy.

Step 4 – Schedule the execution time in EventBridge
Now, you need to schedule Lambda to execute at the end of each month so that the cost categories accurately reflect the organizational structure when a new monthly invoice is received.
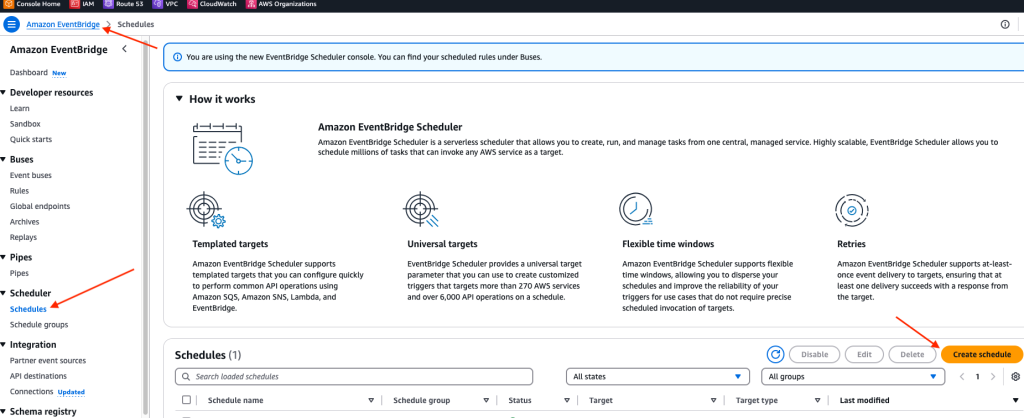
- Open the Amazon EventBridge console.
- From the left pane menu, choose Schedules.
- Choose Create Schedule.
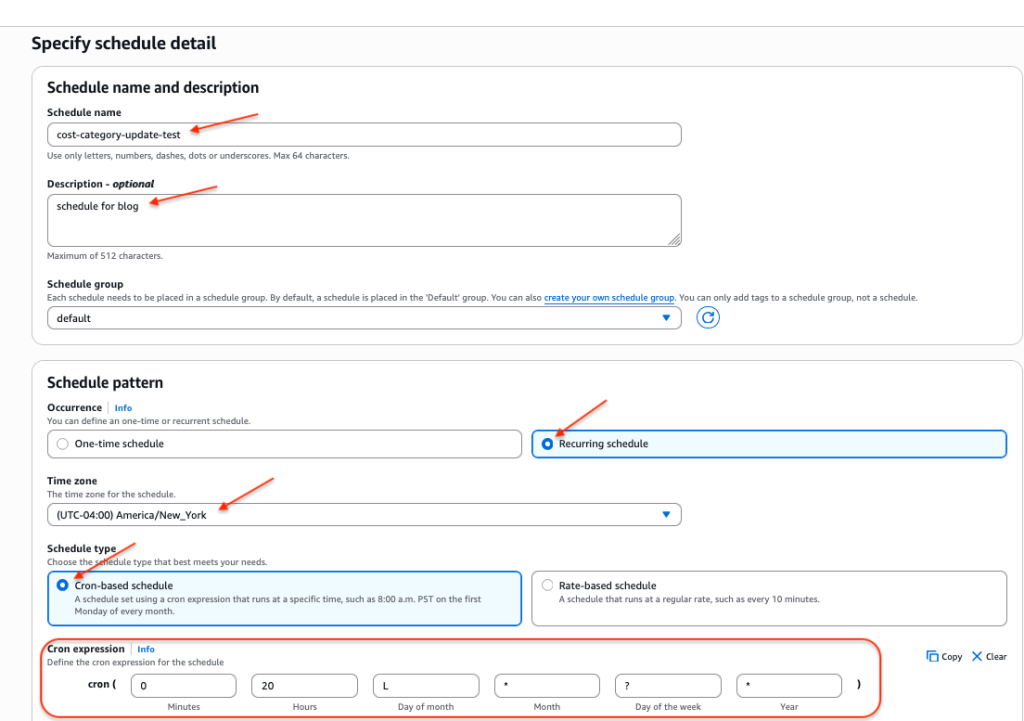
- Enter a name and description
- Select Recurring schedule.
- For Time zone, select your local time zone.
- Select Cron-based schedule.
- For Cron expression, fill in the details for the desired execution time. The example shown below uses the following settings:
- Minutes: 0
- Hours: 20
- Day of month: L
- Month: *
- Day of the week: ?
- Year: *
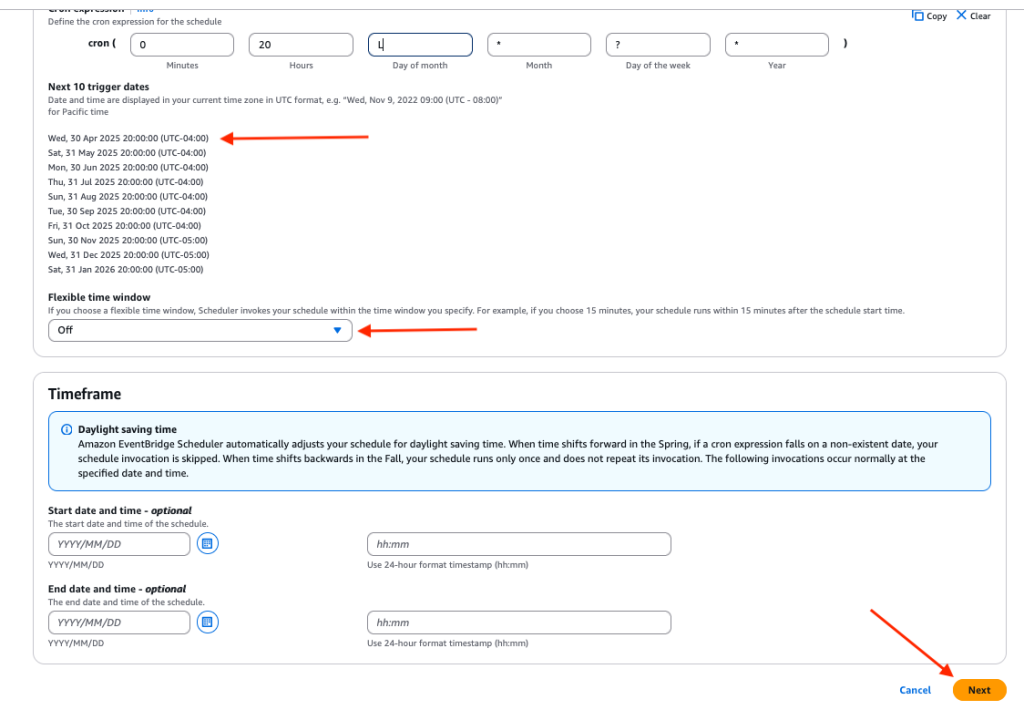
This creates a schedule that executes at 8:00 PM on the last day of each month. For details on how to configure cron expressions see, Cron-based schedules.
- Notice that if you’ve entered a cron expression with correct syntax, the next 10 trigger dates are shown.
- For Flexible time window select Off.
- Choose Next.
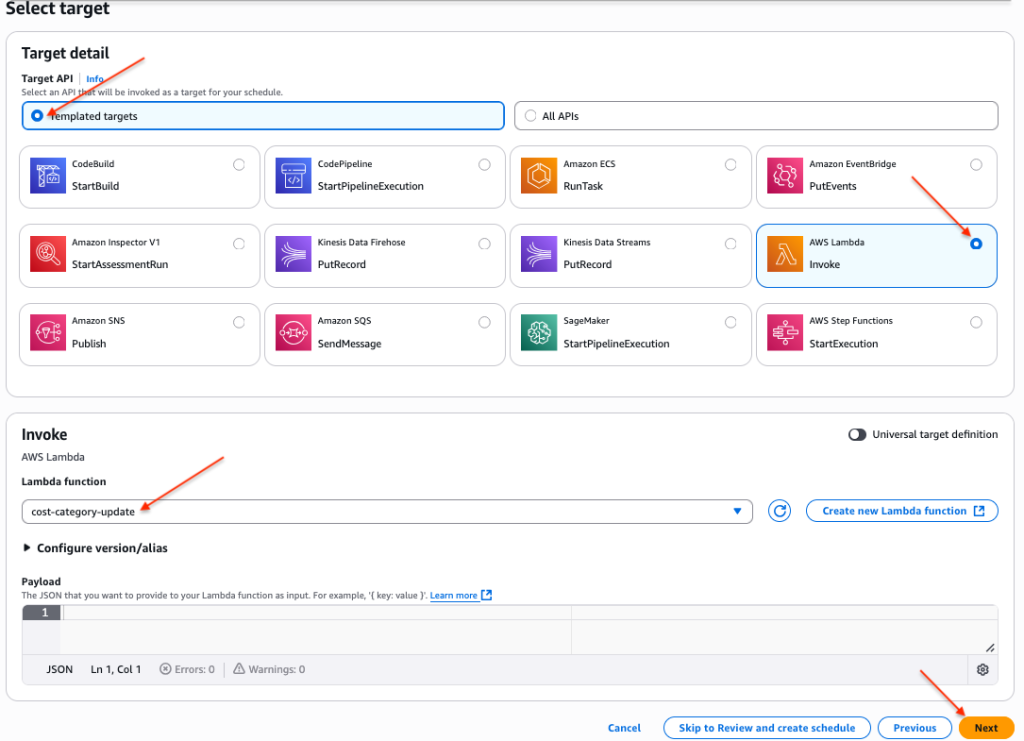
- For Target detail, select Templated targets and AWS Lambda.
- In the Lambda function drop-down menu, select the function you created.
- Choose Next.
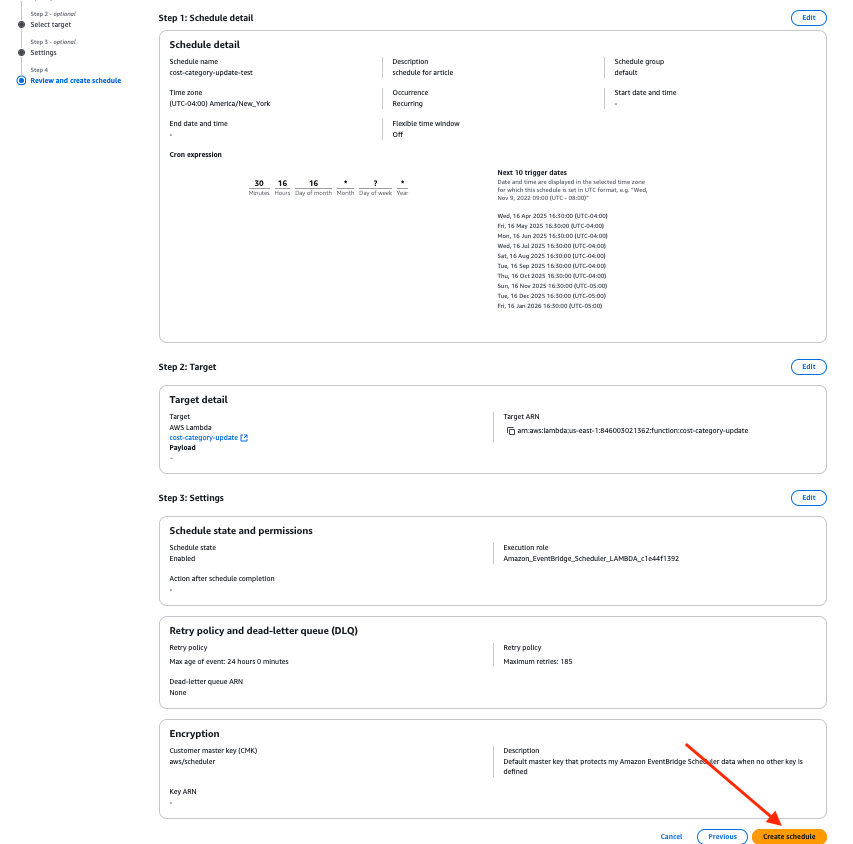
- Choose Next and review the details.
- Choose Create schedule.
Step 5 – Validate Cost Categories
After the Lambda function has been triggered at the scheduled time, you can validate that the cost categories have been properly configured.
- Open the AWS Billing and Cost Management Console
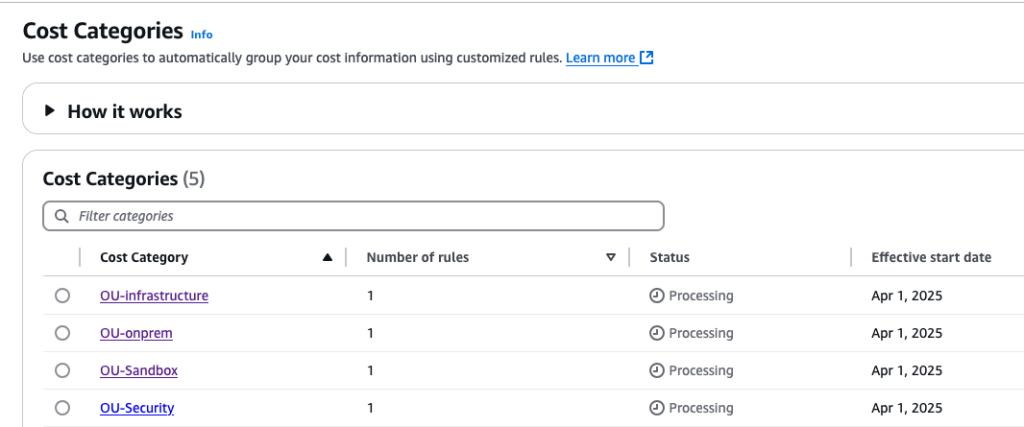
- Choose Cost Categories from the left pane menu.
You should see one cost category for each OU in your organization. When you create or update a cost category, it will show a status of Processing for approximately 24 hours. New cost categories aren’t available for use in Cost Explorer until processing is complete. Existing cost categories can be used during subsequent updates, but they won’t show updated information until the processing has completed.
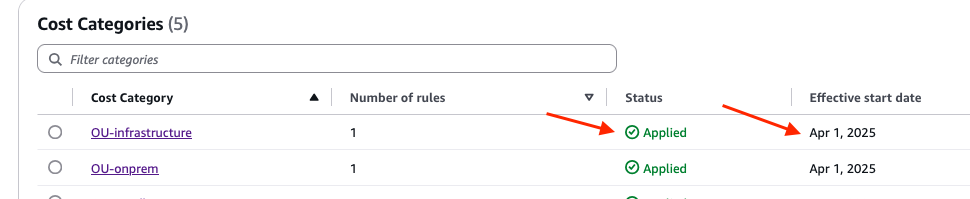
When the cost categories show a status of Applied, you can use them to build reports. Note the effective start date as you will need this when configuring reports.
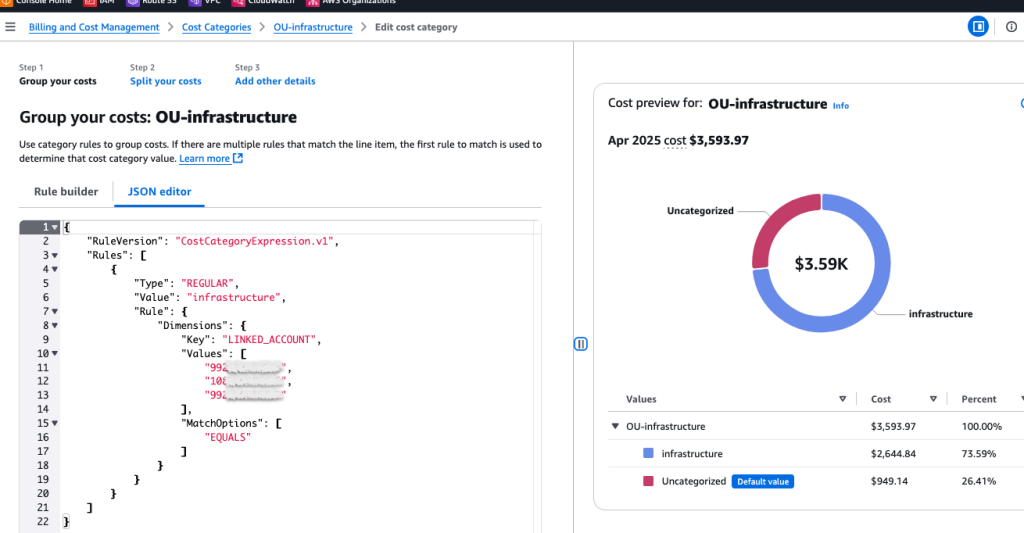
To see the configuration details of a cost category, choose it from the list and then choose Edit cost category.

In the left pane you will see the rule that defines the category. In this example, the rule matches the three accounts which are members of the infrastructure OU. In the right pane, you’ll see the total cost attributed to this category. Any costs that are not included in this category are summarized as “Uncategorized“.
Step 6 – Configure Reporting
Now that the cost categories are created, you can use them to build reports.
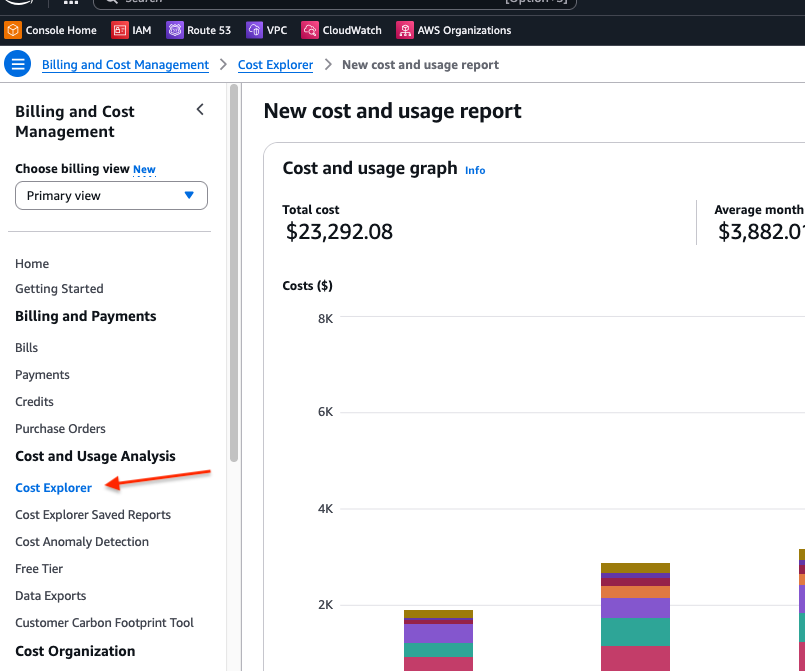
- Open the AWS Billing and Cost Management Console
- Choose Cost Explorer.
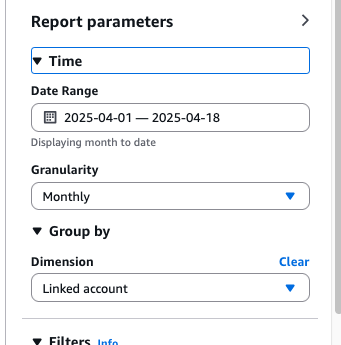
- In the Report parameters section in the right pane, enter the desired reporting period for Date Range. The start date for the range cannot be earlier than the effective start date of the cost category you are reporting on.
- For Granularity, select Monthly.
- For Dimension, select Linked account.
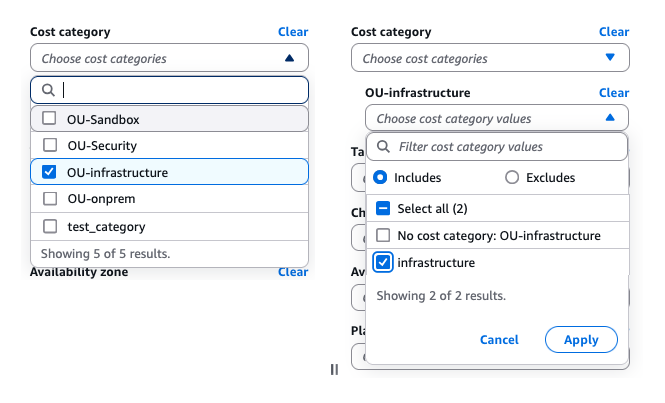
- In the Filters section, for Cost category select the cost category that corresponds to the OU you want to report on.
- When you select a cost category, an additional filter choice will appear. This filter allows for filtering based on split charges. Split charges aren’t required for this report, so select the OU name and choose Apply.
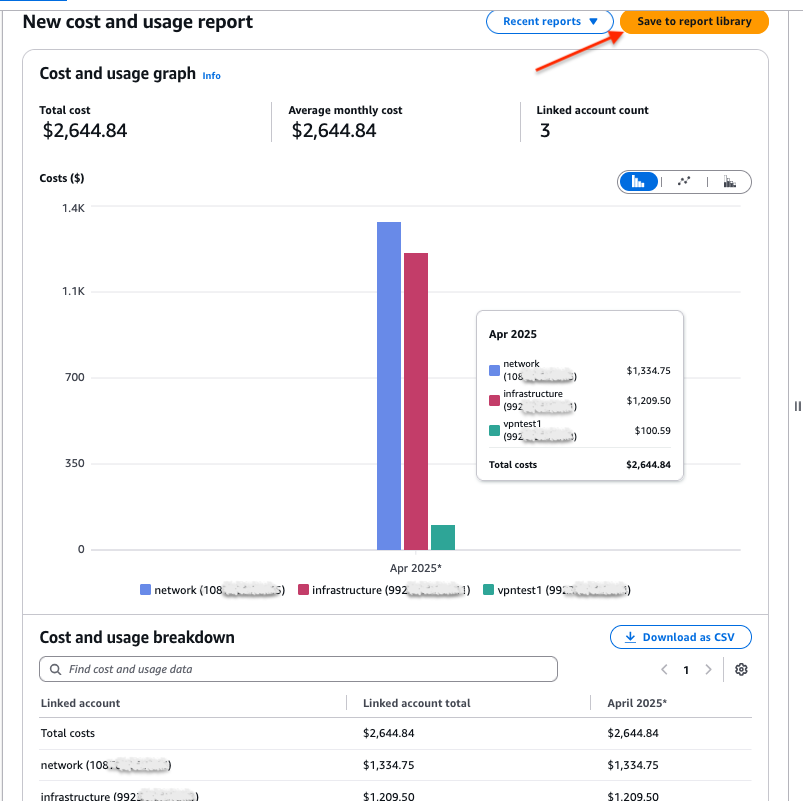
- The resulting report shows the aggregate cost for the infrastructure category. This information can be used as the basis for chargebacks to each department. It also shows the breakdown of cost across the three accounts contained in the infrastructure OU. This can help departments to better understand their spend.
- Choose Save to report library to save this report for future use.
Conclusion
While tagging is a best practice for allocating costs, implementing a robust tagging strategy requires time and discipline. The method described in this blog provides a way to quickly get visibility into aggregated departmental charges. As your organization matures and works to develop a tagging strategy, you can use this cost category methodology to validate that the tag-based reports are correctly reflecting departmental charges.