AWS 기술 블로그
알아두면 쓸모 있는 Aurora MySQL Bluegreen 배포 스크립트
데이터의 폭발적인 증가와 마이크로 서비스 아키텍쳐 환경에서의 Database 관리의 부담 증가
Aurora MySQL과 같은 완전관리형 RDS 서비스는 DBA의 많은 부담을 덜어준 것이 사실입니다. 그러나 데이터가 예측할 수 없는 사이즈로 폭증하고, 많은 서비스들이 마이크로서비스로 현대화되면서 오히려 이전보다 더 많은 수의 데이터베이스를 관리해야 하는 것이 현실이 되었습니다. 한 명의 DBA가 멀티 어카운트의 멀티 리전에 흩어져있는 수십, 수백 대의 데이터베이스를 관리하기도 합니다.
이러한 환경에서 본 블로그는 두 가지 주요 접근 방식을 소개합니다:
- Aurora MySQL의 BlueGreen 배포를 위한 자동화 스크립트
- Python 기반의 자동화된 배포 스크립트를 통해 대규모 데이터베이스 업그레이드 작업 수행
- 배포 생성, 전환 확인, 스위치오버, 이전 클러스터 정리 등 전체 프로세스 자동화
- 멀티 어카운트/리전 환경에서의 확장 가능한 배포 관리
- Amazon Q CLI를 통한 BlueGreen 배포
- Amazon Q Developer의 CLI 도구를 활용한 간편한 배포 방식
- 명령줄 인터페이스를 통한 직관적인 배포 관리
- 에이전트 서비스 기반의 현대적인 배포 방식
이러한 도구들을 활용하여 데이터베이스 관리자들은 보다 효율적이고 안전하게 대규모 Aurora MySQL 환경을 관리할 수 있습니다. 특히 내년에 예정된 Aurora MySQL의 특정 버전들의 EOS(End of Service)에 대비하여, 이러한 자동화된 접근 방식은 더욱 중요해질 것으로 예상됩니다.
Aurora MySQL 의 Bluegreen 배포를 위한 자동화 스크립트
데이터베이스의 Major 또는 Minor 버전 업그레이드 작업은 신중하고 체계적인 접근이 필요합니다. AWS Management Console에서 수동으로 실행하거나 AWS CLI 명령어를 통해 작업을 수행할 수 있지만, 검증된 Python 자동화 스크립트를 활용하면 BlueGreen 배포 프로세스를 더욱 효율적으로 관리할 수 있습니다. 이는 서비스 다운타임을 최소화하고 작업 시간을 대폭 단축할 수 있는 장점이 있습니다.
먼저 단일 클러스터를 대상으로 하는 BlueGreen 배포 자동화 예제를 살펴보겠습니다. Aurora MySQL의 BlueGreen 배포 프로세스는 다음의 5단계로 구성됩니다:
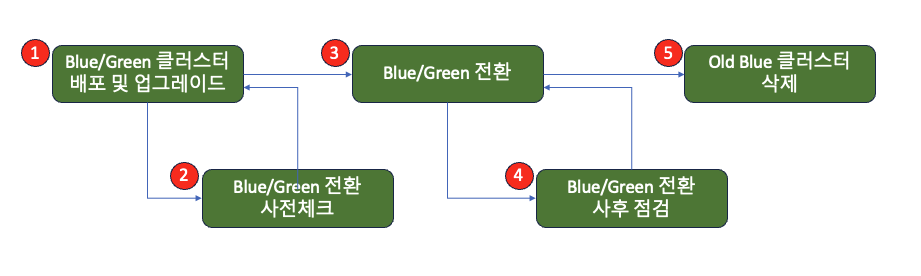
- BlueGreen 배포(Deployment) 및 Green 클러스터 업그레이드
- BlueGreen 전환 전 사전 점검
- BlueGreen 전환(Switch Over) 실행
- BlueGreen 전환 사후 점검
- 이전 Blue 클러스터 삭제
이러한 구조화된 접근 방식을 통해 안전하고 효율적인 데이터베이스 업그레이드가 가능합니다.
1. Blue/Green Cluster 생성
아래는 각 클러스터에 대한 BlueGreen Deployment를 생성하는 Python 스크립트입니다. 스크립트를 실행하면 지정된 클러스터의 BlueGreen Deployment가 생성되고, 이어서 Green 클러스터가 자동으로 구성됩니다. 코드를 살펴보겠습니다:
def create_blue_green_deployment(source_cluster_arn, inputs):
rds_client = boto3.client('rds', region_name=inputs['region'])
with console.status("[bold green]Bluegreen 배포 생성 중...") as status:
console.print(f"소스 DB Cluster명: {inputs['cluster_identifier']}")
response = rds_client.create_blue_green_deployment(
BlueGreenDeploymentName='bg-'+inputs['cluster_identifier'],
Source=source_cluster_arn,
TargetEngineVersion=inputs['target_engine_version'],
TargetDBClusterParameterGroupName=inputs['cluster_parameter_group']
)
deployment_id = response['BlueGreenDeployment']['BlueGreenDeploymentIdentifier']
deployment_name = response['BlueGreenDeployment']['BlueGreenDeploymentName']
status.update("[bold green]배포 상태 확인 중...")
current_status = rds_client.describe_blue_green_deployments(
BlueGreenDeploymentIdentifier=deployment_id
)['BlueGreenDeployments'][0]['Status']
console.print(f"현재 상태: {current_status}")
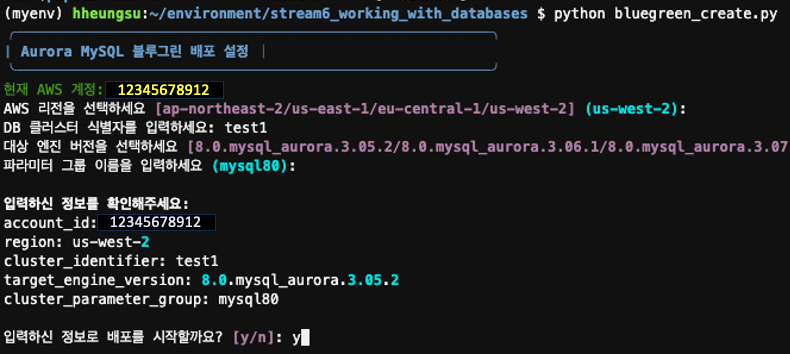
return deployment_name위 함수가 포함된 전체 코드를 실행하면, 아래 그림과 같이 대화형 입력 화면이 표시됩니다. DB 클러스터명, 리전, 업그레이드할 버전 등 필요한 정보를 순차적으로 입력하게 됩니다.
입력된 BlueGreen 배포 정보를 최종 확인한 후, ‘y’를 입력하여 배포 프로세스를 시작할 수 있습니다.
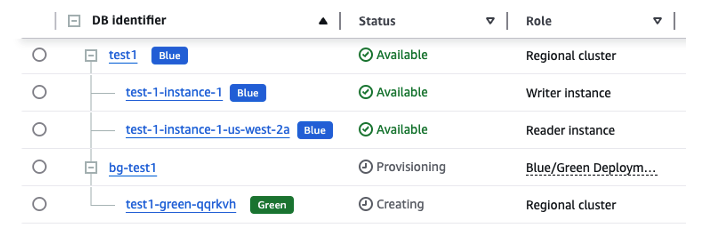
코드를 실행하면 BlueGreen 클러스터 생성이 시작되고, 이어서 Green 클러스터의 업그레이드가 자동으로 진행됩니다.
배포 진행 상태를 모니터링하기 위해 아래의 코드를 사용할 수 있습니다:
def get_deployment_status(rds_client, deployment_name=None):
    try:
        if deployment_name:
            response = rds_client.describe_blue_green_deployments(
                Filters=[{
                    'Name': 'blue-green-deployment-name',
                    'Values': [deployment_name]
                }]
            )
        else:
            response = rds_client.describe_blue_green_deployments()

        deployments = response.get('BlueGreenDeployments', [])
        if deployment_name and not deployments:
            console.print(f"[yellow]지정한 배포명 '{deployment_name}'에 해당하는 배포를 찾을 수 없습니다.[/yellow]")
        return deployments
    except Exception as e:
        console.print(f"[red]블루/그린 배포 조회 실패: {str(e)}[/red]")
        return []
위 코드를 파라미터 없이 실행하면 현재 리전의 모든 BlueGreen 배포 클러스터가 조회됩니다. 필요한 경우, 특정 리전과 BlueGreen 배포 이름을 파라미터로 지정하여 해당 배포의 진행 상태만을 선별적으로 확인할 수 있습니다.


BlueGreen 배포는 다음과 같은 상태 전이 과정을 거칩니다:
Provisioning → Upgrading → Available
각 단계별 진행 과정은 다음과 같습니다:
- Provisioning: 원본 클러스터와 동일한 구성의 인스턴스 생성
- Upgrading: 생성된 인스턴스의 버전 업그레이드 수행
- Available: 업그레이드 완료 및 사용 가능 상태
모든 대상 BlueGreen 클러스터가 ‘Available’ 상태에 도달하면 배포가 성공적으로 완료된 것입니다. 참고로, Green 클러스터의 인스턴스는 업그레이드 완료 후 한 번의 리부팅 과정을 거치게 됩니다.
2) Switch Over
Switch Over는 업그레이드가 완료된 BlueGreen 배포 클러스터와 현재 운영 중인 원본 클러스터를 전환하는 핵심 프로세스입니다. 이 과정에서 다음과 같은 변경이 발생합니다:
- 기존 클러스터는 ‘[원본이름]_old’ 형식의 이름으로 변경됩니다
- 기존 클러스터의 Public Endpoint는 새로운 BlueGreen 배포 클러스터로 자동 승계됩니다
주의사항: 이는 프로덕션 환경에 직접적인 영향을 미치는 중요 작업이므로, 다음 사항을 반드시 준수해야 합니다:
- 개발팀 및 서비스 운영팀과의 사전 협의 필수
- 충분한 사전 검토 및 테스트 수행
- Switch Over 전 사전 체크 포인트 검증
아래 코드는 BlueGreen 전환 시 발생할 수 있는 주요 이슈들을 사전에 점검하는 데 활용됩니다:
def check_aurora_instances_status(blue_cluster_arn, green_cluster_arn, rds_client):

    def check_cluster_instances(cluster_arn):
        response = rds_client.describe_db_clusters(DBClusterIdentifier=cluster_arn)
        instances = response['DBClusters'][0]['DBClusterMembers']

        cluster_id = response['DBClusters'][0]['DBClusterIdentifier']

        all_available = True

        for instance in instances:
            instance_id = instance['DBInstanceIdentifier']
            instance_response = rds_client.describe_db_instances(DBInstanceIdentifier=instance_id)
            status = instance_response['DBInstances'][0]['DBInstanceStatus']

            print(f"> Cluster Name: {cluster_id}, Instance: {instance_id}, Status: {status}")

            if status != 'available':
                all_available = False

        return all_available

    blue_available = check_cluster_instances(blue_cluster_arn)
    green_available = check_cluster_instances(green_cluster_arn)

    return blue_available and green_available

def check_running_ddl(connection):
    cursor = None
    try:
        cursor = connection.cursor(dictionary=True)

        cursor.execute("SHOW PROCESSLIST")
        processes = cursor.fetchall()

        ddl_operations = ['CREATE', 'ALTER', 'DROP', 'TRUNCATE', 'RENAME']
        running_ddl = [process for process in processes if process['Info'] and any(op in process['Info'].upper() for op in ddl_operations)]

        if running_ddl:
            print("> Running DDL detected. Check failed.")
            for process in running_ddl:
                print(f"> ID: {process['Id']}, Command: {process['Command']}, Time: {process['Time']}, State: {process['State']}, Info: {process['Info']}")
        else:
            print("> Not running DDL. Check passed")

    except Error as e:
        print(f"> Database Connection Error: {e}")

    except Exception as e:
        print(f"> An error occurred: {e}")
        return False
    finally:
        if cursor:
            cursor.close()

def check_binlog_replica_lag(cluster_arn, cloudwatch_client):
    current_time = datetime.utcnow()
    start_time = (current_time - timedelta(minutes=5)).strftime('%Y-%m-%dT%H:%M:%SZ')
    end_time = current_time.strftime('%Y-%m-%dT%H:%M:%SZ')

    cluster_identifier = cluster_arn.split(':')[-1]

    try:
        response = cloudwatch_client.get_metric_statistics(
        Namespace='AWS/RDS',
        MetricName='AuroraBinlogReplicaLag',
        Dimensions=[
            {
                'Name': 'DBClusterIdentifier',
                'Value': cluster_identifier
            }
        ],
        StartTime=start_time,
        EndTime=end_time,
        Period=60,
        Statistics=['Average']
    )
        if 'Datapoints' in response and len(response['Datapoints']) > 0:
            lag = response['Datapoints'][0]['Average']

            if lag==0:
                print("> Replica lag between Blue and Green cluster is 0. Check passed")
            else:
                print(f"> Green Cluster lag: {lag}")
                return lag
        else:
            print("> Failed to retrieve lag information for the Green cluster. Check failed")
            return None

    except Exception as e:
        print(f"> Error checking Binlog Replica Lag: {e}. Check failed")
        return None

def check_external_replica(connection):
    try:
        cursor = connection.cursor(dictionary=True)
        sql = """
        SELECT * FROM mysql.rds_replication_status
        WHERE action = 'set master'
        ORDER BY action_timestamp DESC
        LIMIT 1;
        """
        cursor.execute(sql)
        result = cursor.fetchall()

        if result:
            print("External Replica detected. Check failed.")
            for row in result:
                print(f"> Action: {row['action']}, Timestamp: {row['action_timestamp']}")
            return False
        else:
            print("> No External Replica detected. Check passed.")
            return True
    except Error as e:
        print(f"> Error checking External Replica: {e}")
        return False
    finally:
        if cursor:
            cursor.close()

def check_rollback_segment_hll(connection):
    cursor = None
    try:
        cursor = connection.cursor(dictionary=True)
        cursor.execute("SELECT COUNT FROM information_schema.INNODB_METRICS WHERE NAME = 'trx_rseg_history_len'")
        result = cursor.fetchone()

        if result:
            hll = result['COUNT']
            print(f"> current Rollback Segment HLL: {hll}.", end=" ")

            if hll > 1000000:
                print(f"Rollback Segment HLL is greater than 1,000,000. Check failed. HLL Count: {hll}")
            else:
                print("Rollback Segment HLL Check passed.")
        else:
            print("> Unable to retrieve Rollback Segment HLL.")
            return "checked fail", None

    except Exception as e:
        print(f"> An error occurred: {e}")
        return None

    finally:
        if cursor:
            cursor.close()
모든 사전 체크가 완료되고 충분한 테스트를 통해 안정성이 검증되었다면, 아래 코드를 사용하여 Switch Over를 실행할 수 있습니다. 이 코드는 검증된 환경에서 안전하게 전환 작업을 수행합니다:
# BlueGreenDeploymentIdentifier 및 cluster이름 추출
deployment_cluster_map = {
    deployment['BlueGreenDeploymentIdentifier']: deployment['BlueGreenDeploymentName']
    for deployment in response['BlueGreenDeployments']
}

if not deployment_cluster_map:
    print("현재 리전에 Blue/Green 배포가 없습니다.")
else:
    # BlueGreenDeploymentIdentifier 값 출력
    for identifier, cluster_name in deployment_cluster_map.items():
        #print(f"BlueGreenDeploymentIdentifier: {identifier}, ClusterName: {cluster_name}")
        try:
            status = rds_client.describe_blue_green_deployments(
                        BlueGreenDeploymentIdentifier=identifier
                    )['BlueGreenDeployments'][0]['Status']

            if status == 'AVAILABLE':
                response = rds_client.switchover_blue_green_deployment(
                    BlueGreenDeploymentIdentifier=identifier
                )
                print(f"블루그린 [{identifier}] {cluster_name} 스위치오버 완료")
            else :
                print(f"블루그린 [{identifier}] {cluster_name} 이미 스위치오버가 끝났거나 시작되어 처리중입니다.")

        except Exception as e:
            print(f"Error: {e}")
아래와 같이 실행하면 Switch Over 작업의 진행 상태와 결과를 확인할 수 있습니다:

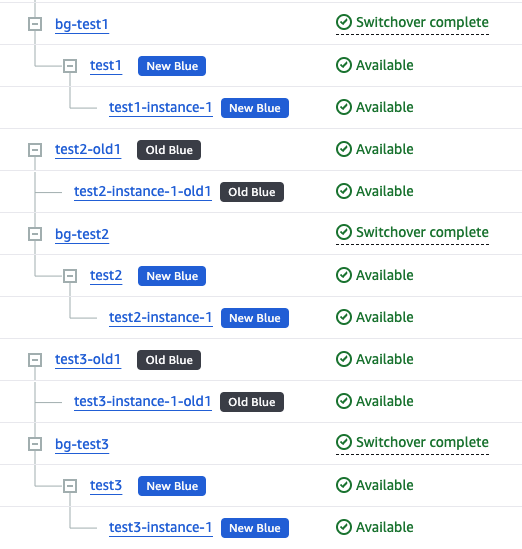
AWS Management Console에서도 아래와 같이 Switch Over 결과를 확인할 수 있습니다:
전환 작업 후 필수 확인 사항:
- 서비스 정상 동작 여부 점검
- 애플리케이션 로그 모니터링
- 전반적인 시스템 상태 확인
이러한 검증 과정에서 문제가 발견되지 않았다면, BlueGreen 배포 작업의 90%가 완료된 것으로 볼 수 있습니다.
3) BlueGreen 배포 삭제 및 기존 Old Blue Cluster 삭제
Switch Over된 새로운 클러스터들은 예기치 못한 버그 등으로 인한 롤백 상황에 대비하여, 충분한 검증 기간을 가져야 합니다. 짧게는 1주에서 길게는 1달 동안 새로운 클러스터의 안정성을 모니터링한 후에 Old 클러스터를 삭제하시기를 강력히 권고드립니다.
Switch Over 작업이 완전히 종료되고 롤백 위험이 전혀 없다고 판단되면, 불필요한 Old Blue Cluster를 삭제할 수 있습니다. 삭제는 다음 순서로 진행됩니다:
- BlueGreen 배포(예: bg-test1, bg-test2) 삭제
- 기존 Old Blue Cluster(예: test1-old1, test2-old2) 삭제
참고로 Old Blue Cluster는 기존 클러스터명(예: “test-1”) 끝에 “-old1″과 같은 suffix가 추가된 이름으로 변경됩니다.
모든 작업이 중요하지만, 특히 삭제 작업은 더욱 신중하게 진행해야 합니다. 안전한 삭제 작업을 위해서는 다음과 같은 방법을 추천드립니다:
- 충분한 사전 테스트 진행
- 삭제 로직 실행 전, 해당 로직을 주석처리하고 삭제 대상 리스트만 먼저 추출하여 검토
- 삭제 대상 중 현재 서비스 중인 클러스터가 포함되어 있지 않은지 반드시 확인
아래 소스코드는 이러한 안전한 삭제 프로세스를 구현한 것으로, BlueGreen 배포를 먼저 삭제한 후 Old Blue Cluster의 인스턴스부터 차례로 삭제하는 작업을 수행합니다:
def delete_blue_green_deployments(rds_client):
    """현재 존재하는 블루그린 배포를 삭제합니다."""
    try:
        response = rds_client.describe_blue_green_deployments()
        deployments = response['BlueGreenDeployments']

        if not deployments:
            print("삭제할 블루그린 배포가 없습니다.")
            return

        for deployment in deployments:
            identifier = deployment['BlueGreenDeploymentIdentifier']
            cluster_name = deployment['BlueGreenDeploymentName']

            try:
                rds_client.delete_blue_green_deployment(
                    BlueGreenDeploymentIdentifier=identifier
                )
                print(f"블루그린 배포 삭제 완료: [{identifier}] {cluster_name}")

                # 배포 삭제 완료 대기
                while True:
                    try:
                        rds_client.describe_blue_green_deployments(
                            BlueGreenDeploymentIdentifier=identifier
                        )
                        time.sleep(30)
                    except:
                        break

            except Exception as e:
                print(f"블루그린 배포 [{identifier}] 삭제 중 에러 발생: {e}")

    except Exception as e:
        print(f"Error: {e}")

def delete_cluster(rds_client, cluster_identifier):
    """클러스터와 관련 인스턴스들을 삭제합니다."""
    try:
        # 클러스터에 속한 DB 인스턴스들을 먼저 삭제
        response = rds_client.describe_db_clusters(
            DBClusterIdentifier=cluster_identifier
        )

        # DB 인스턴스 삭제
        for instance in response['DBClusters'][0]['DBClusterMembers']:
            instance_id = instance['DBInstanceIdentifier']
            print(f"DB 인스턴스 삭제 중: {instance_id}")
            rds_client.delete_db_instance(
                DBInstanceIdentifier=instance_id,
                SkipFinalSnapshot=True
            )

        # 인스턴스 삭제 완료 대기
        for instance in response['DBClusters'][0]['DBClusterMembers']:
            instance_id = instance['DBInstanceIdentifier']
            while True:
                try:
                    rds_client.describe_db_instances(DBInstanceIdentifier=instance_id)
                    time.sleep(30)
                except:
                    break

        # 클러스터 삭제
        print(f"클러스터 삭제 중: {cluster_identifier}")
        rds_client.delete_db_cluster(
            DBClusterIdentifier=cluster_identifier,
            SkipFinalSnapshot=True
        )
        return True

    except Exception as e:
        print(f"Error: {e}")
        return False
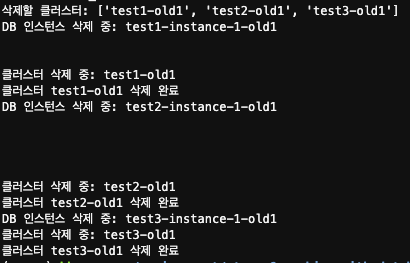
실제 실행 결과는 아래와 같습니다. 코드를 실행하면 우선적으로 BlueGreen 배포 구성이 삭제됩니다:

이어서 진행 되는 작업에서는 Old Blue Cluster들의 삭제가 진행됩니다. 안전한 삭제를 위해 다음과 같은 순차적 프로세스를 구현했습니다:
- 클러스터 삭제 전 인스턴스들을 먼저 제거
- 각 삭제 작업 사이에 30초의 간격(Sleep)을 두어 순차적으로 진행
- 이를 통해 리소스 삭제 과정의 안정성 확보
지금까지 BlueGreen 배포 작업의 기본 프로세스를 단계별로 살펴보았습니다.
앞서 설명한 코드는 개별 클러스터의 BlueGreen 배포 생성 예시였습니다. 하지만 실제 운영 환경에서는 더 복잡한 시나리오를 마주하게 됩니다:
- 100개 이상의 클러스터를 동시에 처리해야 하는 경우
- 여러 리전에 걸쳐 배포를 생성해야 하는 상황
- 대규모 동시 작업으로 인한 리스크 관리 필요성
이러한 대규모 작업의 경우, 리전별로 순차적으로 진행하는 것이 리스크 관리 측면에서 더 안전한 접근 방식이 될 수 있습니다.
아래는 다수의 클러스터에 대한 BlueGreen 배포를 자동화하는 스크립트입니다. 프로덕션 환경에 적용하기 전에 충분한 테스트 검증을 권고드립니다:
def get_account_credentials(secret_name, region):
    #print("AWS Secrets Manager에서 계정 자격 증명을 가져옵니다.")
    try:
        session = boto3.session.Session()
        client = session.client('secretsmanager', region_name=region)
        response = client.get_secret_value(SecretId=secret_name)
        return json.loads(response['SecretString'])
    except Exception as e:
        print(f"시크릿 조회 중 오류 발생: {e}")
        return None

def create_blue_green_deployment(session, region_name, target_version="8.0.mysql_aurora.3.05.2",
                               name_filter="test", tag_key="need_upgrade", tag_value="y"):
    try:
        rds_client = session.client("rds", region_name=region_name)
        account_id = session.client('sts').get_caller_identity()['Account']

        # 클러스터 목록 조회
        paginator = rds_client.get_paginator('describe_db_clusters')
        clusters_to_upgrade = []

        for page in paginator.paginate():
            for cluster in page['DBClusters']:
                cluster_identifier = cluster['DBClusterIdentifier']
                engine_version = cluster['EngineVersion']

                print("cluster_identifier: ",cluster_identifier)

                # 버전, 이름, 태그 기반 필터링
                version_check = float(engine_version.split('.')[0]) < float(target_version.split('.')[0])
                name_pattern = rf"^{name_filter}\d+$"

                # 정규식을 사용한 이름 패턴 체크
                name_check = re.match(name_pattern, cluster_identifier.lower()) is not None

                # 태그 확인
                tags_response = rds_client.list_tags_for_resource(
                    ResourceName=f"arn:aws:rds:{region_name}:{account_id}:cluster:{cluster_identifier}"
                )
                tag_check = any(
                    tag['Key'] == tag_key and tag['Value'] == tag_value
                    for tag in tags_response['TagList']
                )

                if version_check and (name_check or tag_check):
                    clusters_to_upgrade.append(cluster_identifier)

        # 필터링된 클러스터에 대해 블루그린 배포 생성
        for cluster_name in clusters_to_upgrade:
            cluster_arn = f"arn:aws:rds:{region_name}:{account_id}:cluster:{cluster_name}"
            print(f"블루그린 배포를 생성합니다: {cluster_name}")

            response = rds_client.create_blue_green_deployment(
                BlueGreenDeploymentName=f"bg-{cluster_name}",
                Source=cluster_arn,
                TargetEngineVersion=target_version,
                TargetDBClusterParameterGroupName="mysql80"
            )

            print(f"블루그린 배포 생성 완료: {cluster_name}")
            print(f"배포 ID: {response['BlueGreenDeployment']['BlueGreenDeploymentIdentifier']}")

        return len(clusters_to_upgrade)

    except Exception as e:
        print(f"블루그린 배포 생성 중 오류 발생: {e}")
        return 0


def read_accounts_from_csv(file_path):
    """CSV 파일에서 계정 정보와 시크릿 이름을 읽어옵니다."""
    accounts = []
    with open(file_path, "r") as csvfile:
        reader = csv.DictReader(csvfile)
        for row in reader:
            accounts.append({
                "account_id": row["account_id"],
                "secret_name": row["secret_name"],
                "region": row["region"]
            })
    return accounts

def main():
    if len(sys.argv) < 2:
        print("Usage: python script.py <path_to_csv_file>")
        sys.exit(1)

    csv_file_path = sys.argv[1]
    accounts = read_accounts_from_csv(csv_file_path)

    for account in accounts:
        print(f"\nProcessing account: {account['account_id']}")

        credentials = get_account_credentials(account["secret_name"], account["region"])
        if not credentials:
            continue

        session = boto3.Session(
            aws_access_key_id=credentials["access_key"],
            aws_secret_access_key=credentials["secret_key"],
            region_name=account["region"]
        )

        # 블루그린 배포 생성
        upgraded_clusters = create_blue_green_deployment(
            session,
            account["region"],
            target_version="8.0.mysql_aurora.3.05.2",  # 업그레이드할 타겟버전
            name_filter="test",                        # 클러스터 이름 필터
            tag_key="need_upgrade",                     # 태그 키
            tag_value="y"                     # 태그 값
        )
        print(f"계정 {account['account_id']}에서 {upgraded_clusters}개의 클러스터에 대해 블루그린 배포를 생성했습니다.")


if __name__ == "__main__":
    main()
스크립트 실행을 위해서는 다음과 같은 사전 준비가 필요합니다:
- CSV 파일 구성
- Account ID
- Account Credential 정보(access key, secret key)
- Region 리스트
- AWS Secrets Manager 설정
- 각 계정의 credential 정보를 아래 형식으로 저장:
보안 주의사항: Account credential 정보는 매우 중요한 보안 자산이므로, 노출되지 않도록 각별히 주의해야 합니다.
secret 정보는 아래와 같이 CSV 파일 형태로 저장합니다. 파일명은 임의로 지정 가능합니다:
CSV 파일에는 다음 정보들이 포함됩니다:
- account_id: AWS 계정 ID
- secret_name: 해당 계정의 credential이 저장된 Secrets Manager 시크릿 이름
- region: 작업을 수행할 리전
위 예시에서는 3개의 서로 다른 account와 그에 해당하는 secret name, 그리고 각 리전 정보를 포함하고 있습니다.
CSV 파일과 secret 정보 준비가 완료되었다면, 아래 명령어로 스크립트를 실행합니다. 실행 스크립트의 파일명은 필요에 따라 임의로 지정하실 수 있습니다:
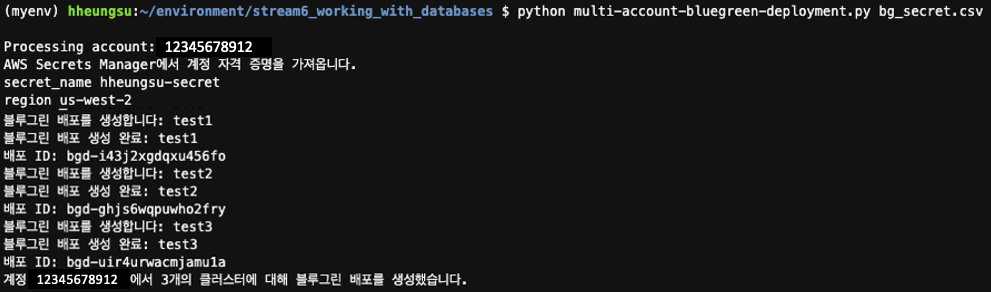
이제 앞서 설명한 블루그린 배포 확인 스크립트를 실행하여 배포 상태를 모니터링할 수 있습니다. 배포 상태 확인을 위한 상세 스크립트는 링크에서 확인 할 수 있습니다.
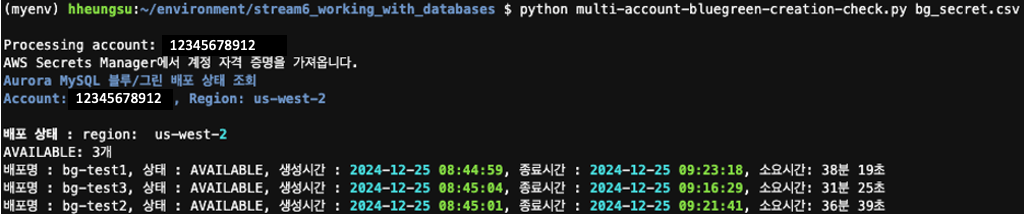
위 실행 결과에서 확인할 수 있듯이, 각 Account의 리전별 클러스터들에 대한 BlueGreen 배포가 성공적으로 완료되었습니다. 동일한 방식으로 Switch Over나 Old Blue Cluster 삭제 등의 후속 작업도 진행할 수 있습니다.
다만 여기서 주의할 점이 있습니다. 이 스크립트는 참고용 예시이며, 실제 운영 환경에서는 더욱 신중한 접근이 필요합니다. 특히 업그레이드 작업의 위험을 최소화하기 위해서는:
- 여러 Account의 모든 Region 클러스터를 동시에 변경하는 것은 지양
- 한 개의 Account 내에서 Region별로 순차적 진행
- 특정 버전의 클러스터들을 단계적으로 업그레이드
이러한 단계적 접근이 더 안전하고 현실적인 방법이 될 것입니다.
상세한 스크립트 내용은 링크 에서 확인하실 수 있습니다.
Amazon Q CLI 를 통한 블루그린 배포
MCP 기반 에이전트 서비스의 확장과 함께, Amazon Q Developer의 Q CLI를 통한 BlueGreen 배포 방식이 새롭게 도입되었습니다. 이는 앞서 살펴본 Python 스크립트 방식 외에 보다 간편한 배포 방법을 제공합니다.
Q CLI의 주요 특징:
- 커맨드 라인 인터페이스를 통한 간편한 실행
- 간단한 설치 및 설정 과정
- 직관적인 사용법
Q CLI 설치 방법은 링크에서 확인하실 수 있습니다.
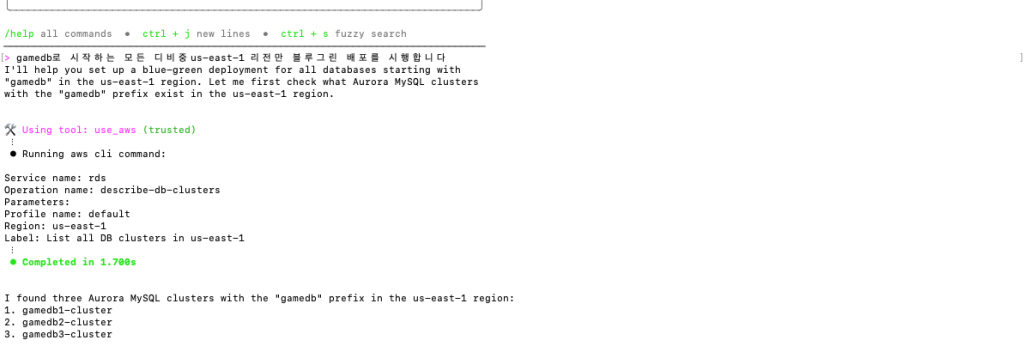
실제 사용 예시를 살펴보겠습니다. Terminal(macOS 기준)에서 다음과 같이 실행합니다:
- 특정 데이터베이스의 Prefix 지정
- 대상 리전 설정
- BlueGreen 배포 실행
실행하면 우선 다음과 같이 대상 데이터베이스 목록이 표시됩니다:
리스트업이 완료되면, 확인된 데이터베이스들에 대해 BlueGreen 배포가 자동으로 진행됩니다:
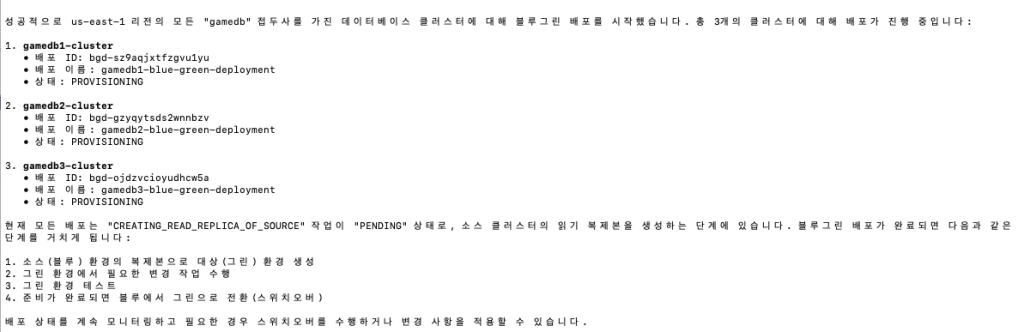
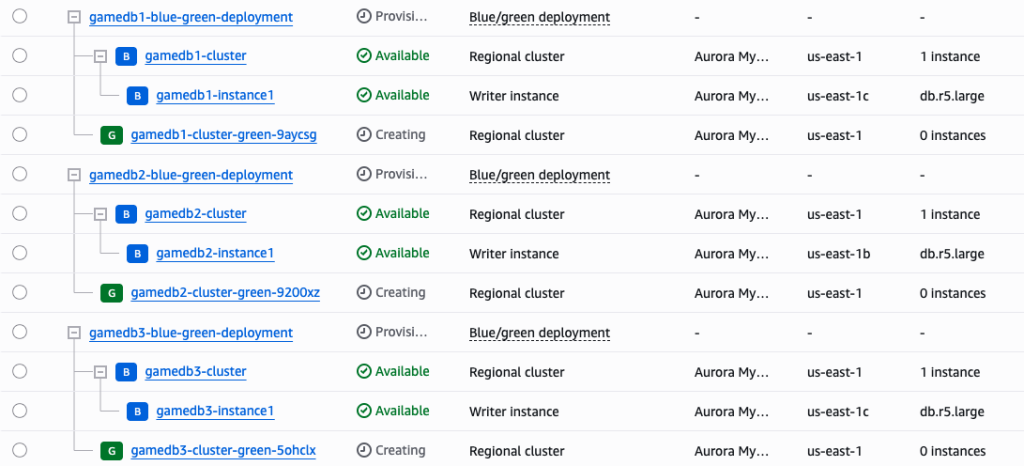
최종적으로 AWS Management Console에서 BlueGreen 배포 진행 상태를 확인할 수 있습니다:
이처럼 Q CLI를 활용하면 BlueGreen 배포를 보다 간편하게 수행할 수 있습니다.
다만, 데이터베이스 업그레이드는 매우 중요한 작업인 만큼, 프로덕션 환경에 적용하기 전에 충분한 테스트 과정을 거치실 것을 강력히 권장드립니다.
글을 마치며
데이터베이스 관리는 매우 중요한 업무입니다. 작은 실수 하나가 심각한 서비스 장애로 이어질 수 있기 때문에, 데이터베이스 작업 자동화에는 세심한 주의와 충분한 검증이 필수적입니다.
현재 많은 DBA들이 AWS Management Console에서의 수동 작업이나 필요할 때마다 AWS CLI 명령어를 수정하여 작업하는 방식을 선호합니다. 이러한 방식이 익숙하고 안전해 보일 수 있지만, 두 가지 중요한 단점이 있습니다:
- 업그레이드 작업에 많은 시간이 소요되어 서비스 다운타임 증가
- 수작업 과정에서 예기치 못한 실수 발생 가능성
자동화 방식을 선택하실 때, Python 스크립트를 활용하시든 직접 상황에 맞는 스크립트를 작성하시든, 가장 중요한 것은 철저한 사전 계획과 충분한 테스트입니다.
이 블로그가 DBA분들의 업무 부담을 조금이나마 덜어드리는 데 도움이 되었기를 바랍니다. 긴 글 읽어주셔서 감사합니다.