概述
双十一、黑五、618…每个电商大促都是对邮件系统的极限挑战。日常 1 万封的发送量,在大促期间可能暴涨到 100 万封。如何确保邮件系统在流量峰值时稳定运行?如何在成本可控的前提下保证高送达率?
本文将分享电商企业在大规模邮件营销中的实战经验,帮助你构建高可用、可扩展的邮件发送架构。
💡 前置阅读:建议先阅读《从零到一搭建发送平台》了解 SES 基础
大规模场景的三大挑战
挑战 1:流量峰值管理
典型场景:双十一预热邮件
日常发送量:10,000 封/天
大促前 3 天:500,000 封/天(50x 增长)
大促当天:1,000,000 封/天(100x 增长)
问题: – ❌ 配额不足,邮件发送失败 – ❌ 发送速率限制,邮件延迟 – ❌ 突然的流量增长导致 ISP 限流
挑战 2:送达率保障
数据对比:
| 场景 |
送达率 |
影响 |
| 日常运营(共享 IP) |
95-97% |
可接受 |
| 大促期间(共享 IP) |
85-90% |
损失 10 万+ 用户触达 |
| 大促期间(专用 IP + 预热) |
98-99% |
最优 |
1% 送达率差异 = 10,000 封邮件 = 潜在数十万营收
挑战 3:成本控制
成本构成分析:
| 项目 |
日常成本 |
大促成本 |
优化空间 |
| 邮件发送费用 |
$1/天 |
$100/天 |
通过批量 API 降低 20% |
| 专用 IP |
$0 |
$24.95/月 |
大促后释放 |
| 数据传输 |
$0.5/天 |
$10/天 |
附件外链化降低 50% |
| 总计 |
$1.5/天 |
$110/天 |
可优化 30% |
容量规划:提前 1 个月准备
配额计算公式
# 计算所需配额
def calculate_quota(user_count, email_per_user, campaign_days):
    """
    user_count: 目标用户数
    email_per_user: 每用户邮件数(预热+正式)
    campaign_days: 活动天数
    """
    total_emails = user_count * email_per_user
    daily_quota = total_emails / campaign_days * 1.2  # 20% 缓冲

    # 计算所需发送速率(假设集中在 8 小时发送)
    sending_hours = 8
    required_rate = daily_quota / (sending_hours * 3600)

    return {
        'daily_quota': int(daily_quota),
        'sending_rate': int(required_rate) + 1
    }

# 示例:双十一活动
quota = calculate_quota(
    user_count=1_000_000,      # 100 万用户
    email_per_user=3,          # 预热 2 封 + 正式 1 封
    campaign_days=5            # 5 天活动期
)
print(f"所需配额:{quota['daily_quota']:,} 封/天")
print(f"所需速率:{quota['sending_rate']} 封/秒")
输出:
所需配额:720,000 封/天
所需速率:25 封/秒
配额申请时间表
| 时间节点 |
行动 |
说明 |
| 大促前 6 周 |
评估发送量需求 |
基于历史数据和业务预测 |
| 大促前 5 周 |
提交配额申请 |
通过 AWS Support 提交 |
| 大促前 4 周 |
申请专用 IP |
开始 IP 预热流程 |
| 大促前 1 周 |
压力测试 |
验证系统承载能力 |
| 大促期间 |
实时监控 |
关注关键指标 |
📚 参考文档:Managing your Amazon SES sending quotas
专用 IP 预热:选择合适的方式
为什么需要预热?
ISP 对新 IP 地址持谨慎态度。如果突然从新 IP 发送大量邮件,会被视为可疑行为,导致: – 邮件被限流(throttling) – 邮件进入垃圾箱 – IP 被加入黑名单
大促场景推荐:标准自动预热
对于大促场景,推荐使用 标准自动预热(Standard Auto Warm-up),原因:
- ✅ 进度可追踪:通过预热百分比精确控制流量
- ✅ 灵活调整:可以根据大促时间表加速或减速
- ✅ Public IP 分流:前期利用 AWS Public IP 池分担流量
- ✅ 成本可控:只在大促期间使用,之后可以释放
大促准备时间表:
| 时间节点 |
预热百分比 |
每日发送量 |
操作 |
| 大促前 4 周 |
0% → 25% |
500 → 50,000 |
申请 DIP,开始预热 |
| 大促前 3 周 |
25% → 50% |
50,000 → 200,000 |
监控退信率和投诉率 |
| 大促前 2 周 |
50% → 75% |
200,000 → 500,000 |
逐步增加发送量 |
| 大促前 1 周 |
75% → 100% |
500,000 → 目标量 |
达到生产水平,压力测试 |
| 大促期间 |
100% |
目标量 |
全力发送 |
| 大促后 1 周 |
– |
– |
评估是否保留 DIP |
标准预热计划(详细版)
| 周次 |
每日发送量 |
累计发送量 |
重点关注 |
| 第 1 周 |
500 → 2,000 |
7,000 |
选择高质量用户 |
| 第 2 周 |
5,000 → 20,000 |
87,500 |
监控退信率 < 2% |
| 第 3 周 |
50,000 → 100,000 |
525,000 |
监控投诉率 < 0.05% |
| 第 4 周 |
200,000 → 目标量 |
1,050,000+ |
达到生产水平 |
标准自动预热监控脚本
import boto3
from datetime import datetime, timedelta

class StandardAutoWarmupManager:
    """标准自动预热管理器"""

    def __init__(self, dedicated_ip):
        self.ses_client = boto3.client('sesv2')
        self.dedicated_ip = dedicated_ip

    def get_warmup_status(self):
        """获取预热状态和百分比"""
        response = self.ses_client.get_dedicated_ip(Ip=self.dedicated_ip)
        ip_info = response['DedicatedIp']

        return {
            'ip': ip_info['Ip'],
            'warmup_status': ip_info['WarmupStatus'],
            'warmup_percentage': ip_info.get('WarmupPercentage', 0),
            'pool_name': ip_info.get('PoolName', 'default')
        }

    def calculate_sending_capacity(self, target_volume):
        """根据预热百分比计算当前可发送量"""
        status = self.get_warmup_status()
        percentage = status['warmup_percentage']

        # 当前可通过 DIP 发送的量
        dip_capacity = int(target_volume * (percentage / 100))

        # 剩余流量会通过 Public IP 发送
        public_ip_volume = target_volume - dip_capacity

        return {
            'warmup_percentage': percentage,
            'dip_capacity': dip_capacity,
            'public_ip_volume': public_ip_volume,
            'total_volume': target_volume
        }

    def adjust_warmup_percentage(self, new_percentage):
        """手动调整预热百分比(高级功能)"""
        try:
            self.ses_client.put_dedicated_ip_warmup_attributes(
                Ip=self.dedicated_ip,
                WarmupPercentage=new_percentage
            )
            print(f"✅ 预热百分比已调整为 {new_percentage}%")
            return True
        except Exception as e:
            print(f"❌ 调整失败:{e}")
            return False

    def monitor_warmup_progress(self):
        """监控预热进度"""
        status = self.get_warmup_status()

        print(f"IP: {status['ip']}")
        print(f"预热状态: {status['warmup_status']}")
        print(f"预热进度: {status['warmup_percentage']}%")

        # 根据进度给出建议
        percentage = status['warmup_percentage']
        if percentage < 25:
            print("📊 建议:当前处于预热初期,保持低发送量")
        elif percentage < 50:
            print("📊 建议:可以逐步增加发送量")
        elif percentage < 75:
            print("📊 建议:接近预热完成,可以加大发送量")
        else:
            print("📊 建议:预热接近完成,可以全力发送")

        return status

# 使用示例
manager = StandardAutoWarmupManager('192.0.2.1')

# 监控预热进度
status = manager.monitor_warmup_progress()

# 计算当前可发送量(目标 100 万封)
capacity = manager.calculate_sending_capacity(1_000_000)
print(f"\n当前可通过 DIP 发送:{capacity['dip_capacity']:,} 封")
print(f"通过 Public IP 发送:{capacity['public_ip_volume']:,} 封")

# 如果需要加速预热(谨慎使用)
# manager.adjust_warmup_percentage(60)
预热进度追踪示例:
# 每天检查预热进度
| Day 1 |
预热进度: 5% |
DIP 发送 500 封 |
Public IP 发送 9,500 封 |
| Day 7 |
预热进度: 25% |
DIP 发送 50,000 封 |
Public IP 发送 150,000 封 |
| Day 14 |
预热进度: 50% → |
DIP 发送 250,000 封 |
Public IP 发送 250,000 封 |
| Day 21 |
预热进度: 75% |
DIP 发送 600,000 封 |
Public IP 发送 200,000 封 |
| Day 28 |
预热进度: 100% |
DIP 发送 1,000,000 封 |
Public IP 发送 0 封 |
托管 IP 池:长期弹性扩容方案
对于发送量波动大、需要长期使用 DIP 的企业,托管 IP 池(Managed IP Pool) 是最简单的方式。
适用场景: – ✅ 发送量波动大(日常 10 万,大促 100 万) – ✅ 需要长期使用 DIP – ✅ 不想关心 IP 预热和扩容细节
核心优势: – 🤖 全自动:AWS 自动申请、预热、扩容、释放 IP – 📈 弹性扩容:根据发送量自动增减 IP 数量 – 💰 成本优化:只为实际使用的 IP 付费 – 🎯 最省心:无需人工干预
配置示例:
# 创建托管 IP 池
aws sesv2 create-dedicated-ip-pool \
  --pool-name ecommerce-managed-pool \
  --scaling-mode MANAGED

# 将 Configuration Set 关联到托管池
aws sesv2 put-configuration-set-delivery-options \
  --configuration-set-name marketing-campaigns \
  --sending-pool-name ecommerce-managed-pool
自动扩容示例:
时间线:
├─ 第 1 个月:日发送 10 万封
│ └─ AWS 分配:1 个 DIP
│
├─ 第 2 个月:日发送增长到 50 万封
│ └─ AWS 自动:申请并预热第 2 个 DIP
│
├─ 第 3 个月(大促):日发送 100 万封
│ └─ AWS 自动:申请并预热第 3、4 个 DIP
│
└─ 第 4 个月:日发送降回 30 万封
└─ AWS 自动:释放多余的 DIP,保留 2 个
成本对比:
| 方案 |
日常成本 |
大促成本 |
灵活性 |
| 固定 4 个 DIP |
$99.8/月 |
$99.8/月 |
❌ 日常浪费 |
| 托管 IP 池 |
$24.95/月 |
$99.8/月 |
✅ 按需付费 |
| 节省 |
$74.85/月 |
$0 |
– |
预热期间的最佳实践
1.选择高质量用户
def select_warmup_users(all_users, warmup_percentage):
    """根据预热百分比选择发送用户"""
    # 预热初期(< 25%):只发送给最活跃用户
    if warmup_percentage < 25:
        return [u for u in all_users if u['engagement_score'] > 80]

    # 预热中期(25-50%):活跃 + 中等活跃用户
    elif warmup_percentage < 50:
        return [u for u in all_users if u['engagement_score'] > 50]

    # 预热后期(50-75%):大部分用户
    elif warmup_percentage < 75:
        return [u for u in all_users if u['engagement_score'] > 30]

    # 预热完成(> 75%):所有用户
    else:
        return all_users
2.实时监控关键指标
def monitor_warmup_health(dedicated_ip):
    """监控预热健康度"""
    cloudwatch = boto3.client('cloudwatch')

    # 获取过去 1 小时的指标
    metrics = cloudwatch.get_metric_statistics(
        Namespace='AWS/SES',
        MetricName='Reputation.BounceRate',
        Dimensions=[{'Name': 'DedicatedIp', 'Value': dedicated_ip}],
        StartTime=datetime.now() - timedelta(hours=1),
        EndTime=datetime.now(),
        Period=3600,
        Statistics=['Average']
    )

    bounce_rate = metrics['Datapoints'][0]['Average'] if metrics['Datapoints'] else 0

    # 告警阈值
    if bounce_rate > 0.05:  # 5%
        send_alert(f"⚠️ 退信率过高:{bounce_rate:.2%}")
        return False

    return True
📚 参考文档:Warming up dedicated IP addresses
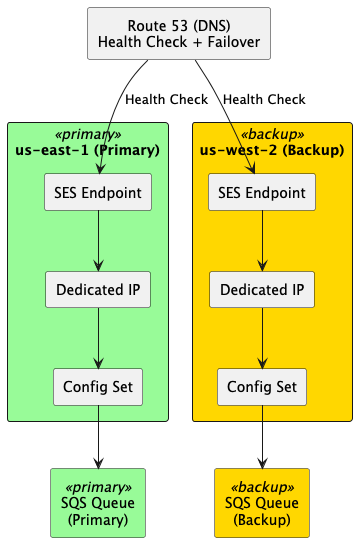
高可用架构:多区域部署
架构设计
故障转移实现
class MultiRegionSender:
    def __init__(self):
        self.regions = [
            {'name': 'us-east-1', 'priority': 1, 'client': boto3.client('ses', region_name='us-east-1')},
            {'name': 'us-west-2', 'priority': 2, 'client': boto3.client('ses', region_name='us-west-2')}
        ]
        self.current_region = self.regions[0]

    def send_email_with_failover(self, email_data, max_retries=2):
        """带故障转移的邮件发送"""
        for region in self.regions:
            try:
                response = region['client'].send_email(**email_data)
                print(f"✅ 发送成功 via {region['name']}")
                return response

            except Exception as e:
                print(f"❌ {region['name']} 发送失败: {e}")

                # 如果不是最后一个区域,尝试下一个
                if region != self.regions[-1]:
                    print(f"🔄 切换到 {self.regions[self.regions.index(region) + 1]['name']}")
                    continue
                else:
                    # 所有区域都失败,记录到死信队列
                    self.send_to_dlq(email_data)
                    raise

    def send_to_dlq(self, email_data):
        """发送到死信队列,稍后重试"""
        sqs = boto3.client('sqs')
        sqs.send_message(
            QueueUrl='https://sqs.us-east-1.amazonaws.com/123456789012/email-dlq',
            MessageBody=json.dumps(email_data)
        )
健康检查
def check_ses_health(region):
    """检查 SES 服务健康状态"""
    ses_client = boto3.client('ses', region_name=region)
    cloudwatch = boto3.client('cloudwatch', region_name=region)

    try:
        # 检查账户状态
        account_info = ses_client.get_account()

        # 检查发送配额
        quota = account_info['SendQuota']
        usage_percent = (quota['SentLast24Hours'] / quota['Max24HourSend']) * 100

        # 检查最近的错误率
        metrics = cloudwatch.get_metric_statistics(
            Namespace='AWS/SES',
            MetricName='Send',
            StartTime=datetime.now() - timedelta(minutes=5),
            EndTime=datetime.now(),
            Period=300,
            Statistics=['Sum']
        )

        return {
            'healthy': usage_percent < 90,  # 使用率 < 90%
            'usage_percent': usage_percent,
            'quota_remaining': quota['Max24HourSend'] - quota['SentLast24Hours']
        }

    except Exception as e:
        return {'healthy': False, 'error': str(e)}
性能优化:批量发送与并发控制
使用 SendBulkTemplatedEmail API
相比逐封发送,批量 API 可以: – ✅ 减少 API 调用次数 50 倍 – ✅ 降低网络开销 60% – ✅ 提升发送速度 3-5 倍
def send_bulk_campaign(recipients, template_name):
    """批量发送模板化邮件"""
    ses_client = boto3.client('sesv2')

    # 准备批量目标(最多 50 个/批次)
    bulk_destinations = []
    for recipient in recipients:
        bulk_destinations.append({
            'Destination': {
                'ToAddresses': [recipient['email']]
            },
            'ReplacementTemplateData': json.dumps({
                'name': recipient['name'],
                'product': recipient['recommended_product'],
                'discount': recipient['discount_code']
            })
        })

    # 分批发送
    batch_size = 50
    for i in range(0, len(bulk_destinations), batch_size):
        batch = bulk_destinations[i:i + batch_size]

        try:
            response = ses_client.send_bulk_email(
                FromEmailAddress='marketing@example.com',
                DefaultContent={
                    'Template': {
                        'TemplateName': template_name,
                        'TemplateData': json.dumps({'default': 'value'})
                    }
                },
                BulkEmailEntries=batch,
                ConfigurationSetName='marketing-campaign'
            )

            print(f"✅ 批次 {i//batch_size + 1} 发送成功:{len(batch)} 封")

        except Exception as e:
            print(f"❌ 批次 {i//batch_size + 1} 发送失败:{e}")
并发控制与速率限制
import asyncio
import aioboto3
from asyncio import Semaphore

class RateLimitedSender:
    def __init__(self, max_rate_per_second=50):
        self.max_rate = max_rate_per_second
        self.semaphore = Semaphore(max_rate_per_second)
        self.sent_count = 0
        self.start_time = None

    async def send_with_rate_limit(self, email_data):
        """带速率限制的发送"""
        async with self.semaphore:
            if self.start_time is None:
                self.start_time = asyncio.get_event_loop().time()

            # 检查是否需要等待
            elapsed = asyncio.get_event_loop().time() - self.start_time
            if elapsed < 1.0 and self.sent_count >= self.max_rate:
                await asyncio.sleep(1.0 - elapsed)
                self.sent_count = 0
                self.start_time = asyncio.get_event_loop().time()

            # 发送邮件
            async with aioboto3.Session().client('ses', region_name='us-east-1') as ses:
                response = await ses.send_email(**email_data)
                self.sent_count += 1
                return response

# 使用示例
async def send_campaign(recipients):
    sender = RateLimitedSender(max_rate_per_second=50)
    tasks = [sender.send_with_rate_limit(r) for r in recipients]
    results = await asyncio.gather(*tasks, return_exceptions=True)
    return results
连接池管理
from botocore.config import Config
from botocore.config import Config

# 配置连接池
config = Config(
    max_pool_connections=100,  # 最大连接数
    retries={'max_attempts': 3, 'mode': 'adaptive'}
)

ses_client = boto3.client('ses', config=config)
📚 参考文档:Sending bulk email with Amazon SES
监控告警:实时掌控发送状态
关键监控指标
# CloudWatch 告警配置
CRITICAL_ALARMS = {
    'bounce_rate': {
        'threshold': 0.05,  # 5%
        'evaluation_periods': 1,
        'action': 'pause_sending'
    },
    'complaint_rate': {
        'threshold': 0.001,  # 0.1%
        'evaluation_periods': 1,
        'action': 'pause_sending'
    },
    'send_error_rate': {
        'threshold': 0.10,  # 10%
        'evaluation_periods': 2,
        'action': 'switch_region'
    },
    'quota_usage': {
        'threshold': 0.90,  # 90%
        'evaluation_periods': 1,
        'action': 'request_increase'
    }
}
使用 VDM 实时监控大促活动
VDM 在大促场景的价值:
大促期间,通过 VDM Dashboard 实时监控关键指标:
监控方式 1:VDM Dashboard 实时查看
- 打开 VDM Dashboard
- 选择时间范围:最近 1 小时
- 关注关键指标:
- 送达率 > 95%
- 退信率 < 5%
- 投诉率 < 0.1%
- 查看 ISP 数据:
- Gmail 收件箱率
- Outlook 收件箱率
- Yahoo 收件箱率
监控方式 2:CloudWatch 告警
import boto3

cloudwatch = boto3.client('cloudwatch')

# 创建送达率告警
cloudwatch.put_metric_alarm(
    AlarmName='ses-low-delivery-rate',
    ComparisonOperator='LessThanThreshold',
    EvaluationPeriods=1,
    MetricName='Reputation.DeliveryRate',
    Namespace='AWS/SES',
    Period=300,  # 5 分钟
    Statistic='Average',
    Threshold=0.95,  # 95%
    ActionsEnabled=True,
    AlarmActions=[
        'arn:aws:sns:us-east-1:123456789012:ses-alerts'
    ],
    AlarmDescription='SES 送达率低于 95%'
)

# 创建退信率告警
cloudwatch.put_metric_alarm(
    AlarmName='ses-high-bounce-rate',
    ComparisonOperator='GreaterThanThreshold',
    EvaluationPeriods=1,
    MetricName='Reputation.BounceRate',
    Namespace='AWS/SES',
    Period=300,
    Statistic='Average',
    Threshold=0.05,  # 5%
    ActionsEnabled=True,
    AlarmActions=[
        'arn:aws:sns:us-east-1:123456789012:ses-alerts'
    ],
    AlarmDescription='SES 退信率超过 5%'
)
监控方式 3:定期导出数据分析
# 每小时导出一次 VDM 数据
aws sesv2 create-export-job \
  --export-data-source '{
    "MetricsDataSource": {
      "Namespace": "VDM",
      "Dimensions": {
        "CONFIGURATION_SET": ["black-friday-campaign"]
      },
      "Metrics": [
        {"Name": "SEND"},
        {"Name": "DELIVERY"},
        {"Name": "BOUNCE"},
        {"Name": "COMPLAINT"}
      ],
      "StartDate": "2024-11-24T00:00:00Z",
      "EndDate": "2024-11-24T23:59:59Z"
    }
  }' \
  --export-destination '{
    "DataFormat": "CSV",
    "S3Url": "s3://campaign-metrics/black-friday/"
  }'
VDM Dashboard 大促监控要点:
- 实时送达率:目标 > 98%
- ISP 分布:关注 Gmail、Outlook、Yahoo 的表现
- 打开率趋势:对比历史活动,评估主题行效果
- 点击率 (UV):评估落地页和 CTA 效果
- 地域分析:不同地区的参与度差异
自动化告警响应
def lambda_handler(event, context):
    """CloudWatch 告警触发的自动响应"""
    alarm_name = event['detail']['alarmName']
    alarm_state = event['detail']['state']['value']

    if alarm_state == 'ALARM':
        if 'bounce_rate' in alarm_name or 'complaint_rate' in alarm_name:
            # 暂停发送,等待人工介入
            pause_all_campaigns()
            send_urgent_notification("🚨 发送已暂停:声誉指标异常")

        elif 'send_error_rate' in alarm_name:
            # 切换到备用区域
            switch_to_backup_region()
            send_notification("🔄 已切换到备用区域")

        elif 'quota_usage' in alarm_name:
            # 自动申请配额提升
            request_quota_increase()
            send_notification("📈 已提交配额提升申请")

def pause_all_campaigns():
    """暂停所有活动发送"""
    # 停止 SQS 消费
    # 标记活动状态为暂停
    pass

def switch_to_backup_region():
    """切换到备用区域"""
    # 更新 Route 53 记录
    # 重定向流量到备用区域
    pass
成本优化策略
1. 合理使用专用 IP
策略:按需租用,大促后释放
def manage_dedicated_ip_lifecycle(campaign_schedule):
    """管理专用 IP 生命周期"""
    ses_client = boto3.client('sesv2')

    # 大促前 4 周申请
    if days_until_campaign(campaign_schedule) == 28:
        response = ses_client.request_dedicated_ips(
            PoolName='campaign-pool',
            WarmupEnabled=True
        )
        print(f"✅ 已申请专用 IP:{response['DedicatedIps']}")

    # 大促结束后 1 周释放
    elif days_after_campaign(campaign_schedule) == 7:
        # 释放专用 IP
        for ip in get_campaign_ips():
            ses_client.delete_dedicated_ip_pool(PoolName='campaign-pool')
        print("✅ 已释放专用 IP,节省成本")
成本节省:$24.95/月 × 10 个月 = $249.5/年
2. 附件外链化
问题:大附件增加数据传输成本
def optimize_email_with_s3(email_content, attachments):
    """将附件上传到 S3,邮件中使用链接"""
    s3_client = boto3.client('s3')

    attachment_links = []
    for attachment in attachments:
        # 上传到 S3
        key = f"attachments/{uuid.uuid4()}/{attachment['filename']}"
        s3_client.upload_fileobj(
            attachment['file'],
            'email-attachments-bucket',
            key
        )

        # 生成预签名 URL(7 天有效)
        url = s3_client.generate_presigned_url(
            'get_object',
            Params={'Bucket': 'email-attachments-bucket', 'Key': key},
            ExpiresIn=604800  # 7 days
        )
        attachment_links.append({
            'name': attachment['filename'],
            'url': url
        })

    # 在邮件中插入下载链接
    email_html = email_content + "<h3>附件下载:</h3><ul>"
    for link in attachment_links:
        email_html += f"<li><a href='{link['url']}'>{link['name']}</a></li>"
    email_html += "</ul>"

    return email_html
成本节省:数据传输成本降低 50%
3. 区域选择优化
| 区域 |
发送成本 |
数据传输成本 |
总成本(100万封) |
| us-east-1 |
$100 |
$50 |
$150 |
| ap-southeast-1 |
$100 |
$80 |
$180 |
| 节省 |
– |
$30 |
20% |
总结与下一步
通过本文,你已经掌握了: – ✅ 大规模场景的容量规划方法 – ✅ 专用 IP 预热的 4 周计划 – ✅ 高可用架构的多区域部署 – ✅ 性能优化和成本控制策略 – ✅ 实时监控和自动化告警
下一步行动
- 评估业务规模:计算大促期间的发送量需求
- 制定预热计划:提前 4 周申请专用 IP
- 搭建监控体系:配置 CloudWatch 告警
- 压力测试:大促前 1 周验证系统承载能力
系列文章
相关资源
📚 官方文档: – Managing sending quotas – Dedicated IP warming – Monitoring your sending activity
💡 最佳实践: – High-volume email sending – Email deliverability best practices
本篇作者
AWS 架构师中心: 云端创新的引领者
探索 AWS 架构师中心,获取经实战验证的最佳实践与架构指南,助您高效构建安全、可靠的云上应用

|
 |