AWS Storage Blog
Simplify log rotation with Amazon S3 Express One Zone
Log rotation is a standard operational practice for maintaining system health and performance while managing storage costs effectively. This practice involves systematically archiving log files to prevent them from consuming excessive storage. When a log file reaches a certain size or age, it’s rotated—meaning the current file is archived with a new name and a fresh log file is created to continue recording new events. This process helps maintain required system performance and efficient storage utilization, while also making log data less complicated to manage and analyze. Because applications continuously generate log data, organizations need storage solutions that can handle frequent writes and updates to log data with consistently high performance while optimizing their storage cost.
Amazon S3 Express One Zone is a high-performance, single-Availability Zone storage class purpose-built for your most frequently accessed data and latency-sensitive applications. In 2024, S3 Express One Zone added support to append data directly to existing objects. With this feature, you can append new data to existing objects without having to download the object, append new data locally, and then upload the entire object. This makes it possible to configure applications to log directly to S3 Express One Zone, without requiring local storage.
In June 2025, S3 Express One Zone also added support for renaming objects with the new RenameObject API. For the first time in Amazon S3, you can rename your existing objects atomically (with a single operation) without data movement. This new API is useful for log rotation because you can now atomically rename your log files in S3 Express One Zone instead of having to rename them locally, upload the renamed log file, and then delete the original log file.
In this blog post, we demonstrate a log rotation strategy using S3 Express One Zone. We cover using append functionality to append new log entries to the end of existing log files, and the RenameObject API to atomically rename your log file for rotation. Additionally, we show you how to use Mountpoint for Amazon S3 to mount your S3 directory bucket in S3 Express One Zone storage class as a local filesystem. Mountpoint makes it straightforward for applications using a standard logging framework, like Log4j2, to take advantage of these new capabilities in S3 Express One Zone.
Solution overview
In this solution, you configure Log4j2, a popular logging framework for the Java programming language, to write logs directly to a directory bucket in the S3 Express One Zone storage class. You’ll use Mountpoint to mount the directory bucket as a local filesystem. Note that you need Mountpoint version 1.19.0 or later to be able to rename files using Mountpoint.
As Log4j2 appends log entries to the filesystem, you’ll notice that Mountpoint sends append requests to S3 Express One Zone. You’ll also configure Log4j2 to rotate log files based on either a specific time period or a size limit. As these log files are rotated, you’ll notice that Mountpoint translates the log file renames to RenameObject API calls to S3 Express One Zone.
Solution walkthrough
To implement a logging solution with S3 Express One Zone, you need to follow four steps:
- Create the required AWS resources, such as a directory bucket, IAM role, and an EC2 instance.
- Prepare your workspace by downloading dependencies such as Mountpoint and Maven, which is used to build and run a Java application.
- Write a Java application to use Log4j2 to write logs and rotate the log files.
- Run the application and monitor the logs.
Let’s go through each of these steps in detail.
Step 1: Create the required AWS resources
In this step, you create AWS resources that are required to build the logging solution.
- Create a directory bucket. In this example, we use the bucket name
logging-on-expressin the Availability Zoneusw2-az3, resulting in a full directory bucket name oflogging-on-express--usw2-az3--x-s3. - Create an IAM role for Amazon Elastic Compute Cloud (Amazon EC2). To do so, choose Create role. On the first page, select AWS service as the trusted entity type and the use case EC2 from the dropdown to allow EC2 instances to access the directory bucket. After that, choose Next to reach the Add permissions page, and then choose Next. On the final page, enter
logging-on-expressas the name for the new AWS Identity and Access Management (IAM) role and choose Create role.
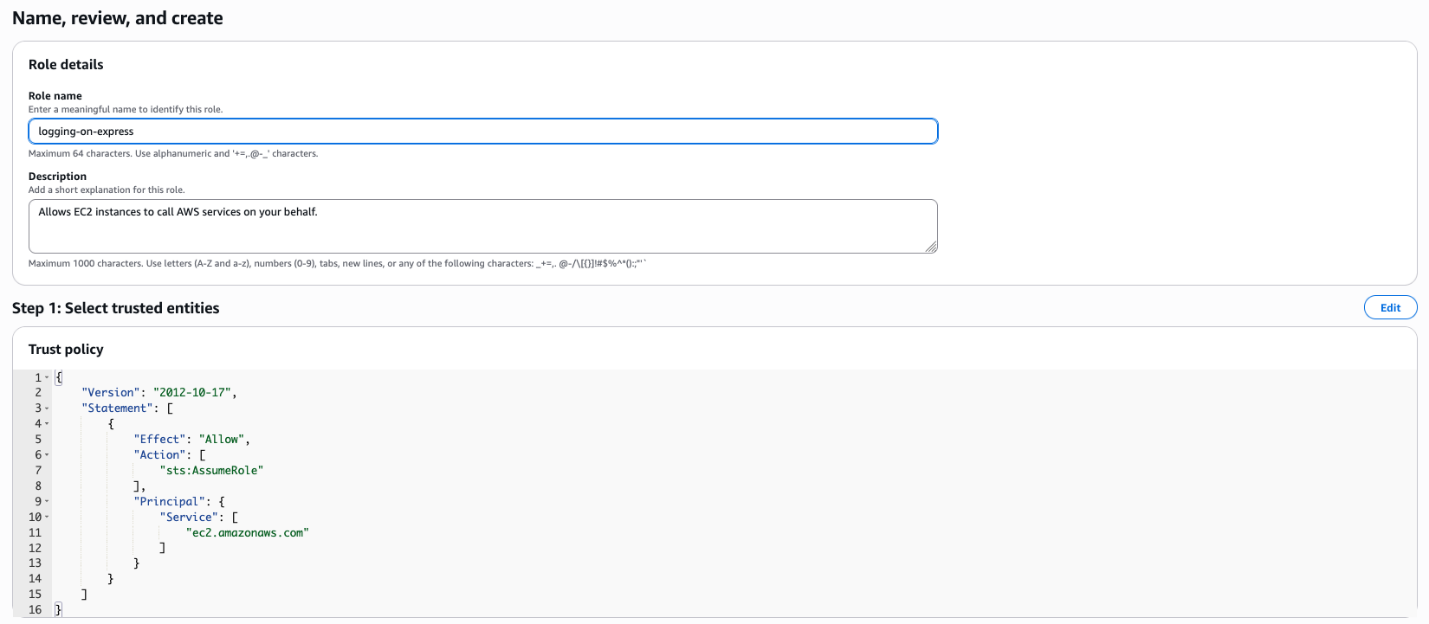 Figure 1: Create an IAM role
- You’ve created the IAM role without pre-defined policies, and will instead create an inline policy. To do so, after your IAM role is created, choose Add permissions and select Create inline policy.
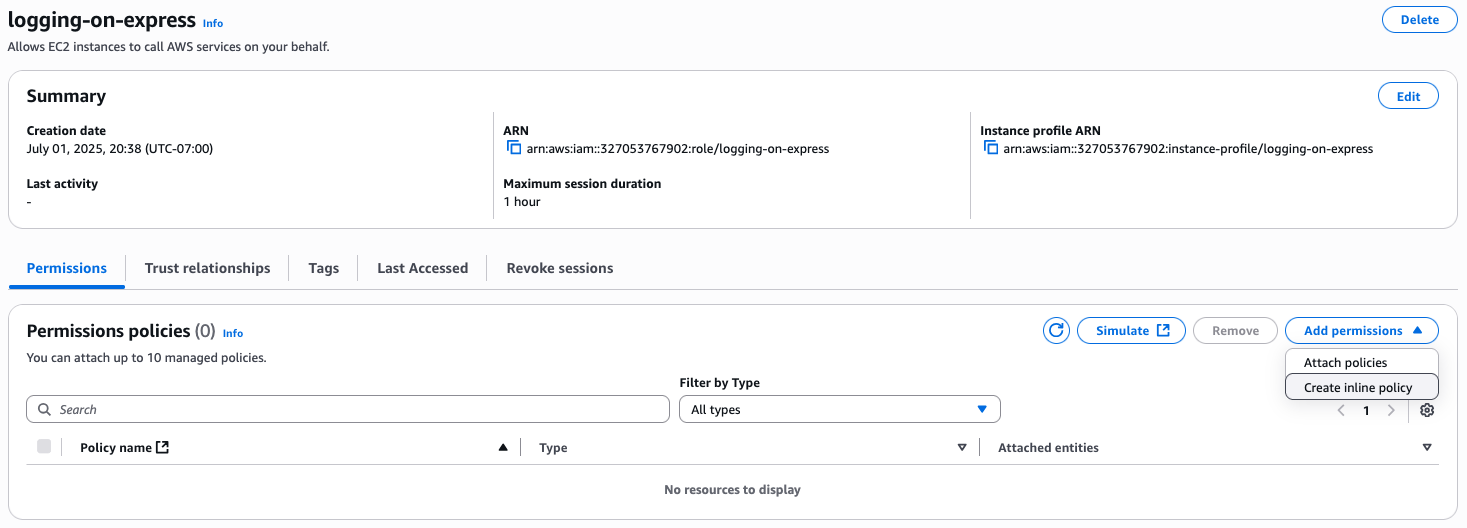 Figure 2: Add permissions to the IAM role
- Select S3 Express as the service and then select CreateSession to allow S3 Express One Zone to make
CreateSessionAPI calls. After that, choose All under Resources and then choose Next. On the final page, enter a name for the policy and choose Create Policy. In this example, we used the nameexpress-create-session.
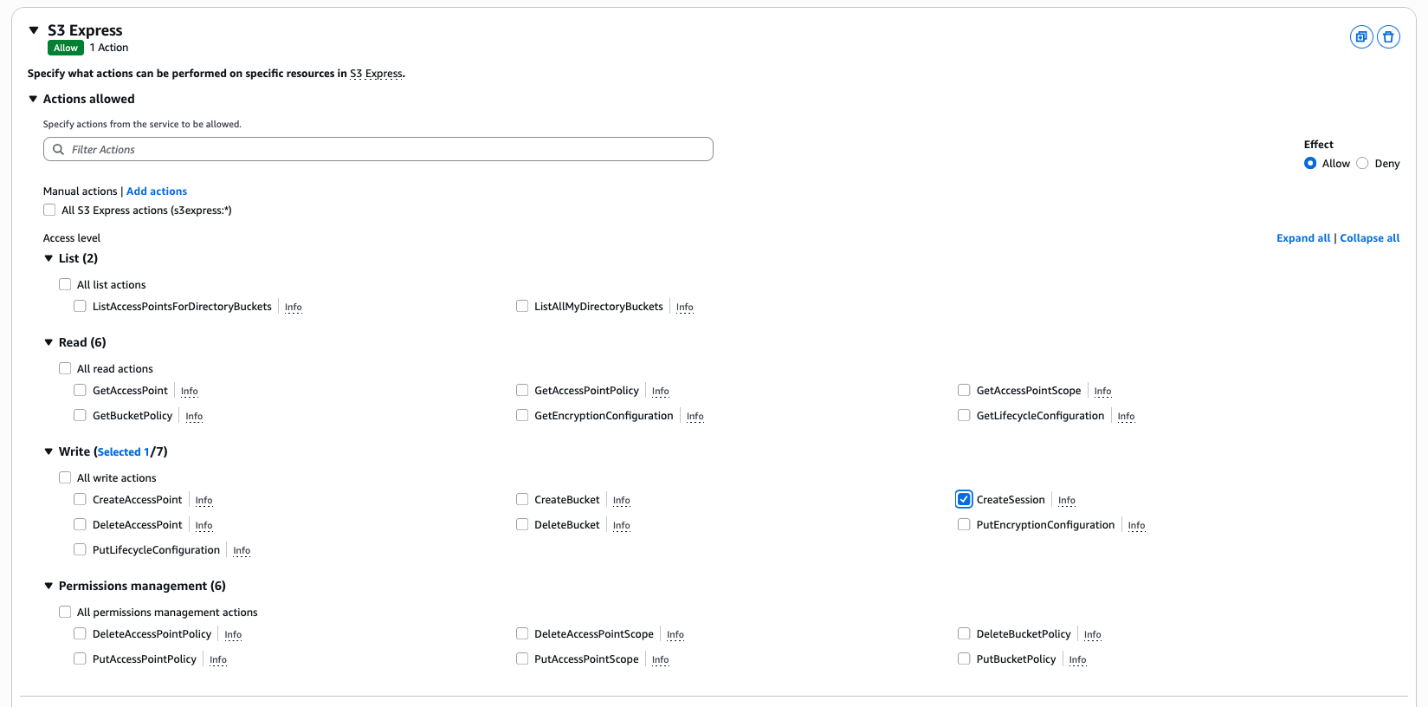
Figure 3: Create an inline policy to allow S3 Express One Zone to make CreateSession API calls
- Launch an EC2 instance to run your logging application. For this solution, use
Amazon Linux 2023as the Amazon Machine Image (AMI),t3.microas the instance type, and added one 24 GiB gp3 Amazon Elastic Block Store (Amazon EBS) volume for storage. These values are available under the free tier. - Under the Network Settings section, make sure to use the same Availability Zone that your directory bucket is in. You can do so by opening the Amazon EC2 console and checking the widget titled ServiceHealth on the landing page, which shows a mapping between Availability Zone names and Availability Zone IDs. In this example, the bucket resides in the Availability Zone ID
usw2-az3which maps to the nameus-west-2c. Therefore, we selected the subnet in our Amazon Virtual Private Cloud (Amazon VPC) inus-west-2c. If you don’t have a subnet there, you can create a new subnet.
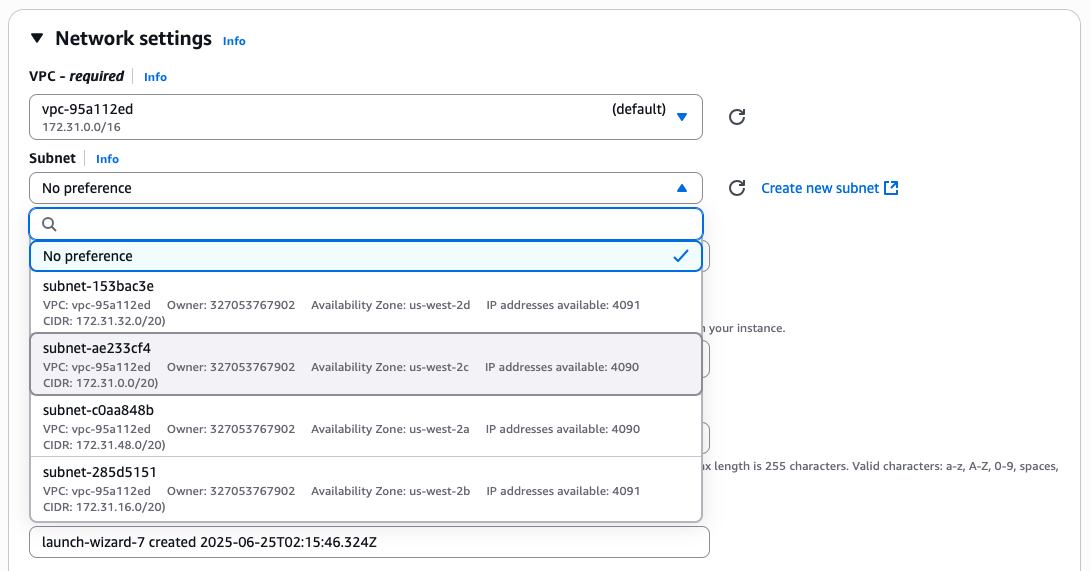 Figure 4: Network settings while launching an EC2 instance
- Choose Advanced details for further customization. Under the IAM instance profile, select the role
logging-on-expressthat you created earlier. Choose Launch instance to create an EC2 instance.
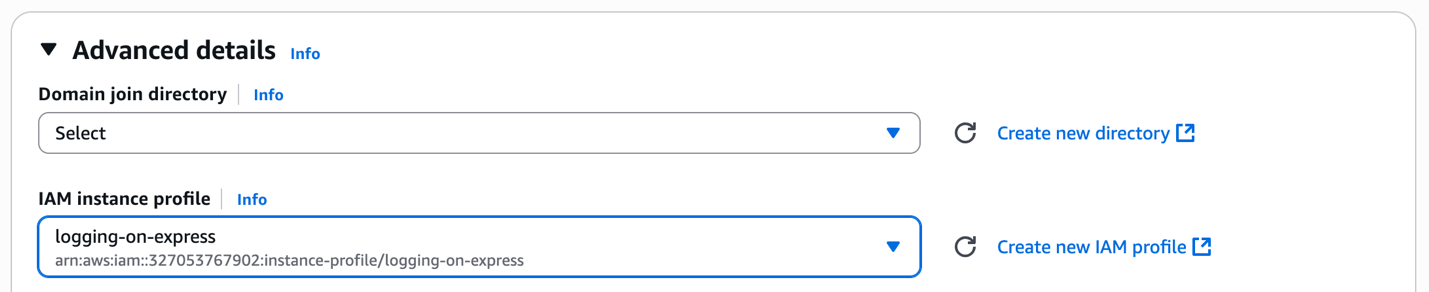 Figure 5: Add IAM instance profile while launching an EC2 instance
Step 2: Prepare your workspace
In this step, you download and install dependencies to build the log rotation solution.
- Connect to the EC2 instance that you launched in the previous step. Install Mountpoint, which is used to mount the directory bucket on the EC2 instance as a local file system, and Maven, which is a build automation tool primarily used to build and run Java applications. You can install Mountpoint by following the Installing Mountpoint instructions and Maven by following the Maven installation instructions.
- Verify that the Mountpoint version is 1.19.0 or later, as shown in the following command.
- Create the directory where the logging application and the logs that it generates will reside.
- Mount your directory bucket. Use the system configuration file
/etc/fstabto configure the operating system to mount the directory bucket using Mountpoint during instance boot. This helps makes sure that even if the instance reboots, the logs will continue to be uploaded to the specified directory bucket.
With the preceding command, you have appended an entry to /etc/fstab file that uses mount-s3 command to mount the s3://logging-on-express--usw2-az3--x-s3 bucket to the /home/ssm-user/logging-on-express/logs directory. You will notice that we have added a variety of fstab options for the mount:
_netdevspecifies that the file system requires networking to mountnosuidspecifies that the file system cannot contain setuseridfilesnodevspecifies that the files ystem cannot contain special devicesrwspecifies that the file system will have both read and write permissions
Additionally, you will notice Mountpoint specific options:
incremental-uploadallows incremental uploads and support for appending to existing objects.write-part-sizespecifies part size for multi-partPUTin bytes. This value determines how much data Mountpoint buffers locally before issuing an append request. S3 Express One Zone currently supports 10,000 total parts in an object sowrite-part-sizeand log rotation configuration surrounding file size must be planned accordingly.
- With the configuration in place, make sure that the configuration is valid. To do so, load the configuration changes that you just made and mount your directory bucket using the following commands:
- Finally, run a check to see if everything worked as expected using the following commands:
Now that you’ve mounted the directory bucket, Mountpoint will transform the file system commands against the /opt/logging-on-express/var/logs directory to the corresponding S3 API calls.
Step 3: Write a Java application for logging
Next, you write a Java application to use Log4j2 to write logs and rotate the log files.
- Define a new Java application with a dependency on Log4j2. To do so, first create a
pom.xmlfile using the sample below. This instructs Maven to take a dependency on Log4j2 and defines how to build the application.
- Configure Log4j2 by using the sample below for a Log4j2 configuration file
src/main/resources/log4j2.xml.
This configuration specifies the directory to write logs, a rotation period after which the log file gets renamed, maximum size of a log file, and the log file naming pattern. This configuration file instructs Log4j2 to write logs in the $HOME/logs directory, which is the directory you used to mount the directory bucket. The configuration file defines a max log file size of 10 GB, which is well within the limit of approximately 83.89 GB based on Mountpoint write-part-size value. Logs will be written to an object named app.log and the object will be renamed every 1 minute (rotation period) or 10 GB of logs written (maximum log file size). The configuration file uses a log file name pattern of ${LOG_DIR}/app-%d{yyyy-MM-dd-HH-mm}-%i.log, which means that the rotated log files will have a minute-based timestamp and a counter i, which will be incremented if more than 10 GB of logs are written within the rotation period. This rotation results in a RenameObject call against your directory bucket, which atomically changes the name of the current app.log object to its timestamp-counter name without copying data that’s been written.
- Write and rotate logs with Log4j2 using the sample program below. This program spawns 50 threads that write log messages every 1 millisecond until the program is interrupted. You can interrupt the program by pressing
CTRL-C.
Step 4: Run the application and monitor the logs
In this final step, you run the logging application and see log rotation in action on S3 Express One Zone.
- Build your application using Maven with the following command:
sh-5.2$ mvn clean package
- Run the application using
java.
sh-5.2$ java -jar target/logging-on-express-1.0-SNAPSHOT-jar-with-dependencies.jar
- Monitor the results.
At this point the application will start running and will append logs to the app.log object in the directory bucket, creating the object if it doesn’t exist. Every minute or every 10 GB of logs appended, app.log will be renamed and new logs will be written to a newly created app.log object. You can see that the timestamp in the Last modified column and the size of the object in the Size column change as new logs are appended.
 Figure 6: Empty app.log file in S3 Express One Zone
 Figure 7: Logs getting appended to app.log
After one minute passes or after 10 GB logs have been appended, app.log is renamed to a name that includes the timestamp and the new logs start being appended to a newly created app.log object. Figure 8: A log file getting rotated as new logs get appended to app.log
 Figure 9: A second log file getting rotated as another new log gets appended to app.log
If you’ve set up CloudTrail data events for directory buckets, you can observe the requests being made by Mountpoint. As shown in the following example, for every append request you will see the value of the header “x-amz-write-offset-bytes”, which specifies the offset for appending data to existing objects.
Clean up
After you’re done testing the solution and no longer need the resources that you set up for this post, use the following steps to clean up the resources to avoid incurring unwanted charges.
- Terminate the EC2 instance to avoid additional compute charges.
- Delete the S3 directory bucket to avoid additional storage charges.
Conclusion
In this post, you learned how to build a log rotation solution using S3 Express One Zone storage class. You started by creating a new S3 directory bucket to store the log files, an IAM role to be used by your EC2 instance, and an EC2 instance to run a Java application using Log4j2 to write logs to a directory where an S3 Express One Zone bucket has been mounted with Mountpoint. You configured Log4j2 to rotate logs every minute and wrote a basic Java application that writes log events. You saw that as log events were being emitted, Log4j2 would append to the file system mounted with Mountpoint, which would translate the append requests to S3 PutObject append requests. Every minute, Log4j2 rotated the log file, renaming the file in the file system mounted with Mountpoint, which would translate into a RenameObject API request to S3 Express One Zone.
You can use the example in this post to get started using S3 Express One Zone while you generate log files and implement a log rotation solution. With this solution, you can configure your logging application to log and rotate your log files directly in S3 Express One Zone, without requiring local storage. If you use other logging tools, you can build on top of this example to integrate your preferred tools while working with S3 Express One Zone. To learn more about S3 Express One Zone, visit Getting started with S3 Express One Zone.