AWS Storage Blog
Cross-Region disaster recovery using AWS Elastic Disaster Recovery
As businesses evolve, critical applications must remain highly available whether running on traditional virtualized infrastructure or more modern cloud- based environments. These workloads need to be resilient against ransomware attacks, data corruption, infrastructure failures, and regional impairments. Organizations must focus on defining the appropriate recovery objectives, while also minimizing costs. However, implementing disaster recovery can be complex and requires the ability to maintain data consistency, manage the failover process, and ensure the recovery is successful from the perspective of the user. Without a robust DR plan, businesses face prolonged downtime, revenue loss, and reduced user trust.
To address these challenges, AWS Elastic Disaster Recovery provides a scalable, cost-effective way to protect workloads. It continuously replicates applications and data to a designated AWS Region, allowing organizations to recover quickly without major infrastructure changes. For businesses running legacy applications, Elastic Disaster Recovery delivers efficient disaster recovery through automated failover and failback, enabling rapid workload recovery and minimal downtime during Regional disruptions. With near real-time data replication, organizations can meet Recovery Time Objectives (RTOs) and Recovery Point Objectives (RPOs) while ensuring a seamless recovery process.
In this post, we guide you through the process of setting up cross-Region failover and failback using Elastic Disaster Recovery. We demonstrate how to configure replication, automate failover, and restore workloads efficiently during a disruption. By the end of this post, you’ll have the knowledge to implement a resilient cross-Region DR strategy to meet the needs of your business.
Solution overview
In this scenario, we are protecting a web application hosted in the eu-west-2 (London) Region, using Elastic Disaster Recovery to enable failover to the eu-central-1 (Frankfurt) Region in the event of a regional impairment, as shown in the following figure 1. During a failover event, Elastic Disaster Recovery allows us to failover the application to eu-central-1, ensuring business continuity by quickly shifting workloads to the recovery Region.
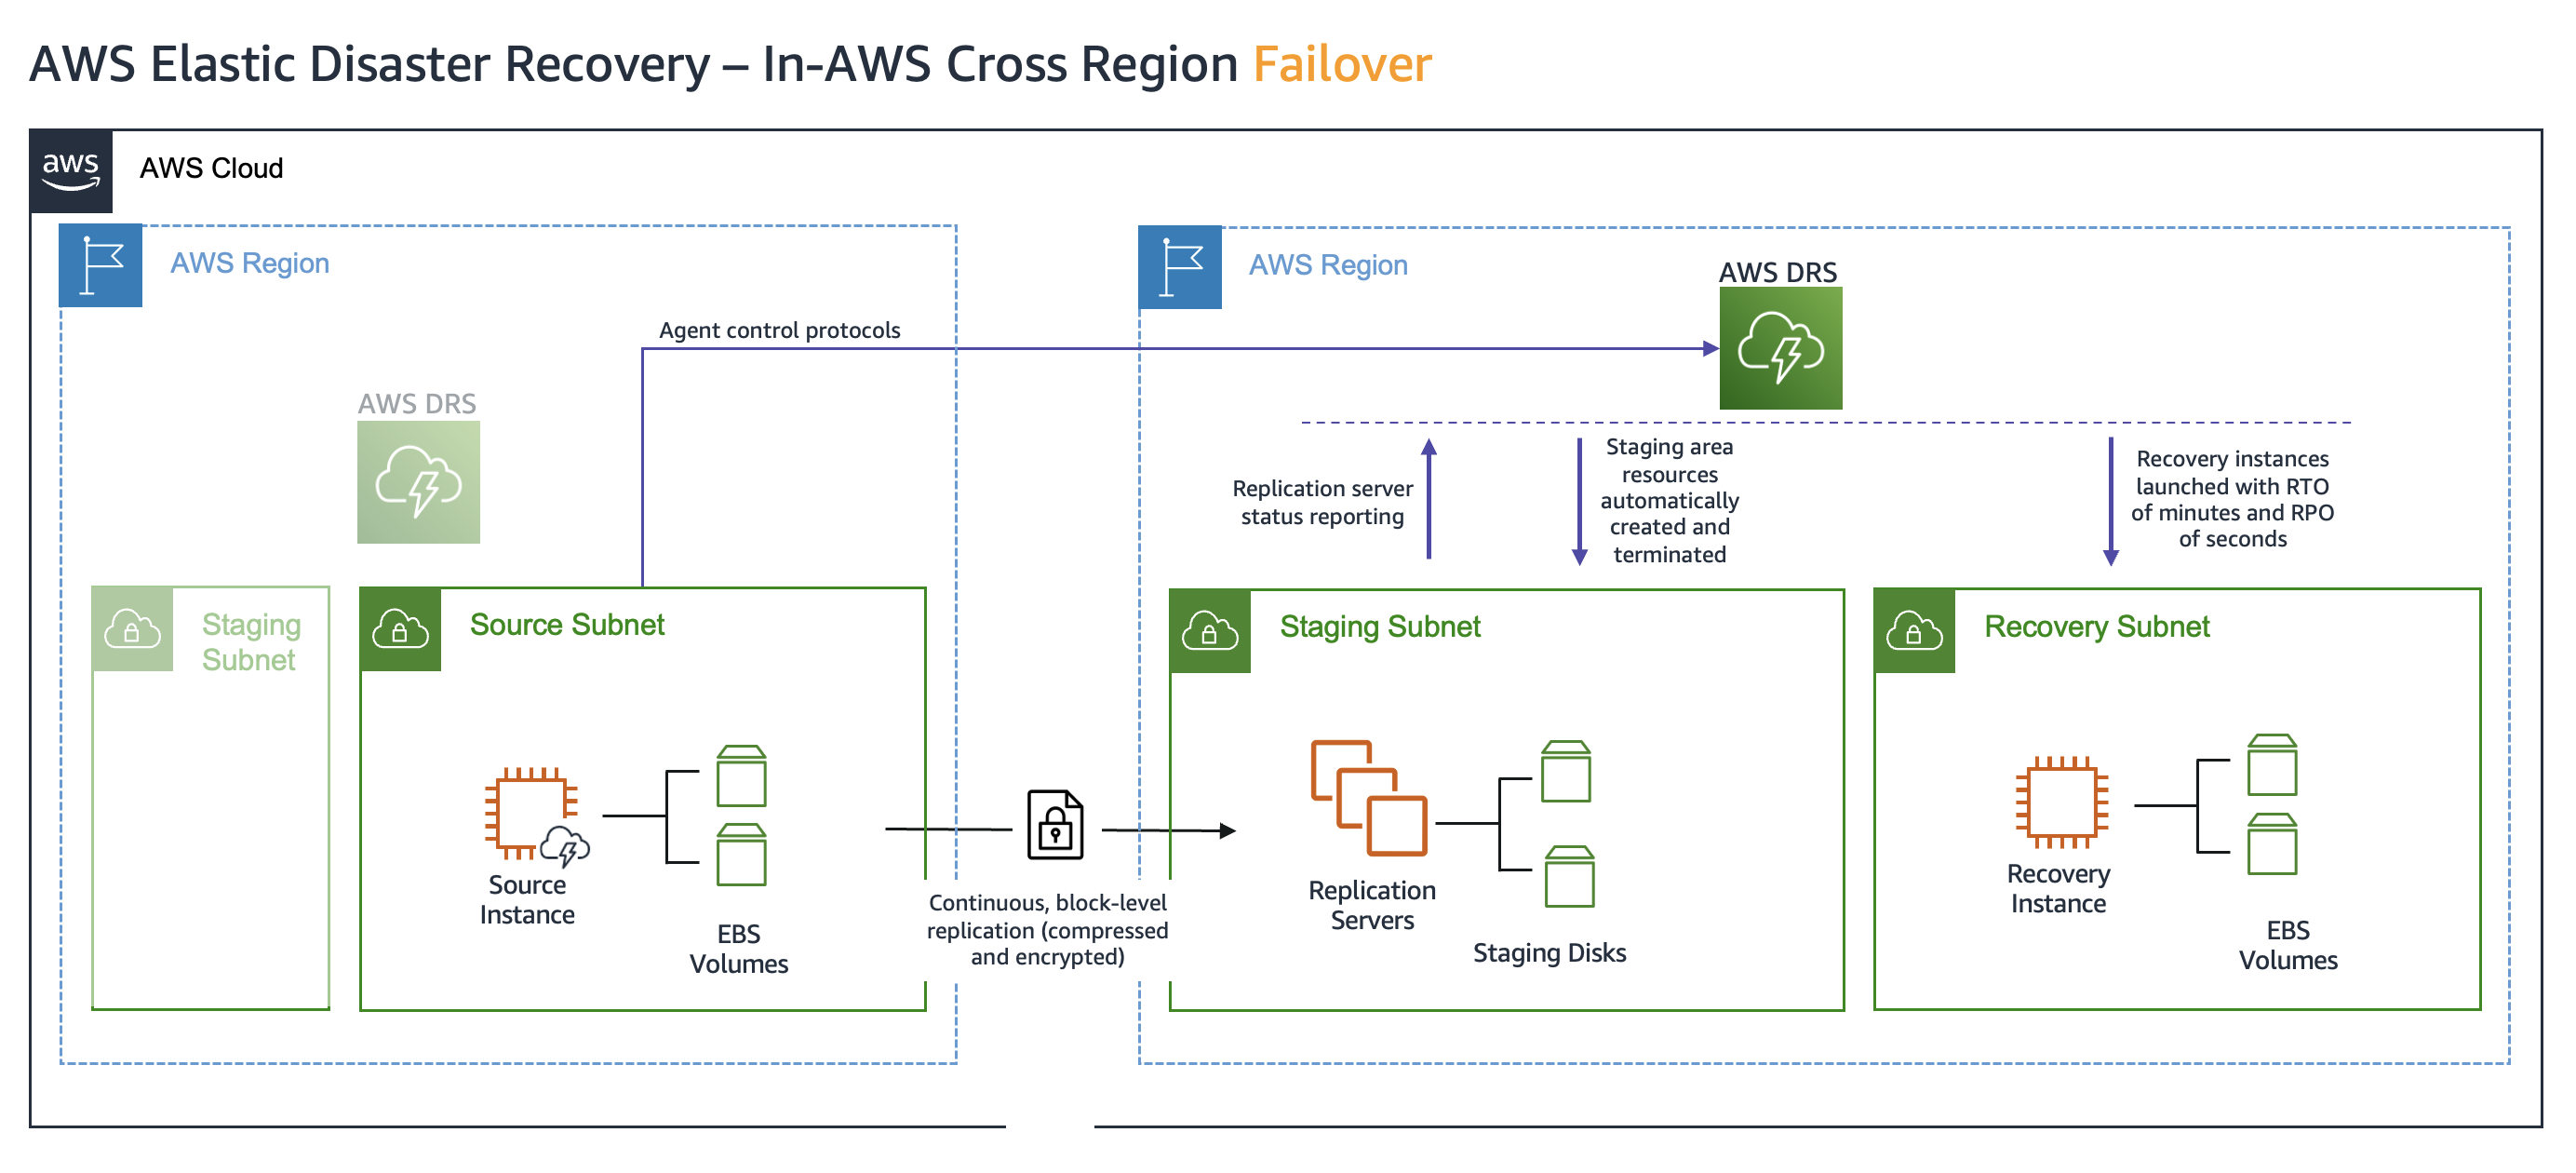 Figure 1: Elastic Disaster Recovery cross-Region failover architecture
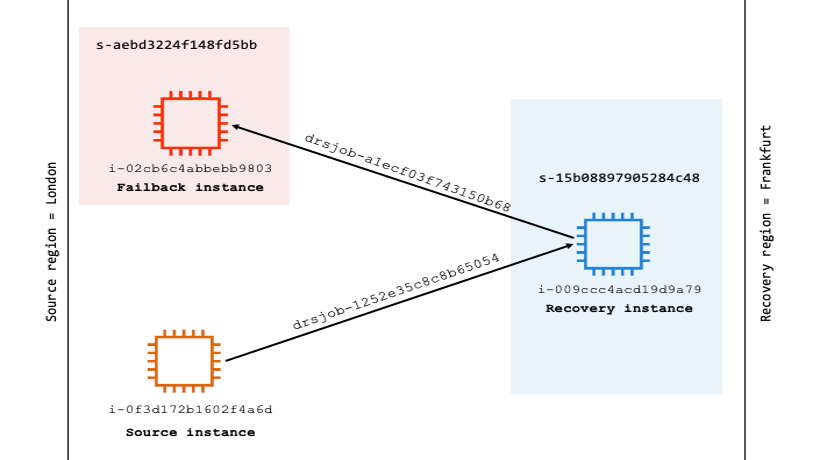
After the failover is completed, Elastic Disaster Recovery enables us to protect the recovered instance by setting up replication from the recovery Region back to the original eu-west-2 Region (failback), as shown in the following figure 2. This mitigates the risk of future impairments in the recovery Region and makes sure that your application remains resilient and operational, minimizing the impact of any potential regional disruptions.
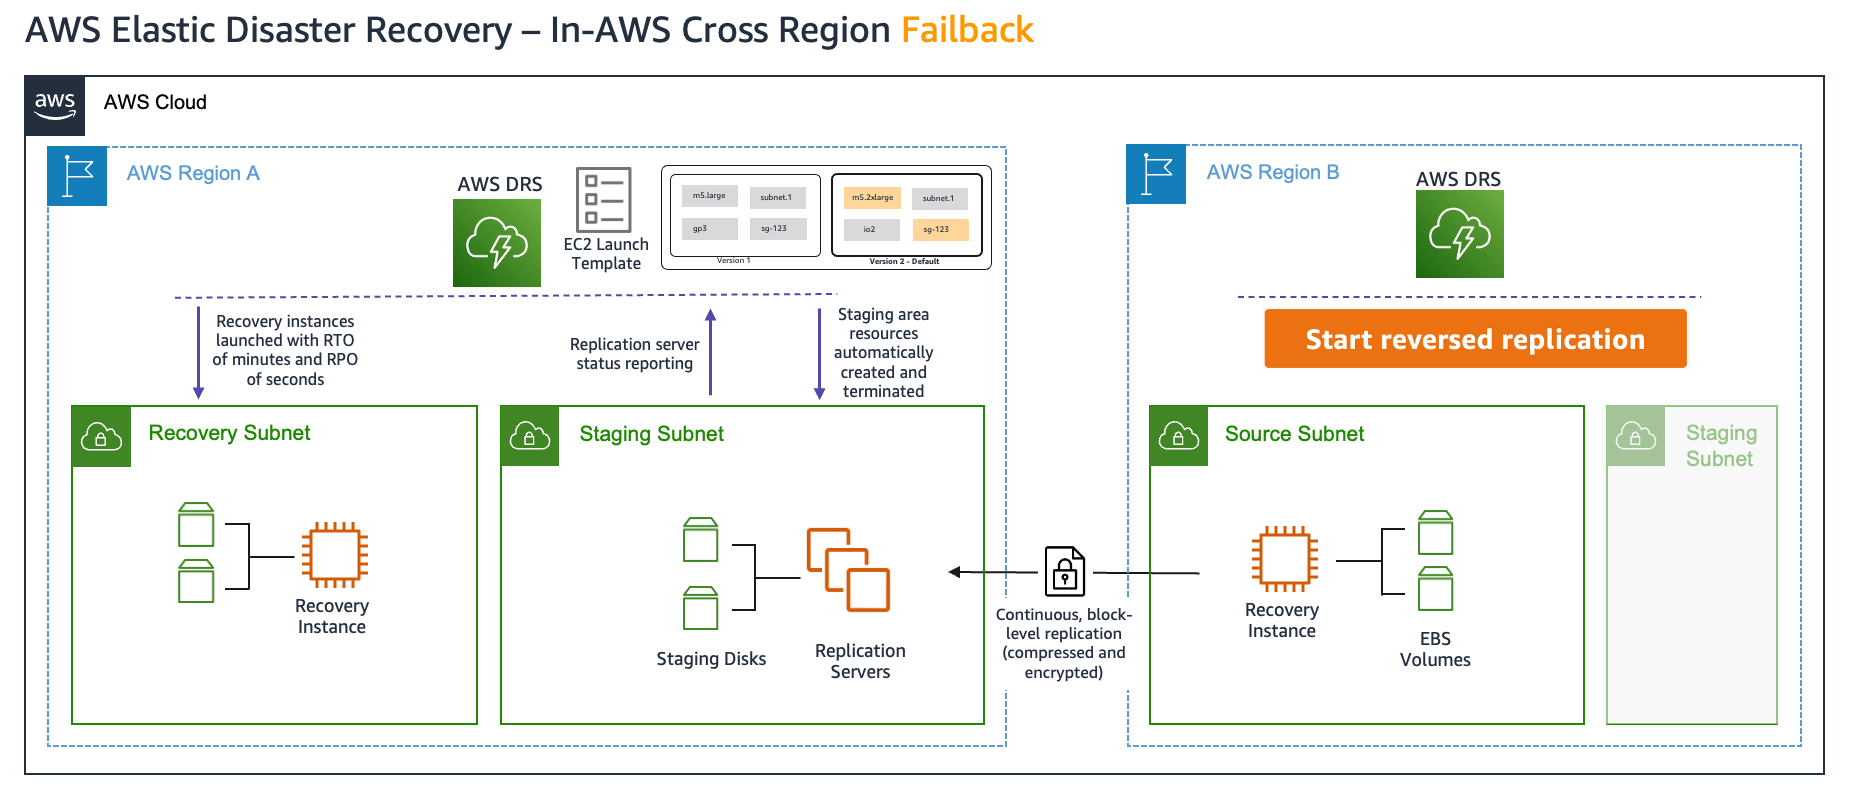
Figure 2: Elastic Disaster Recovery cross-Region failback architecture
Prerequisites
Before implementing cross-Region failover and failback using Elastic Disaster Recovery, make sure that the following steps and configurations are in place:
- Initialize Elastic Disaster Recovery in the recovery Region (for failover):
- Elastic Disaster Recovery must be initialized in the recovery Region (for example eu-central-1, Frankfurt) where you want to failover your Amazon Elastic Compute Cloud (Amazon EC2) instances. This includes setting up the Elastic Disaster Recovery default replication settings, default launch settings, and default launch template in the recovery Region.
- Initialize Elastic Disaster Recovery in the source Region (for failback):
- Initialize Elastic Disaster Recovery in the source Region (for example eu-west-2, London) to facilitate the failback process. This makes sure that when the service impairment in the source Region is alleviated, you can safely replicate the recovered instances and return to normal operations. This includes setting up the Elastic Disaster Recovery default replication settings and default launch settings.
- Network configuration
- Although staging and recovery subnets can be placed in the same Virtual Private Cloud (VPC), it is recommended to separate them. Make sure that these subnets/VPCs are properly configured to handle the necessary traffic for data replication and recovery.
- Furthermore, make sure that your chosen staging subnet has a sufficiently large IP CIDR range to accommodate both staging and conversion servers.
- Verify that security groups and network access control lists (NACLs) allow traffic between the source Region, staging area, and recovery Region. This includes making sure that the correct ports are open for Elastic Disaster Recovery communication, allowing the smooth transfer of replication data between AWS Regions.
- IAM roles and permissions
- To install the agent, make sure that the instance profile role has the AWSElasticDisasterRecoveryEc2InstancePolicy AWS Identity and Access Management (IAM) policy attached.
- For Failback, you can either add the AWSElasticDisasterRecoveryRecoveryInstancePolicy IAM policy to your existing instance profile role, or let the service automatically assign the AWSElasticDisasterRecoveryRecoveryInstanceRole instance profile role to the recovery instance.
Walkthrough
In this scenario, we are protecting an EC2 instance running in the eu-west-2 (London) Region by replicating it to the eu-central-1 (Frankfurt) Region using Elastic Disaster Recovery. This setup makes sure that the instance remains protected and can be quickly recovered in the event of an impairment.
1. Agent installation
To replicate the source instance, you must install the Elastic Disaster Recovery replication agent on the source EC2 instance.
- Download the Elastic Disaster Recovery replication agent:
- In the terminal, run the following command to download the replication agent as shown in the following figure 3.
wget -0./aws-replication-installer-init https://aws-elastic-disaster-recovery-eu-central-1.s3.eu-central-l.amazonaws.com/latest/linux/aws-replication-installer-init

Figure 3: Downloading Elastic Disaster Recovery replication agent installer
Remember to modify the Region name in the preceding URL to match your specific recovery Region.
- Install the Elastic Disaster Recovery replication agent
- When the agent is downloaded, install it by running the following command as shown in the following figure 4.
sudo chmod +x aws-replication-installer-init; ./aws-replication-installer-init

Figure 4: Installing Elastic Disaster Recovery replication agent
2. Replication process
When the Elastic Disaster Recovery agent is successfully installed, the source server is added to the Elastic Disaster Recovery dashboard, where it is assigned a unique source server ID. You can view detailed information about the server by navigating to the Recovery dashboard, as shown in the following figure 5.
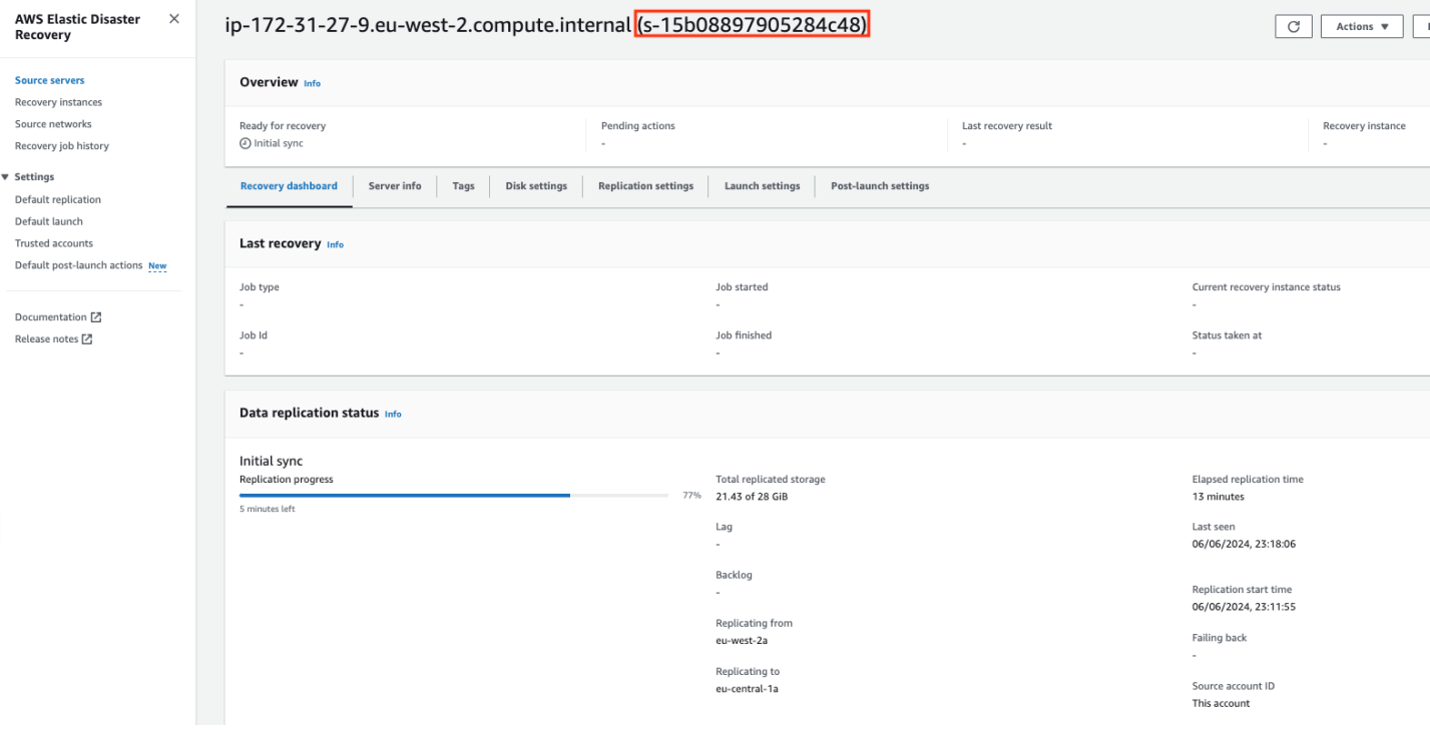
Figure 5: Source server added to dashboard
- In the staging area, Elastic Disaster Recovery automatically creates a replication server along with corresponding secondary volumes as shown in the following figure 6. These volumes correspond to the Amazon Elastic Block Store (Amazon EBS) volumes attached to the source instance and are used for data replication.
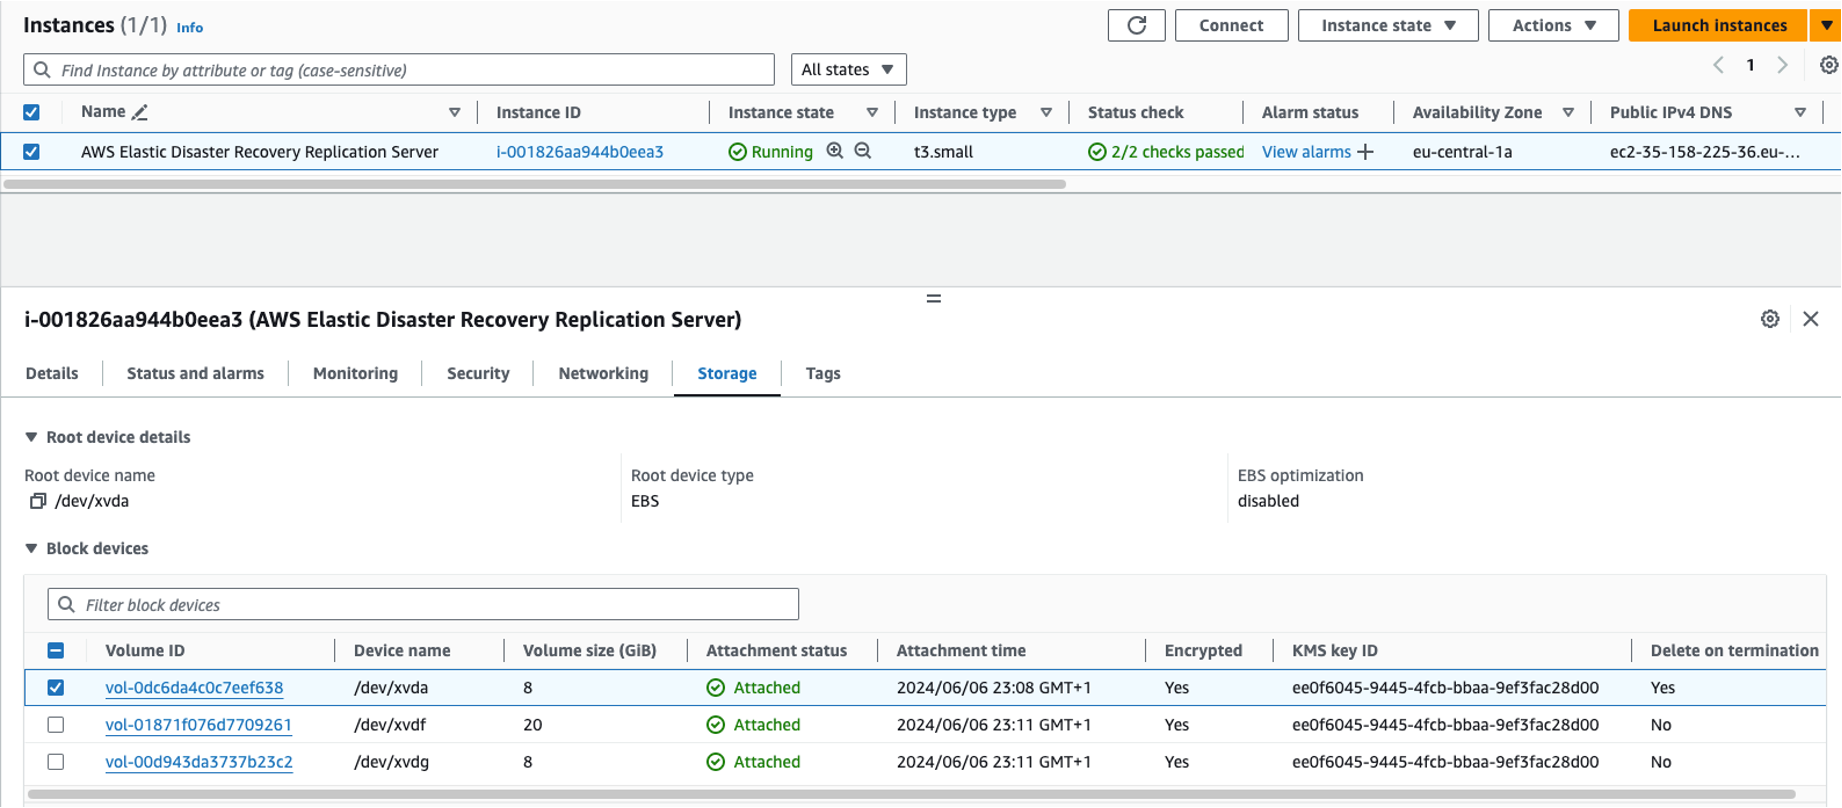
Figure 6: Replication server and target volumes creation in staging area
- You can check more details about the source instance by checking the Server info section, as shown in the following figure 7.

Figure 7: Server info section—detailed source instance information
- You can monitor the replication progress through the Elastic Disaster Recovery dashboard as shown in the following figure 8. When replication reaches 100%, Elastic Disaster Recovery begins creating snapshots for each EBS volume. This phase is shown as the Creating snapshot stage.

Figure 8: Replication progress
- Elastic Disaster Recovery creates a snapshot for each EBS volume and this is represented by the Creating snapshot phase as shown in the following figure 9.

Figure 9: Amazon EBS volume snapshot creation phase
- When the snapshots are successfully created, the data replication status is marked as Healthy, and the server is marked as Ready for recovery as shown in the following figure 10.

Figure 10: Server ready for recovery status
- At this point, the server is fully replicated and ready for the failover process.
3. Preparing for failover
When all source servers have been added and their launch settings are configured, you must perform a recovery drill before initiating a live recovery. Drilling the recovery of your source servers makes sure that they function properly within the AWS environment and meet your desired RTO.
- Initiate a drill by choosing the Initiate recovery drill option in the Elastic Disaster Recovery dashboard as shown in the following figure 11.

Figure 11: Initiating recovery drill job
- Choose the desired point-in-time (PIT) from which to launch the drill instance as shown in the following figure 12. A PIT snapshot is a crash-consistent recovery point of your source server, and represents your RPO.

Figure 12: Recovery drill—choosing point-in-time for instance launch
- Choose Initiate drill to start the recovery drill as shown in the following figure 13.
 Figure 13: Recovery drill—initiating the process
- This creates a new Elastic Disaster Recovery job, which handles the recovery process as shown in the following figure 14.

Figure 14: Recovery drill—new drill job creation
- During the drill, Elastic Disaster Recovery launches a conversion server in the staging subnet to handle the conversion process as shown in the following figure 15. This server is temporary and is terminated when the process is completed.

Figure 15: Recovery drill—temporary conversion server launch
- You can monitor the full history of the Elastic Disaster Recovery job by choosing the job ID in the Elastic Disaster Recovery dashboard as shown in the following figure 16. When the job is completed, you should see the drill instance in the list of recovery instances.

Figure 16: Recovery drill—job history and completed drill instance
- Check the EC2 dashboard to confirm that the drill instance was successfully created and launched as shown in the following figure 17.

Figure 17: Recovery drill—verifying successful drill instance creation in the Amazon EC2 console
- The Drill instance has been successfully created as shown in the following figure 18.

Figure 18: Recovery drill—drill instance successfully created
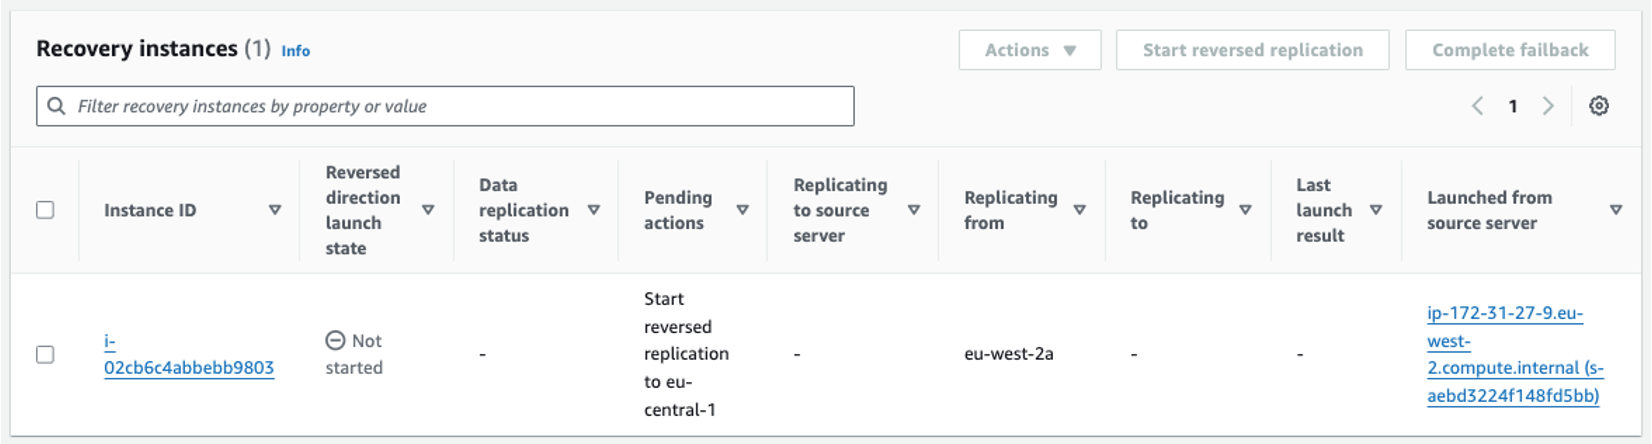
- The instance will appear in the list of recovery instances. The following figure 19 shows the relationship between the source and drill instance.

Figure 19: Recovery instances list—newly created drill instance in the recovery Region
- Make sure that you terminate the drill EC2 instances promptly after the drill is complete to avoid unnecessary resource usage and other charges.
Best practices for recovery drills
Performing meaningful recovery drills is essential to make sure of disaster recovery readiness and meeting RTOs. Follow these best practices for effective and safe recovery drills:
- Isolate the drill environment: Launch recovery drill instances in a subnet that is part of an isolated network. Make sure this subnet has no route to the source or production environment to prevent IP address or routing conflicts. Configure security groups and access control lists (ACLs) to reinforce boundaries between the drill and production systems. This isolation makes sure that recovery drills do not disrupt the production environment while enabling realistic testing scenarios.
- Test networking configuration: Validate that the networking configuration in the drill environment supports recovery requirements. Make sure that server-to-server communication works as expected and that verification access (for example SSH or RDP) is available.
- Verify functionality: After launching recovery drill instances, confirm that they are functioning as intended. Use SSH (Linux) or RDP (Windows) to connect to the instances and verify key aspects such as boot status, application functionality, and communication between servers for multi-server applications.
- Perform regular drills: Regularly test recovery processes to identify potential issues and maintain disaster recovery readiness. This helps make sure that you are prepared to respond effectively in the event of an actual disaster.
4. Performing a failover
A failover involves redirecting traffic from a primary system to a secondary (recovery) system. To ensure a proper failover, you must ensure that the network is properly updated to communicate with the recovered system. Elastic Disaster Recovery helps facilitate the process by launching recovery instances within AWS in the event of an impairment.
Before launching a recovery instance, make sure that your source servers are ready for recovery as shown in the following figure 20. You can check this in the Source Servers page by confirming that the replication status is Healthy and that the server is marked as Ready for Recovery.

Figure 20: Verifying readiness for recovery
Launching recovery instance
- Navigate to Source servers in the Elastic Disaster Recovery console and choose Initiate recovery job > Initiate recovery as shown in the following figure 21.

Figure 21: Initiating recovery job
- To launch the recovery instance, choose a point-in-time snapshot from which to restore the instance as shown in the following figure 22.

Figure 22: Recovery—choosing point-in-time for instance launch
- When it is initiated, a new Elastic Disaster Recovery job with Type equal to Recovery is created to track the recovery process as shown in figure 23.

Figure 23: Recovery—new recovery job creation
- You can monitor the progress of the job in the Elastic Disaster Recovery console as shown in figure 24. Elastic Disaster Recovery automatically cleans up any previous drill instances before launching the new recovery instance.
 Figure 24: Recovery—job history and completed recovery instance
- After the job is completed, the recovery instance is launched, and you can verify it by checking the Amazon EC2 console to make sure it’s running properly as shown in figures 25.

Figure 25: Recovery—verifying successful recovery instance creation in the Amazon EC2 console
- The Recovery instances page in the Elastic Disaster Recovery console lets you monitor and manage launched recovery instances, including their replication status and instance settings as shown in figures 26.

Figure 26: Recovery—recovery instance successfully created
When the recovery instance is verified, redirect traffic from your primary system to the new recovery instance. This makes sure that your application remains operational while the primary system is restored or replaced as shown in the following figure 27.
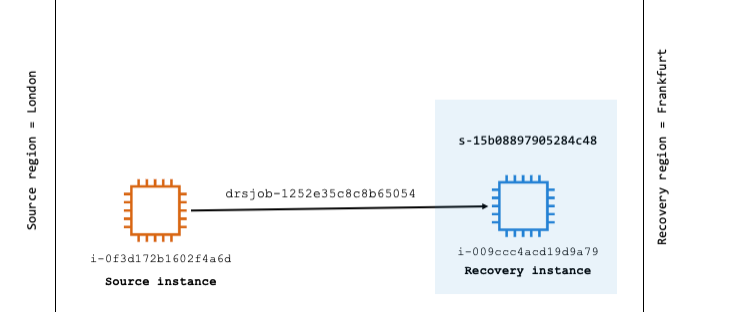
Figure 27: Recovery instances list—newly created recovery instance in the recovery Region
5. Performing a failback
After performing a recovery, your applications are running on EC2 instances in the recovery Region. However, these instances aren’t protected against potential impairments. To prevent data loss, you must start reversed replication as soon as possible. This process involves replicating the data from the recovery instances back to the original Region.
Make sure that the recovery instance has the necessary permissions, using either the AWS-managed IAM role AWSElasticDisasterRecoveryRecoveryInstanceRole or a custom IAM role with the AWSElasticDisasterRecoveryRecoveryInstancePolicy attached.
- When permissions are in place, start reversed replication from the Elastic Disaster Recovery dashboard as shown in the following figure 28 and 29.

Figure 28: Initiating reversed replication

Figure 29: Confirmation – starting reversed replication
- The Elastic Disaster Recovery dashboard in the source Region (eu-west-2) shows a new source server as shown in the following figure 30.
 Figure 30: Source Region—new source server creation
- A new replication server is created in the source Region to handle the data replication as shown in the following figure 31.
 Figure 31: New replication server in the source Region (eu-west-2)
- Replication has successfully started and data is being replicated to the source Region as shown in the following figure 32.

-
Figure 32: Reversed replication to source Region initiated
In cross-Region disaster recovery, new staging resources are created for replication, meaning the entire data set is replicated rather than just the changes.
6. Complete failback
- Before launching the failback instance, make sure that the Launch settings are correctly configured in the source Region. When the server status is marked Ready for Recovery and the Data Replication Status is Healthy, initiate the failback by choosing Launch for failback as shown in the following figure 33.

-
Figure 33: Failback readiness check and initiation
- Choose a Point-in-Time snapshot to launch the failback instance as shown in the following figure 34.

-
Figure 34: Failback—choosing point-in-time snapshot for instance launch
- A new Elastic Disaster Recovery job begins as shown in the following figures 35 and 36.

-
Figure 35: Failback—new job creation

-
Figure 36: Failback—job history and completed recovery instance
- The failback instance appears in the Recovery Instances tab in the Elastic Disaster Recovery console for the source Region as shown in figure 37.
-
Figure 37: Failback—recovery instance successfully created
- Verify the failback instance by checking the EC2 console in the source Region to make sure it is running correctly as shown in figure 38.

Figure 38: Failback—verifying recovery instance in the source Region Amazon EC2 console
- At this point, your application is fully restored in the original Region, completing the failback process as shown in the following figure 39. Before redirecting traffic back to the original source Region, make sure you have a planned failback window, as downtime may occur during the transition.
-
-
-
Figure 39: Recovery instances list—newly created recovery instance in the source Region
-
-
7. Protect new failed back instance
After the failback process, the new instance in the source Region serves as your primary production instance, and the original production server in the recovery Region can be safely decommissioned. To make sure the new instance is protected and disaster recovery-ready, you need to enable replication.
- Steps to protect the new instance:
- Navigate to the Recovery Instances console in the source Region.
- Choose the new recovery instance and choose Start reversed replication as shown in the following figures 40 and 41.

-
-
Figure 40: Source Region—starting reversed replication for new recovery instance

-
Figure 41: Confirmation—starting reversed replication (source to recovery Region)
- This action initiates replication from the source Region back to the staging area in the recovery Region.
The replication is done with the same first server ID, thus no new source server is created in the recovery Region. Instead, the new source instance is associated with the already existing source server resource in the recovery Region. The following diagram 42 shows this relationship.
 Figure 42: Existing source server ID reused in the recovery Region
Starting reversed replication allows you make sure that your new production instance is protected against potential future outages and remains part of your disaster recovery strategy.
Cleaning up
Upon completing the failover and failback, several AWS resources may no longer be necessary and should be cleaned up. These resources include the following:
-
- The old source EC2 instance in the source Region
- The recovery EC2 instance in the recovery Region
- Source server resource in the Elastic Disaster Recovery console for the source Region
- Recovery instance resources in both the source and recovery Regions
- Stop replication on the source server of the source Region: In the Elastic Disaster Recovery console for the source Region, select the source server. From the Actions menu, choose Stop replication as shown in the following figures 43 and 44. When replication is stopped, all replicated data will be discarded, and the associated AWS resources used for replication are terminated.

Figure 43: Source Region—stopping replication and discarding replicated data

-
Figure 44: Source Region—confirming stop replication
- Terminate the recovery instance in the recovery Region: Navigate to the Recovery Instances console in the recovery Region, choose the recovery instance, and choose Terminate recovery instance. This initiates a clean up job to remove the recovery instance from the Recovery Instances list as shown in the following figure 45 .
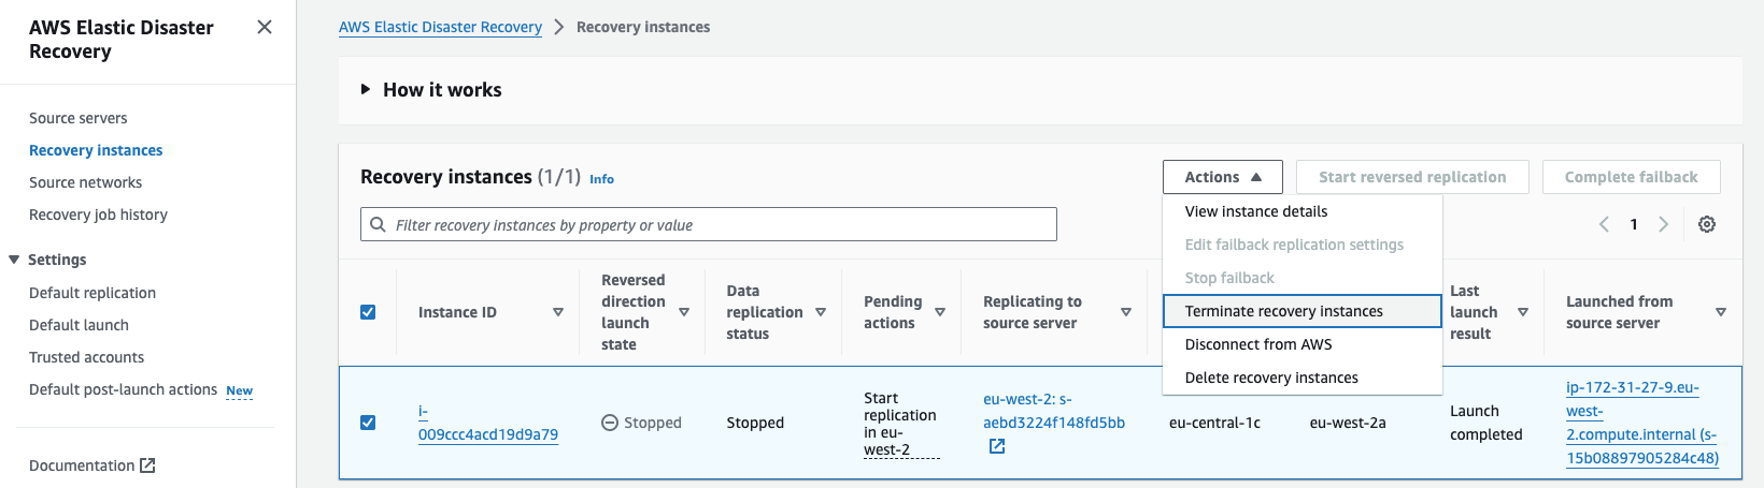
Figure 45: Recovery Region—terminating recovery instance
- Terminate the old source EC2 instance in the source Region: Navigate to the Amazon EC2 console in the source Region, choose the old source instance, and choose Terminate instance. This removes the old instance from the source Region.
- Remove the recovery instance from the source Region: In the Recovery Instances console in the source Region, choose the recovery instance, choose Delete recovery instance from the Actions menu, and confirm the deletion. This permanently removes the recovery instance from the Elastic Disaster Recovery dashboard as shown in the following figure 46.
-

-
Figure 46: Source Region—permanently deleting recovery instance from dashboard
- Remove the source server in the source Region: In the Elastic Disaster Recovery console for the source Region, choose the source server, choose Disconnect from AWS under the Actions menu, and choose Delete server. This removes the source server resource from the source Region as shown in the following figure 47 and 48.

-
Figure 47: Source Region—confirming delete recovery instance

-
Figure 48: Source Region—disconnecting and deleting source server
When these steps are complete, your environment is cleaned up. After a successful failover and failback, with the new source EC2 instance replicated back to the recovery Region, the remaining resources are as follows:
- The new source EC2 instance in the source Region
- The source server resource in the recovery Region
Conclusion
In this post, we’ve covered the process of implementing cross-Region failover and failback using AWS Elastic Disaster Recovery. We walked through key steps, such as configuring replication, launching recovery and failback instances, and cleaning up your environment. Following these steps allows you to protect your EC2 instances from Regional outages, making sure of business continuity and minimizing downtime.
Elastic Disaster Recovery allows you to achieve fast RTOs within minutes and RPOs within seconds, minimizing data loss and disruption. To start enhancing your disaster recovery strategy, refer to the cross-Region disaster recovery with AWS Elastic Disaster Recovery solution guidance for step-by-step details on implementing fast and reliable recovery for both cloud-based and on-premises applications.
To stay up to date on Elastic Disaster Recovery, explore the AWS Storage Blog for the latest updates. Thank you for reading this post. If you have questions or feedback, then feel free to post it in the comments section.