AWS Storage Blog
Copy objects between any Amazon S3 storage classes using S3 Batch Operations
When storing data, choosing the storage class that is best suited for your particular needs allows you to optimize your storage costs, performance, and object availability. However, over time, the access patterns for your objects can change, which means you may need to migrate your objects to a different storage class to continue optimize for cost and availability.
Amazon S3 offers a range of storage classes designed to meet diverse workload requirements. From frequently accessed data to long-term archival, S3 provides the flexibility and cost-optimization to support your evolving storage needs. When setting up your workload, you may have initially believed that a particular storage class worked best for you. But over time, your objects’ access patterns may have changed–to a point where it may be more economical to store your objects in a different storage class. Amazon S3 offers S3 Lifecycle configuration rules that allow you to automatically transition objects between different storage classes or expire objects to optimize costs. Amazon S3 supports a waterfall model for transitioning between storage classes. If your desired storage class transition is not natively supported by S3 Lifecycle rules (for example, S3 Standard-Infrequent Access to S3 Standard or One Zone-Infrequent Access to S3 Intelligent-Tiering), then you can use other S3 tools like S3 Batch Operations and S3 Inventory to copy data between any two S3 storage classes.
In this post, we provide step-by-step guidance for copying Amazon S3 objects to optimize request costs and operational efficiency for general purpose buckets in S3. We show the end-to-end process of setting of an S3 Batch Operations job and executing it, and we review some edge case scenarios. Finally, we overview several validation techniques that you can use to confirm the success of your Batch Operation job. By leveraging S3 Batch Operations and S3 Inventory to copy objects to different storage classes, organizations can ensure they always use the most cost-effective and appropriate storage tier for their evolving data access patterns.
Solution overview
This solution uses multiple AWS services working together to efficiently move objects between Amazon S3 storage classes. The workflow follows these main steps:
1. Generate a manifest file to use as the input for the Batch Operations job. In this post, you generate the manifest file by creating an S3 Inventory report. An S3 Inventory report contains a list of the objects in your source bucket. It can contain metadata such as an object’s size and its current storage class.
2. Set up and run your S3 Batch Operations job
2.1. Create and configure Job from manifest file. We use the S3 Inventory report (generated in Step 1) as an input to the S3 Batch Operation.
2.2. Configure Batch Operation job completion report.
2.3. Add IAM Permissions for S3 Batch Operations job.
2.4. Job Execution. The S3 Batch Operations job reads your objects and makes the designated storage class changes. If your source and destination bucket & prefix are the same, and if versioning is enabled, then the copy of your objects will appear as new versions.
3. Review multiple validation techniques to make sure that all objects were copied to an appropriate Amazon S3 storage class.
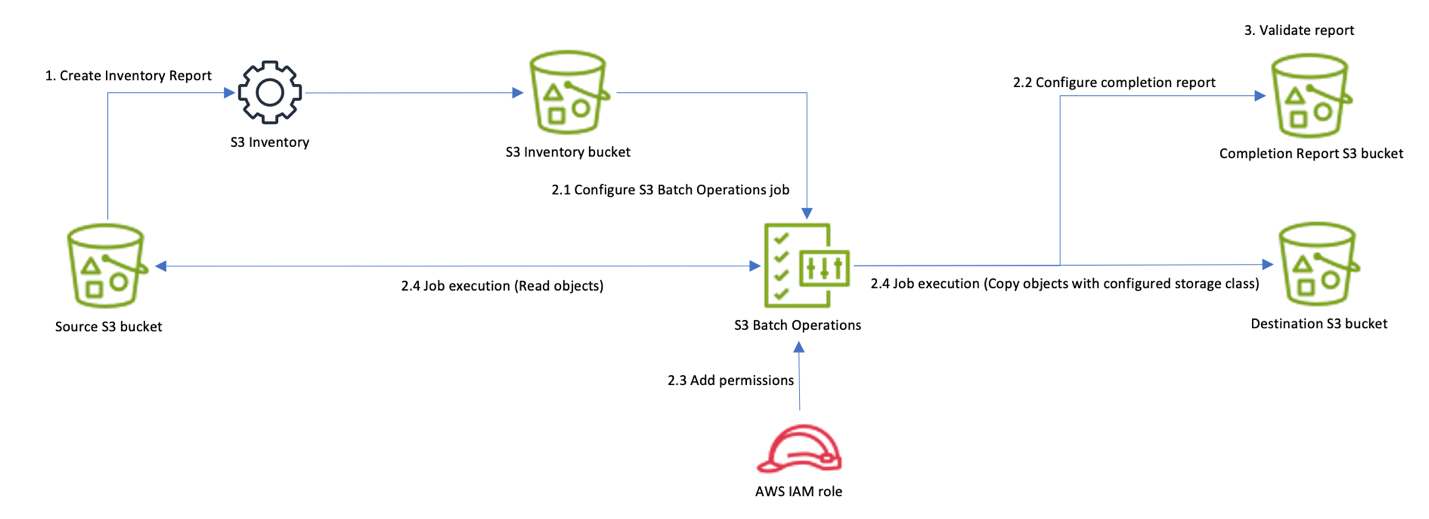
Figure 1: Copy objects between any Amazon S3 storage classes using S3 Batch Operations
This post applies to objects in general purpose buckets. For guidance on using S3 Batch Operations to process objects in S3 directory buckets, refer to this other AWS Blog post.
Solution walkthrough: copying S3 objects between any storage classes
The following steps walk you through this solution:
Step 1: Generate manifest file
Step 2: Set up and run S3 Batch Operations job
Step 3: Validate results
Step 1: Generate manifest file
The first step is to create a manifest file for the S3 Batch Operations job. In this post, you use an S3 Inventory report as our manifest file, which can take up to 48 hours the first time you turn it on. Alternatively, you can use the S3 manifest generator to generate your manifest file. For more information on this approach, refer to the S3 User Guide.
1. To get an S3 Inventory report for your bucket, go to your S3 bucket on the AWS Management Console.

Figure 2: S3 buckets view on AWS Management Console
2. Choose your bucket name and go to its Management tab. Scroll down on the page until you see Inventory configurations.

Figure 3: Management tab of the S3 bucket
3. Choose Create inventory configuration and provide the configuration details based on your need.

Figure 4: Inventory configurations of the S3 bucket
4. Choose inventory scope by choosing either Current version only or Include all versions depending on your S3 objects versioning requirements. Depending on inventory scope option choice, the inventory manifest file has either the current version or all of the versions listed for an object.

Figure 5: Configure the inventory scope of your inventory configuration
5. Choose the S3 bucket where the report is stored.

Figure 6: Select a destination for the inventory report
6. Choose the Frequency for generating the report. This storage class change is a one-time activity, thus you can configure it to run it Daily, and delete the job when activity is completed.

Figure 7: Select the frequency for generating the report
7. Specify the Output format of the S3 Inventory report. For this use case (Batch Operations), choose CSV.

Figure 8: Specify output format of the S3 Inventory report
If you have a use case where you want to apply the storage class move to only a subset of objects based on their characteristics, then you need to choose the relevant metadata fields when setting up your S3 Inventory report so that you can filter based on these fields when creating the manifest file. File keys are present in your S3 Inventory report, which you can use to filter by prefix. S3 Inventory reports also contain your objects’ user-defined metadata, which you can use as a filtering field.
User-defined metadata is not included in your S3 Inventory report if it is generated by the S3 Manifest Generator.
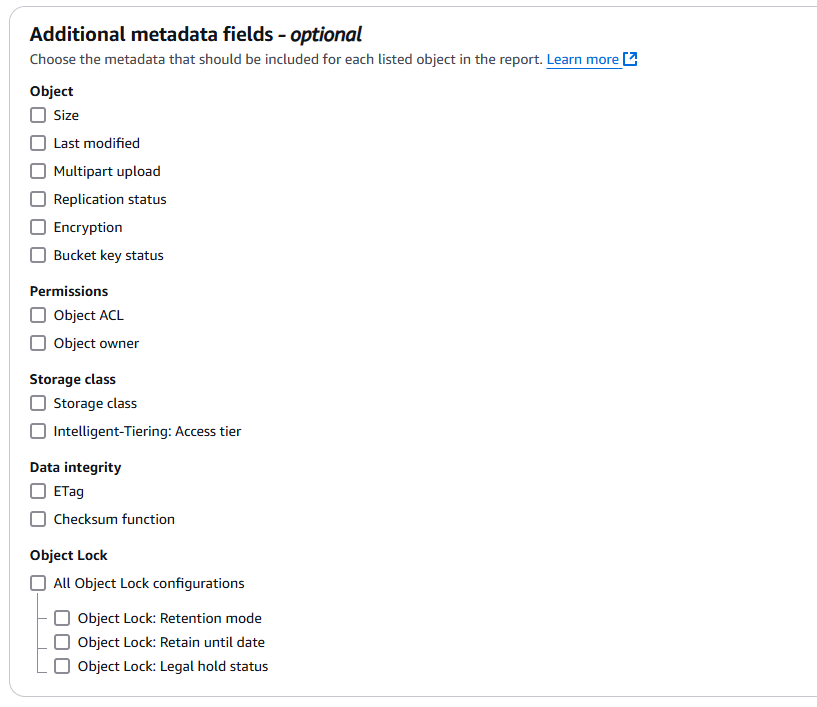
Figure 9: Select any additional metadata fields you want to include in your report
You can also choose the size of the objects in case you have objects larger than 5 GB. This specific use case and its handling are covered later in this post. By default, a Batch Operations job throws the “The specified copy source is larger than the maximum allowable size for a copy source…” error with the Failed status while processing objects larger than 5 GB in size.
The first S3 Inventory report may take up to 48 hours to be delivered to your destination bucket. When you create the S3 Inventory report configuration, your screen should look like the following figure.

Figure 10: Depiction of successful creation of an inventory configuration
Step 2: Set up and run S3 Batch Operations job
An S3 Batch Operations job contains all of the information necessary to run a specified operation on a list of objects. To create an S3 Batch Operations job, you can provide the manifest file (from the S3 Inventory report configuration) and specify the operation that you want to perform on your objects.

Figure 11: Steps for creating an S3 Batch Operations job from a manifest file
1. From the Amazon S3 console page, go to your source bucket’s inventory configuration:
1.1. Choose your bucket name
1.2. go to the Management tab and scroll to the bottom of the page
1.3. choose your inventory
1.4. Choose the Create job from manifest button
Alternatively, you can also create a batch job directly:
1.1. Choose Batch Operations on the left navigation pane of the Amazon S3 console.
1.2. choose Create job.
2. The job details should be pre-populated to use your S3 Inventory report and it should look similar to the following figure. When you’ve verified it, choose Next. Optionally, you can use Amazon Athena to query your Amazon S3 Inventory to generate a customized manifest file based on your requirements (for example the object’s current version only, objects > 5 GB in size, etc.). In that case, you must choose the CSV option for your Manifest Format, and supply the customized manifest file path. For more information on generating a customized manifest file using S3 Inventory reports, refer to this AWS blog post.

Figure 12: Select a manifest file for the S3 Batch Operations job
3. Now, you must describe the operation that you want to perform on your objects. Use the following configurations. For Copy Destination: choose General purpose bucket option. Then, choose the S3 bucket you want to use as your destination. Finally, choose your Storage class. This post uses Intelligent-Tiering as an example.

Figure 13: Select the operation type of the S3 Batch Operations job
You can have your destination bucket be the same as your source bucket. If this is the case, then the S3 Batch Operation job performs an in-place copy of objects. If versioning is disabled on your bucket, then the S3 objects are overwritten with copies where the objects are of the destination storage class. If versioning is enabled, then depending on your Manifest file choice, S3 Batch Operations either changes the storage class of all versions of an object (when S3 Inventory report is chosen), or for chosen versions specific to the customized Manifest file (when the CSV option is chosen, and you provide a customized manifest file under the Manifest object option).
During copy, S3 Batch Operations changes the last-modified timestamp of the newly created copy of the respective object with the current timestamp. If your application needs to maintain the object’s last-modified timestamp consistent across current/all versions, then AWS recommends saving this information by either using the object-tag or user-metadata properties of the respective object.
As of the writing of this post, the copy operation supports objects up 5 GB in individual size. Users have objects of all sizes stored in Amazon S3, thus you may need to copy objects larger than 5 GB. In these scenarios, you can create a separate manifest file that includes a list of objects larger than 5 GB. You can do this by using Amazon Athena to query your S3 Inventory report. Then, create a separate Batch job and choose the Invoke with AWS Lambda function operation type. Refer to this other AWS blog post for more details. The following is an example Amazon Athena query to generate a manifest file using S3 Inventory report. You can customize it based on your Athena table, columns structure, and use case requirements.
SELECT <bucket_name_column>, <object_key_column> FROM <your_s3_inv_report_table> WHERE <object_size_column> > 5368709120
If your objects are in the S3 Glacier Flexible Retrieval or S3 Glacier Deep Archive storage class, or in S3 Intelligent-Tiering Archive Access or Deep Archive Access tiers, then your steps are slightly different. For these objects, prior to running the ‘copy’ S3 Batch Operations job as described in this post, you must first run a Batch Operation Job of the type restore. Only after your objects have been restored can you run the ‘copy’ S3 Batch Operations job.
Restores take time to initiate (up to 1000 requests per second per account at the time of this writing) and to complete. Make sure to factor in this time when you set your restore expiration so that you have enough time to copy the objects after your restores have completed. For more guidance on how to restore these types of objects through an S3 Batch Operation, visit the AWS documentation.
4. In the Configure additional options page, provide a destination bucket for Completion report destination.

Figure 14: Select the destination for your S3 Batch Operation job’s completion report
Objects aren’t necessarily copied in the same order as they appear in the manifest for S3 Batch Operations job. For versioned buckets, if preserving the current or noncurrent version order is important, then copy all noncurrent versions first. After the first job is complete, copy the current versions in a subsequent job.
5.1. For the permissions section, expand, the View IAM role policy template and IAM trust policy dropdown. You are presented with an IAM role policy and an IAM trust policy. You are now going to create an IAM role that uses these policies, because this is necessary to allow the S3 Batch Operations service to perform the batch job.
5.2. In a new tab, open the console page to IAM. From the IAM console page, go to Policies and choose Create policy. Switch the Policy Editor view to JSON.
5.3. Copy the IAM role policy template from the S3 Batch Operations setup window and paste it into the JSON editor in the IAM window. In the JSON editor, replace the value of {{SourceBucket}} with the name of the S3 bucket that contains your objects. Furthermore, replace the value of {{ReportBucket}} with the name of the S3 bucket that contains your S3 Inventory reports.
Figure 15: Replace the placeholder value for the bucket name with the name of your bucket
5.4. Choose next, provide a name for your policy (for example S3BatchOperationsPolicy), and choose Create policy.
5.5. Next, go to Roles and Create role. For trust entity settings, enter the following:
- Trusted entity type: AWS service
- Service or use case: S3
- Use case: S3 Batch Operations
Them, choose next. In the policy search bar, enter the name of the policy that you just created. Choose it. Choose Next.
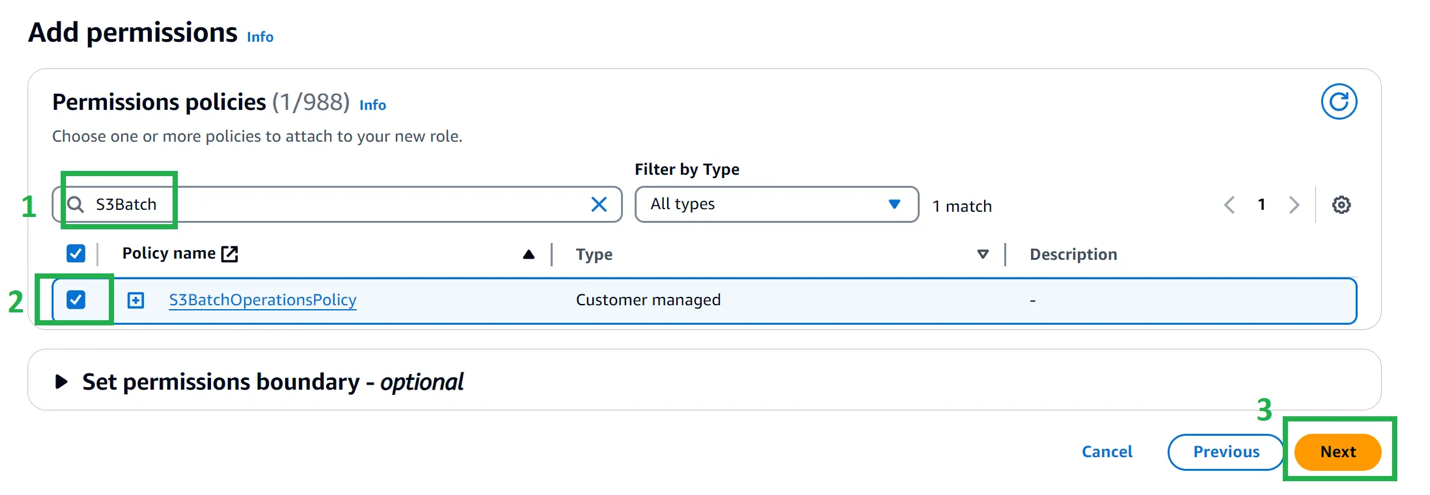
Figure 16: Add the permission policy to your IAM role
5.6. Finally, provide the role a name (for example S3BatchOpsRole) and choose Create role.
5.7. Go back to the window of the S3 Batch Operations job setup page. Choose the circular refresh button next to the IAM role dropdown, then choose the IAM role that you just created. Choose next.
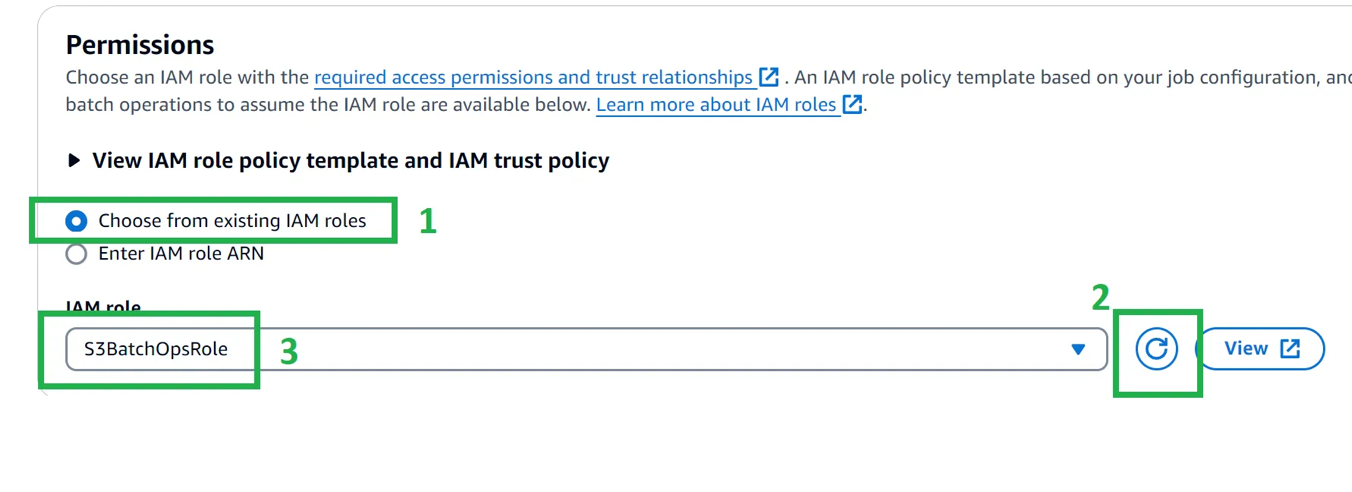
Figure 17: Select the newly-created IAM role
6. Review the job configuration, scroll all the way down, then choose Create job.
7.1. Choose the job and choose Run job.

Figure 18: Run the S3 Batch Operation job
7.2. Wait for the batch operation job to finish. The amount of time it takes depends on the size of the job’s manifest file and the job’s priority. When the job is completed, its Status says Completed.

Figure 19: Completion status of the S3 Batch Operation job
Be aware that you incur cost for the Batch Operations job and other Amazon S3 costs (for example another version of object incase versioning was enabled). You are charged for each S3 Batch Operations job ($0.25 per job), the number of objects per job ($1.00 per million object operations performed), manifests, and requests, as well as any charges associated with the operation that S3 Batch Operations performs on your behalf, such as data transfer, requests, and other charges. Check the Amazon S3 pricing for more details.
Step 3: Validate results
For validation, you make sure that all of the objects were copied and that all of those new copies have the correct storage class. In this section, you review a few techniques to validate the correctness and completeness of the Batch Operations job.
Technique 1: You can check the report of your S3 Batch Operation job in the Amazon S3 console. To do this, go to the S3 bucket that you specified in the Completion report destination configuration for your Batch Operation job. The bucket contains a folder with the S3 Batch Operation job ID. Choose that folder name. Then, choose the “results/” folder. Within the results folder, there is a single CSV file. Choose and download it. The number of rows in this file should be equal to the number of objects that you intended to move to a different Amazon S3 storage class. All cells in Column D should be “succeeded”, all cells in Column E should have a status code of “200”, and all cells in Column G should be “Successful”.

Figure 20: Example of a job’s completion report
Technique 2: You can also use AWS Command Line interface (AWS CLI) to verify the expected behavior of your Batch Operations job. Specifically, you can use the aws s3api list-objects-v2 command to retrieve a list of objects from our bucket, filter for the destination Amazon S3 storage class, then format and write the output to a CSV file for validation. The following is the command template for convenience. Replace [YOUR_DESTINATION_BUCKET_NAME] and [DESTINATION_STORAGE_CLASS] with your actual values and run the command in a shell. Make sure you have installed and configured your AWS CLI profile.
aws s3api list-objects-v2 --bucket [YOUR_DESTINATION_BUCKET_NAME] --query "Contents[?StorageClass=='[DESTINATION_STORAGE_CLASS]'].[Key, LastModified, Size, StorageClass]" --output text | awk '{print $1","$2","$3","$4}' > my-filtered-objects.csv
When you run that command and open the corresponding CSV file, you should see something like the following.

Figure 21: Output of the aws s3api command in a csv file
This CSV file lists all of the S3 Intelligent-Tiering objects in your S3 bucket. Confirm that the number of rows in the CSV equals the number of objects in your inventory report CSV file.
If your destination bucket had pre-existing S3 Intelligent-tiering objects prior to running the Batch Operation job, then we recommend applying a filter in the spreadsheet to remove the rows for objects last_modified (column B) before the date and time at which you ran the Batch Operation job.
The list-objects-v2 command returns up to 1000 objects. If you have more than 1000 objects in your batch operation job, then you must use the
--starting token parameterto fetch all of your objects. Refer to the official list-objects-v2 documentation for sample code on how you can programmatically script this.
Technique 3: You can also use S3 Storage Lens, which delivers organization-wide visibility into object storage usage.
You can also use Athena or Amazon Redshift to query the S3 Inventory report in case objects count is hundreds of millions. Refer to this S3 bucket guide for more details.
As a post-transition consideration, if you chose to copy your objects into a different S3 bucket (in other words, if your source bucket and destination bucket are different), then after the verification step you may want to swap out the Amazon S3 endpoints in your downstream applications with the endpoints of the destination bucket. When you have updated your endpoints and tested your applications, you can delete the objects from the source destination bucket if they are not needed anymore. You can delete your S3 objects at scale through S3 Life Cycle Policies.
Cleaning up
After successfully completing and validating the objects in desired storage class, you may want to clean up the resources created during this process to avoid ongoing costs.
Before deleting any resources, make sure that:
- All objects are moved to the desired storage class and validated
- Application functionality and data has been validated
- No active applications or processes depend on the resources that you’re removing
Delete the S3 Inventory Configuration, Batch Operations Resources (such as the completion reports and IAM roles and policies you used for the batch operation job). Clean up Source Data (if applicable). If you copied objects to a new bucket and verified that the transition was successful, then you can delete the original objects using S3 Lifecycle rules. If you implemented the Lambda function approach for objects larger than 5 GB, then delete the function if it’s no longer needed. Remove any associated IAM roles and policies created for the Lambda function.
If you had Amazon S3 versioning enabled on the bucket and performed in-place copy, then S3 Batch Operation creates a new version of the object with the desired storage class. You may want to delete the previous version of the object to reduce both storage consumption and the associated cost. Refer to the AWS Documentation for details.
Conclusion
In this post, we demonstrated how to efficiently copy Amazon S3 objects between any two storage classes. Combining S3 Inventory reports and S3 Batch Operations, you can implement sophisticated storage management workflows that go beyond standard lifecycle policies. The approach outlined in this post delivers several key benefits for organizations managing large-scale Amazon S3 storage:
- Greater flexibility in storage class choice, allowing you to optimize costs as your access patterns evolve
- Automated, scalable processes for managing storage transitions across millions of objects
- Validation mechanisms to make sure of successful transitions
- Ability to handle special cases such as objects larger than 5 GB through Lambda integration
We encourage you to get started by testing this workflow with a small subset of your data and in a non-production environment. For help with planning your storage optimization strategy, check out the following resources:
- Use S3 Analytics Storage Class Analysis to understand your current access patterns
- Use the AWS Pricing Calculator to estimate potential cost savings
- Consult the AWS documentation for detailed information about S3 storage classes and their use cases
- Reach out to your AWS account team for more guidance on implementing these storage optimization strategies