AWS Security Blog
Implementing just-in-time privileged access to AWS with Microsoft Entra and AWS IAM Identity Center
June 19, 2025: We made a correction to the windows of access that a user could have when using this solution.
Controlling access to your privileged and sensitive resources is critical for all AWS customers. Preventing direct human interaction with services and systems through automation is the primary means of accomplishing this. For those infrequent times when automation is not yet possible or implemented, providing a secure method for temporary elevated access is the next best option. In a privileged access management solution, there are several elements that should be included:
- User access should follow the principle of least privileged
- Users should be granted only the minimum amount of access required to perform their job duties
- Access granted should persist only for the time necessary to perform the assigned tasks
- The solution should include:
- An eligibility process for granting access
- An approval process for granting access
- Auditing of the access grants and activities taken
Entra Privileged Identity Management (PIM) is a third-party solution that provides dynamic group management, access control, and audit capabilities that integrate with AWS IAM Identity Center.
In this post, we show you how to configure just-in-time access to AWS using Entra PIM’s integration with IAM Identity Center.
Just-in-time privileged access with Entra PIM and IAM Identity Center
Privileged Identity Management is a Microsoft Entra ID feature that enables management, control, and access monitoring of your important cloud resources. There are many different configuration options when it comes to eligibility and assignment to privileged security groups, including time-bound access with start and end dates, multi-factor authentication (MFA) enforcement, justification tracking, and so on. You can read more about those options in Microsoft’s product documentation.
Figure 1 shows the just-in-time access solution powered by Entra PIM group activation requests. In this solution, Entra PIM is integrated with IAM Identity Center to provide temporary, limited access to AWS resources based on user requests and approvals. Entra ID users can submit requests for specific access to specific AWS permissions sets, which are then automatically granted for a set duration.

Figure 1 – Entra PIM solution integrated with IAM Identity Center
Prerequisites
To try the solution described in this post, you need to have the following in place:
- An AWS account with an organization instance of IAM Identity Center enabled. For more information, see What is IAM Identity Center.
- An Azure account subscription with Entra ID P1 or P2 licensing.
- Entra ID as an external identity provider (IdP) for IAM Identity Center as described in Configure SAML and SCIM with Microsoft Entra ID and IAM Identity Center. Follow Steps 1.1, 3.1, 3.2, and 3.3.
- A sample user in Entra ID as described in the step 4.1 of Step 4: Configure and test your SCIM synchronization or use an existing user within Entra ID for testing.
- Automatic provisioning enabled in Entra ID and IAM Identity Center. Follow Steps 4.2 and 4.3 in this Step 4: Configure and test your SCIM synchronization.
Step-by-step configuration
In the following steps, you create configurations to enable Entra PIM for Groups to automatically assign users to groups based on approval criteria. The groups will be Entra ID security groups that use direct assignment. Note that, at the time of this writing, dynamic groups and groups that you have synchronized from a self-managed Active Directory cannot be used with Microsoft Entra PIM. While it might be possible to also populate these groups using a third-party synchronization tool, for the purposes of this exercise, we assume that administration is occurring solely within Entra ID.
In the example scenario, the role corresponds to a specific job function within your organization. We use a group called AWS – Amazon EC2 Admin, which corresponds to a DevOps on-call site reliability engineer (SRE) lead.
Step 1: Create a group representing a specific privilege level.
Create a group in Entra ID that represents a specific privilege level that your employees can request for access to the AWS Management Console.
- Sign in to the Microsoft Entra admin center with your credentials.
- Select Groups and then All groups.
- Choose New group.
- Specify Security in the Group type dropdown list.
- In the Group name field, enter
AWS - Amazon EC2 Admin. - In the Group description field, enter
Amazon EC2 administrator permissions. - Choose Create.
- In the Group name field, enter
Step 2: Assign access for the group in Entra ID
Now you need to assign the newly created group to your enterprise application.
- Sign in to the Microsoft Entra admin center with your credentials
- Select Applications and then Enterprise applications and select the IAM Identity Center application that you created.
- Select Users and groups from the Manage menu group and select + Add user/group.
- Select the None selected option from the Users and groups section.
- Select the AWS – Amazon EC2 Admin group checkbox.
- Choose Select and then choose Assign.
- Select Provisioning from the Manage menu group and begin synchronizing the empty group by selecting the Start provisioning option.
When you first enable provisioning, the initial Microsoft Entra ID sync is triggered immediately. After that, subsequent syncs are triggered every 40 minutes, with the exact frequency depending on the number of users and groups in the application.
When the initial sync completes, the AWS – Amazon EC2 Admin group will be ready for configuration in IAM Identity Center.
Step 3: Create permission sets in IAM Identity Center
As you prepare to configure your permission set, let’s consider session duration from both the AWS and Entra PIM perspectives. There are two session durations on the AWS side: AWS access portal session duration and permission set session duration. The AWS access portal session duration defines the maximum length of time that a user can be signed in to the AWS access portal without reauthenticating. The default session duration is 8 hours but can be configured anywhere between 15 minutes and 7 days.
Note: Entra does not pass the SessionNotOnOrAfter attribute to IAM Identity Center as part of the SAML assertion. Meaning the duration of the AWS access portal session is controlled by the duration set in IAM Identity Center.
The session duration defined within a permission set specifies the length of time that a user can have a session for an AWS account. The default and minimum value is 1 hour (with a maximum value of 12). Entra PIM allows you to configure an activation maximum duration. The activation maximum duration is the length of time that the specified group will contain the activated user account. The activation maximum duration has a default value of 8 hours but can be configured between 30 minutes and 24 hours.
You should carefully consider the values that you provide for each of these durations. The AWS access portal will display permission sets that the user had access to at the time that they signed in for the duration of the active AWS access portal session.
When you set the permission set session duration, you need to keep in mind that active sessions are not terminated when the Entra PIM activation maximum duration has been reached. Let’s look at an example:
- AWS access portal session duration: default (8 hours)
- Session duration defined in the permission set: 1 hour
- Entra PIM group activation maximum duration: 1 hour
You might be inclined to think that an hour after being added to the group in Entra, the user would no longer have access to AWS resources. This is not necessarily the case. Even after the Entra PIM group activation period expires, it can take up to 30 minutes for the user to lose access to applications, and in some cases, it can take up to an hour. Additionally, their session would remain active for the duration of the session setting defined in the permission set, which is one hour in this case. In the example shown in Figure 2, we have a potential window of access of up to three hours.
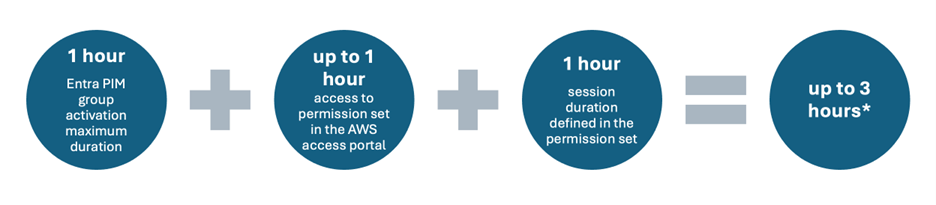
Figure 2 – Calculating session duration
Note: In most situations, Entra ID group membership changes will be synchronized to IAM Identity Center within 2–10 minutes but can revert to the standard 40-minute interval if activity runs up against Entra PIM throttling limits.
With this in mind, configure your test environment with the default setting of 8 hours for the AWS access portal and 1 hour for the permission set session duration value.
- Open the IAM Identity Center console.
- Under Multi-account permissions, choose Permission sets.
- Choose Create permission set.
- On the Select permission set type page, under Permission set type, select Custom permission set, and then choose Next.
- On the Specify policies and permissions boundary page, expand AWS managed policies.
- Search for and select AmazonEC2FullAccess policy, and then choose Next.
- On the Specify permission set details page, enter
EC2AdminAccessfor the Permission set name and choose Next. - On the Review and create page, review the selections, and choose Create.
Step 4: Assign group access in your organization
At this point, you’re ready to assign the Microsoft Entra group to the corresponding permission set in IAM Identity Center. This allows users who are members of the group to be granted the appropriate access level in AWS.
- In the navigation pane, under Multi-account permissions, choose AWS accounts.
- On the AWS accounts page, select the check box next to one or more AWS accounts to which you want to assign access.
- Choose Assign users or groups.
- On the Groups tab, select AWS – Amazon EC2 Admin and choose Next
- On the Assign permission sets to “<AWS-account-name>” page, select the EC2AdminAccess permission set.
- Check that the correct permission set was selected and choose Next.
- On the Review and submit page, verify that the correct group and permission set are selected, and choose Submit.
Step 5: Configure Entra PIM
To use this Microsoft Entra group with Entra PIM, you bring the group under the management of PIM by using the Entra admin console to activate the group. You can read more about group management with PIM in the Microsoft documentation. Begin by activating the Entra group that you created.
- Sign in to the Microsoft Entra admin center with your credentials.
- Select Groups and then All groups
- Select the AWS – Amazon EC2 Admin group.

Figure 3 – Selecting groups for PIM enablement
- Select Privileged Identity Management under the Activity menu list.
- Choose Enable PIM for this group.

Figure 4 – Enable PIM for this group
Now, you will configure the PIM settings for the group. These settings define Member or Owner properties and requirements. It’s here that you can establish MFA requirements, configure notifications, conditional access, approvals, durations, and so on. The Owner role can elevate their permissions using just-in-time access to manage a group, while the Member role is limited to requesting just-in-time membership within the group. In this example, you use the Member properties to demonstrate group membership level temporary elevated access and set a 1-hour duration for the group assignment.
- Sign in to the Microsoft Entra admin center with your credentials.
- Select Identity Governance, Privileged Identity Management, and then Groups.
- Select the AWS – Amazon EC2 Admin group.

Figure 5 – Selecting groups for PIM configuration
- From the Manage menu select Settings.
- Choose Member to view the default role setting details.

Figure 6 – Settings option for the Member role
- Review the default settings. The activation maximum duration should be set to 1 hour and require a justification from the user.
- Close the Role setting details – Member blade.

Figure 7 – Closing the Role setting details – Member blade
- From the Manage menu select Assignments and choose + Add assignments.

Figure 8 – Adding eligibility assignments to the PIM enabled groups
- Select Member from the Select role dropdown menu and choose No member selected. Select the test account, Rich Roe in this example, and then choose Select.
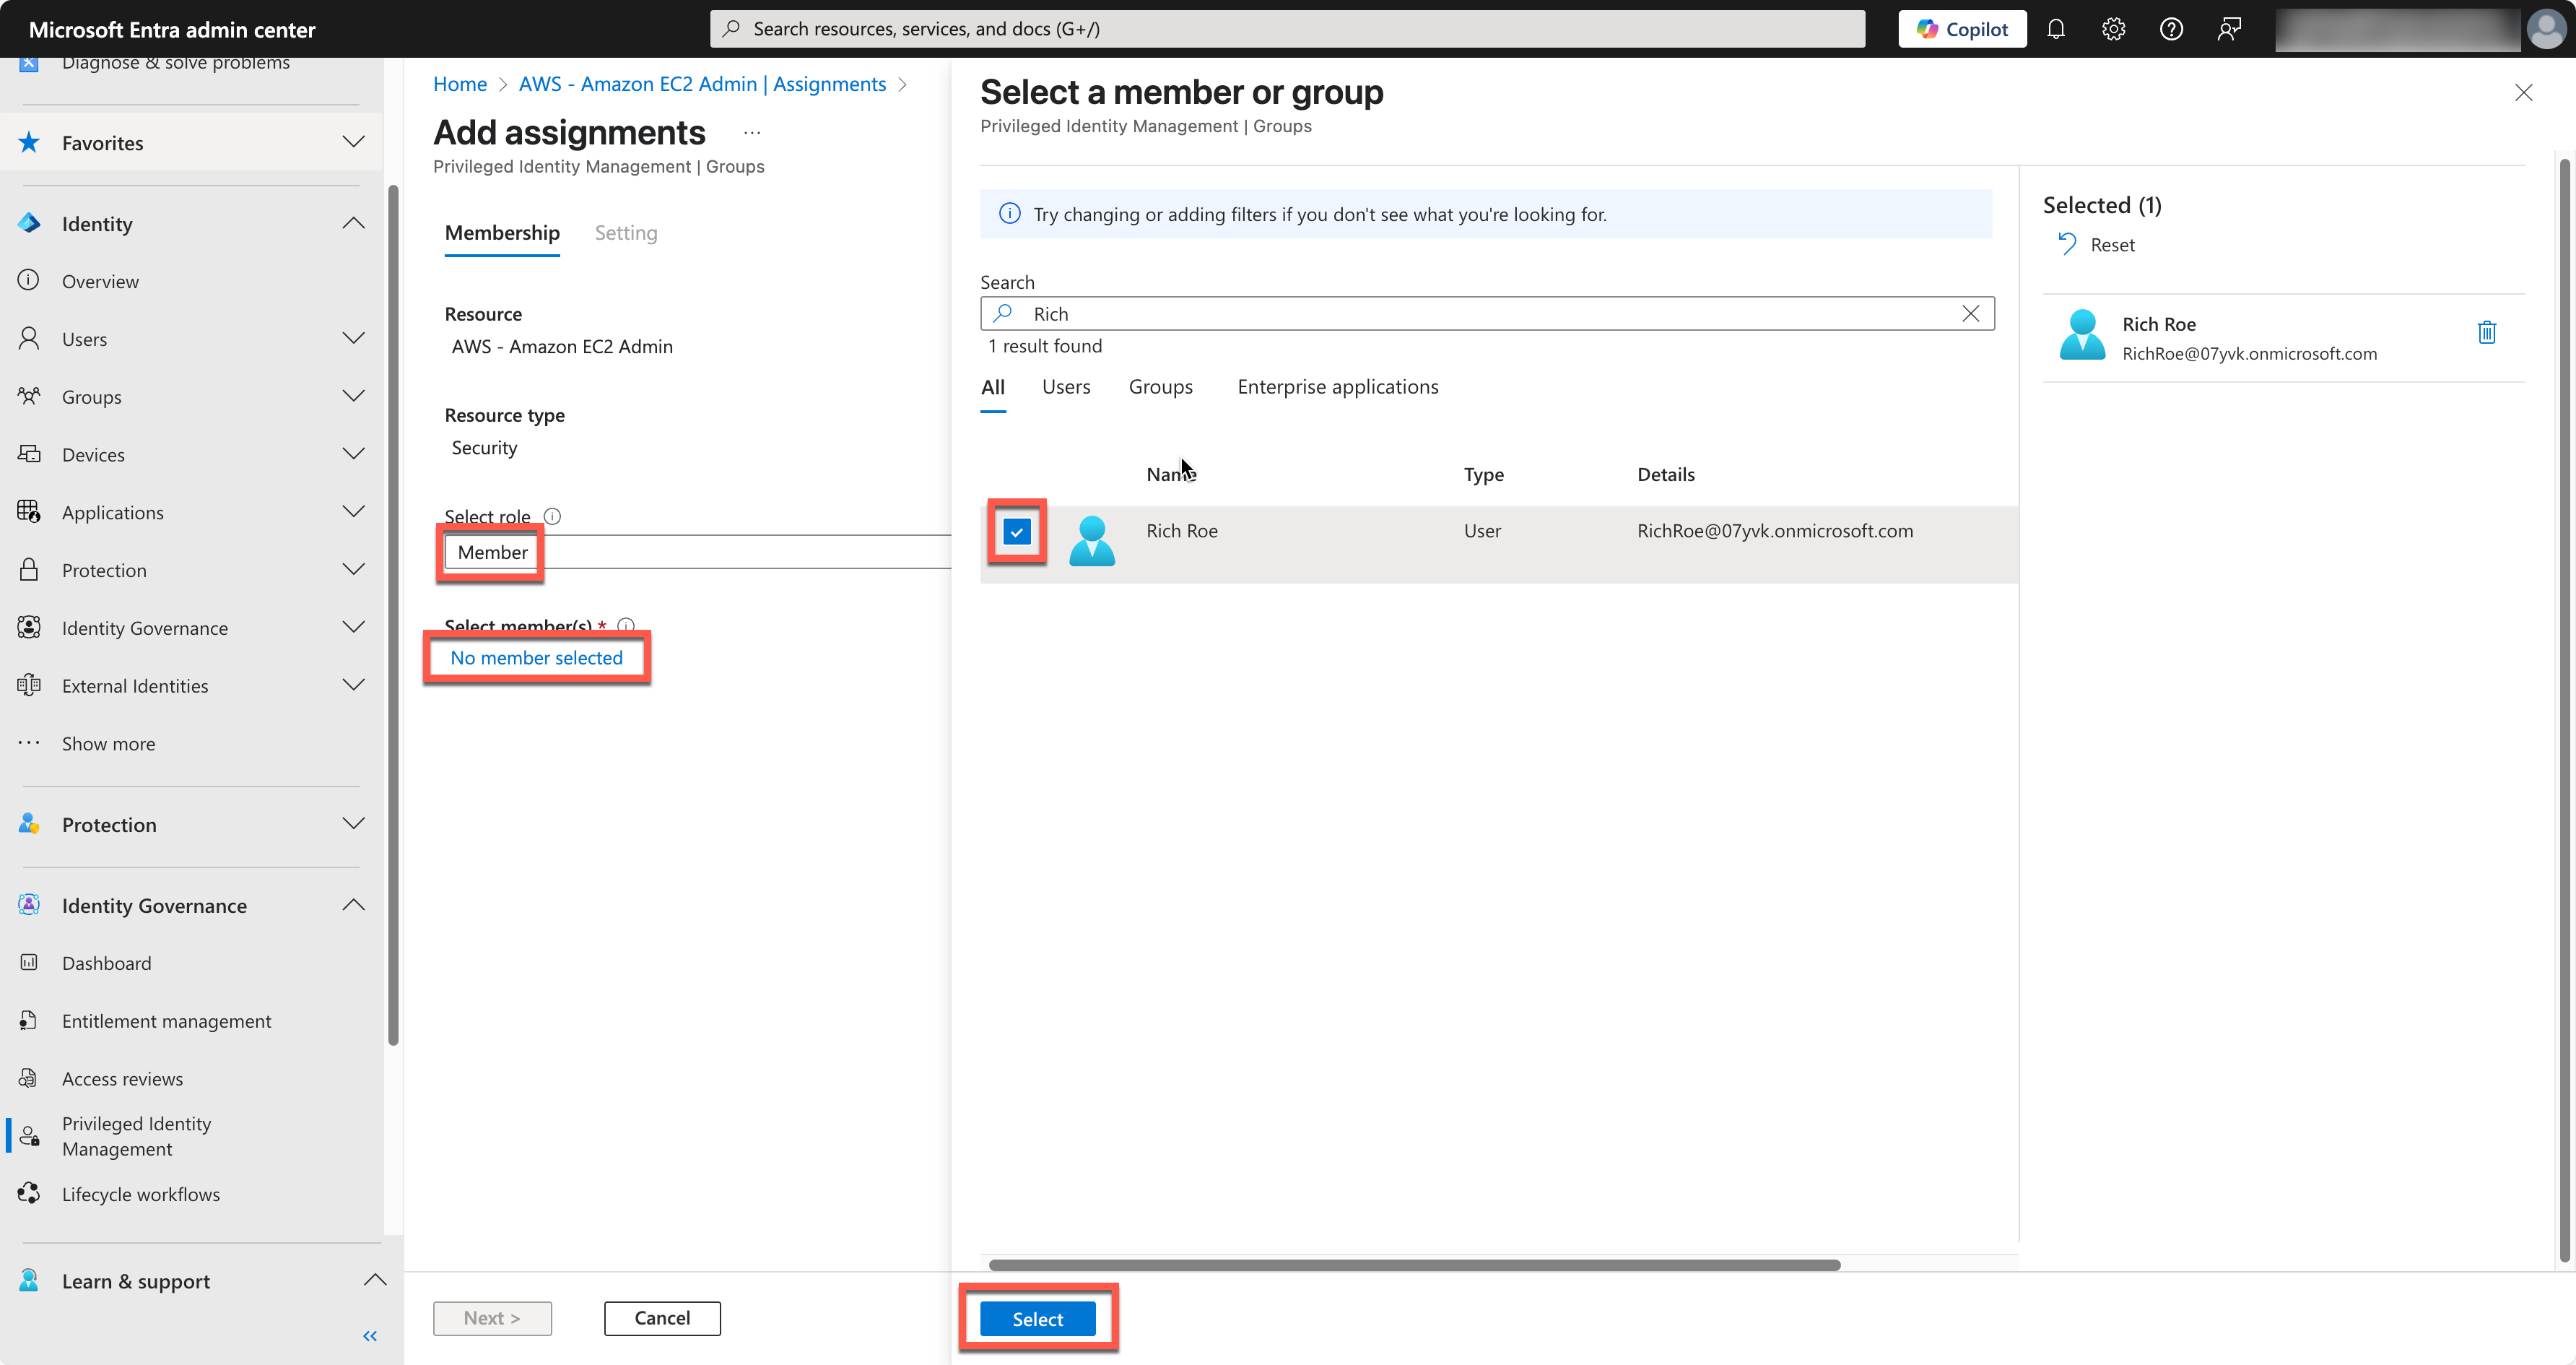
Figure 9 – Adding the test user as an eligible identity for PIM activation to the group
- Choose Next and leave the default setting of 1 year of eligibility. Duration eligibility defines the period that the user can request activation for the group. Depending on your use case, you will define this as permanent or for a set period. For testing purposes, keep the default setting. Choose Assign.

Figure 10 – Completing the eligibility assignment
Test the configuration
You should now have a test configuration of Entra PIM and IAM Identity Center. Use the test account to verify just-in-time access.
- Sign in to the Microsoft Entra admin center using the test account (Rich Roe in this example).
- Select Identity Governance, Privileged Identity Management, and then My roles.

Figure 11 – Browsing to the My Roles section of the Entra admin center
- From the Activate menu list, select Groups. Your eligible group assignments should be listed.
- Choose Activate for the AWS – Amazon EC2 Admin group.

Figure 12 – Activating the just-in-time group membership
- In the Activate – Member blade, enter a justification for the access request and choose Activate.

Figure 13 – Providing a justification for access
In this example, there are no approval workflow processes configured for the group, so Entra validates the eligibility requirements and adds the test account to the AWS – Amazon EC2 Admin group. If you want to dive deeper into the approval workflow process, you can read more about it on the Configure PIM for Groups settings page. Because the group is assigned to the enterprise application and configured for provisioning, the updated group membership is automatically synchronized using the SCIM protocol with the connected IAM Identity Center instance. The provisioning time can vary based on the number of PIM enabled users that are activating their memberships within a given 10-second period. In most situations, group memberships are synchronized within 2–10 minutes, but can revert to the standard 40-minute interval if activity runs up against Entra PIM throttling limits. IAM Identity Center responds to SCIM requests as they arrive from Entra ID.
To test access with the newly activated group assignment, use a separate browser or a private window.
- Sign in to the My Apps portal with the test user credentials and select the IAM Identity Center app that you created for testing. If you experience an error or don’t see the expected permission set, wait a few minutes until the group membership has synchronized to IAM Identity Center and try again.

Figure 14 – Accessing IAM Identity Center through the My apps portal
- Expand the associated AWS account and confirm the EC2ReadOnly permission set has been granted.
- Close the AWS tab. Wait for the access to be revoked, which has been set to 60 minutes in this example.

Figure 15 – Just-in-time access to the EC2AdminAccess permission set
- Sign back in to the My Apps portal and select the AWS IAM Identity Center app. Notice that the EC2ReadOnly permission set has been revoked.
Conclusion
The combination of AWS IAM Identity Center and Entra PIM provides a robust solution for managing just-in-time elevated access to AWS. By using security groups in Entra and mapping them to permission sets in IAM Identity Center, you can automate the provisioning and deprovisioning of privileged access based on defined policies and approval workflows. This approach helps to make sure the principle of least privilege is enforced, with access granted only for the duration required to complete a task. The detailed auditing capabilities of both services also provide comprehensive visibility into privileged access activities.
For AWS customers seeking a comprehensive, secure, and scalable privileged access management solution, the Entra PIM and IAM Identity Center integration is a common option that’s worth investigating to see if it’s a good fit for your use case.
If you have feedback about this post, submit comments in the Comments section below. If you have questions about this post, contact AWS Support.