AWS Public Sector Blog
Web filtering for education using AWS Network Firewall with egress TLS inspection
This post is part two of a two-part series. It builds on part one, Web filtering for education using AWS Network Firewall, which covered filtering using HTTP host fields and Server Name Indication (SNI) for encrypted traffic.
This post demonstrates how TLS inspection in Network Firewall provides visibility into encrypted traffic, even when browsers implement Encrypted Client Hello (ECH) or when SNI fields contain modified information.
This capability decrypts and re-encrypts HTTPS traffic, enabling inspection of encrypted data and helping to mitigate filter bypass attempts. Although the decryption also supports identification of additional security risks, that is out of scope for this post.
Solution overview
The overall design of the underlying infrastructure remains the same as covered in part one of the series, which is shown in the following diagram. Although this diagram depicts multiple Availability Zones, for simplicity, this discussion focuses on deployment into a single Availability Zone.
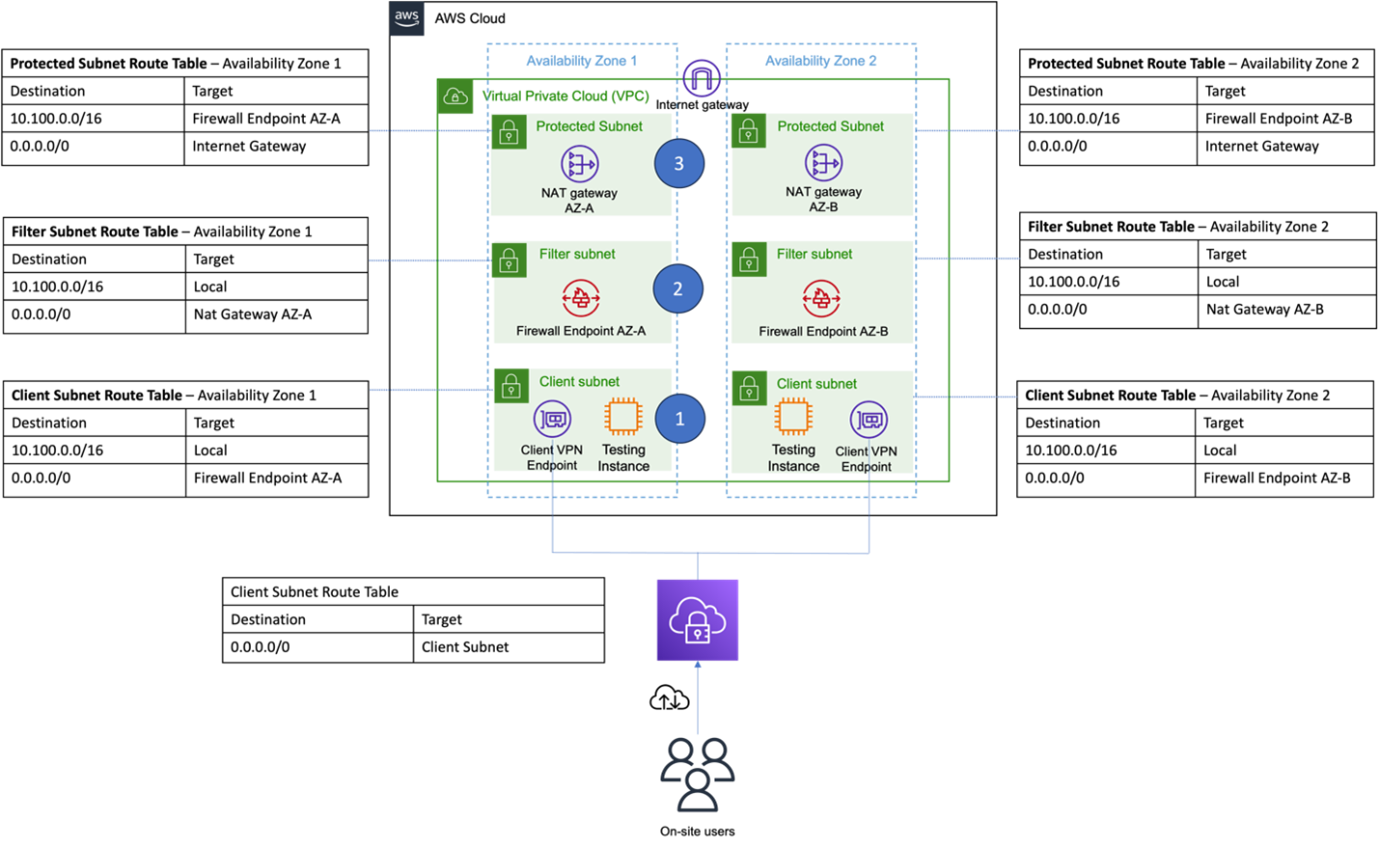
Figure 1: Architecture overview of the solution. VPC architecture with dual-AZ deployment showing protected, filter, and client subnets. Each AZ contains a NAT gateway, Network Firewall, and Client VPN endpoint for on-site user access.
Important considerations
The next section provides AWS Command Line Interface (AWS CLI) commands and configuration files examples. These are NOT intended for production use. Before implementing:
- Review and modify all commands to meet your security requirements.
- Understand that deploying these resources will incur AWS charges.
Solution walkthrough
This walkthrough covers the solution deployment shown in Figure 1 through these six steps:
- Deploy foundation infrastructure
- Create and import private certificate into AWS Certificate Manager (ACM)
- Set up TLS Inspection
- Create Network Firewall rule group
- Configure Network Firewall policy with TLS inspection
- Deploy Network Firewall
Deploy foundational infrastructure
The following AWS CLI commands will deploy the resources discussed in part one, along with the TLS inspection functionality. Although these examples demonstrate the technical implementation, you should thoroughly evaluate them within your security context before proceeding.
- Create a VPC in Amazon Virtual Private Cloud (Amazon VPC):
vpc_id=$(aws ec2 create-vpc --cidr-block 10.0.0.0/16 --tag-specifications 'ResourceType=vpc,Tags=[{Key=Name,Value=network-filter-vpc}]' --query 'Vpc.VpcId' --output text) - Enable the DNS hostname:
aws ec2 modify-vpc-attribute --vpc-id $vpc_id --enable-dns-hostnames - Create the internet gateway:
igw_id=$(aws ec2 create-internet-gateway --tag-specifications 'ResourceType=internet-gateway,Tags=[{Key=Name,Value=network-filter-igw}]' --query 'InternetGateway.InternetGatewayId' --output text) - Attach the internet gateway to the VPC:
aws ec2 attach-internet-gateway --vpc-id $vpc_id --internet-gateway-id $igw_id - Identify first Availability Zone in your preferred Region:
az=$(aws ec2 describe-availability-zones --query 'AvailabilityZones[0].ZoneName' --output text) - Create public subnet:
public_subnet_id=$(aws ec2 create-subnet --vpc-id $vpc_id --cidr-block 10.0.0.0/24 --availability-zone $az --tag-specifications 'ResourceType=subnet,Tags=[{Key=Name,Value=filter-protected-public-subnet-1a}]' --query 'Subnet.SubnetId' --output text) - Create network firewall subnet:
nfw_subnet_id=$(aws ec2 create-subnet --vpc-id $vpc_id --cidr-block 10.0.1.0/24 --availability-zone $az --tag-specifications 'ResourceType=subnet,Tags=[{Key=Name,Value=filter-nfw-subnet-1a}]' --query 'Subnet.SubnetId' --output text) - Create client subnet:
client_subnet_id=$(aws ec2 create-subnet --vpc-id $vpc_id --cidr-block 10.0.2.0/24 --availability-zone $az --tag-specifications 'ResourceType=subnet,Tags=[{Key=Name,Value=filter-client-subnet-1a}]' --query 'Subnet.SubnetId' --output text) - Create protected route table:
protected_rt_id=$(aws ec2 create-route-table --vpc-id $vpc_id --tag-specifications 'ResourceType=route-table,Tags=[{Key=Name,Value=protected-subnet-route-table-az1}]' --query 'RouteTable.RouteTableId' --output text) - Create client route table:
client_rt_id=$(aws ec2 create-route-table --vpc-id $vpc_id --tag-specifications 'ResourceType=route-table,Tags=[{Key=Name,Value=client-subnet-route-table-az1}]' --query 'RouteTable.RouteTableId' --output text) - Create network file route table:
nfw_rt_id=$(aws ec2 create-route-table --vpc-id $vpc_id --tag-specifications 'ResourceType=route-table,Tags=[{Key=Name,Value=filter-nfw-subnet-1a-rt}]' --query 'RouteTable.RouteTableId' --output text) - Associate protected route table:
aws ec2 associate-route-table --subnet-id $public_subnet_id --route-table-id $protected_rt_id - Associate client route table:
aws ec2 associate-route-table --subnet-id $client_subnet_id --route-table-id $client_rt_id - Associate network file route table:
aws ec2 associate-route-table --subnet-id $nfw_subnet_id --route-table-id $nfw_rt_id - Obtain Elastic IP address:
eip_id=$(aws ec2 allocate-address --domain vpc --query 'AllocationId' --output text) - Provision NAT Gateway:
nat_gateway_id=$(aws ec2 create-nat-gateway --subnet-id $public_subnet_id --allocation-id $eip_id --tag-specifications 'ResourceType=natgateway,Tags=[{Key=Name,Value=NAT-GW-AZ1}]' --query 'NatGateway.NatGatewayId' --output text) - Wait for NAT Gateway provisioning:
aws ec2 wait nat-gateway-available --nat-gateway-ids $nat_gateway_id
This concludes the deployment of the foundational network infrastructure shown in figure 1, except for the Network Firewall. You’ll deploy the firewall after configuring TLS inspection.
Create and import private certificate into ACM
AWS Network Firewall requires a certificate for outbound TLS inspection to encrypt and decrypt traffic. For this walkthrough, you create a self-signed certificate using OpenSSL. Self-signed certificates are suitable for testing only. For production environments, consider using certificates signed by a trusted public certificate authority that aligns with your organization security requirements.
To enable TLS inspection, create an OpenSSL configuration file with Basic Constraints extension settings before generating the certificate.
- OpenSSL configuration file:Copying and pasting the following block of commands on a Linux operating system will create a file named
OpenSSL_basicconstraints.conf. Update the fields under [dn] with your specific certificate details.
cat << EOF > openSSL_basicconstaints.conf
[ req ]
default_bits = 2048
prompt = no
default_md = sha256
distinguished_name = dn
x509_extensions = v3_ca
[ dn ]
CN = Your Common Name
O = Your Organization
OU = Your Organizational Unit
C = GB
ST = Your State
L = Your Location
[ v3_ca ]
basicConstraints = critical,CA:TRUE
subjectKeyIdentifier = hash
authorityKeyIdentifier = keyid:always,issuer
keyUsage = critical, digitalSignature, cRLSign, keyCertSign
EOF - Create the SSL certificate:
openssl req -config openSSL_basicconstaints.conf -new -newkey rsa:2048 -nodes -x509 -extensions v3_ca -keyout key.pem -out crt.pem - Import the certificate into ACM:
certificate_arn=$(aws acm import-certificate --certificate fileb://./crt.pem --private-key fileb://./key.pem --query 'CertificateArn' --output text) - To confirm that the certificate has been imported, check for the Amazon Resource Name (ARN) using the following AWS CLI command:
echo "Imported Certificate ARN: $certificate_arn"
Set up TLS inspection
To create the TLS inspection configuration using the test certificate you imported into ACM, use the following code. These AWS CLI commands configure AWS Network Firewall to inspect all traffic flowing through it:
tls_config_arn=$(aws network-firewall create-tls-inspection-configuration --tls-inspection-configuration-name "outbound-tls-inspection-cli-created" --description "TLS Inspection for all outbound traffic" --tls-inspection-configuration '{"ServerCertificateConfigurations": [{"CertificateAuthorityArn": "'$certificate_arn'","Scopes": [{"Sources": [{"AddressDefinition": "0.0.0.0/0"}],"Destinations": [{"AddressDefinition": "0.0.0.0/0"}],"SourcePorts": [{"FromPort": 1, "ToPort": 65535}],"DestinationPorts": [{"FromPort": 1, "ToPort": 65535}],"Protocols": [6]}]}]}' --query 'TLSInspectionConfigurationResponse.TLSInspectionConfigurationArn' --output text)
Create Network Firewall rule group
IMPORTANT: These rules are provided for demonstration purposes only. Create and thoroughly test your own rules in a nonproduction environment before implementing them to make sure they meet your filtering and security requirements.
We’re exclusively using a Suricata-based rule group. These rules inspect the host header, specifically dropping traffic to amazon.co.uk.
rule_group_arn=$(aws network-firewall create-rule-group --rule-group-name "Suricata-Domain-Rules" --type STATEFUL --capacity 100 --rule-group '{"RulesSource":{"RulesString":"pass tcp $HOME_NET any -> any any (flow:not_established, to_server; msg:\"allow TCP 3-way handshake to_server\"; sid:100001;)\npass tcp any any -> $HOME_NET any (flow:not_established, to_client; msg:\"allow TCP 3-way handshake back to_client\"; sid:100002;)\ndrop http any any -> any any (http.host; content:\"amazon.co.uk\"; endswith; sid:100003;)\ndrop http2 any any -> any any (http.host; content:\"amazon.co.uk\"; endswith; sid:100004;)\npass tcp any any -> any any (flow:established; msg:\"Allow all established TCP connections\"; sid:100005;)"},"StatefulRuleOptions":{"RuleOrder":"STRICT_ORDER"}}' --tags Key=Name,Value=Suricata-Domain-Rules --query 'RuleGroupResponse.RuleGroupArn' --output text)
Configure Network Firewall policy with TLS inspection
Now create a Network Firewall policy that combines the TLS configuration with the Suricata rule group created earlier:
policy_arn=$(aws network-firewall create-firewall-policy --firewall-policy-name content-filter-fw-policy --firewall-policy '{"StatelessDefaultActions": ["aws:forward_to_sfe"],"StatelessFragmentDefaultActions": ["aws:forward_to_sfe"],"StatefulDefaultActions": ["aws:drop_strict"],"StatefulEngineOptions": {"RuleOrder": "STRICT_ORDER"},"StatefulRuleGroupReferences": [{"ResourceArn": "'$rule_group_arn'","Priority": 100}],"TLSInspectionConfigurationArn": "'$tls_config_arn'"}' --query 'FirewallPolicyResponse.FirewallPolicyArn' --output text)
Deploy Network Firewall
Follow these steps to create the AWS Network Firewall endpoint and update route tables using the TLS-enabled policy you created previously.
NOTE: TLS inspection can’t be added to existing Network Firewall policies, which is why we configured it first. If you already have Network Firewall deployed, you can create a new policy with TLS inspection and update your existing firewall to use it.
- Create the Network Firewall
firewall_arn=$(aws network-firewall create-firewall --firewall-name "content-filter-firewall" --firewall-policy-arn $policy_arn --vpc-id $vpc_id --subnet-mappings "SubnetId=$nfw_subnet_id" --query 'Firewall.FirewallArn' --output text) - Retrieve the Network Firewall endpoint ID:
endpoint_id=$(aws network-firewall describe-firewall --firewall-arn "$firewall_arn" --query 'FirewallStatus.SyncStates.*.Attachment[].EndpointId' --output text | head -n1)Wait for Network Firewall to complete endpoint provisioning before creating and updating the route tables. To check the endpoint status, run the command below. If the command returns “None”, the endpoint is still provisioning.
echo "Endpoint ID: $endpoint_id" - Create outbound route in protected route table:
aws ec2 create-route --route-table-id $protected_rt_id --destination-cidr-block 0.0.0.0/0 --gateway-id $igw_id - Update route to Network Firewall in protected route table:
aws ec2 replace-route --route-table-id $protected_rt_id --destination-cidr-block 10.0.0.0/16 --vpc-endpoint-id $endpoint_id - Create route to Network Firewall in Client route table:
aws ec2 create-route --route-table-id $client_rt_id --destination-cidr-block 0.0.0.0/0 --vpc-endpoint-id $endpoint_id - Create route to NAT Gateway in Network Firewall route table:
aws ec2 create-route --route-table-id $nfw_rt_id --destination-cidr-block 0.0.0.0/0 --nat-gateway-id $nat_gateway_id
Testing
To validate the configuration, deploy a test Amazon Elastic Compute Cloud (Amazon EC2) instance in the client subnet, connect privately using EC2 Instance Connect (without requiring external SSH access) and enter curl commands to verify Network Firewall filtering.
The following AWS CLI commands will create and configure the test instance.
- Create EC2 client security group:
client_sg_id=$(aws ec2 create-security-group --group-name "ClientEC2SecurityGroup" --description "Security group for Client EC2 instance" --vpc-id $vpc_id --query 'GroupId' --output text) - Create Instance Connect security group:
connect_sg_id=$(aws ec2 create-security-group --group-name "ConnectEndpointSecurityGroup" --description "Security group for EC2 Instance Connect Endpoint" --vpc-id $vpc_id --query 'GroupId' --output text) - Allow SSH access to client security group from Instance Connect:
aws ec2 authorize-security-group-ingress --group-id $client_sg_id --protocol tcp --port 22 --source-group $connect_sg_id - Create the EC2 instance connect endpoint:
connect_endpoint_id=$(aws ec2 create-instance-connect-endpoint --subnet-id "$client_subnet_id" --security-group-ids "$connect_sg_id" --no-preserve-client-ip --query 'InstanceConnectEndpoint.InstanceConnectEndpointId' --output text) - Get the latest Amazon Linux 2 AMI ID:
ami_id=$(aws ssm get-parameter --name /aws/service/ami-amazon-linux-latest/amzn2-ami-hvm-x86_64-gp2 --query 'Parameter.Value' --output text) - Launch the EC2 instance:
instance_id=$(aws ec2 run-instances --image-id $ami_id --instance-type t3.small --subnet-id $client_subnet_id --security-group-ids $client_sg_id --tag-specifications 'ResourceType=instance,Tags=[{Key=Name,Value=Client-Instance}]' --query 'Instances[0].InstanceId' --output text) - Add self-signed certificate to your EC2 instance trust store:Before running any tests, add your self-signed certificate to the EC2 instance’s trust store.Use EC2 Instance Connect to transfer the certificate (crt.pem) created earlier over to your EC2 instance.
For connection instructions, refer to Connect to a Linux instance using EC2 Instance Connect in the AWS documentation.
Running the following commands on your EC2 Instance will add the certificate to the Linux Trust store:
Create trust store:
sudo mkdir -p /etc/pki/ca-trust/source/anchors/
Copy certificate to trust store:
sudo cp crt.pem /etc/pki/ca-trust/source/anchors/
Update trust store:
sudo update-ca-trust extract
Expected results
Based on our Suricata rules, we expect the following results:
- Requests to amazon.co.uk to be blocked
- Requests to other domains to be allowed
From our EC2 Instance we can test the behavior using the Curl command:
curl -v https://amazon.co.uk
We can see from the curl output below that TLS inspection is taking place as our self-signed certificate is used for the TLS handshake. The connection is closed by Network Firewall due to the drop statement for amazon.co.uk in our Suricata rules.
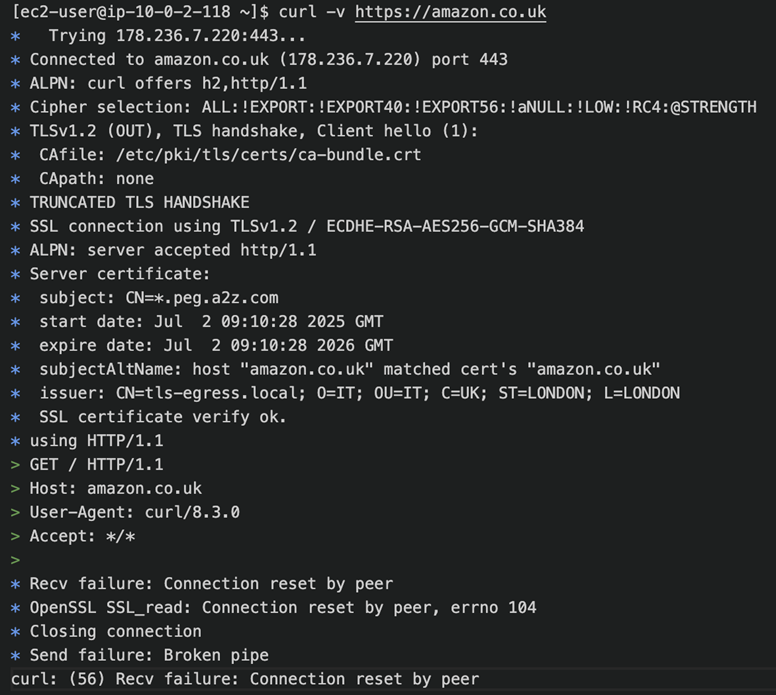
Figure 2: Linux CLI output of Curl command showing unsuccessful connection to amazon.co.uk
Optionally you could deploy a Windows EC2 instance into the client subnet and test using a browser.
The same test using a browser confirms that requests to amazon.co.uk are blocked, as shown in the following screenshot.
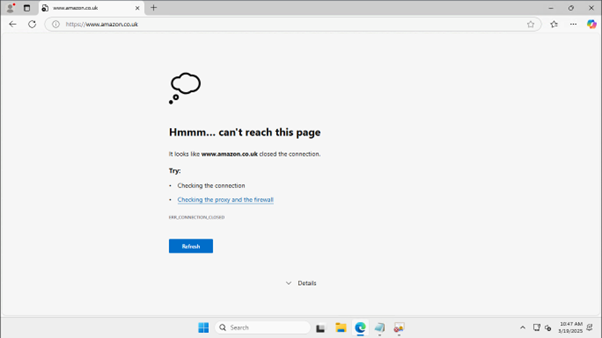
Figure 3: Microsoft Edge browser displaying notification of failure to connect to www.amazon.co.uk
Using Curl to test an allowed domain we can see a successful connection:
curl -v https://amazon.de
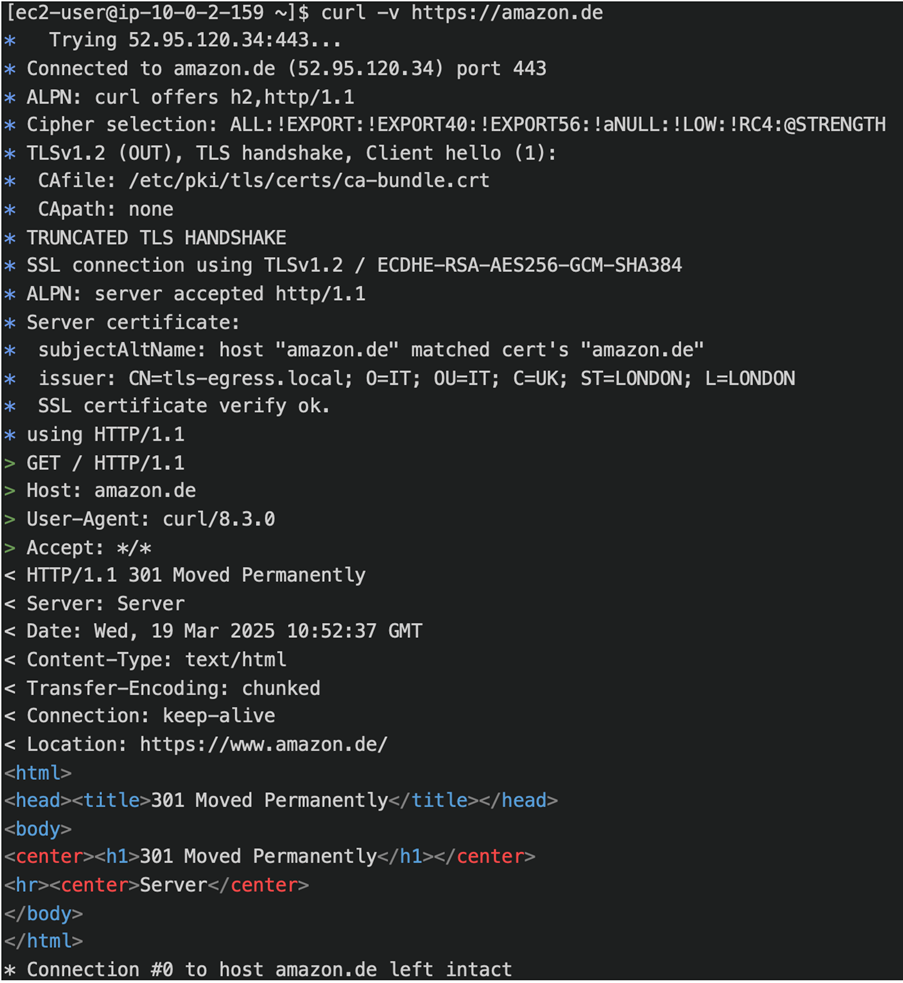
Figure 4: Linux CLI output of Curl command showing successful connection to amazon.de
When we performed the same test using a browser, the domain request succeeded. Using certificate viewer, as shown in the following screenshot, we confirmed that the certificate used is the private one created, confirming that TLS inspection is taking place.
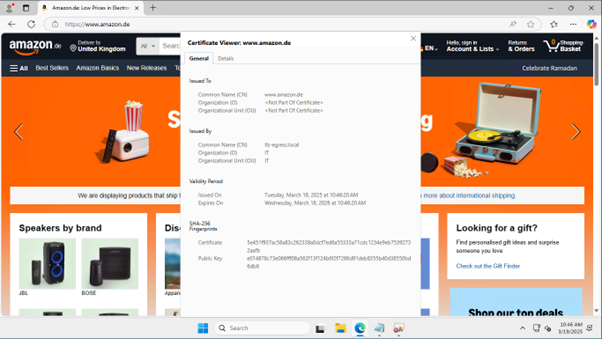
Figure 5: Shows Microsoft Edge browser successfully connecting to www.amazon.de
Cleanup
To avoid ongoing charges, remove resources that you created as part of this walkthrough:
- Before deleting the firewall and endpoints, remove routes from route tables.
- Delete the Network Firewall rule groups, policies, and endpoints.
- Delete the EC2 instance and EC2 Instance Connect endpoint.
- Delete the NAT Gateway.
- Delete the Internet Gateway.
- Delete subnets and route tables.
- Delete the VPC.
Conclusion
In this post, we demonstrated how to enable and configure TLS inspection in AWS Network Firewall, extending its security capabilities beyond standard packet filtering. By implementing TLS inspection, organizations can effectively filter HTTPS traffic and enforce URL-based access control.
AWS Network Firewall provides a comprehensive, cloud-based solution for traffic filtering and inspection. The ability to decrypt, inspect, and re-encrypt HTTPS traffic, combined with custom domain filtering and AWS managed rule groups, creates a robust security framework.
Remember that although we used a self-signed certificate for demonstration purposes, production environments should use certificates that align with your organization’s security requirements and PKI infrastructure.
If you have feedback about this post, submit comments in the comments section. If you have further questions around the content of this post, contact AWS Support.