Networking & Content Delivery
Securing Service Communications: Combining VPC Lattice with Network Firewall
Introduction:
Organizations building modern applications in AWS often need different security controls for various types of service communications. While centralized inspection using AWS Network Firewall has been the traditional approach for securing service-to-service traffic, it presents challenges as applications scale. Managing static firewall rules is operationally complex, especially for Layer 7 traffic, and troubleshooting becomes increasingly time-consuming.
Amazon VPC Lattice offers an alternative to firewalling HTTP/S communications, providing identity-based access controls and simplified connectivity management. This complements existing Network Firewall deployments, allowing organizations to use the most appropriate security controls for different traffic types.
- Use centralized traffic inspection with Network Firewall for workloads requiring deep packet inspection.
- Implement VPC Lattice for HTTP/HTTPS and TCP Service-to-service communication.
- Combine both approaches in a comprehensive security architecture.
Solution Overview:
This solution shows how to secure service communications using both VPC Lattice and Network Firewall. The architecture allows:
- Deep packet inspection for traffic requiring malware detection and IPS/IDS capabilities.
- Identity-based access control for HTTP/HTTPS service communication.
- Simplified management of service-to-service connectivity.
- Optimized routing based on security requirements.
Scenario Walkthrough:
In this section, we explore three different approaches on securing your workloads.
1. Centralized Traffic Inspection Setup.
2. VPC Lattice Service Network Configuration.
3. Combined Architecture.
1. Centralized Traffic Inspection Setup
In this section, we cover the centralized inspection architecture using AWS Transit Gateway and Network Firewall. We use the Production, Dev, and IT/Shared Service environments as our baseline architecture, where all inter-VPC traffic must flow through a centralized inspection point. This design enforces security controls through deep packet inspection and provides both network-level and application-level security monitoring. Let’s dive deeper into how this traditional architecture handles secure application connectivity.
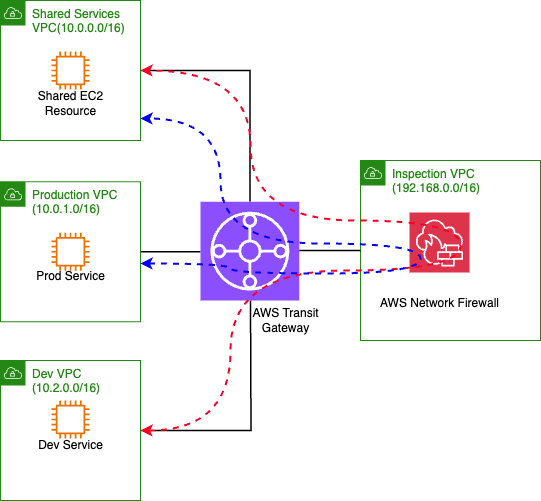
Figure-1: Centralized inspection architecture
Defining traffic inspection patterns is essential for implementing secure connectivity with Transit Gateway and Network Firewall. When traffic flows between VPCs, it must first route through the Transit Gateway, which directs it to the inspection VPC hosting the Network Firewall. This creates a hub-and-spoke model where all inter-VPC communication undergoes security inspection, regardless of the source or destination. This approach, while comprehensive, introduces additional network hops and potential bottlenecks in the communication path.
In the centralized inspection architecture, the Production and Dev web services’ communication with the logging service and Redis Cache service within the shared services VPC requires multiple network hops. As shown in the diagram, all traffic first routes through the Transit Gateway, then passes through the Network Firewall in the inspection VPC before reaching its destination. This creates several challenges: increased latency due to additional network hops, complex routing table management, potential performance bottlenecks at the inspection point, and higher costs due to data processing charges at both the Transit Gateway and Network Firewall. These limitations suggest that a more modern approach using VPC Lattice could provide a more efficient solution for service-to-service communication while maintaining security controls.
For a deeper dive into centralized inspection architectures using AWS services, including detailed implementation guidance and best practices, refer to these AWS blogs:
- Deploy centralized traffic filtering using AWS Network Firewall
- Centralized inspection architecture with AWS Gateway Load Balancer and AWS Transit Gateway
2. VPC Lattice Service Network Configuration:
In this section, we cover VPC Lattice Service Network configuration. We use the Production, Dev and IT/Shared Service environments shown above as our baseline architecture. We set up a VPC Lattice network and demonstrate service to service connectivity from Production and Dev to IT/Shared Services environment. We cover both Layer 7 HTTP and TCP Layer 4 communication patterns. Let’s dive deeper into how you can set up secure application connectivity using VPC Lattice.
Defining access patterns is essential for architecting secure connectivity with VPC Lattice. When you associate a VPC with a Service Network, clients within that VPC can access services that are associated with the same Service Network. Similarly, when you associate services with a Service Network, these can be accessed by clients within VPCs associated with the same Service Network, all provided the auth policies permit client to service communication.
In the centralized inspection architecture, the Prod and Dev web services communicate with the logging service and Redis cache service within shared services VPC for logging and caching related calls respectively. As shown in the following diagram (Figure 2), we introduce a VPC Lattice Service Network, and we associate the Prod, Dev and Shared Services with it. The figure below shows the communication flows from the Production and Dev web services to the Shared Service VPC for logging (HTTP logstash) and Redis Cache (TCP 6379) through the VPC Lattice Service Network.
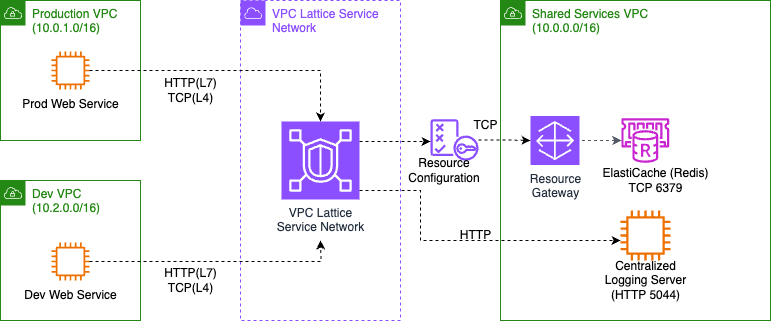
Figure-2: Service-to-service communication using VPC Lattice
Implementation steps:
Following the instructions, we set up the VPCs and the corresponding services shown in the baseline architecture. Let’s dive deeper into how you can set up secure application connectivity using VPC Lattice.
Step 1: Create a VPC Lattice Service Network:
- Create a Service Network
- Associate the Service Network with Prod, Dev and IT/Shared Services VPCs.
- Also create security groups for each VPC association to control inbound traffic from the respective VPC to the Service Network.
- For Network Access Auth type please select AWS IAM.
- You can enable ‘Service Access Logs’ and ‘Resource Access Logs’ to monitor all requests and responses to and from the Service Network.
Step 2: Create a VPC Lattice target group:
- In our example the logging service runs on Shared Services VPC EC2 instance. This are your EC2 target instance(s).
- Configure the protocol HTTP on port 5044.
Step 3: Create a VPC Lattice service for the logging Server in Shared Services VPC
- Create a VPC Lattice service for the logging server.
- Define routing by setting up listeners and rules to define how network traffic is routed within your service.
- In this case, we set up a listener with protocol HTTP and port 5044.
- We use listener default action of forwarding to Target group.
- Associate the service with the lattice network created above.
Step 4: Set up VPC Resource gateway and Resource Configuration for VPC Lattice to connect Redis Cache Service (TCP) to the Service Network:
- Create a VPC Resource Gateway within IT/Shared Services VPC
- Associate a security group to control any inbound traffic from VPC to Service Network.
- Create a Resource Configuration by specifying above created Resource gateway.
- Define the IP address of the Redis Cache server and port (TCP 6379) under the resource definition.
Step 5: Associate resource configuration created above with your Service Network.
- Open the Amazon VPC console.
- In the navigation pane, under PrivateLink and Lattice, choose Resource configurations.
- Select the name of the resource configuration to open its details page.
- Select Service Network associations tab.
- Choose Create associations.
- Select a Service Network which we created in Step 1.
- Choose Save changes.
Step 6: Configure DNS (Optional)
By default, VPC Lattice manages unique global DNS names for each VPC Lattice service it creates. These DNS names reside in Amazon Route 53 public hosted zones. For this implementation, we have preconfigured custom domain names for our services:
- Logging service: logging.example.com
- Redis Cache service: redis.example.com
This step is optional and only necessary if you prefer to use your own custom domain names. If you choose to use custom domain names, you can reference the VPC Lattice-managed domain names as CNAME or Alias records in Route 53. For detailed instructions, see Configuring custom domain names for VPC Lattice services.
Step 7: Create an AWS Identity and Access Management (IAM) auth policy:
Use IAM to implement zero-trust authentication and authorization. Create a policy to allow only authenticated access, requiring requests to services to be signed using SIGv4. This approach enables you to configure granular security controls among your services without going through the central Inspection VPC.
{
         "Version": "2012-10-17",
         "Statement": [
         {
              "Effect": "Allow",
              "Principal": "*",
              "Action": "vpc-lattice-svcs:Invoke",
              “Resource”: “*”,
                       "Condition": {
                                "StringEquals": {
                                        "aws:PrincipalOrgID": [
                                                "o-123456example"
                                 ]
                         }
                 }
         }
    ]
}
Step 8: Connectivity validation
Perform testing against the Logging Service:
Perform testing using a curl operation against logging.example.com. In step-7, the IAM auth policy allows everybody to make requests.

Figure-3: Successful curl against logging.example.com
Apply the IAM policy and perform the curl operation against logging.example.com without using your credentials. You cannot access the request because you haven’t provided your credentials, resulting in an access denied error as shown in Figure 4.

Figure-4: Access Denied curl against logging.example.com
Perform testing against the Redis Cache Service:
Similarly, perform a successful test against redis.example.com. This domain name is associated with the Redis cache resource we created in our Service Network. You can now securely connect to shared services VPC via the VPC Lattice network.

Figure-5: Successful test against redis.example.com
Apply the IAM policy and perform the netcat (nc) operation against redis.example.com without using your credentials. You get a timeout because the request lacks credentials

Figure-6: Failed test against redis.example.com
Using the VPC Lattice approach demonstrated above, we are able to leverage Identity-based authentication using IAM for requests between services and also have per-request authorization which authenticates and authorizes requests at layer 7, while for layer 4 filtering we are able to leverage associated security groups to control traffic flowing between Services.
3. Combined Architecture
We now explore a combined strategy, where we use a Centralized inspection approach with Network Firewall for flows requiring deep packet inspection, while using VPC Lattice approach for other non-critical TCP connections and Application layer traffic (HTTP).
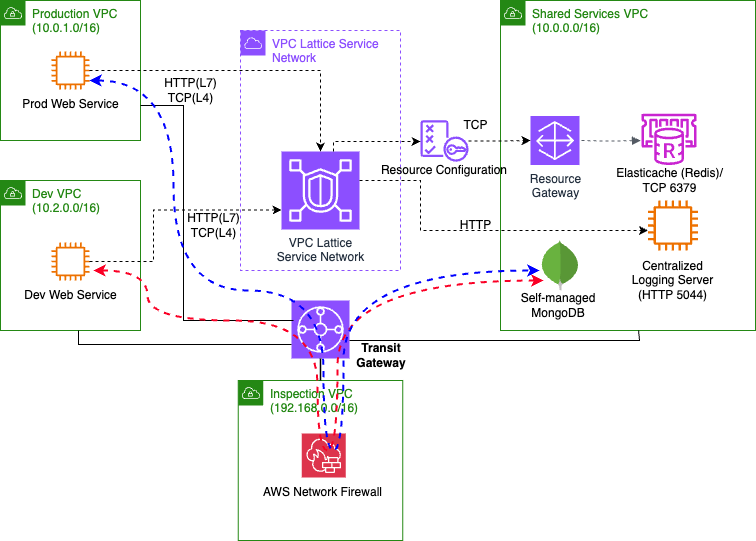
Figure-7: Combined approach for secure service-to-service communication for L7-L4 protocols
In this scenario, applications or services in Production and Development VPCs communicate with Redis Cache Service (Layer 4) and Centralized Logging Server (Layer 7) in the Shared Services VPC over the VPC Lattice Service Network using redis.example.com and logging.example.com respectively. Traffic routes via the VPC Lattice Service Network endpoints created within each VPC associated with the Service Network. The Transit Gateway and its attachments remain intact as discussed in the centralized traffic inspection section. Other traffic, such as communication with the self-managed MongoDB in the Shared Services VPC (containing sensitive data requiring protection against exfiltration), continues to flow through the centralized inspection path via the Transit Gateway and Network Firewall.
This combined approach ensures that:
- Critical traffic requiring Deep Packet Inspection (DPI), such as MongoDB database access with sensitive data, flows through the centralized inspection pattern. Here, Network Firewall can prevent data exfiltration and provide malware detection and IPS/IDS functionality.
- Non-DPI Layer 4 connection flows (like Redis Cache) and HTTP/HTTPS traffic can connect through the VPC Lattice network.
This setup maintains identity-based access control for HTTP/HTTPS service communication and provides optimized routing based on security requirements.
Cost Advantage of Combined Approach:
The combined architecture combining VPC Lattice with Network Firewall offers substantial cost savings compared to traditional centralized inspection approaches. These savings stem from three main areas:
- Reduced Network Firewall Processing.
- Significant reduction in Network Firewall data processing costs.
- More efficient handling of HTTP and TCP traffic through VPC Lattice.
- Cost benefits scale with increased traffic volume.
- Optimized Transit Gateway Usage.
- Lower Transit Gateway data processing charges as VPC Lattice traffic bypasses TGW.
- Reduced TGW attachment utilization for non-inspection traffic.
- Direct service-to-service communication eliminates unnecessary routing.
- Efficient Resource Utilization.
- Identity-based routing eliminates the need for complex networking rules.
- Simplified service discovery and connectivity management.
- Reduced operational complexity in maintaining routing tables.
The cost benefits of this combined approach increase significantly as traffic volumes grow. Both Network Firewall processing costs and Transit Gateway data transfer charges scale with usage, making this architecture particularly beneficial for organizations with high inter-service communication patterns.
To calculate specific costs for your implementation, use the following resources:
Conclusion:
This post demonstrates how to secure your workloads using VPC Lattice and Network Firewall. It highlights the importance of using VPC Lattice for HTTP/HTTPS service communication that requires identity-based controls, while employing Network Firewall when deep packet inspection is needed. The key takeaway is to choose the appropriate security control based on traffic type, balancing security, performance, and cost considerations. By combining both VPC Lattice and Network Firewall approaches, organizations can achieve optimal security and operational efficiency in their AWS environments. This strategy allows for a comprehensive security architecture that adapts to various communication needs while maintaining robust protection across different types of network traffic.
Call to Action:
We encourage you to implement this combined approach using VPC Lattice and Network Firewall to enhance your AWS network security. If you have questions about this post, please submit them to AWS re:Post. For more information, refer to the Amazon VPC Lattice, Network Firewall, AWS Transit Gateway, Security Best Practices, and additional Networking & Content Delivery Blog posts that cover VPC Lattice.
About the authors

Anoop Talluri
Anoop Talluri is a Solutions Architect at AWS helping greenfield AWS customers accelerate their cloud outcomes. He has over 8 years of experience with designing and implementing various networking and cloud solutions. In his spare time, Anoop enjoys badminton, hiking, reading and traveling.
 SaiJeevan Devireddy
SaiJeevan Devireddy is a Sr. Solutions Architect at AWS working with Strategic accounts. He is passionate about helping customers with architecting and building highly available systems on AWS.