Networking & Content Delivery
Enhancing Pinterest’s organizational security with a DNS firewall: Part 2
This post was authored by Ali Yousefi, Senior Security Software Engineer on the Infrastructure Security Team at Pinterest
Introduction
In part 1 one of this two-part blog series, we demonstrated how Pinterest gained visibility into DNS traffic originating from its VPCs by enabling Amazon Route 53 Resolver query logs across its Amazon Web Services (AWS) Organization. We also showed how to analyze these logs with Python to generate a set of DNS query allowlists. In part two, we outline how Pinterest implemented a scalable, secure, cost-effective, and flexible DNS firewall using AWS Firewall Manager, Amazon Route 53 Resolver DNS Firewall, and the allowlists generated in part one of this series. We demonstrate how to place an Organization’s member accounts under a DNS Walled Garden (allowlist + default deny) by default, while providing an option for certain accounts to use a Deny Malicious (denylist + default allow) strategy instead for needed exceptions.
Well-known vendor solutions provide comparable DNS filtering capabilities to the consumer industry. The techniques referenced in this post offer similar protections at the enterprise level, while making it easy to manage these DNS controls at scale in the AWS cloud and adhere to security best practices.
Solution overview
The services used include:
- Organizations: Enables central management and governance of multiple AWS accounts
- Firewall Manager: Enables central management of various firewall solutions across an Organization
- Route 53 Resolver DNS Firewall: Allows configuration of firewall rules for DNS queries made from a VPC to Amazon Route 53 Resolver
Some important concepts of Route 53 Resolver DNS Firewall are shown in Figure 1:

Figure 1: Route 53 Resolver DNS Firewall service concepts
Alt Text: Diagram showing Amazon VPC DNS Firewall rule group associations with domain lists and priorities. The top half illustrates one firewall rule group containing multiple rules, such as Rule 1 allowing A queries to domains in Domain List A (*.amazonaws.com., *.example.com.) and Rule n allowing AAAA queries to domains in Domain List B (*.amazonaws.com., *.example2.com.). This firewall rule group is associated with an Amazon VPC at priority 1. The bottom half shows another firewall rule group, where Rule 1 allows A queries to Domain List C (example3.com.) and Rule m denies MX queries to Domain List D (example4.com., example5.com.). This second rule group is associated with the same Amazon VPC at priority p.
- Rule group: a collection of Route 53 Resolver DNS Firewall rules. Rule groups are associated with a VPC with a specific priority.
- Rule: a set of properties defining how the firewall will handle matching DNS queries.
- Domain list: a collection of domains that can be referenced by a firewall rule.
Use-case 1: DNS Walled Garden
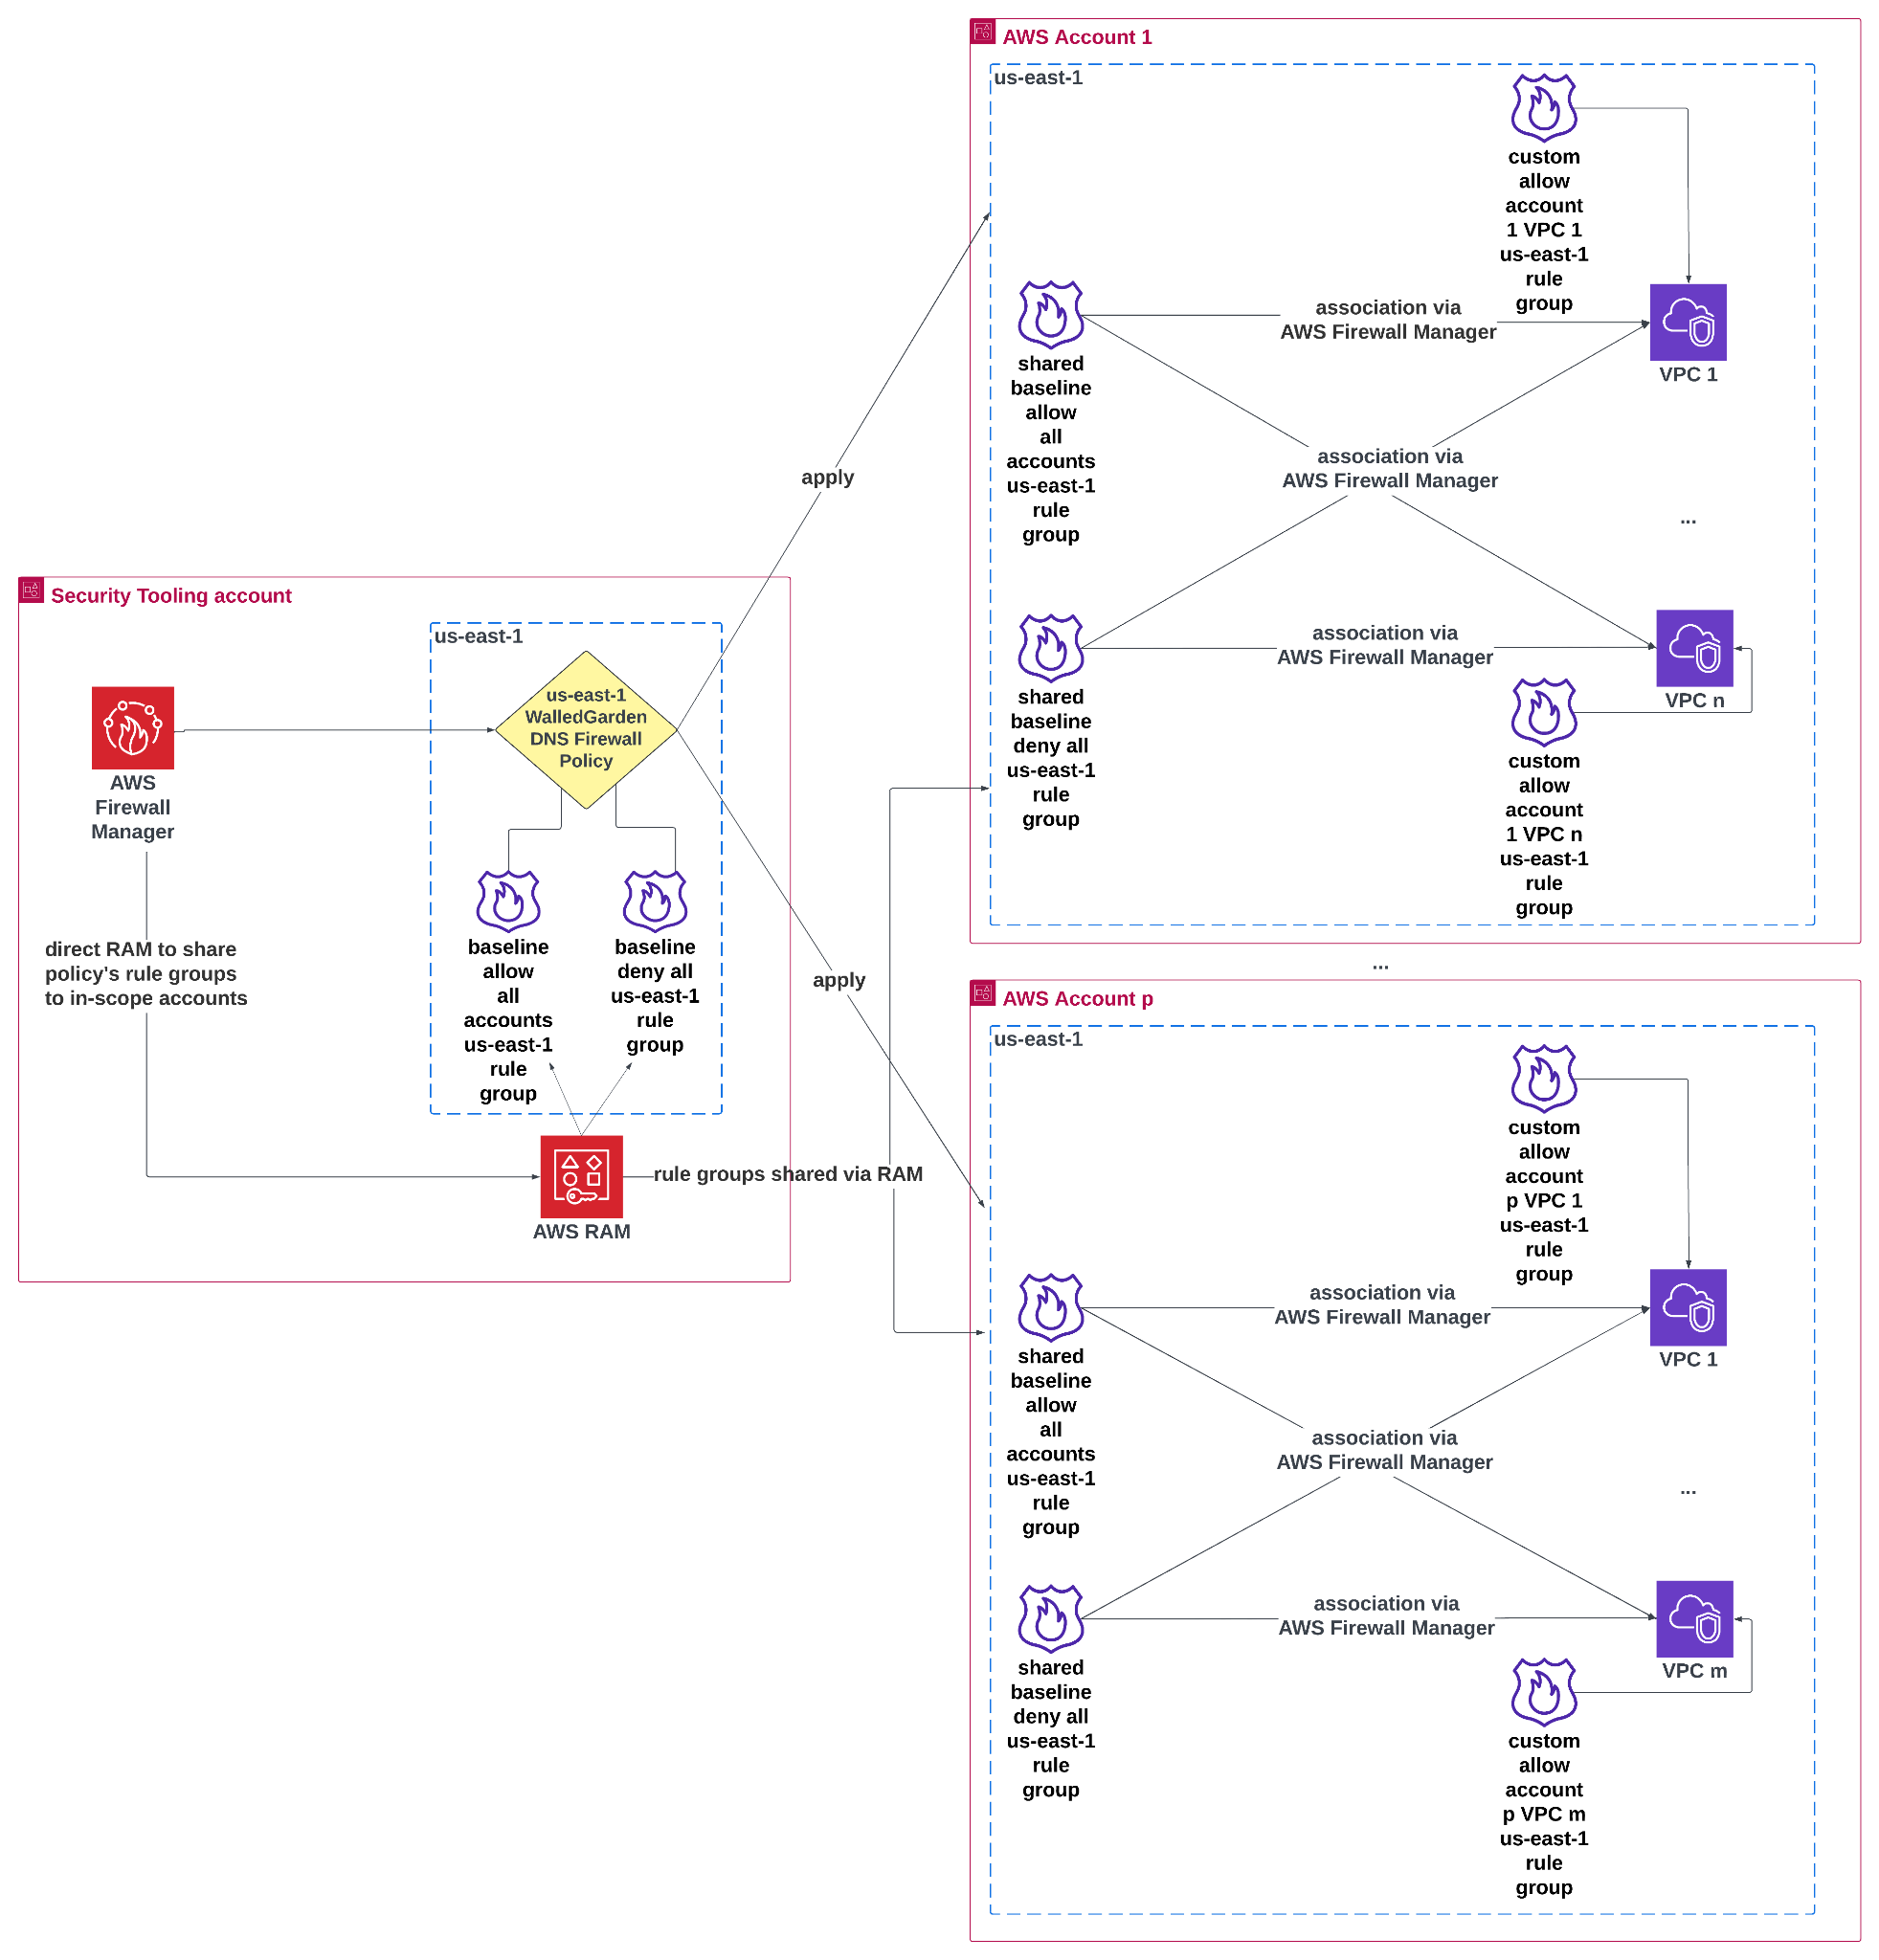
Figure 2: DNS Walled Garden firewall
Alt Text: Architecture diagram illustrating centralized management of Amazon VPC DNS Firewall rule groups using AWS Firewall Manager and AWS Resource Access Manager (RAM) across multiple AWS accounts. On the left, the Security Tooling account contains a WalledGarden DNS Firewall Policy in the us-east-1 Region, managed by AWS Firewall Manager. This policy includes rule groups shared via AWS RAM to in-scope accounts. The right side shows AWS Account 1 and AWS Account p, each with multiple VPCs. The RAM-shared Firewall rule groups are associated with these VPCs through AWS Firewall Manager, ensuring consistent DNS Firewall policies are applied across all accounts and VPCs. In addition, individual custom rule groups are created directly in each account, and associated with their respective VPC for finer-grained allowlisting. Arrows depict sharing and association flows between the Security Tooling account and member accounts.
- Firewall Manager: manages the DNS Firewall policies applied to the Organization.
- us-east-1 WalledGarden DNS Firewall Policy: a Firewall Manager policy dictating how the Walled Garden is applied across the Organization. This policy makes sure that new accounts are opted into an allowlist and default deny strategy as soon as they are created.
- Route 53 Resolver DNS Firewall rule groups: three rule group types are associated with the in-scope VPCs of the Walled Garden policy, as shown in Figure 3.
- Baseline allow all accounts us-east-1 rule group (priority: 1; preProcess rule group): contains a set of standard ALLOW rules that apply to all in-scope VPCs across all in-scope accounts within the policy’s scope. This allowlist was generated using the log analysis pipeline from part one of the series. Firewall Manager shares this rule group to each account within policy scope.
- Custom allow account p VPC m us-east-1 rule group (priority 100–9900): contains a set of ALLOW rules that further determine which DNS queries VPC m within account p can resolve. This rule group contains two sets of rules:
- Rules that allow DNS queries of commonly accessed domains and query types specifically within account p, regardless of the VPC in account p
- Rules that allow DNS queries of domains and query types specific to VPC m in account p
For each VPC, there is one such custom rule group defined. These rule groups are not shared or associated with in-scope VPCs through Firewall Manager. Instead, they are deployed individually to account p and manually associated with their respective VPC.
-
- Baseline deny all us-east-1 rule group (priority: 10,000; postProcess rule group): contains a single BLOCK rule to deny all DNS queries that did not match any rule in rule groups with association priorities 1–9999. Firewall Manager shares this rule group with each account within the policy scope.

Figure 3: DNS Walled Garden rule groups
Alt Text: Diagram of DNS Firewall rule group associations for Amazon VPC m in AWS Account p within the us-east-1 Region. The first rule group contains Rule 1 allowing A queries for baseline domains (*.amazonaws.com., *.example.com.) at priority 1, and Rule n allowing AAAA queries for baseline domains (*.amazonaws.com., example2.com.) at priority n. The second rule group includes Rule 1 allowing A queries for VPC-specific domains (example3.com., *.example4.com.) at priority 1, and Rule k allowing PTR queries for *.in-addr.arpa. at priority k. The final rule group contains a single rule that blocks all query types to all domains (*.). These rule groups are associated with Amazon VPC m at different priority ranges (1, 100–9900, and 10,000, respectively) to enforce layered DNS query controls.
Prerequisites
The following prerequisites are necessary to complete this solution:
- Firewall Manager is enabled in your Organization. All prerequisites for enabling Firewall Manager are satisfied.
- An AWS Identity and Access Management (IAM) principal that can manage Firewall Manager, Route 53 Resolver DNS Firewall across in-scope accounts, and tags on in-scope VPCs.
Implementation
The rollout necessitates two Firewall Manager policies:
- An onboarding policy
- A blocking policy
This approach maintains continuous alert coverage of in-scope accounts during their transition to blocking mode. Each policy needs separate pre/postProcess rule groups, and DNS Firewall rules. However, both sets of DNS Firewall rules should reference the same domain lists. For the policies:
- Blocking policy: The rule within the baseline deny all us-east-1 rule group should have its action set to BLOCK.
- Onboarding policy: The rule within the baseline deny all us-east-1 onboarding rule group should have its action set to ALERT.
The pre/postProcess rule groups in the blocking policy must always have higher priority (indicated by numerically lower values) than their corresponding rule groups in the onboarding policy, as shown in Figure 4.
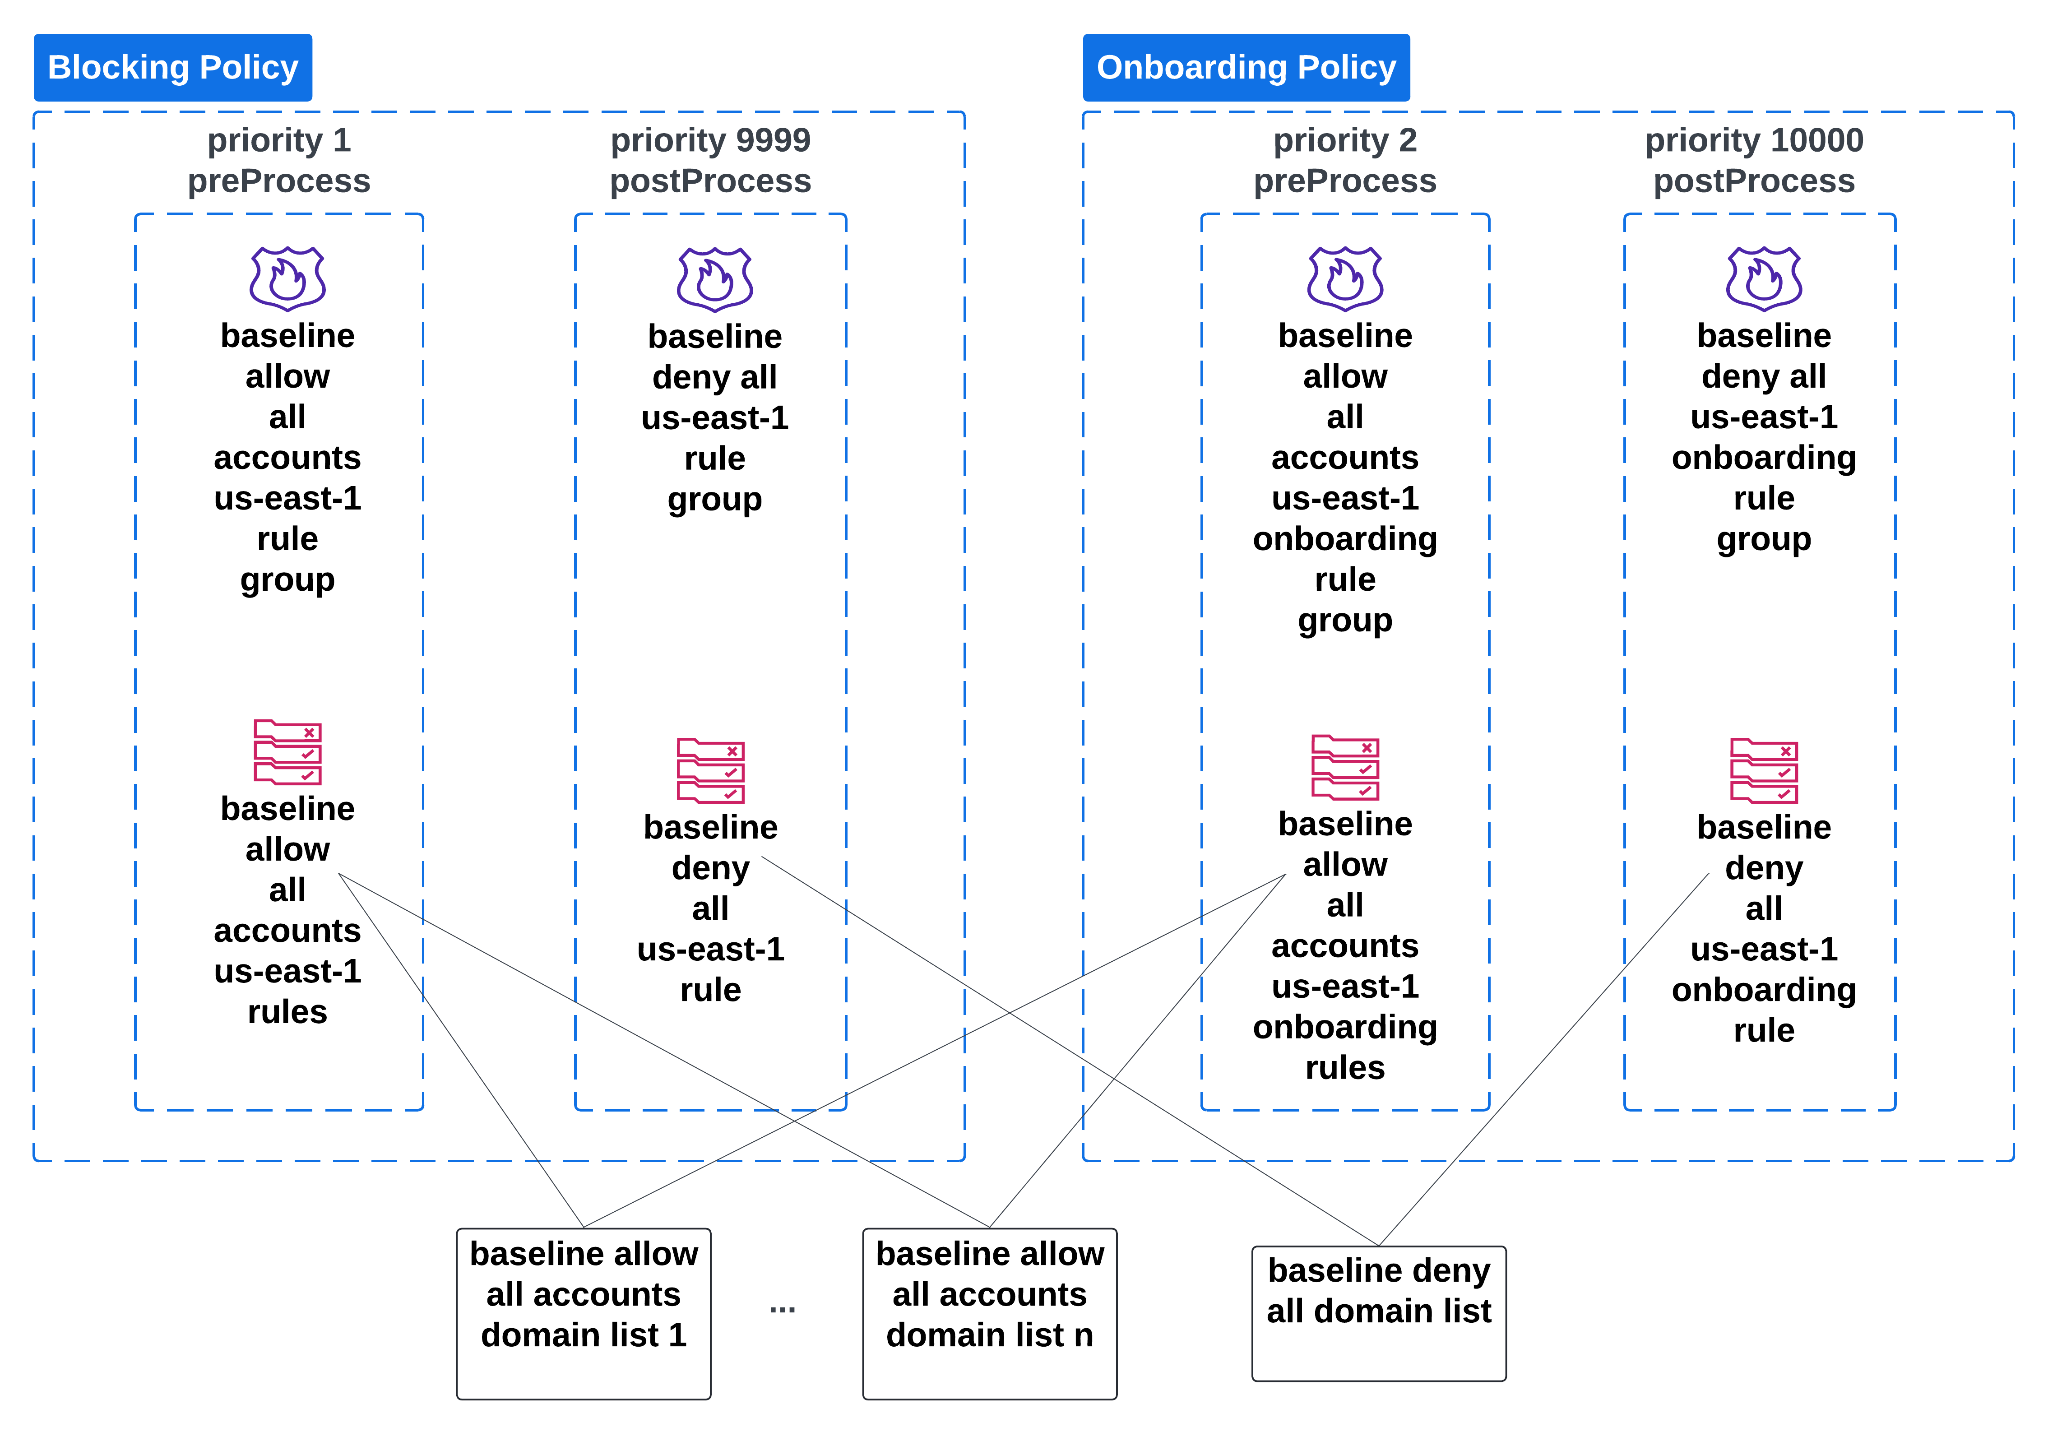
Figure 4: The blocking and onboarding Firewall Manager policies for transitioning accounts into blocking mode
Alt Text: The diagram shows two DNS Firewall policies, a Blocking Policy and an Onboarding Policy, each containing rule groups with assigned priorities for DNS query processing. The Blocking Policy has a rule group at priority 1 (preProcess) for early enforcement and another at priority 9999 (postProcess) for later enforcement, while the Onboarding Policy has a rule group at priority 2 (preProcess) and another at priority 10000 (postProcess). Arrows link the rules in these rule groups to domain lists, illustrating how DNS queries are filtered and enforced at different processing times within each policy.
To deploy the Walled Garden in alert mode:
- Tag the VPCs that should be excluded from the Walled Garden’s scope using the tags specified in both the onboarding and blocking policy’s ResourceTags field. Set the ExcludeResourceTags field to true in both policies.
- In your Firewall Manager default administrator account (recommended to be your Organization’s Security Tooling account):
- Create the necessary rule groups
- Configure the rules
- Create the domain lists to be used by both onboarding and blocking policies
- For each in-scope VPC, create the custom rule groups, rules, and domain lists directly within their respective accounts. Use allowlists generated from the log analysis (detailed in part one of this series) to define the rules and domain lists.
- Associate the custom rule groups with in-scope VPCs, setting priorities between 100–9900.
- In your Firewall Manager default administrator account, create the onboarding Firewall Manager policy:
- Specify an ExcludeMap containing accounts that should opt-in to the Deny Malicious option instead (omit the ExcludeMap if none exist)
- Configure rule groups with the appropriate pre/postProcess values
- Set association priorities as shown in Figure 4
The final step involves transitioning accounts into the blocking policy.
While your DNS Firewall operates in alert mode, the query logs will show alerts on any DNS queries that match the onboarding policy’s ALERT rule. Use Python to analyze any alerts in the logs. Process the logs as described in part one of this series, but also include analysis of these fields:
- firewall_rule_group_id
- firewall_rule_action
- firewall_domain_list_id
An alerted DNS query from the onboarding policy can be identified by the following:
- The presence of these fields
- The firewall_rule_action field value set to ALERT
- The firewall_rule_group_id field set to the id of the baseline deny all us-east-1 onboarding rule group
Before transitioning to blocking mode, you should either update the allowlists for any alerted DNS queries, or take the appropriate action on workloads making undesired queries. To transition in-scope accounts to blocking mode, make sure that your blocking policy is deployed with all account IDs listed in its ExcludeMap field. Configure the rule groups in the blocking policy with the pre/postProcess values and priorities as seen in Figure 4. Then, transition the accounts into blocking mode in rounds of four to five accounts using the following protocol:
- Choose the accounts to be transitioned in the current round
- For each selected account:
- Use Python to perform a final query log analysis on the in-scope VPCs
- Update the coarse-grained or fine-grained firewall allow rules to allowlist any missing or new DNS queries identified in Step 2a
- Remove the account ID from the blocking policy’s ExcludeMap
- Repeat Steps 1 and 2 for subsequent rounds until all in-scope accounts have been transitioned into the blocking policy
After transitioning all in-scope accounts to blocking mode:
- Delete the onboarding policy
- Remove the rule groups and rules used in the onboarding policy from your Firewall Manager default administrator account
- Delete any VPC tags that were previously used to exclude VPCs from the onboarding policy’s scope
- In the blocking policy, set the priority of the baseline deny all us-east-1 rule group association to 10000
Use-case 2: DNS Deny Malicious
The Deny Malicious strategy employs a denylist with a default allow approach in contrast to the Walled Garden method. This strategy blocks DNS queries only for known malicious or suspicious domains, while allowing all other DNS queries to proceed. The architecture is shown in Figure 5:
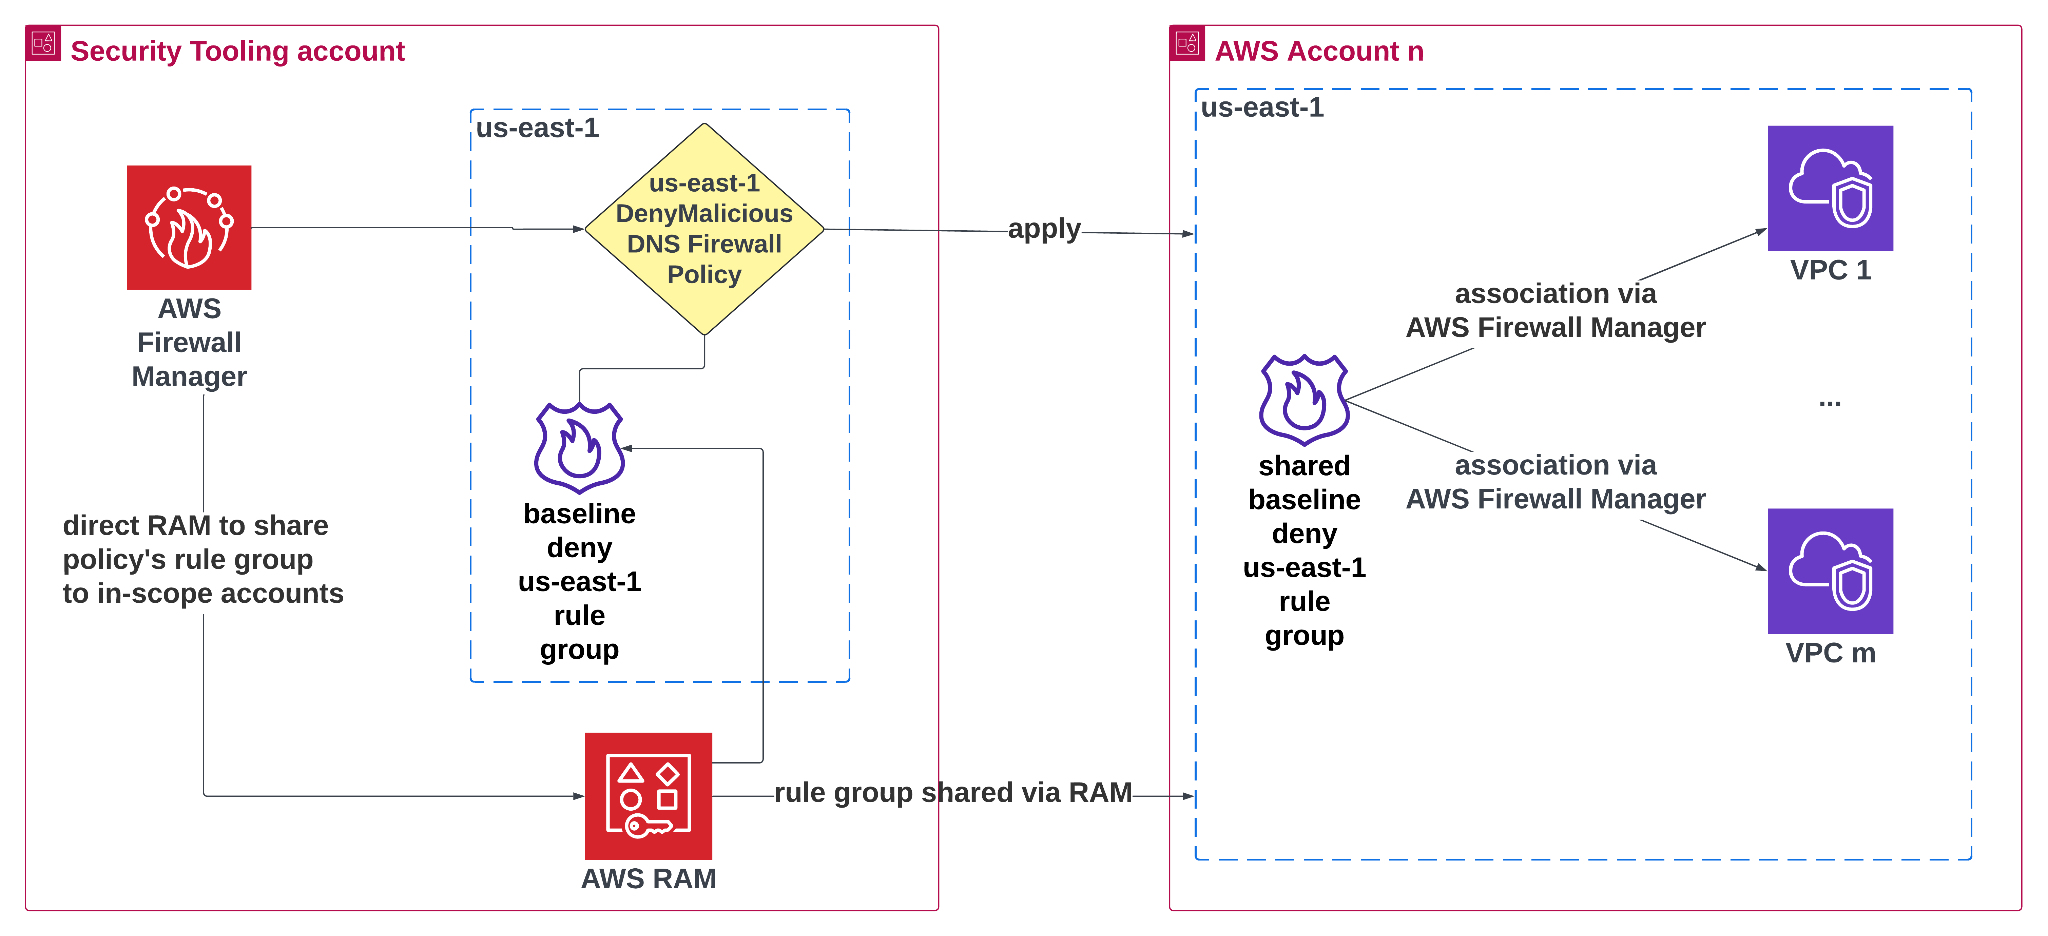
Figure 5: DNS Deny Malicious firewall
Alt Text: Diagram showing a Security Tooling account in us-east-1 using AWS Firewall Manager to manage a “DenyMalicious DNS Firewall Policy.” The policy’s rule group is shared via AWS Resource Access Manager (RAM) to AWS Account n, where it is associated with multiple VPCs through AWS Firewall Manager to block malicious domains.
The preceding architecture is similar to the Walled Garden but is simplified, containing only one rule group in the Firewall Manager policy: the baseline deny us-east-1 rule group. This rule group exclusively contains blocking rules, and references domain lists containing malicious or suspicious domains. AWS Managed Domain Lists can be incorporated into the blocking rules within the Deny Malicious policy.
The rollout necessitates two Firewall Manager policies:
- An onboarding policy
- A blocking policy
Important configuration details:
- The blocking policy’s rule group association priority must be higher (using numerically lower values) than the onboarding policy’s rule group association priority.
- Use an IncludeMap in the Deny Malicious policies.
This configuration makes sure that the Walled Garden serves as the default organizational DNS Firewall, while the Deny Malicious strategy needs explicit opt-in from accounts.
Prerequisites
The same prerequisites from Use-case 1 apply. Make sure to satisfy those before continuing along.
Implementation
To deploy the Deny Malicious firewall in alert mode:
- Tag the VPCs that should be excluded from the Deny Malicious policy’s scope using the tags specified in both the onboarding and blocking policy’s ResourceTags field. Set the ExcludeResourceTags field to true in both policies.
- In your Firewall Manager default administrator account:
- Create the necessary rule groups
- Configure the rules
- Reference the AWS Managed Domain Lists in the firewall rules
- Create the onboarding Firewall Manager policy, with all in-scope accounts in the onboarding policy’s IncludeMap. Set the rule group association priority of the baseline deny us-east-1 onboarding rule group to 2 as a preProcess rule group. The rules in the onboarding rule group should all have their action set to ALERT
The final step is to transition in-scope accounts into the Deny Malicious blocking policy. To do this, follow these steps:
- Analyze the query logs for alerts for your first round of accounts. If you discover alerts in the query logs for VPCs under this policy scope, then this may indicate that your workloads are attempting to connect to malicious domains. Follow-up with the relevant teams to address these issues, and take appropriate remedial action
- Add the first round of account IDs to the blocking policy’s IncludeMap field, and deploy the policy
- For subsequent round of accounts:
- Repeat the query log analysis to search for alerts
- When ready to transition the accounts into the blocking policy, add their account IDs into the blocking policy’s IncludeMap
The baseline deny us-east-1 rule group in the blocking policy should be set to priority 1 as a preProcess rule group. After transitioning all in-scope accounts to blocking mode:
- Delete the onboarding policy
- Delete the rule group and associated rules used in the onboarding policy from your Firewall Manager default administrator account
- Remove any VPC tags that were previously added to exclude VPCs from the onboarding policy’s scope
Conclusion
We demonstrated how to deploy a DNS firewall across an AWS Organization initially in alert mode, and how to transition accounts into blocking mode. By default, this DNS firewall implements a Walled Garden strategy to provide robust, automated security. However, it can be configured to opt-in certain accounts to a Deny Malicious approach instead, accommodating specific exceptions.
Maintaining a strong cloud network security posture is crucial for protecting digital assets from attackers and preserving trust with users and partners. A company’s industry reputation can be severely damaged by attacks against its DNS configurations, potentially resulting in reduced revenue if the impact is significant. Deploying a DNS firewall helps safeguard an organization’s sensitive information at scale, and demonstrates a proactive approach in reducing network security risk.
If you have questions or feedback about this post, start a new thread on AWS re:Post or contact AWS Support.
About the author

Ali Yousefi
Ali Yousefi is a Senior Software Engineer at Pinterest, specializing in Cybersecurity, Big Data, AI/ML, and Cloud Architecture. In his role, he leads the design and implementation of large-scale, secure, multi-account architectures in AWS that impact a diverse set of systems. He collaborates across the organization with various teams on solving complex technical problems. Ali has experience working in multiple industries including data, analytics, AI, digital ads, and financial services.