Networking & Content Delivery
Enhancing Pinterest’s organizational security with a DNS firewall: Part 1
This post was authored by Ali Yousefi, Senior Security Software Engineer on the Infrastructure Security Team at Pinterest
Introduction
Network security has become an increasingly important focus area in cloud security as more organizations shift to the cloud. Organizations can take an active approach in protecting themselves and their data from various threats by strengthening their network security. Hardening egress controls is one way to implement these safeguards, helping organizations reduce the risk of data exfiltration, malware communication, botnet coordination, and other security threats.
The Domain Name System (DNS) is one layer in the network stack where egress controls can be placed. Gaining visibility into the DNS activity within their networks and deploying a DNS firewall allows organizations to mitigate many of the possible threats associated with DNS. In this first installment of a two-part blog series, we demonstrate how Pinterest gained visibility into DNS queries made by systems across their Amazon Web Services (AWS) Organization, and analyzed these DNS query logs at scale with Python to build a set of allowlist DNS firewall rules. In part two, we show how these allowlists were used to deploy an Organization-wide DNS firewall using AWS Firewall Manager and Amazon Route 53 Resolver DNS Firewall.
Background
Organizations commonly begin with widely-open DNS querying capabilities in their networks. Although this may be desired for certain use-cases such as crawlers, most workloads do not need such unrestricted DNS querying. This is especially true for offline systems that are primarily used for analytics (for example OLAP systems) and machine learning (ML).
Starting off with widely-open DNS access presents an opportunity to implement the principle of least privilege: grant a system only its needed permissions, and deny all other permissions by default. In a DNS firewall context, this means allowing DNS queries only to the necessary domains and query types that workloads running in the network require, while denying all other DNS queries by default. This strategy is known as a Walled Garden.
To build a DNS Walled Garden on AWS, the first step is to gain visibility into the DNS traffic originating from the Organization’s VPCs. This visibility enables the creation of allowlist rules through which our firewall permits authorized DNS resolutions to Amazon Route 53 Resolver to pass, while blocking all other DNS resolutions that use Route 53 Resolver.
Solution overview
The solution uses the following AWS services:
- Organizations: Enables central management and governance of multiple AWS accounts
- AWS Resource Access Manager (AWS RAM): Facilitates the sharing of AWS resources across accounts
- Amazon Route 53 Resolver query logging: A feature in Amazon Route 53 that enables logging on DNS queries originating from VPCs to Route 53 Resolver
- Amazon Simple Storage Service (Amazon S3): An object-storage service offering scalability, high availability, security, and performance
- Amazon Elastic Compute Cloud (Amazon EC2): Provides the ability to create and manage resizable compute capacity in AWS
- Amazon Elastic Block Store (Amazon EBS): Offers high-performance block storage that can be attached to EC2 instances
Phase 1: Route 53 Resolver query logs setup
The first step is to deploy and associate a standardized Route 53 Resolver query log configuration across the VPCs in the Organization, as shown in Figure 1. This configuration provides us with comprehensive insights into the DNS queries that workloads in the Organization are making, and the DNS responses received. Using an infrastructure as code (IaC) tool such as Terraform or AWS CloudFormation to deploy the cloud infrastructure is recommended.
Prerequisites
The following prerequisites are necessary for Phase 1:
- Organizations must be set up
- AWS RAM must be enabled and configured to integrate with Organizations
- Access to an AWS Identity and Access Management (IAM) principal with the following permissions:
- Create a Route 53 Resolver query log configuration
- Create an S3 bucket and attach a bucket policy
- Create AWS RAM resource shares, resource associations, and principal associations
- Create Route 53 Resolver query log configuration associations in each Organization member account
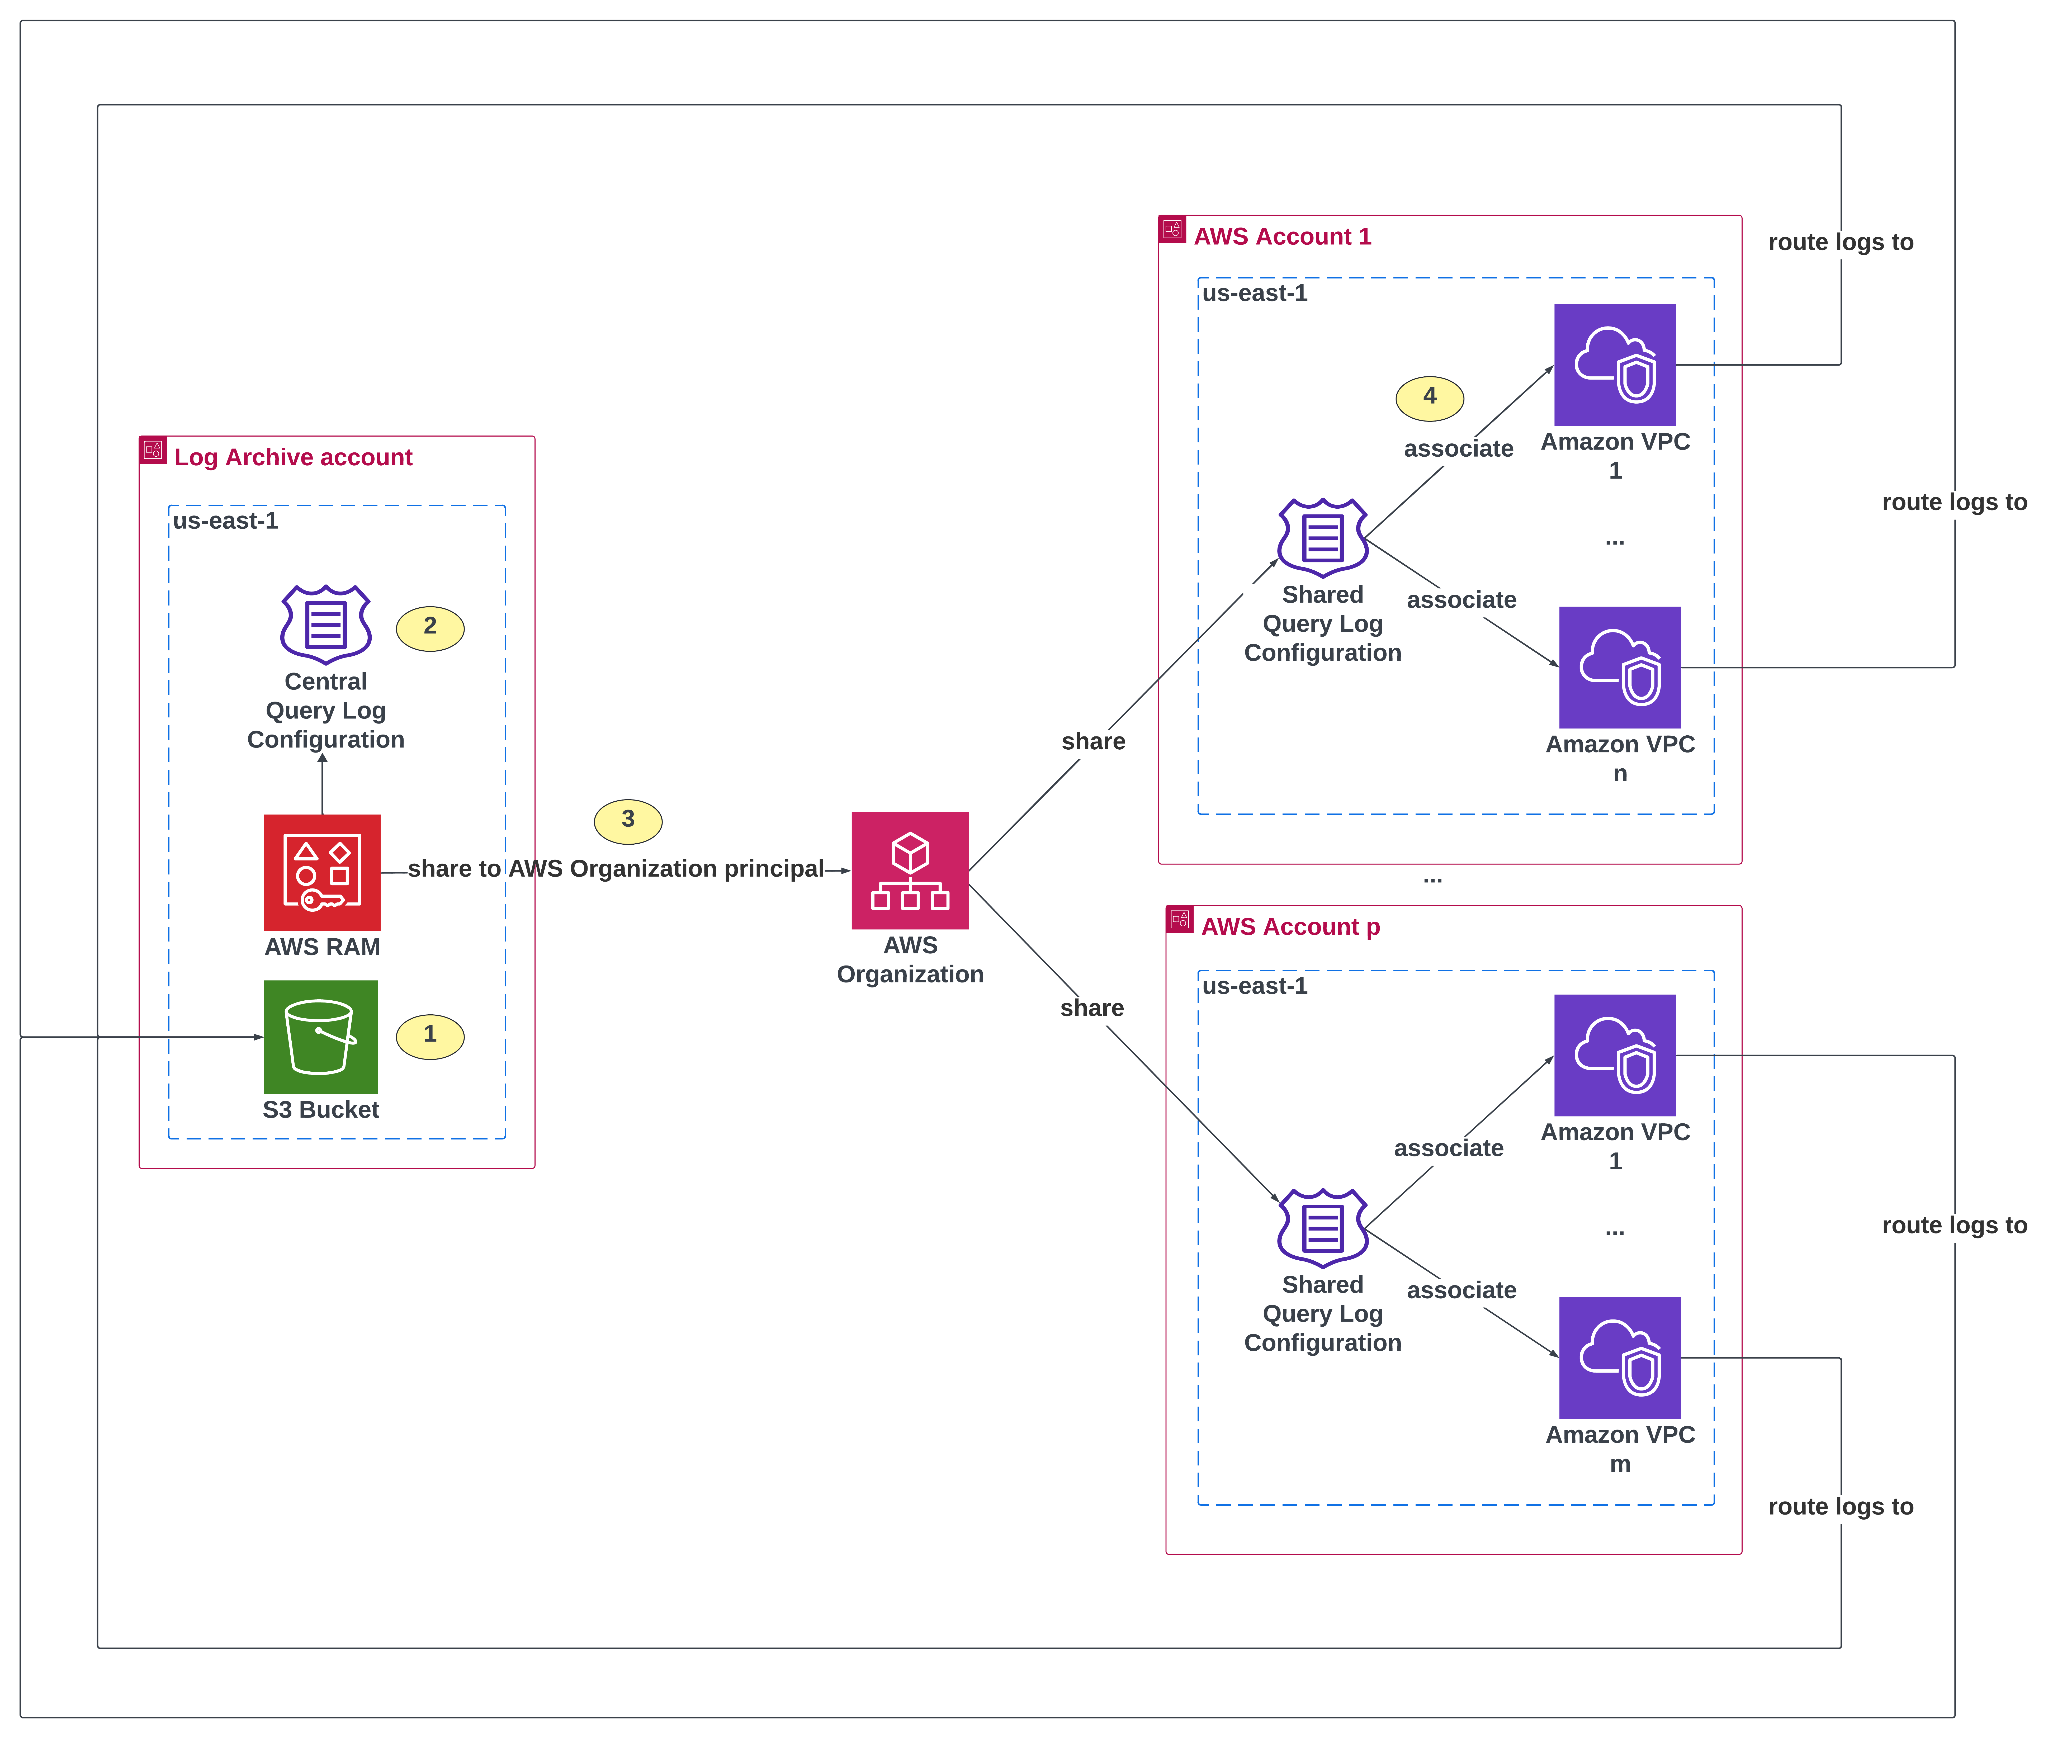
Figure 1: Enabling Route 53 Resolver query logs across the Organization
Alt Text: Architecture diagram showing centralized Amazon VPC DNS query logging across multiple AWS accounts. On the left, a “Log Archive account” contains three components: an Amazon S3 bucket for log storage, a central query log configuration, and AWS Resource Access Manager (RAM) to share resources. The central query log configuration is shared with the AWS Organization (step 3). On the right, multiple AWS accounts (Account 1 through Account p) each have one or more Amazon VPCs. Each VPC is associated with the shared query log configuration, allowing logs to be routed back to the central S3 bucket in the Log Archive account. Arrows illustrate the flow of logs from VPCs in all accounts to the centralized bucket.
Implementation
- A central S3 bucket is needed to store the query logs from the target VPCs. We recommend creating this bucket in your Organization’s Log Archive account. The bucket policy specified in this documentation must be attached to allow cross-account log delivery from all accounts within your Organization. If the IAM principal used to retrieve the data in Phase 2 of this post is located in a different account than the bucket’s owner account, then the bucket policy must also grant read permissions to that IAM principal.
- A central Route 53 Resolver query log configuration defined in a single account (for example the Log Archive account).
- AWS RAM is used to share the central query log configuration with the Organization principal. As a result, every account in the Organization receives this standardized configuration.
- The shared query log configurations must be associated with your target VPCs.
Phase 2: Analyzing DNS query logs at scale with Python
After successfully configuring query logs to be sent to Amazon S3, we can analyze them to build the initial Walled Garden firewall allowlists. Allow an appropriate duration of time to pass to allow the logs to accumulate and capture the full set of DNS queries made by your systems. The log analysis pipeline consists of the following steps:
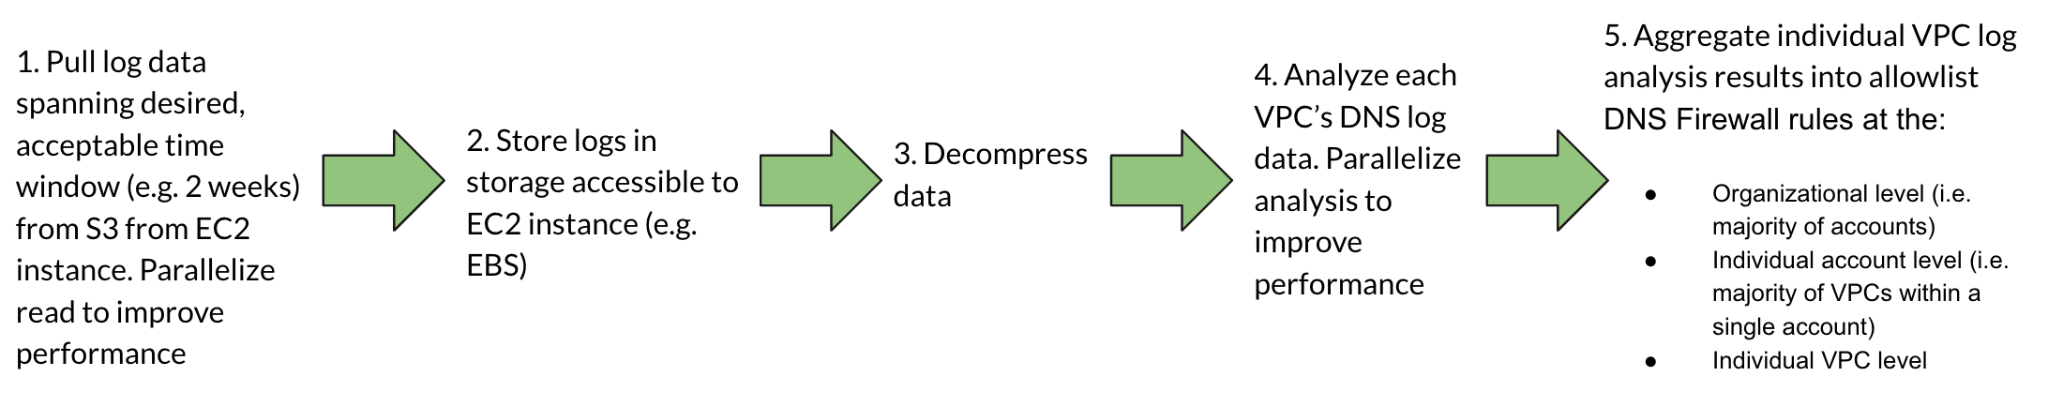
Figure 2: Route 53 Resolver query logs analysis pipeline
Alt Text: A five-step diagram illustrating how to analyze VPC DNS logs and create DNS Firewall allowlist rules: pull logs from S3 to EC2, store in accessible storage, decompress, analyze per VPC with parallel processing, and aggregate results into DNS Firewall allowlist rules at organizational, account, and VPC levels.
Prerequisites
The following prerequisites are necessary for Phase 2:
- A multi-core, Linux-based EC2 instance. At Pinterest, we used an r7gd.16xlarge memory-optimized instance for data analysis to use the machine’s multiple cores through parallelization techniques, and relatively high memory capacity. This enabled us to conduct the analysis with Python efficiently.
- A network-based storage system such as Amazon EBS attached to the instance, with enough storage capacity to store both the zipped and unzipped data.
- The following tooling installed on the instance:
- IAM credentials available to the AWS CLI on the EC2 instance with read access to the centralized S3 bucket.
Implementation
We can use the AWS CLI and Unix tools mentioned previously to accomplish several tasks: summarize the data size, parallelize Amazon S3 reads, filter logs by account ID, VPC ID, and time window (Figure 3), and store the logs on a network-based storage system such as Amazon EBS that is accessible to the instance. For downstream analysis, it’s beneficial to store the logs on the filesystem in a partitioned manner, organized first by account ID, then by VPC ID (Figure 3). This organization enables parallel decompression and analysis, allowing us to build our allowlists efficiently with Python. Figure 3 shows the recommended storage layout for the imported data:
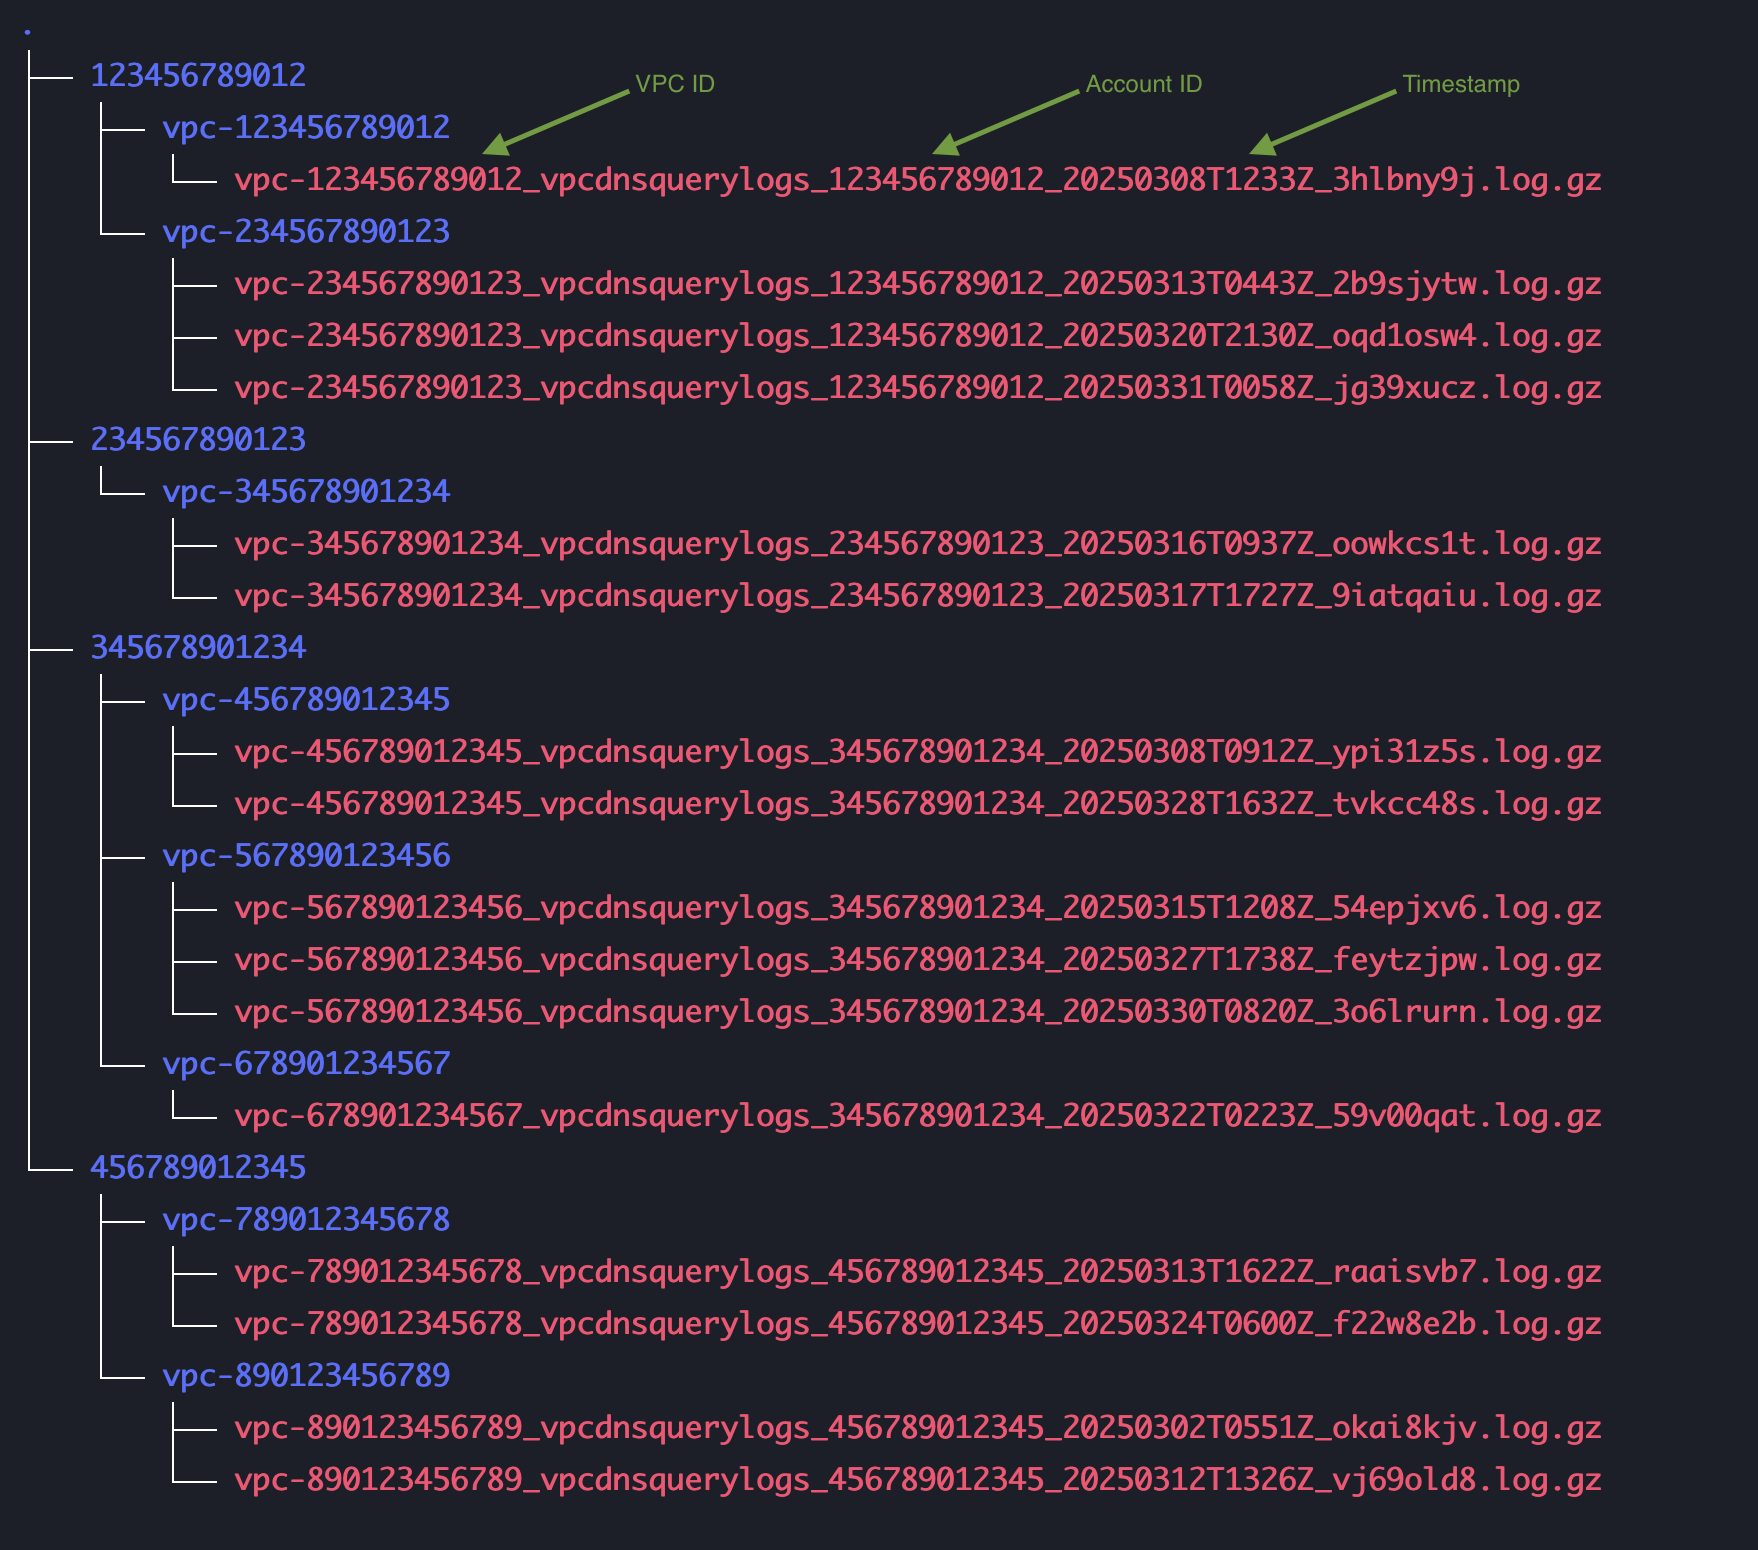
Figure 3: Log storage layout for downstream analysis
Alt Text: Tree-structured view of Amazon VPC DNS query log files organized by AWS account IDs and VPC IDs. Each folder represents an AWS account ID, containing subfolders for individual VPC IDs. Within each VPC folder are multiple log files named using the format: vpc-<VPC-ID>_vpcdnsquerylogs_<Account-ID>_<Timestamp>_<RandomString>.log.gz. Green labels above the filenames indicate the sections representing the VPC ID, Account ID, and timestamp.
Using custom Python tooling, unzip the log data into another directory, maintaining the same storage layout structure shown in Figure 3. Implement concurrency to unzip all data for analysis. File decompression is typically I/O-bound, thus you should begin by using concurrent.futures.ThreadPoolExecutor to handle the flow: reading data from disk, decompressing it, and writing the decompressed data back to disk, all using multiple concurrent Python threads. If you need to improve performance, and suspect that the Python Global Interpreter Lock (GIL) is creating a bottleneck, then consider switching to concurrent.futures.ProcessPoolExecutor to parallelize operations across multiple vCPUs and Python processes.
To parallelize the log analysis across multiple Python processes running in our instance, we can use the ProcessPoolExecutor class to create a distinct child process for each VPC, which reads and processes its assigned VPC’s raw log data files. This flow involves both I/O-bound and CPU-bound operations at different stages. The initial loading of log data from disk into memory is I/O-bound. When the data is in memory, the task becomes CPU-bound, because we process the log entries to build the allowlists. Using ProcessPoolExecutor to parallelize analysis by VPC allows us to bypass the Python GIL constraint that typically limits concurrently running Python threads created from the ThreadPoolExecutor class from performing parallel CPU-bound work, thereby improving analysis performance. Each worker process created by ProcessPoolExecutor can both read its assigned VPC’s log data into memory and process it in parallel with other workers across our multi-core instance.
Allowlisting all subdomains associated with a particular domain is beneficial for several reasons: it reduces domain list sizes, streamlines allowlist maintenance, and enables developer productivity. This can be accomplished by replacing the subdomain portion of the query_name field in log entries with a wildcard *, when applicable. When a DNS response to a query (found in the log entry’s answers field) contains records that alias other hostnames (for example CNAME records), we must allowlist the complete set of domain names found in the full redirection chain to allowlist the originally queried domain.
Domains should be allowlisted based on their observed query types, rather than allowlisting all query types for each domain. This approach more closely adheres to the principle of least-privilege. Each individual VPC analysis should produce a JSON file that maps queried domain names to their corresponding requested query types. Figure 4 shows an example JSON file generated from analyzing a specific VPC’s DNS query logs:
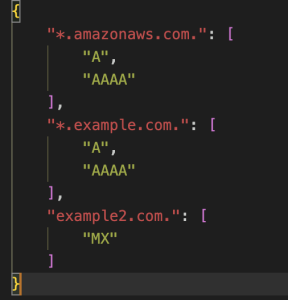
Figure 4: Output file from individual VPC analysis. Contains a mapping of domain names to the query types requested for each domain name in the analyzed query logs for a particular VPC.
Alt Text: A JSON configuration snippet defining DNS record types allowed for specific domains. It includes three entries: 1/ “*.amazonaws.com.” with record types “A” and “AAAA” , 2/”*.example.com.” with record types “A” and “AAAA”, 3/”example2.com.” with record type “MX”.
After generating all individual JSON files, conduct an aggregate analysis that processes each file as input. This aggregate analysis should identify both common DNS queries made within an account (occurring across the majority of the VPCs within a single account) and common DNS queries shared across the majority of analyzed accounts. For the common DNS queries identified across accounts, your aggregate analysis can output a YAML file as shown in Figure 5:
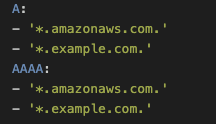
Figure 5: The coarse-grained “allow-all accounts” allowlist
Alt text: A YAML configuration snippet defining allowed DNS record types for specific domains. The A record type allows *.amazonaws.com. and *.example.com., and the AAAA record type also allows *.amazonaws.com. and *.example.com.
Your analysis should also output a similar YAML file for common DNS queries observed within each individual account. An example of this output is shown in Figure 6:
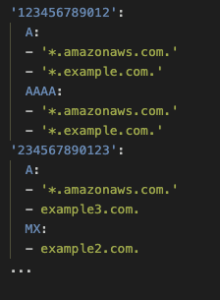
Figure 6: DNS queries that occurred commonly within an account
Alt Text: A YAML configuration snippet mapping AWS account IDs to allow DNS record types for specific domains. For account 123456789012, A and AAAA record types are allowed for *.amazonaws.com. and *.example.com. For account 234567890123, the A record type allows *.amazonaws.com. and example3.com., and the MX record type allows example2.com.
Your analysis should also identify and output DNS queries that are unique to specific VPCs, rather than being common within an account or across multiple accounts. An example of this output is shown in Figure 7:
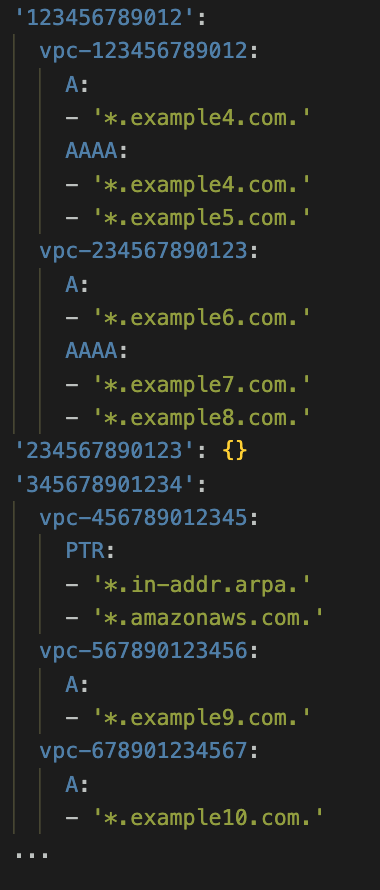
Figure 7: Unique DNS queries observed from each VPC
Alt Text: Alt Text: The YAML configuration snippet defines allowed DNS record types for specific VPCs across multiple AWS account IDs. In account 123456789012, vpc-123456789012 permits A records for the domain *.example4.com., and AAAA record types for the domains *.example4.com. and *.example5.com., while vpc-234567890123 allows A records for *.example6.com. and AAAA records for *.example7.com. and *.example8.com. The account 234567890123 contains no configured rules. In account 345678901234, vpc-456789012345 is configured to allow PTR records for the reverse lookup domain *.in-addr.arpa. and the AWS domain *.amazonaws.com., vpc-567890123456 allows A records for *.example9.com., and vpc-678901234567 allows A records for *.example10.com.
Use these last two output files to build your Route 53 Resolver DNS Firewall custom rule group rules for each specific VPC. This process is explained in detail in part two of the series.
Considerations
- Implement a RAID 0 configuration for analyzing logs at scale, as this enables local storage of a relatively larger volume of data.
- Consider alternative tools and services for large-scale data analysis and log processing:
- Amazon Athena for running SQL queries against centralized log data stored in Amazon S3
- Apache Spark (such as PySpark) for performing cluster-level distributed data analysis and building firewall rules
For very large data volumes, it is recommended to use these types of services and big data processing frameworks rather than local processing.
Conclusion
In this post, we demonstrated how Pinterest enhanced its network visibility capabilities. We showed how we can gain insight into DNS activity occurring across our AWS Organization using Amazon Route 53 Resolver query logging and AWS RAM. Furthermore, we demonstrated how to build a log analysis pipeline to read and analyze DNS traffic at scale using standard Unix tools and Python to create both coarse-grained and fine-grained DNS firewall rule allowlists. In part 2 of this two-part blog series, we demonstrate how to use the analysis results to deploy a flexible, secure, cost-effective, and robust DNS firewall. The solution uses Firewall Manager and Route 53 Resolver DNS Firewall to implement DNS controls.
About the author

Ali Yousefi
Ali Yousefi is a Senior Software Engineer at Pinterest, specializing in Cybersecurity, Big Data, AI/ML, and Cloud Architecture. In his role, he leads the design and implementation of large-scale, secure, multi-account architectures in AWS that impact a diverse set of systems. He collaborates across the organization with various teams on solving complex technical problems. Ali has experience working in multiple industries including data, analytics, AI, digital ads, and financial services.