Networking & Content Delivery
Building secure multicloud access with AWS Client VPN and AWS Site-to-Site VPN
In today’s rapidly evolving cloud landscape, organizations are increasingly adopting multicloud strategies for several compelling reasons. Following mergers and acquisitions, companies need to integrate and maintain existing cloud solutions from both organizations. Different business units within an organization often have varying technical requirements and expertise, leading them to prefer specific cloud providers. For highly regulated industries, contractual obligations may require the use of particular cloud providers. Additionally, organizations adopt multicloud to meet compliance requirements and digital sovereignty regulations, ensuring proper portability and interoperability between different cloud service provider. Multicloud deployment offers many benefits but creates new challenges. Specifically, it complicates securing and managing access to workloads across different cloud environments.
This post explores how to use AWS Client VPN in combination with AWS Site-to-Site VPN to establish secure, scalable, and seamless access to workloads across multiple cloud platforms. We walk through the architecture, configuration steps, and best practices for setting up a reliable multicloud VPN solution that extends to other cloud providers and network destinations that need secure private network connectivity.
We will explore the essential elements that enable secure access across multiple cloud platforms before diving into solution architecture. Client VPN and Site-to-Site VPN are at the heart of our solution, and they serve as the foundation for enabling secure remote access across cloud environments.
Services brief
We begin with a summary of the AWS services used in this solution.
Client VPN is a scalable, fully managed VPN service. It provides an endpoint for users to establish a secure connection to the AWS network using OpenVPN-based VPN client software. With the right networking configuration, users can connect to Client VPN to access both AWS and on-premises resources.
Site-to-Site VPN is a managed service that creates secure, encrypted connections between your data center or branch office and your AWS cloud resources.
This post assumes you have a foundational understanding of Client VPN and Site-to-Site VPN. For more information or detailed explanations, refer to the following documentation.
The multicloud challenge
Organizations adopting multicloud strategies typically face three critical challenges:
- Access management: Managing multiple authentication systems and security policies across clouds creates inconsistent access controls and complex user onboarding processes. This fragmentation can compromise both security and user experience.
- Network complexity: Varied networking models and routing requirements across cloud providers create performance inconsistencies and increase management complexity. IT teams fail to maintain a unified network structure while ensuring reliable connectivity.
- Security and operations: Teams must manage multiple security perimeters, compliance requirements, and operational tools across different cloud environments. This fragmentation increases operational overhead and complicates security monitoring.
Solution overview
The following figure outlines the solution.
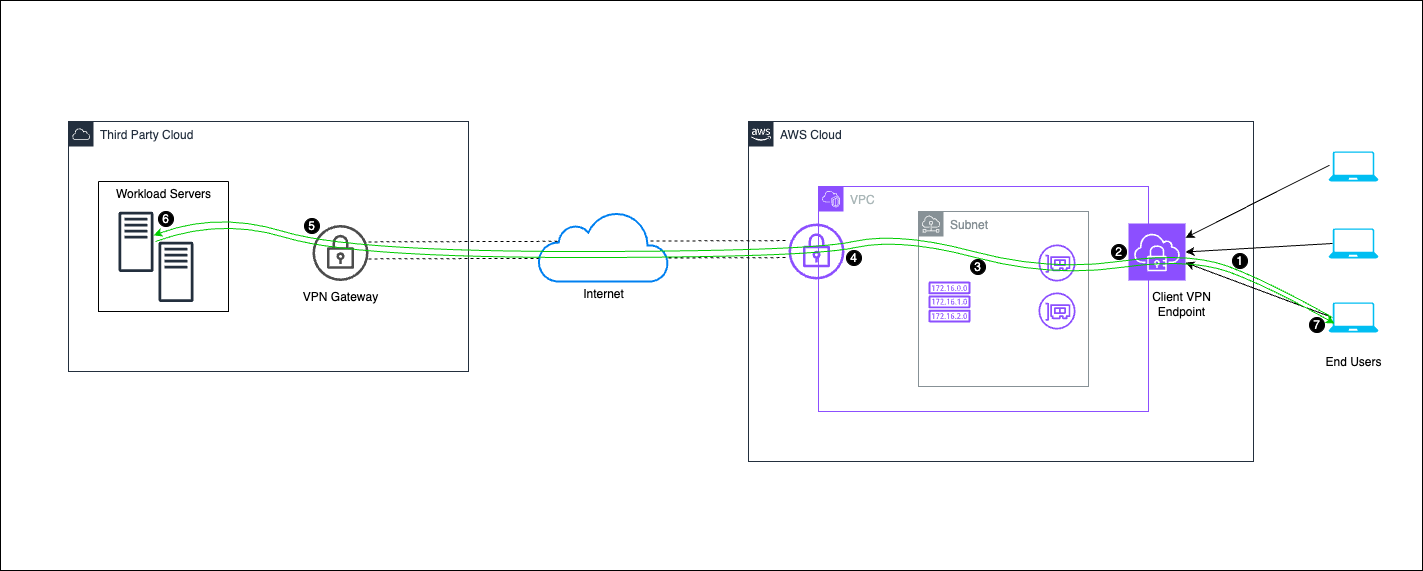
Figure 1: Connectivity between AWS and third-party cloud provider using virtual private gateway
Traffic flow in the multicloud VPN architecture
1. End users initiate a connection to access applications hosted in the third-party cloud through the Client VPN endpoint.
2. The Client VPN Endpoint receives the traffic and routes it to the associated subnet within the Amazon Virtual Private Cloud (Amazon VPC).
3. The Amazon VPC routes traffic to instances within subnets or forwards it to the third-party cloud.
4. Traffic to the third-party cloud is sent through the Virtual Network Gateway and securely transmitted over the internet.
5. The third-party cloud Virtual Network Gateway receives the traffic and forwards it to workload servers in the cloud.
6. Workload servers in the third-party cloud process the request and send the response back through the VPN connection.
7. Return traffic flows back through the Virtual Network Gateway, across the internet, into the VPC, and then to the end users.
Prerequisites
To implement the solution, you need the following prerequisites:
– An AWS account with administrative permissions
– Access to a Microsoft Azure account or another cloud platform for extended connectivity
– AWS-provided or OpenVPN-compatible client software installed on your local machine
– Basic familiarity with VPN concepts and AWS networking services
Implementation steps
This post demonstrates the solution using Microsoft Azure, but it works with all cloud providers and networks. Refer to the respective documentation for specific implementation steps. The VPN implementation process consists of two parts:
1. Azure VPN Configuration
2. AWS VPN and Client VPN Setup
Step 1: Microsoft Azure configuration steps
First, we configure the Azure IPsec VPN to obtain the public IP address required for creating the Customer Gateway (CGW) in AWS.
1. Setting up Site-to-Site VPN between AWS and Microsoft Azure
A. Create a Virtual Network on Microsoft Azure Portal
- Sign in to the Azure portal with your Azure account, as shown in the following figure.
- Search for Virtual networks, and then Create virtual network.
- Choose the correct resource group.
- Enter a name for your Virtual Network and choose the AWS Region.

Figure 2: Creation of the Virtual Network using the Microsoft Azure Portal
B. Create a Gateway Subnet
- Go to your Created Virtual Networks. You can search with Virtual Network from the search bar and choose the Virtual Network created earlier, Multicloud-Access, as shown in the following figure
- On the left side, choose Subnets.
- Choose + Gateway Subnet on the top of the page.
The Virtual Network Gateway must be deployed in a dedicated subnet named ‘GatewaySubnet’. This subnet, which must be created within your virtual network’s IP address range, is specifically recognized by Azure as the designated space for gateway virtual machines (VMs) and services. Note that the name ‘GatewaySubnet’ is mandatory and cannot be changed.
The Gateway Subnet must be /27 or larger (/26, /25, etc..). Only a single Gateway Subnet can be created and it cannot be modified after creation.

Figure 3: Creation of Gateway Subnet using the Microsoft Azure Portal
C. Create a Virtual Network Gateway
- Search for Virtual Network Gateways on the Azure search bar, as shown in the following figure.
- Create Virtual Network Gateways.

Figure 4: Creation of Virtual Network Gateway using the Microsoft Azure Portal
To use two tunnels, enable active-active mode.
The public IP address can be found on the Virtual Network Gateway portal’s overview page, as shown in the following figure. When you have this IP address, you can proceed with the configuration of the Customer Gateway on the AWS side.

Figure 5: Public IP for Customer Gateway on Microsoft Azure Portal
Step 2: AWS configuration steps
2. Setting up Site-to-Site VPN
A. Create a Customer Gateway in the Amazon VPC console using the public IP address from your Microsoft Azure VPN.
- In the navigation pane, choose Customer gateways, as shown in the following figure.
- Choose Create customer gateway.

Figure 6: Creation of the customer gateway using the Console
B. Create a virtual private gateway
- In the navigation pane, choose Virtual private gateways, as shown in the following figure.
- Choose Create virtual private gateway.
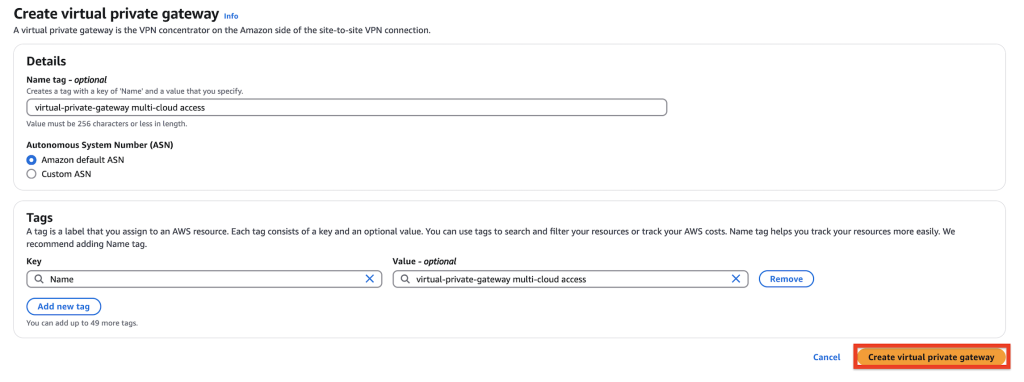
Figure 7: Creation of the virtual private gateway using the Console
2B. Attach virtual private gateway to your VPC
- Choose the virtual private gateway you created, then choose Actions, Attach to VPC, as shown in the following figure.
- For Available VPCs, choose your VPC and then choose Attach to VPC.

Figure 8: Attaching virtual private gateway to Virtual Private Cloud using the Console
C. Create a Site-to-Site VPN connection and add static route to the Microsoft Azure Resource group
- In the navigation pane, choose Site-to-Site VPN connections, as shown in the following figure.
- Choose Create VPN connection.
- For Target gateway type, choose Virtual private gateway. Then, choose the virtual private gateway that you created in previous step.
- For Customer gateway, choose Existing, then choose the customer gateway that you created earlier from Customer gateway ID in previous step.
- Choose one of the routing options based on your use case, in this example we have used Static routing.
- For Static IP Prefixes, specify each IP prefix for the private network of your VPN connection.
- Choose Create VPN connection. It might take a few minutes to create the VPN connection.

Figure 9: Creating Site-to-Site VPN using the Console
D. Download a generic configuration file to use for configuring the Microsoft Azure side of the VPN connection
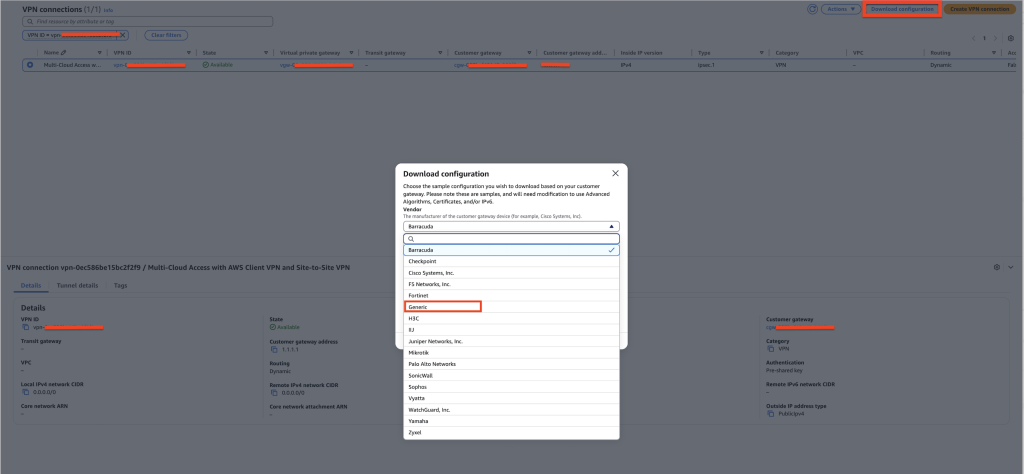
Figure 10: Downloading VPN configuration file using the Console
For more detailed steps, follow our step-by-step configuration guide: Get started with AWS Site-to-Site VPN.
Copy the Tunnel 1 IP address from the VPN console to complete the configuration and create a local network gateway on the Microsoft Azure side, as shown in the preceding figure.
E. Create a local network gateway in the Microsoft Azure portal and define the VPN peer IP (VPN outside IP address) and VPC CIDR in the address space
- Search for Local Network Gateway > Create Local Network Gateway, as shown in the following figure
- Make sure to choose the correct Resource Group
- Region: Where the Virtual Network is created, “East US”
- Name: You can name it Multicloud-Access or AWSTunnel 1 IP
- IP address: AWS Tunnel 1 public IP (3.91.x.x)
- Address Space: AWS VPC CIDR (172.31.0.0/16)
- On the Advanced Tab, make sure to disable BGP settings for static VPN
- Choose Review + Create > Create

Figure 11: Creating Local Network Gateway using the Azure Management Console
Repeat Step E to create one more Local Network Gateway for Tunnel 2 for high availability.
If you want to configure two IPsec tunnels, then make sure that you enable Active-Active mode when creating Azure Virtual Network Gateway.
F. Create the connection on the Virtual Network Gateway
- From the Home menu choose the created Virtual Network Gateways Multicloud-Access, as shown in the following figure
- From the left side expand Settings and choose connections
- Add the VPN connection from + Add
- Resource Group: Created Earlier in step 1
- Connection Type: Choose Site-to-site (Ipsec)
- Name: Tunnel1
- Region: East US

Figure 12: Creating connection on Virtual Network Gateway using the Microsoft Azure Portal
2F. Navigate to Settings tab and add the Pre-shared key from AWS downloadable configuration file

Figure 13: Creating connection on Virtual Network Gateway using the Azure Management Console
Repeat Step F and Step 2F to create another connection for Tunnel 2, as shown in the preceding figure.
G. Verify the status to check if VPN tunnels are established.
AWS side tunnels show as UP, as shown in the following figure.

Figure 14: VPN tunnel status on Console
Microsoft Azure side tunnels show as Connected, as shown in the following figure.
Figure 15: Azure VPN tunnel status on Azure Management console
3: Setting up Client VPN
A. Create a Client VPN endpoint in the Console
a. Navigate to the VPC console and choose Client VPN Endpoints, as shown in the following figures.
b. Choose Create Client VPN Endpoint: Configure the VPN endpoint settings with your network information and the desired authentication method. In this example, we have configured the Client VPN Endpoint to authenticate through mutual authentication.
– Name tag: Multi-Cloud-ClientVPN
– Client IPv4 CIDR: 192.168.100.0/22
– Server certificate ARN: Choose or import a certificate from AWS Certificate Manager (ACM).
– Authentication options: Choose Mutual authentication and choose the client certificate.
– DNS Server: Specify your preferred DNS server or use AWS-provided DNS.
c. Choose Create client VPN endpoint.

Figure 16: Creation of the Client VPN endpoint using the Console

Figure 17: Creation of the Client VPN endpoint using the Console
B. Associating client VPN endpoint with VPC
Associate the Client VPN endpoint to a subnet in your VPC to allow users to access AWS resources hosted in that VPC.

Figure 18: Associating Client VPN target network using the Console
C. Integrating the VPN solutions
To integrate Client VPN with Site-to-Site VPN, go through the following steps, as shown in the following figures:
a. Update the Client VPN endpoint route table to include routes to Microsoft Azure subnets through the Site-to-Site VPN connection.
b. Modify security groups and network ACLs to allow traffic between Client VPN users and Microsoft Azure resources.
c. If using AWS Transit Gateway, then make sure that it’s configured to route traffic between the Client VPN, Site-to-Site VPN, and relevant VPCs.

Figure 19: Adding route to Client VPN route table using the Console

Figure 20: Adding route to Client VPN route table using the Console
D. Adding authorization rules
Set up authorization rules for accessing the Microsoft Azure workloads or any networks you want to access.

Figure 21: Adding Client VPN authorization rules using the Console

Figure 22: Adding Client VPN authorization rules using the Console
Verify the setup
After completing the configuration, you must test connectivity from a client machine through the Client VPN to both AWS and Microsoft Azure resources.
Prerequisites for testing
– AWS-provided or OpenVPN client software installed on your test machine
– Client VPN configuration file (.ovpn) downloaded from the Client VPN endpoint
– Valid client certificates installed (if using mutual authentication)
Testing steps
1. Connect to Client VPN:
– Open your OpenVPN client. For more detailed steps, follow our step-by-step configuration guide.
– Import the .ovpn configuration file.
– Connect to the VPN endpoint.
– Verify that you receive an IP address from the Client VPN CIDR range (192.168.100.0/22).
2. Test end-to-end connectivity:
From your Client VPN-connected machine, test the following:
# Check assigned IP
ipconfig (Windows) or ifconfig (Linux/Mac)
# Test connectivity to AWS resources
ping <aws-private-ip>
A successful ping output indicates that network connectivity is working.
# Test connectivity to Microsoft Azure resources
ping <azure-private-ip>
A successful ping output indicates that network connectivity is working.
Security best practices
Implement the following best practices to enhance the security of your multicloud VPN solution:
1. Multi-Factor Authentication (MFA): Integrate MFA with AWS Directory Service for stronger user authentication.
2. Certificate-Based Authentication: Use ACM Private Certificate Authority (CA) to issue and manage Client VPN certificates.
3. Least Privilege Access: Define granular access policies using security groups and network ACLs.
4. Monitoring and Logging: Use Amazon CloudWatch to monitor VPN activity and detect suspicious behavior.
5. Regular Audits: Conduct periodic reviews of VPN configurations and access logs.
Considerations
When implementing this solution, consider the following cost factors:
– Client VPN endpoint association cost
– Data transfer costs for traffic traversing the AWS VPN, AWS Client VPN and Azure VPN
– Site-to-Site VPN connection hours
Conclusion
By Integrating AWS Client VPN with AWS Site-to-Site VPN, organizations can build a secure, scalable, and efficient multicloud access solution. This approach streamlines connectivity between AWS and third-party cloud providers, providing seamless access for remote users while making sure of strong security controls.
Refer to the following resources for more information:
· AWS Client VPN Administrator Guide
· AWS Site-to-Site VPN User Guide
About the authors
 Saransh Burman is a Sr. Solutions Architect with AWS. He works with AWS customers to provide them architectural guidance and help them build on AWS using a broad range of AWS Service. Saransh is passionate about helping customers adopt AWS for their use cases and innovate using AWS services.
 Narinder Singh is a senior support engineer and networking expert at Amazon Web Services, Inc. He works with customers to design, troubleshoot, and implement cloud-based architectures. He enjoys working with customer and holds MS in computer systems networking and telecommunications from George Mason University, specializing in computer networking.
 Arshdeep Grover is a Sr. Cloud Support Engineer in AWS having expertise in Network Devices. He finds great pleasure in collaborating with customers to troubleshoot complex technical issues, identify performance improvement, cost optimization and resilience opportunities, design modern cloud architectures. With a strong passion for automation, Arshdeep actively works on streamlining workflows through Python scripting.