AWS Cloud Operations Blog
Automate installing AWS Systems Manager agent on unmanaged Amazon EC2 nodes
Managing a fleet of AWS resources at scale can be challenging. Organizations rely on multiple solutions to automate tasks, collect inventory, patch instances, and maintain security compliance. Organizations need to access instances without opening inbound ports or managing SSH keys. AWS Systems Manager (SSM) simplifies this by serving as a centralized management solution that supports all these needs at scale. AWS Systems Manager is designed to simplify this complexity by serving as a centralized management solution that supports all these needs at scale.
To use Systems Manager’s capabilities, three main requirements must be met:
- Systems Manager agent (SSM agent) installed on the instance.
- Configure instance permissions required for Systems Manager.
- Network connectivity to AWS Systems Manager endpoints.
Systems Manager’s unified console allows you to configure and grant instance permissions across all nodes in your organization. The diagnose and remediate feature helps identify unmanaged AWS nodes and resolve network-related issues. These issues include security group misconfigurations or disabled Amazon Virtual Private Cloud (Amazon VPC) DNS.
While many AWS-provided Amazon Machine Images (AMIs) include the Systems Manager agent pre-installed, you might need to install the agent on a custom or older AMI. For organizations managing large fleets of nodes, manually installing the SSM agent across multiple servers and accounts can create operational overhead.
This post demonstrates an automated solution for the installation of the SSM agent on existing Amazon EC2 instances. The solution is designed to streamline SSM agent installation across your fleet of nodes that are spread across multiple accounts and Regions. This enables quick adoption of Systems Manager’s management capabilities across your AWS Organization.
Prerequisites
Your nodes must have the following prerequisites:
- Supported Operating System:
- Windows Server 2016-2025.
- Amazon Linux 2/2023.
- RHEL/CentOS 7.x-10. x.
- Ubuntu 18.04-24.04.
- SUSE Linux Enterprise 15.x.
- EC2Launch v2 agent for Windows nodes.
- Cloud-init for Linux nodes.
- Network connectivity to Amazon S3 (s3.amazonaws.com) is required for downloading SSM agent installation files and uploading execution logs after the installation. You can establish a connectivity through an Internet Gateway, NAT Gateway, or S3 Gateway endpoint for private subnets.
- For Linux-based nodes, the automation requires unzip, curl, and awscli packages to download the SSM agent software and upload logs. If these packages aren’t present, the automation will attempt to install them from the system’s package repositories, which requires internet access during the installation process.
- If you’re onboarded to unified console, use the Delegated Administrator for Systems Manager used for onboarding.
- If you’re aren’t onboarded to unified console, use either the Delegated Administrator for CloudFormation StackSets or the management account for the organization.
Important considerations
This solution installs SSM agent using user data and requires stopping and starting your nodes during the process. Be aware that this will clear any ephemeral storage and change non-Elastic IP addresses.
Any applications running on these nodes are interrupted. We recommend running this remediation during a scheduled maintenance period to avoid unexpected interruptions.
During execution, the automation temporarily attaches an instance profile to enable log uploads to S3 from the instance. When completed, this temporary profile is removed, and the instance is restored to its original state.
Overview of solution
This solution provides automated deployment using AWS CloudFormation to provision all necessary resources. These resources include S3 buckets, Systems Manager Automation runbooks, IAM roles, permission policies, and instance profiles. After deployment, you can run the Systems Manager Automation runbook on-demand to install the SSM agent. The installation can target your entire EC2 fleet or specific nodes using tags.
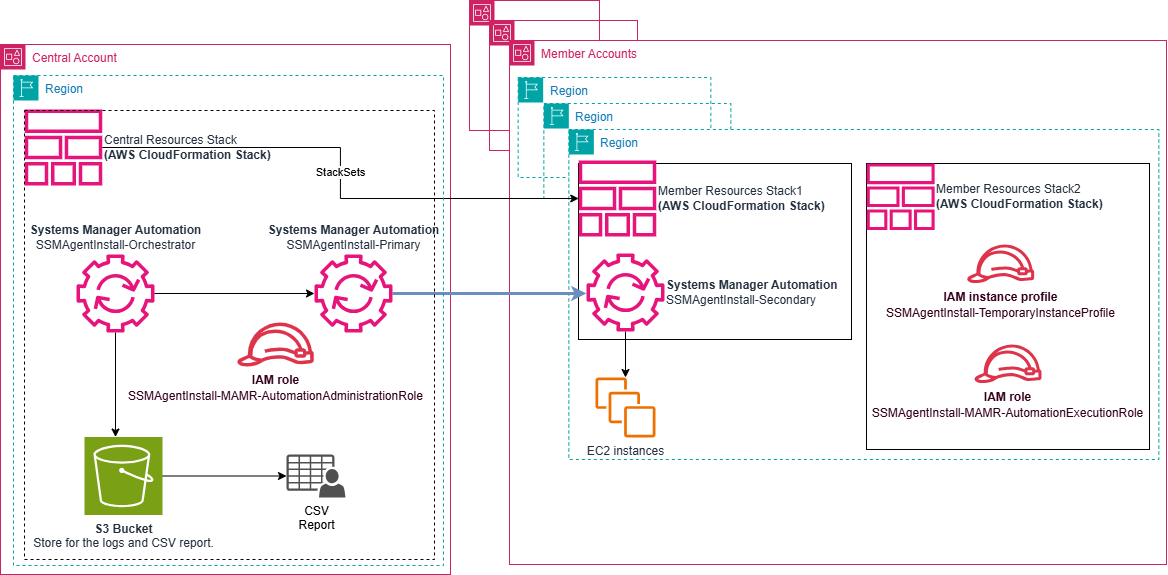
Figure 1 – Architecture diagram for deployment workflow for SSM agent installation
The automation workflow consists of three interconnected Systems Manager Automation runbooks working in harmony. The process begins when you run the SSMAgentInstall-Orchestrator runbook, which acts as the central coordinator. This orchestrator first validates all input parameters and then invokes the SSMAgentInstall-Primary runbook in each target account specified.
The Primary runbook runs against the nodes specified in the input (either through tags or using diagnose and remediate output) in the targeted Regions. For each target node, it invokes the SSMAgentInstall-Secondary runbook, which first verifies if the node is already SSM-managed.
If the nodes is unmanaged, the secondary runbook proceeds with the installation process through a carefully sequenced procedure: it validates nodes eligibility (checking for ASG membership, root volume type, and node state), then runs a stop-and-start cycle where it injects the SSM agent installation scripts via user data, temporarily attaches necessary IAM permissions, and verifies successful agent installation.
Throughout this process, execution logs are collected and stored in a central S3 bucket. Finally, the Orchestrator aggregates all results into a comprehensive CSV report, providing visibility into the success or failure of each installation attempt across your organization.
Permissions:
After installation, the SSM agent registers the nodes with AWS Systems Manager. For this, ensure nodes have network connectivity to Systems Manager endpoints and required IAM Permissions. Note: If you’re using unified console, the required permissions are automatically configured.
Walkthrough
To deploy the solution, use the Delegated Administrator for CloudFormation StackSets.
Step 1: Deploy the resources using the CloudFormation template.
- Download the CloudFormation template.
- Login to your appropriate AWS account. If enabled, switch to the home region of Unified console.
- On the Stacks page, choose Create stack at top right, and then choose With new resources (standard).
- For Prerequisite – Prepare template, choose Choose an existing template.
- For Template source, choose Upload a template file and select Choose file and choose the template you downloaded in step 1.
- Choose Next.
- Provide a stack name, for example, SSMAgentMultiAccountInstallation.
Stack Parameters:
- In the Parameters section, specify the values for the parameters:
- For DeploymentTargetsOUs, specify the Organizational Unit IDs (OU IDs) where target instances are in your organizations. CloudFormation attempts to create resources to these accounts and regions using Stacksets.
- For OrganizationId, enter the Organization ID of your Organizations.
- For TargetRegions, enter the regions where the where target instances are located in your organizations.
- On the Configure Stack Options page, apply tags if needed, otherwise choose Next.
- On the Review and create page, Select I acknowledge that AWS CloudFormation might create IAM resources with custom names, then choose Submit.
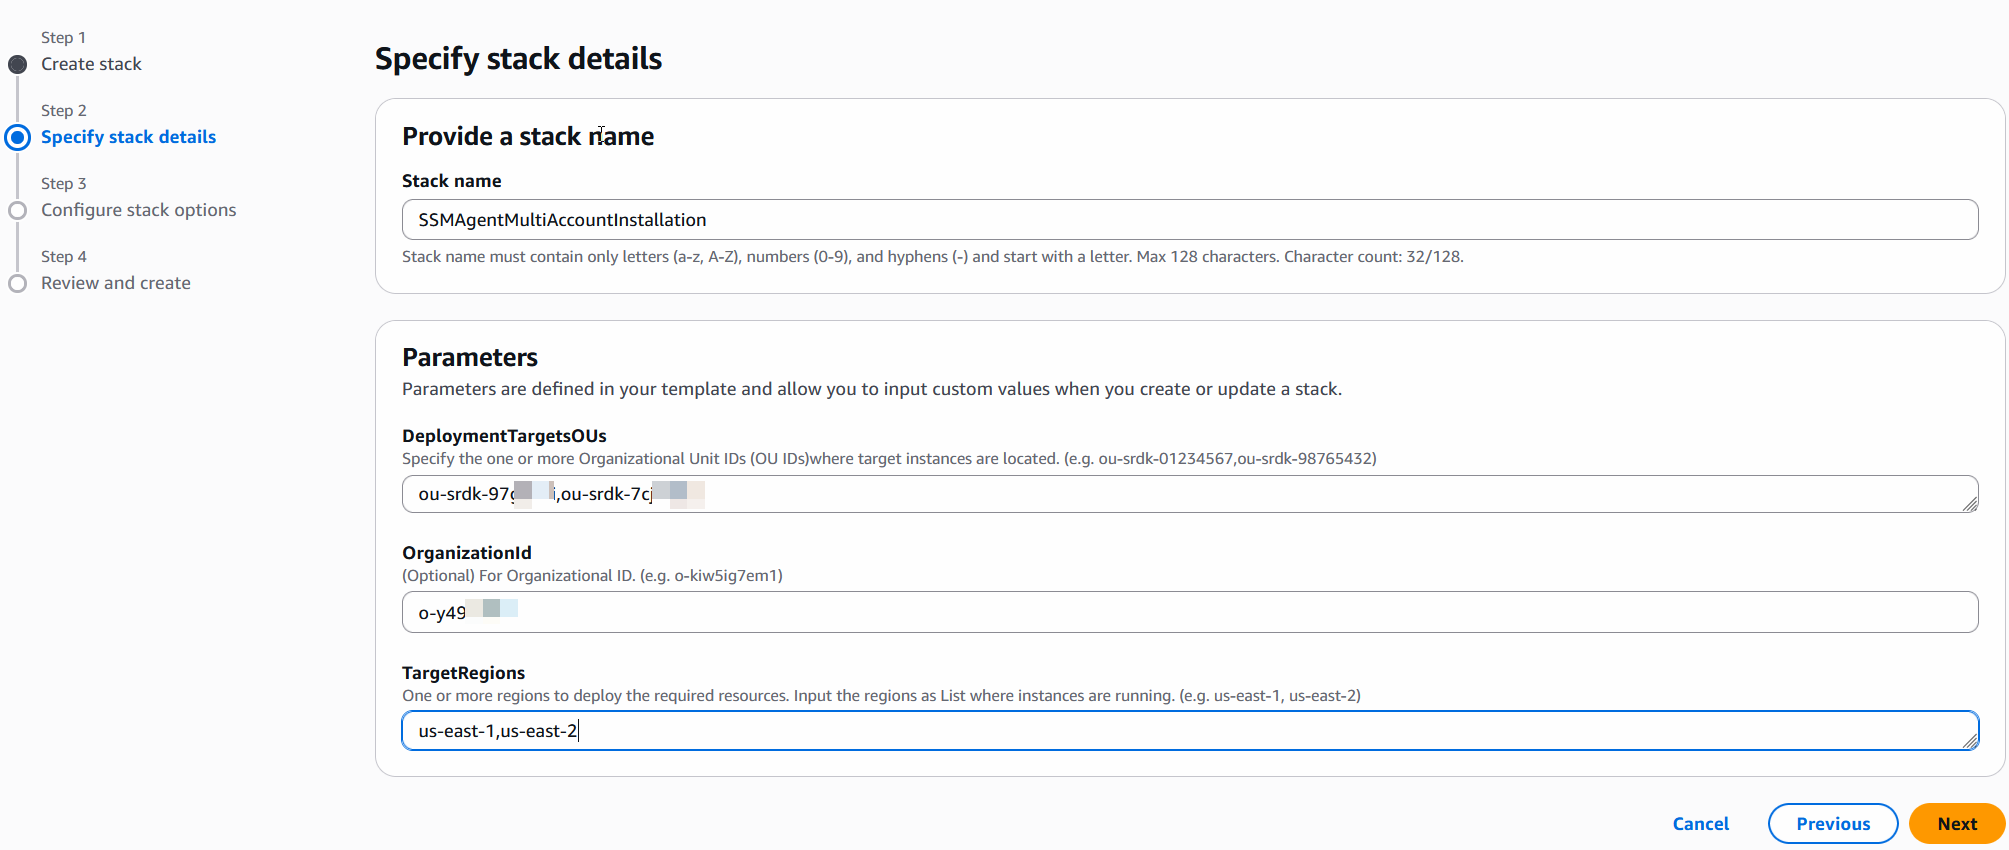
Figure 2 – AWS CloudFormation Console – Stacks page
Step 2: Run the Automation runbook.
- After the CloudFormation template deployment completes, open the Systems Manager console in the same Region.
- In the navigation pane, choose Automation, and then choose Execute automation.
- On the Owned by me tab, choose SSMAgentInstall-Orchestrator and choose Next.
- In the Input parameters section, specify the required inputs:
- For AutomationAssumeRole, choose SSMAgentInstall-MAMR-AutomationAdministrationRole
- For UploadLogsToS3Bucket, choose the log S3 bucket ssm-agent-install-automation-logs-<account-id>
- To target the instances via Tags, specify the required inputs:
- TargetAccounts – Enter Account IDs or OUs where unmanaged instances are running.
- TargetRegions – Enter Regions containing the unmanaged instances.
- TargetTagKey – Enter target’s tag key as tag:<tagname> (Use InstanceIds to target all instances).
- TargetTagValue – Enter the target’s tag value (Use * with InstanceIds to target all instances).
- Alternatively, Use Diagnose and Remediate output If you previously ran a diagnosis using Systems Manager unified console. The automation will fetch the unmanaged Instances from the csv:
- In the navigation pane, choose Diagnose and remediate.
- Choose View executions.
- Choose the execution and expand the Output section.
- Copy the S3 path from AggregateOutput.ExportObjectUri.
- Choose Execute.
- When complete, the automation creates an aggregated report CSV file in the S3 bucket and displays the file path in the output summary.
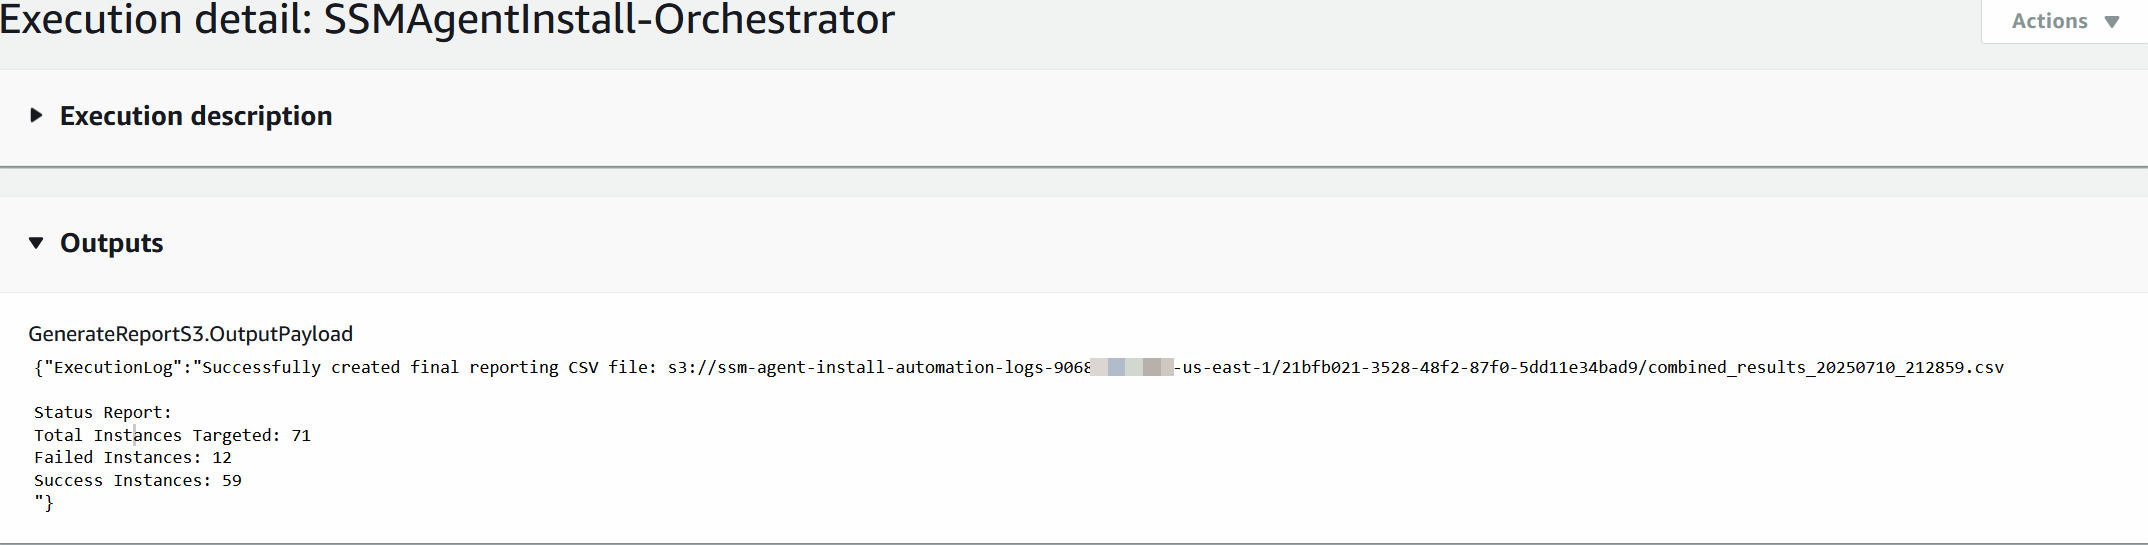
Figure 3 – AWS Systems Manager – Automation Output
The report csv file provides per instance details along with execution logs:

Figure 4 – Instance details report csv file
The solution deploys SSM agent across multiple AWS accounts using CloudFormation StackSets, followed by running an Automation runbook in Systems Manager. Upon completion, the automation generates a comprehensive CSV report in S3 containing instance-level details and execution logs, providing visibility into the deployment status across your organization. Please note, if the SSM agent is not installed after using the automation described above, you can use one of the strategies mentioned or resort to manual installation.
Cleanup
When you have completed running and you no longer need the solution in place, remember to remove the provisioned AWS resources. This helps avoid ongoing costs. To clean up:
- Navigate to the AWS CloudFormation Console.
- Select the stack you created for this solution.
- Choose Delete and confirm when prompted.
The deletion process attempts to remove all resources created by both the CloudFormation template and the automation document, including S3 buckets, log files, associated IAM roles and policies, and any other dependent resources.
Conclusion
Now that you have the SSM agent installed on your EC2 instances, Explore AWS Systems Manager: Dive into features like Patch Manager, Session Manager, Parameter Store, and Automation. Each of these tools can significantly enhance your AWS operations.
- Implement automated patching: Use Patch Manager to set up regular, automated patching schedules for your EC2 instances, ensuring your systems are always up-to-date and secure.
- Enhance security with Session Manager: Replace SSH access with Session Manager for secure, auditable instance access without the need for open inbound ports.
- Streamline configuration with Parameter Store: Start storing your configuration data, secrets, and other operational parameters securely in Parameter Store.