Microsoft Workloads on AWS
Mastering SQL Server Backups with T-SQL Snapshots and Amazon FSx for NetApp ONTAP
In this blog post, we will guide you through the process on performing a snapshot backup using native T-SQL based backup abilities and snapshot technology of Amazon FSx for NetApp ONTAP (FSxN). This method provide near-instant, consistent backups with negligible I/O, storage and compute capacity impact unlike traditional Microsoft SQL Server backups.
Introduction
Microsoft SQL Server backups play a crucial role in database disaster recovery. On Amazon Web Services (AWS), we provide multiple backup options to protect your database workloads from using traditional SQL server backups to using AWS Backup VSS snapshots. we provide different storage options to meet the performance needs of your backups.
If you are running SQL Server 2022, it is time to revisit your backup strategy. SQL Server 2022 offers new capabilities to do database backups.
- Backup directly to S3
- Offloading backups to Hardware using QAT
- Use Software compression
- Use snapshot backup
With the growth of databases and tight recovery time objective (RTO) and recovery point objective (RPO) SQL Server backup and restore operations are very critical for database administrators to meet their business needs.
In this post, we will guide you through the process on performing a snapshot backup using native T-SQL based backup abilities and snapshot technology of Amazon FSx for NetApp ONTAP (FSxN). This approach helps you to take backups for your databases in few mins when compared to traditional SQL Server backups.
Prerequisites
- Deploy Highly available SQL Server 2022 on Amazon Elastic Compute Cloud (Amazon EC2) with FSxN referring to best practices in this guide.
- SSH connect using PowerShell7.
Note: For SQL Server workloads running on FSxN volumes, automatic snapshots should be set to None as mentioned in the blog on deployment best practices. FSxN automated snapshots are crash consistent and T-SQL snapshots are application consistent. Setting automatic snapshots to None will avoid unnecessary storage consumption by having both crash-consistent and app-consistent snapshots for the volume.
Solution Overview
This blog focuses on achieving application-consistent backups in SQL Server 2022 by combining T-SQL suspend for snapshots, metadata backups, and Amazon FSx for ONTAP snapshot technology.
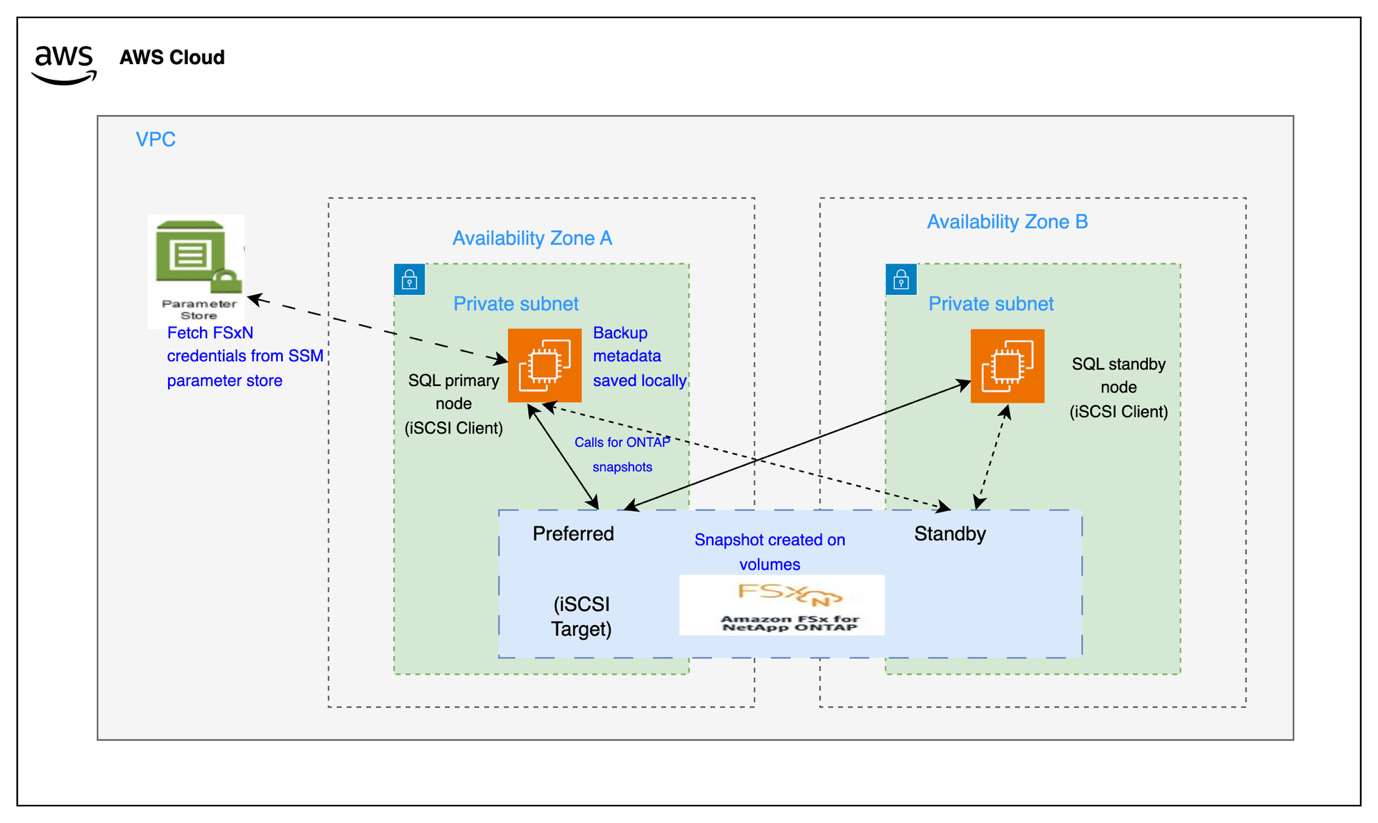
Figure 1 Architecture Overview
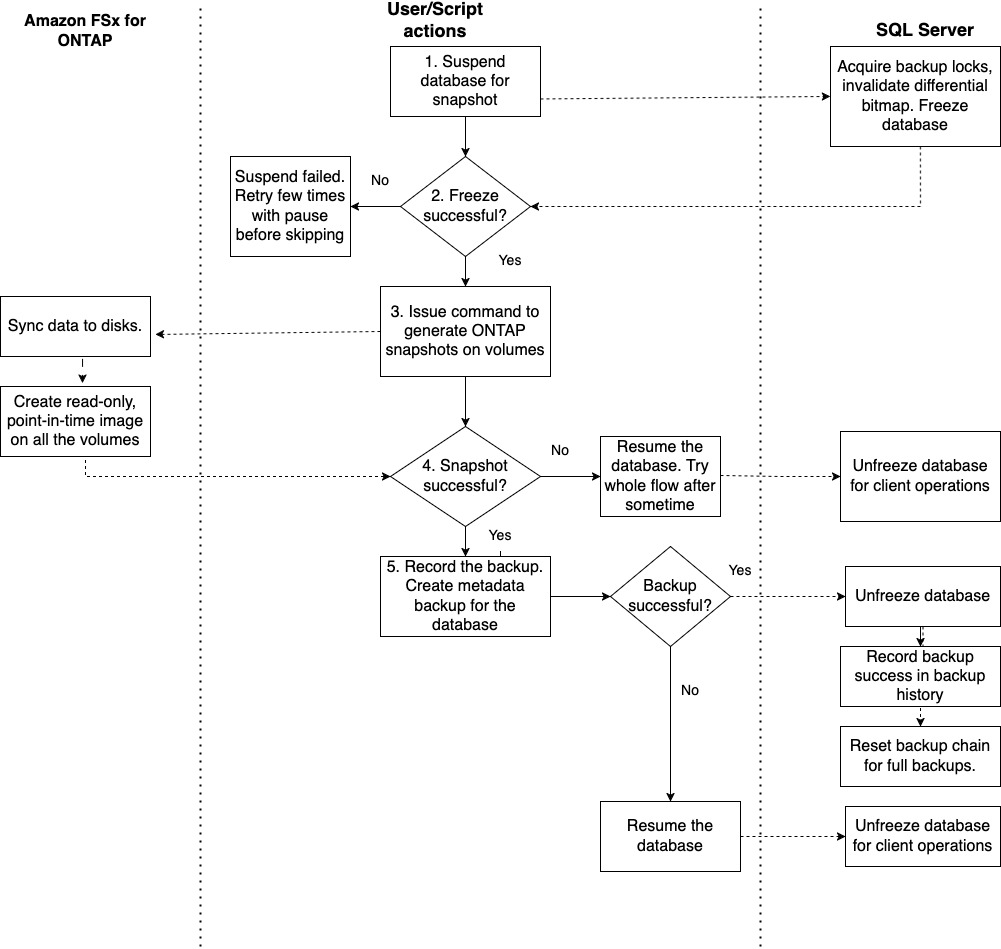
Figure 2 Workflow Overview
Overview of NetApp Snapshots
A snapshot is a read-only image of an Amazon FSx for NetApp ONTAP volume captured at a specific point in time. Snapshots help protect against accidental file deletion or modification by enabling you to easily restore individual LUN paths or entire volume contents from a previous state. This is useful for undoing changes, recovering deleted data, or restoring after database failures. Because snapshots are incremental, they primarily store metadata about changed data blocks, enabling faster restores without the need to copy large volumes of data.
As mentioned in prerequisites, we suggest setting snapshot policy to None for the volumes assigned to SQL Server databases. In this tutorial we recommend using separate volume for SQL Server backups. We can use the default policy for the backup volume. More details at Protecting your data with snapshots.
If your database spans multiple FSx for ONTAP volumes or you want to configure similar backup schedules for multiple databases across volumes, using the consistency group feature would make the management easier. Instead of calling multiple volume snapshot commands and waiting for response, you could issue a single snapshot create on the consistency group. For details, refer to ONTAP Consistency Groups.
Walkthrough
Connect to FSxN
In this blog we are going to use PowerShell 7 to connect to FSxN and run commands.
- The DNS name or management IP address to access the FSxN is found in the AWS console sections (see Figure 3) after selecting FsxN Filesystem.
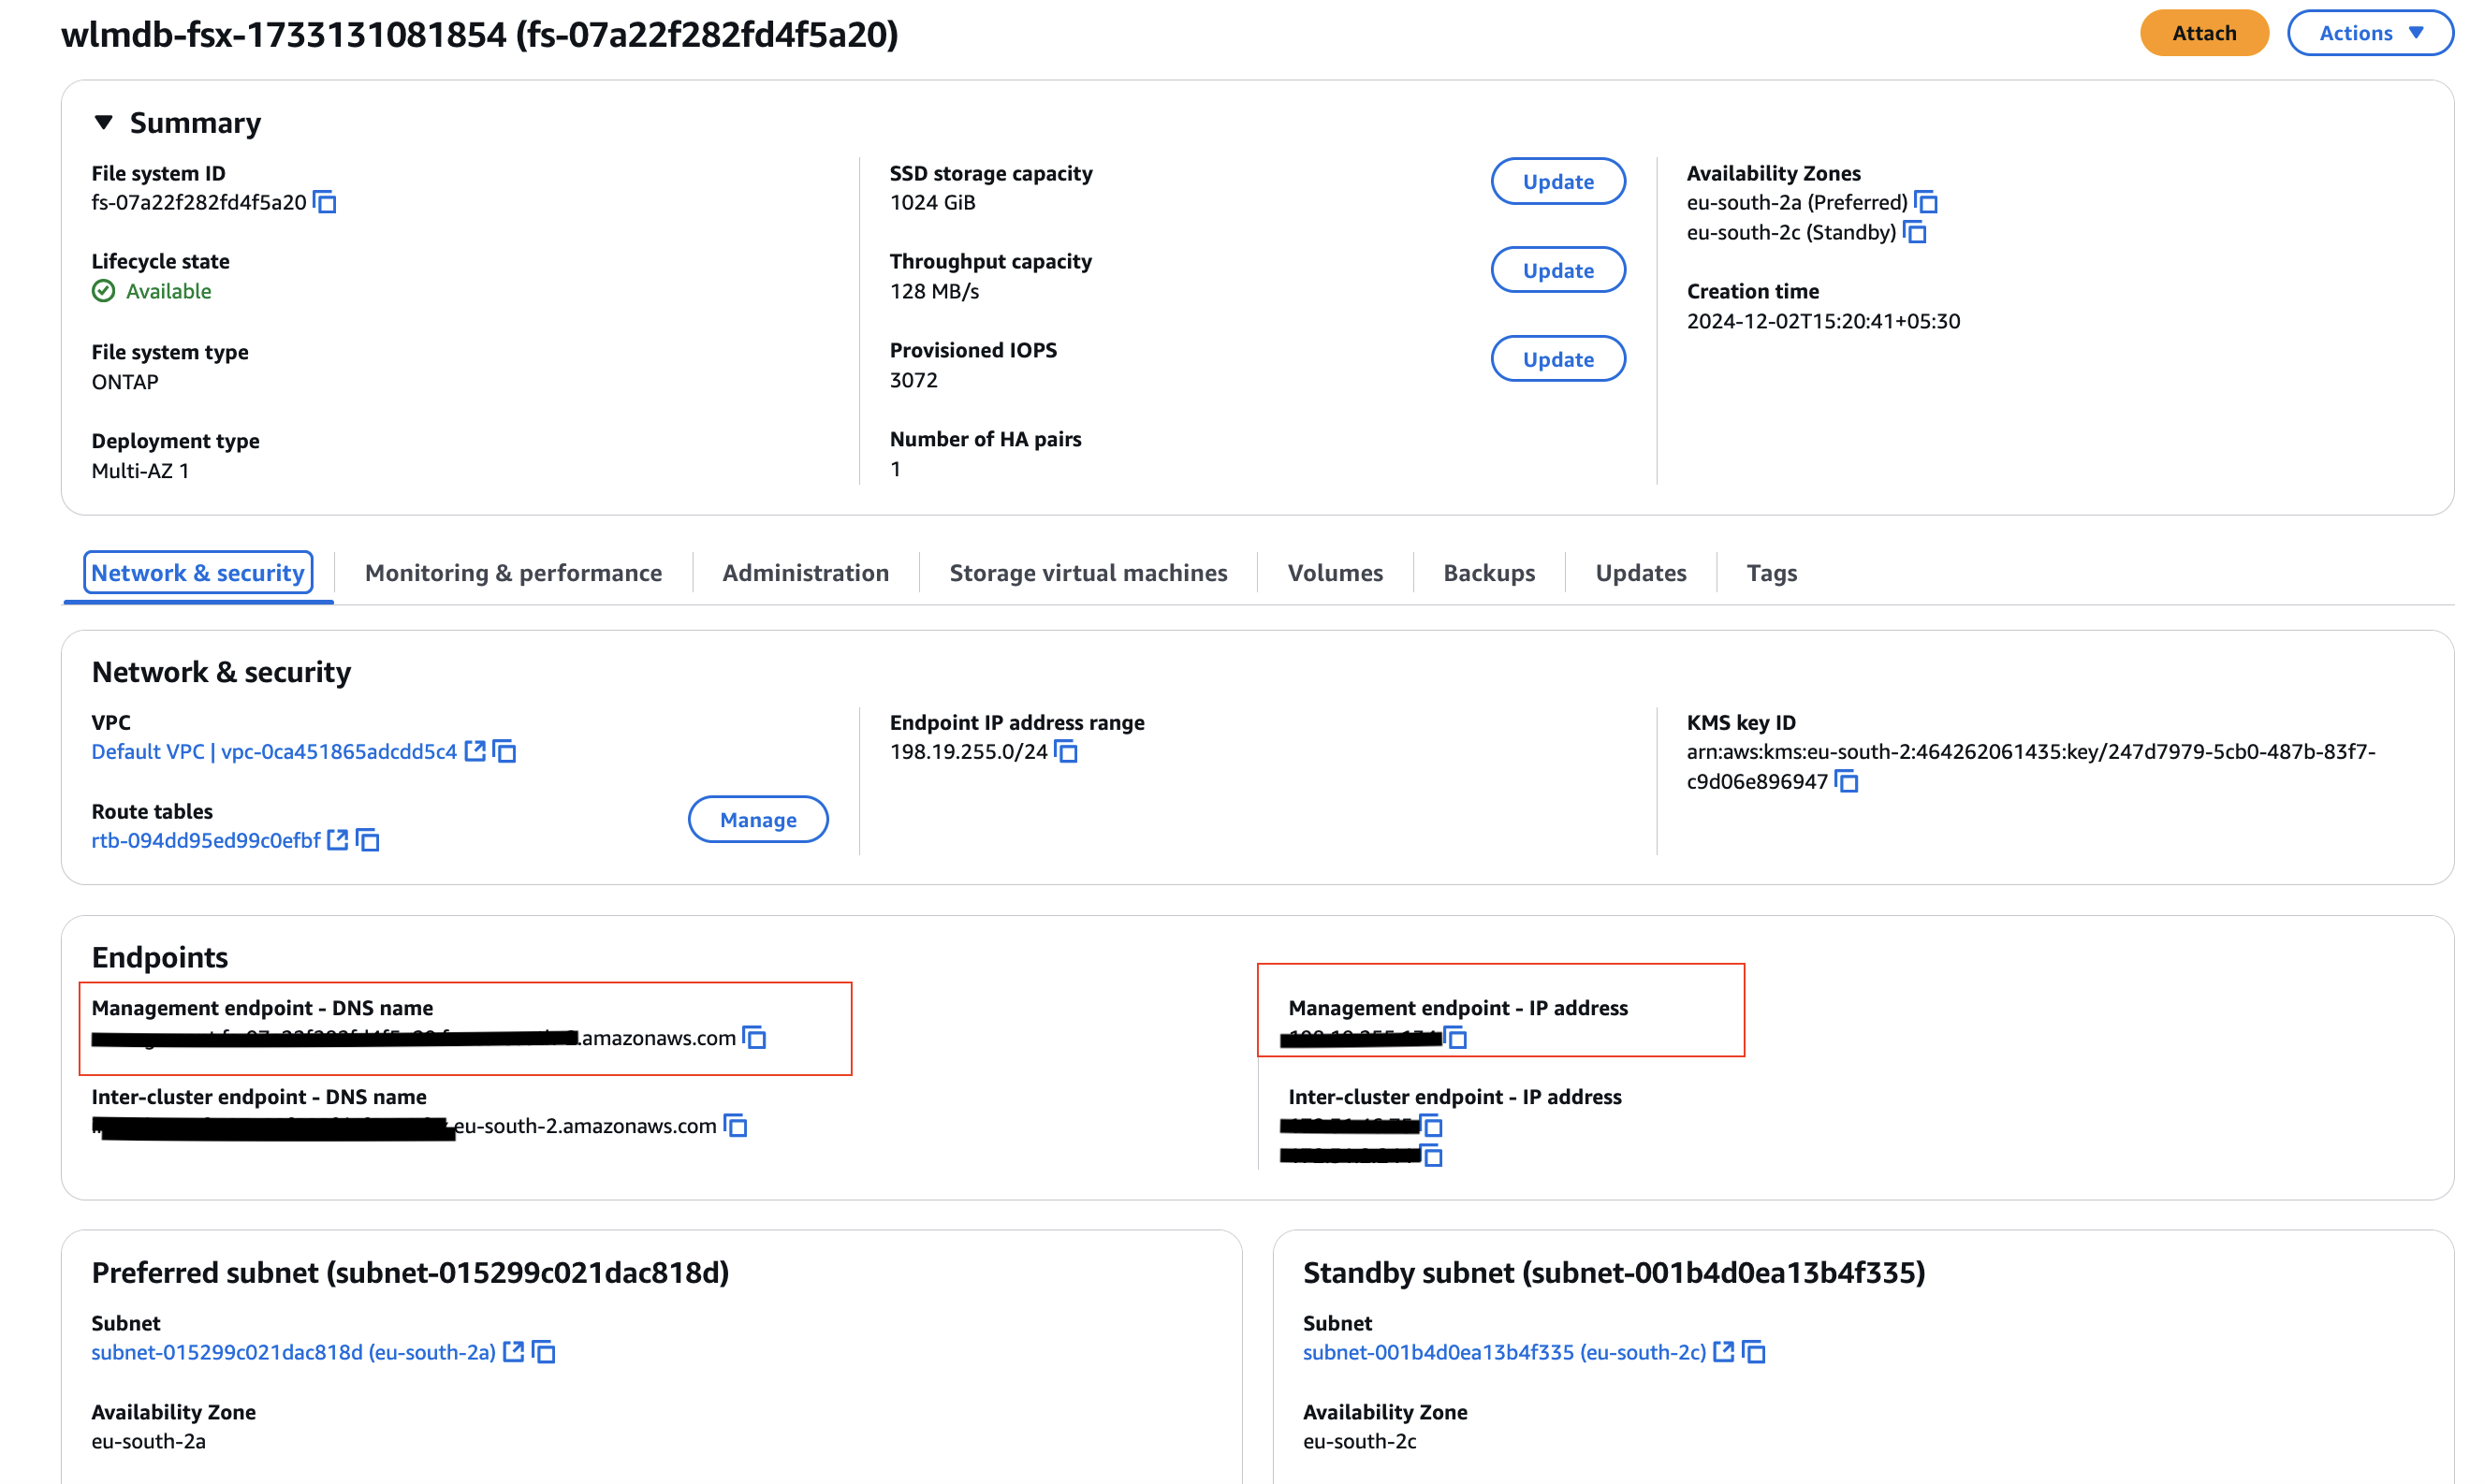
Figure 3 Connection Info for FSxN
- Connect to the FSxN filesystem using the management DNS name or management IP obtained above with ‘fsxadmin’ user credentials to run any ONTAP commands as shown in Figure 4.
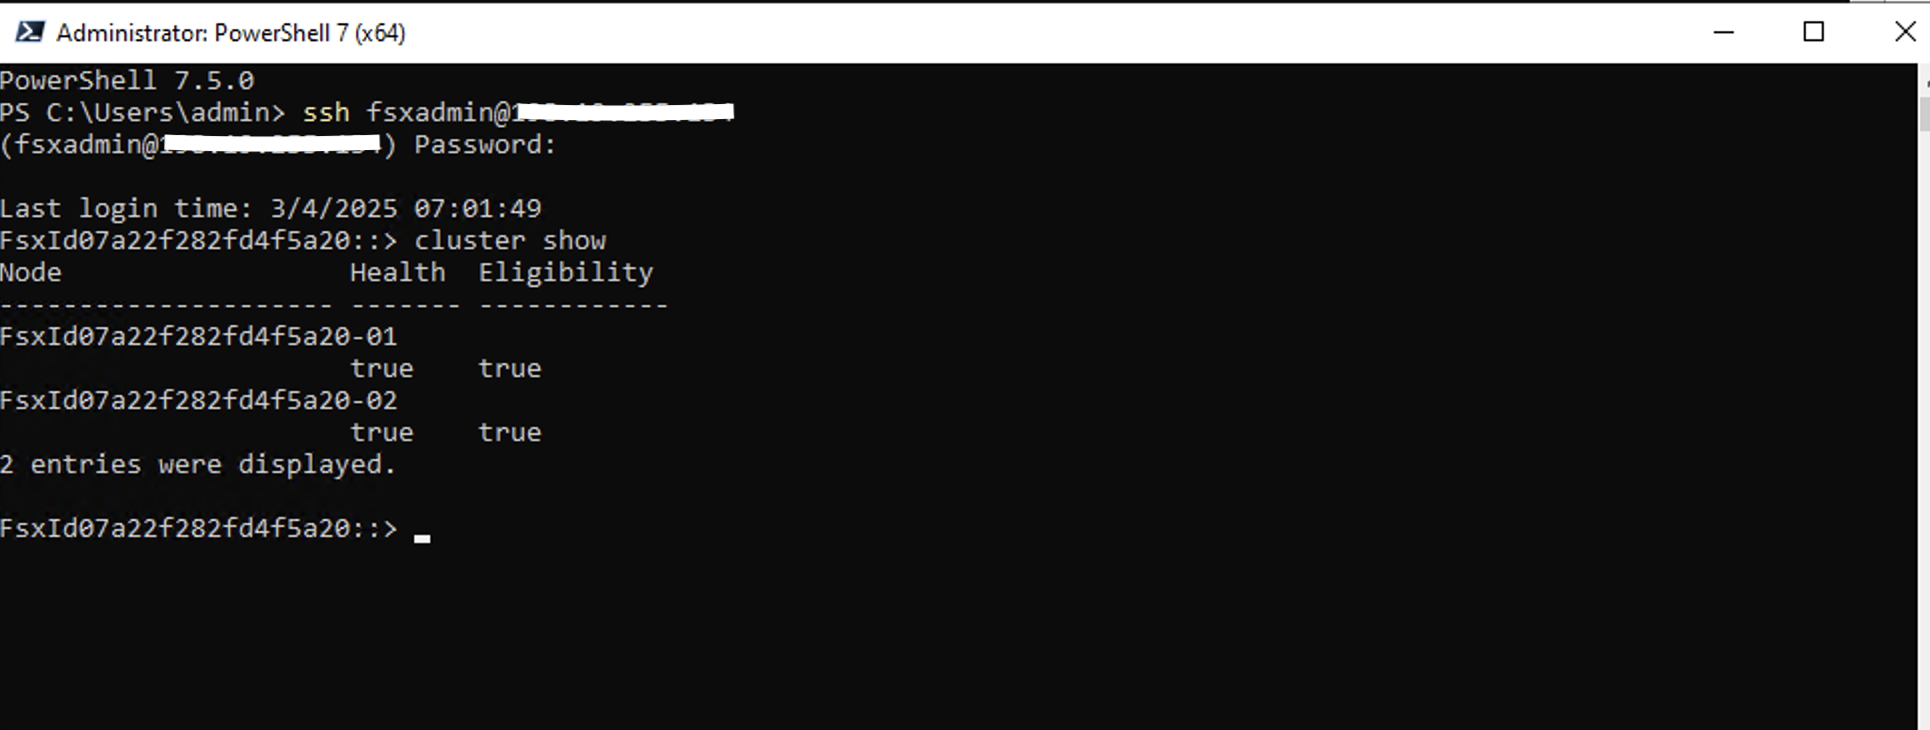
Figure 4 Connect to FsxN Filesystem using Powershell
Configure dedicated backup disk
In addition to the requirement for separate data and log defined in SQL Server High Availability Deployments Using Amazon FSx for NetApp ONTAP, we recommend creating a dedicated volume and LUN for SQL backups. This allows metadata and transaction log backups to reside on an independent volume that benefits from the default snapshot policy. Follow the steps below to provision a dedicated disk for SQL backups on the FSxN filesystem.
- Login to the FSxN filesystem as shown in Figure 3.
- Within the same SVM that hosts your SQL data and log volumes, create a new volume formatted with NTFS. Use the default snapshot policy and allocate storage based on your backup requirements—for this blog, we use a 50 GB volume as an example as shown in figure 5.
volume create -vserver SQL_Cluster -volume SQL_Backup -state online -security-style ntfs -snapshot-policy default -size 50G -aggregate aggr1

Figure 5 Create Volume on FSxN
3.Create a LUN inside the volume with OS type as windows_2008 as shown in figure 6.
lun create -vserver SQL_Cluster -volume SQL_Backup -lun sqlbackup -size 45G -ostype windows_2008 -space-reserve enabled -space-allocation enabled

Figure 6 LUN Creation
4.Create a LUN mapping with the existing initiator group for the SQL server that you had created for log and data disks. You can see output as per figure 7.
lun mapping create -vserver SQL_Cluster -volume SQL_Backup -lun sqlbackup -igroup SQL_igroup
 Figure 7 LUN Mapping
5.After successfully mapping the LUN, open the Windows Disk Management console to discover the new disk. Navigate to the Action tab and select Rescan Disks to detect newly added disks.
o From the list, locate the disk you just created, right-click it, and select Online.
o Then, choose Initialize Disk and select GPT (GUID Partition Table) as the partition style as shown in figure 7.
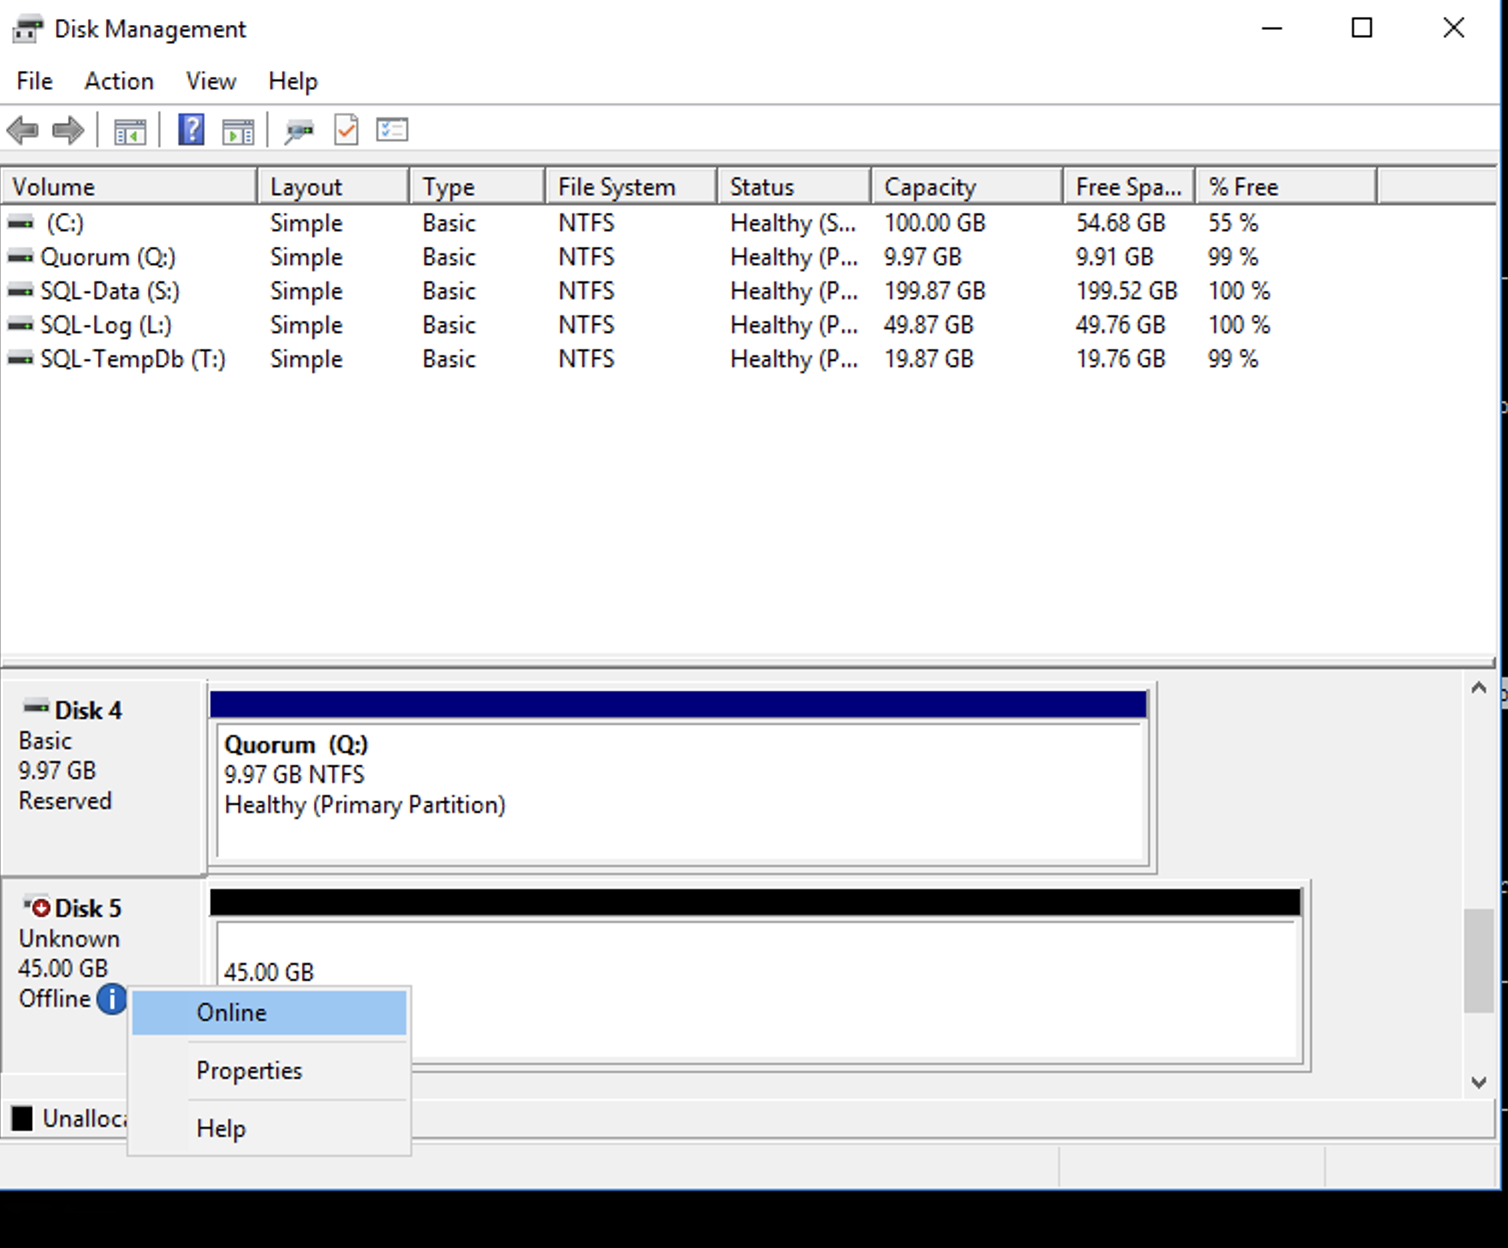 Figure 8 Disk Partition
 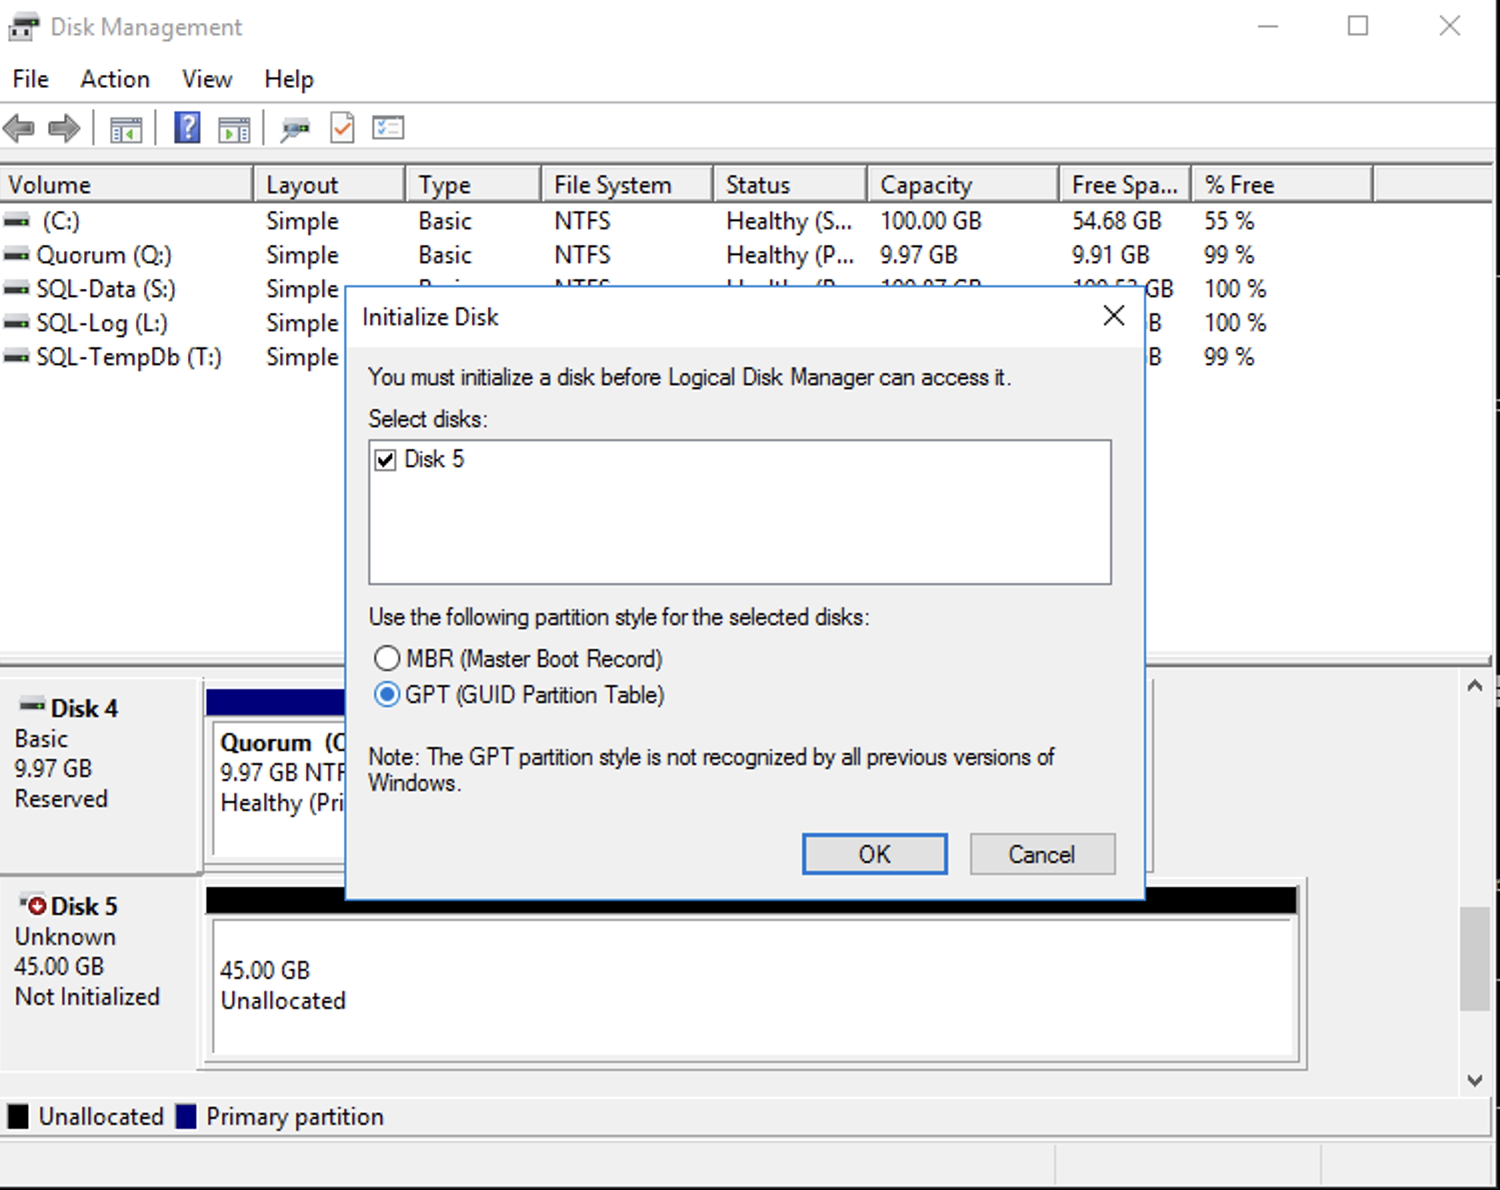 Figure 9 Disk initialization GPT
-
-
-
- Create a new simple volume from the disk as shown in figure 9.
-
-
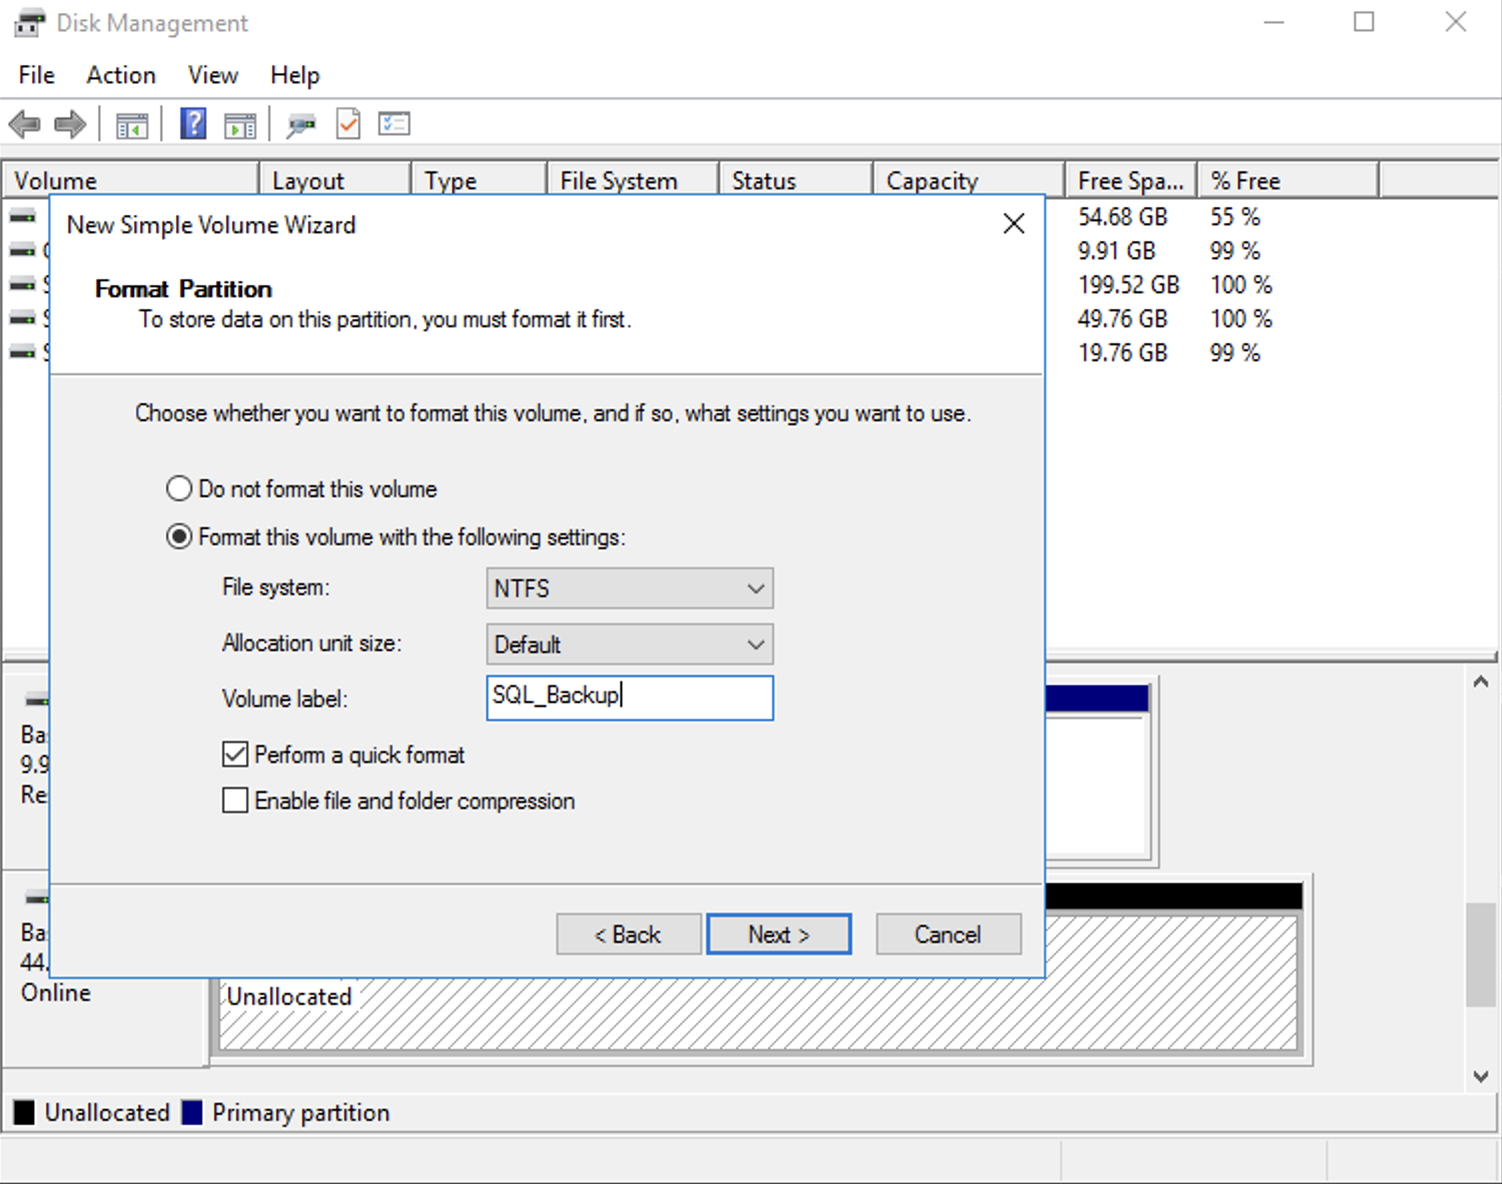 Figure 10 Create Volume
-
-
-
- Or run the following PowerShell script as Administrator to initialize, format and label the disk. This automates process in Step 5 as shown in figure 11.
-
-
#SetupBackupDisk.ps1
$getbackupdisk = (Get-Disk | Where-Object { $_.FriendlyName -eq 'NETAPP LUN C-MODE' -and $_.OperationalStatus -eq 'Offline'})

$disknumber = ($getbackupdisk).Number
if (($getbackupdisk).IsOffline -eq $True) {
    Set-Disk -Number $disknumber -IsOffline $False
    Start-Sleep 2
 }
if (($getbackupdisk).PartitionStyle -eq 'RAW') {
    Initialize-Disk -Number $disknumber -PartitionStyle GPT
    Start-Sleep 2
 }
if ($getbackupdisk.IsReadOnly -eq $True) {
    Set-Disk -Number $disknumber -IsReadOnly $False
    Start-Sleep 2
 }

New-Partition -DiskNumber $disknumber -UseMaximumSize -DriveLetter D | Format-Volume -FileSystem NTFS -Force -NewFileSystemLabel SQL-Backup

Figure 11 Automate Disk initialization
6.As we configured SQL server using Always On Failover Cluster Instance, you need to add the new disk to Windows Failover Cluster and set as dependency for the SQL Server role. Run below commands in PowerShell as Administrator to add disk to the cluster as shown in figure 12.
$InstanceName = 'MSSQLSERVER'
# Add disk to cluster and SQL server dependency
$disknumber= 5 # Get Disk Number from Disk Management console or from previous script
$backupdisk = (Get-Disk -Number $disknumber | Add-ClusterDisk)
$SQLRoleGroup = (Get-ClusterGroup).Name -like "SQL Server ($InstanceName)*"
$SQLGroup = $SQLRoleGroup[0]
$backupvol = $backupdisk.Name
Move-ClusterResource -Name $backupvol -Group $SQLGroup
  if ($InstanceName -eq "MSSQLSERVER") {
Add-ClusterResourceDependency -Resource "SQL Server" -Provider $backupvol
            }
            else {
Add-ClusterResourceDependency -Resource "SQL Server ($InstanceName)" -Provider $backupvol
            }
(Get-ClusterResource -Name $backupvol).name = 'SQL-Backup'
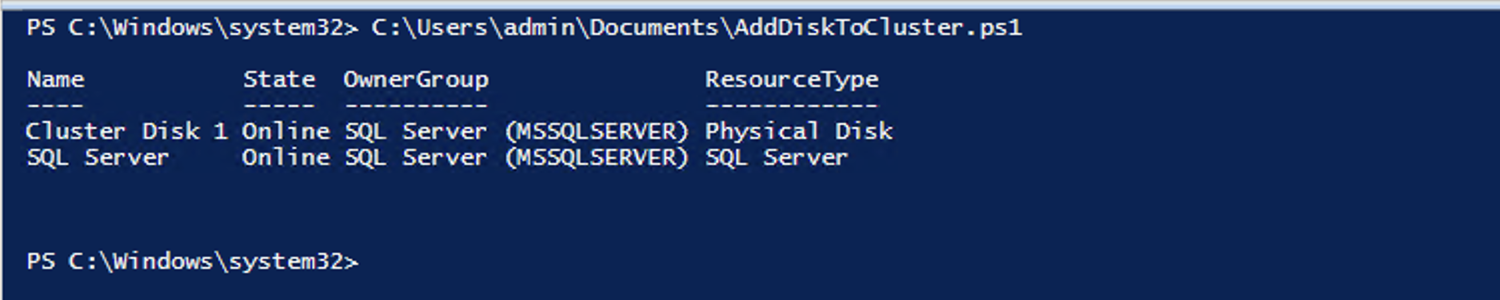
Figure 12 Adding disk to cluster
7.Now we update SQL Server to use new disk as our default database backup volume by using SQL Server Management Studio (SSMS). Right click on the SQL server instance name and select ‘Properties’ to bring up ‘Server Properties’ dialog. Select ‘Database Settings’ and update the default location for Backup folder as shown in figure 13.
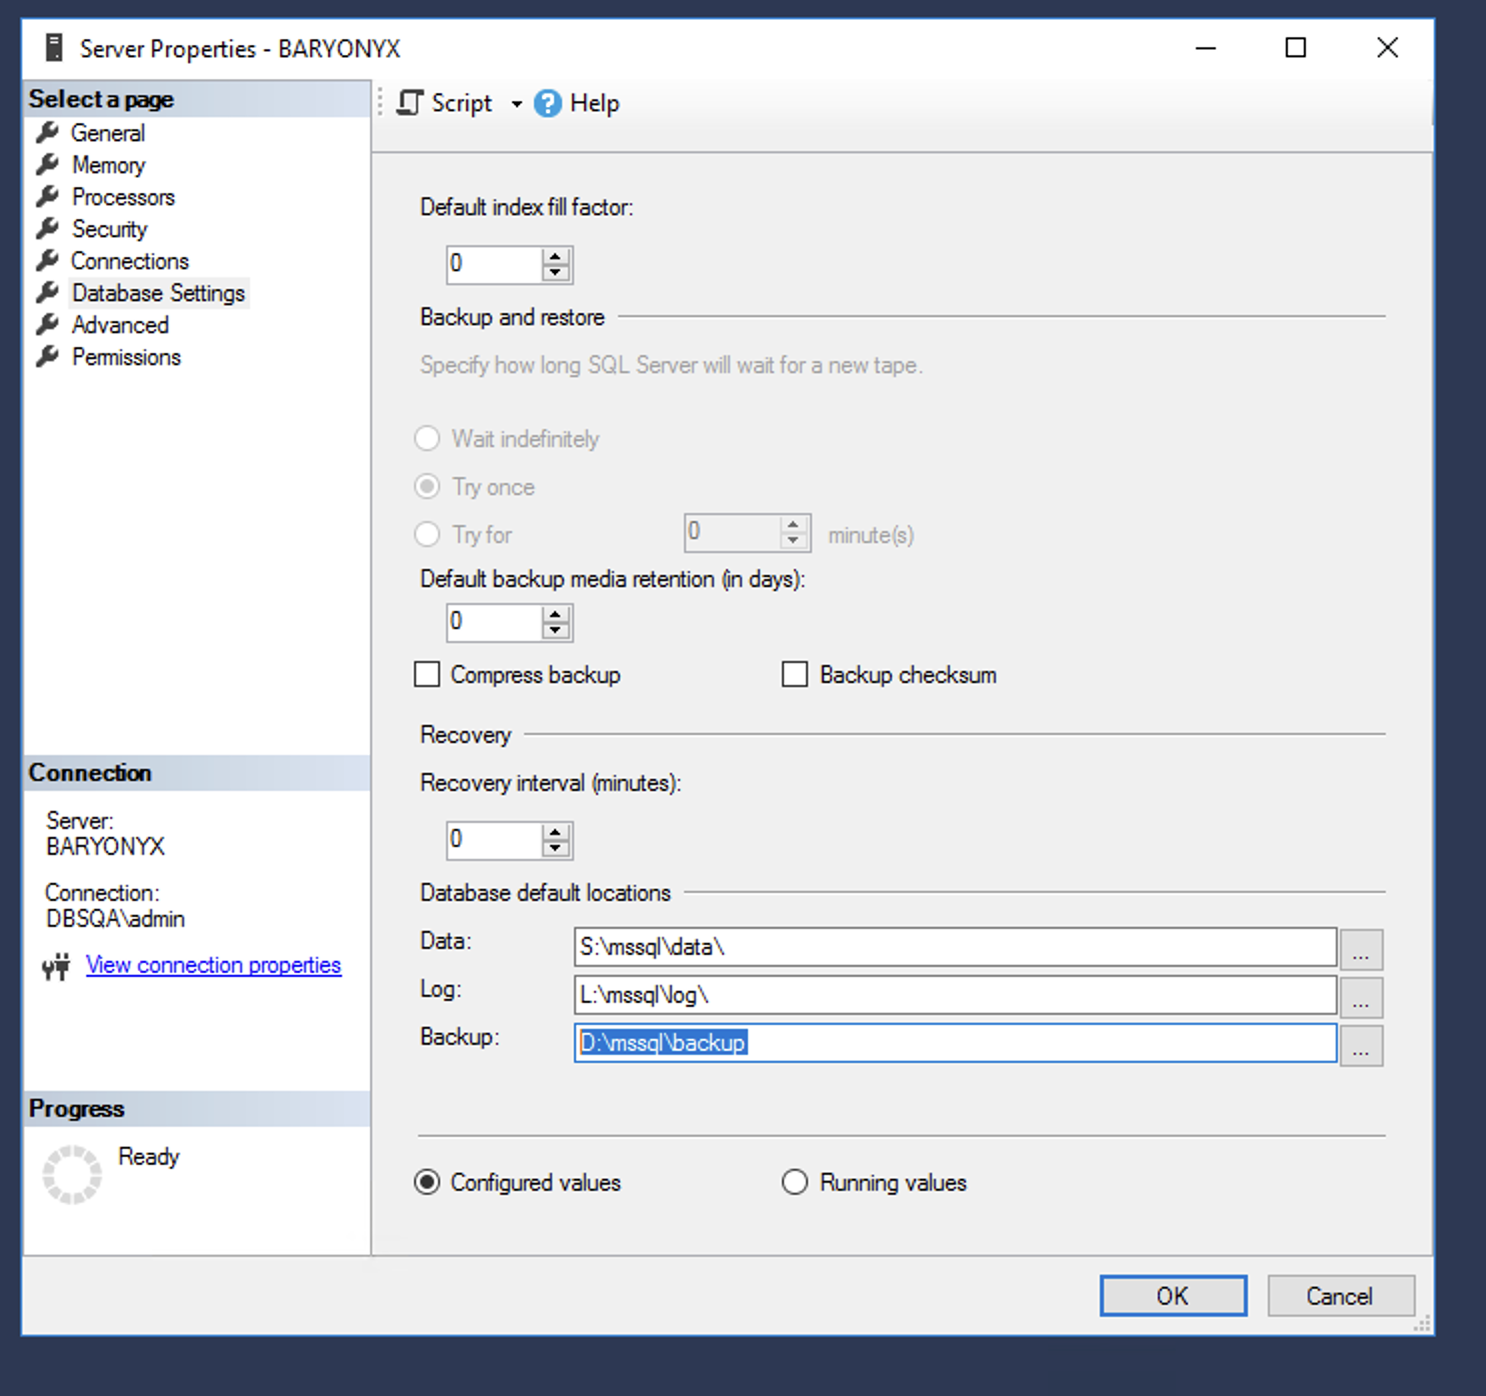
Figure 13 SQL Server Backup Location
Create application consistent backup
In this section, we outline the backup process for a single user database, a group of databases, and all databases hosted on SQL Server. Once a SQL Server database is suspended using T-SQL, the method to create snapshots on Amazon FSx for NetApp ONTAP volumes remains consistent, regardless of the number of databases involved.
A. Backup operation for a single user database
We use T-SQL to suspend I/O activity on the database and use FSxN snapshots to perform the actual full and differential backups at the storage layer..
- Suspend the database with ALTER command, that provides opportunity to perform snapshot of storage.
ALTER DATABASE testdb1 SET SUSPEND_FOR_SNAPSHOT_BACKUP = ON;2. Create snapshots on FSxN for the data and log volumes. As we have the data and log files hosted on testdb1_Data and testdb1_Log volumes respectively, we create snapshots for both volumes by executing the commands below after connecting to FSxN, as illustrated in Figure 3.
volume snapshot create -vserver SQL_Cluster -volume testdb1_Data -snapshot testdb1_Check1
volume snapshot create -vserver SQL_Cluster -volume testdb1_Log -snapshot testdb1_Check1
3. Record the backup from T-SQL (metadata only). On completion, this will also unquiesce database and resume operations.
BACKUP DATABASE testdb1 TO DISK = 'D:\mssql\backup\testdb1.bkm' WITH METADATA_ONLY, FORMAT;In case the backup fails at snapshot or other step, you can resume the database and retry the entire process at a later time.
ALTER DATABASE testdb1
SET SUSPEND_FOR_SNAPSHOT_BACKUP = OFF;
B. Backup operation for multiple user databases sharing the same data and log volumes
When backing up a group of user databases, it’s important to suspend all participating databases and create snapshots of the volumes hosting their data and log files. Having separate LUN or volume ensures recovery independent of other databases. For databases that share the same underlying disk infrastructure (volume or LUN), it’s best to perform backups as a coordinated group to ensure consistency across all affected databases. In this blog we are using separate volumes for each database. We are using testdb1 and testdb2 as sample database names.
1.Suspend the databases with ALTER command, before performing snapshot of storage.
ALTER SERVER CONFIGURATION
SET SUSPEND_FOR_SNAPSHOT_BACKUP = ON
(GROUP = (testdb1, testdb2));
2. Create volume snapshots for all the volumes hosting this group of databases by executing the commands below after connecting to FSxN, as illustrated in Figure 3.
volume snapshot create -vserver SQL_Cluster -volume testdb1_data -snapshot testdb_Check1
volume snapshot create -vserver SQL_Cluster -volume testdb1_log -snapshot testdb_Check1
volume snapshot create -vserver SQL_Cluster -volume testdb2_data -snapshot testdb_Check1
volume snapshot create -vserver SQL_Cluster -volume testdb2_data -snapshot testdb_Check1
- Alternately, create a consistency group snapshot on the consistency group containing volumes hosting these databases on FSx for ONTAP.
vserver consistency-group snapshot create -vserver SQL_Cluster -consistency-group testgroup -parent-consistency-group MSSQL -snapshot testdb_Check1
3. Record the backup for the Group of databases with T-SQL.
BACKUP GROUP testdb1, testdb2
TO DISK = 'D:\mssql\backup\testdb_Check1.bkm'
WITH METADATA_ONLY, FORMAT;
In case the backup fails at snapshot or other step, you can resume the database and retry the entire process at a later time
ALTER SERVER CONFIGURATION
SET SUSPEND_FOR_SNAPSHOT_BACKUP = OFF
(GROUP = (testdb1, testdb2));
C. Backup all user databases on the Server
To backup whole server, all user databases on the server need to be suspended and storage snapshots need to be captured for all the SQL volumes for the server. When there are multiple volumes, having a consistency group ease taking snapshot.
- Suspend all databases on the server to prepare for backup.
ALTER SERVER CONFIGURATION SET SUSPEND_FOR_SNAPSHOT_BACKUP = ON;2. Create snapshots for all volumes hosting the SQL databases on server. Alternately, you can create snapshot for the parent consistency group on FSxN that includes all the SQL volumes by executing the commands below after connecting to FSxN, as illustrated in Figure 3.
vserver consistency-group snapshot create -vserver SQL_Cluster -consistency-group MSSQL -snapshot mssql_Check1
3.Record the server backup
BACKUP SERVER TO DISK = 'D:\mssql\backup\mssql_Check1.bkm' WITH METADATA_ONLY, FORMAT;In case if the backup fails at any step (snapshot or otherwise) you can resume the database and retry the entire process later.
ALTER SERVER CONFIGURATION
SET SUSPEND_FOR_SNAPSHOT_BACKUP = OFF;
Note: If you would like to automate the backup solution you can use this PowerShell script.
Considerations/Best Practices
- Though the steps in this document follow the best practice of using separate data and log volumes for databases, the process also works if both data and log files reside on the same volume.
- Separate the backup disk from the data disk is important because the metadata for the database backup is written after the volume snapshot, and this metadata is required during restore operations.
- The snapshot process on FSxN is instantaneous, regardless of volume size or system activity, offering significant time and processing advantages over traditional full database backups.
- FSxN snapshot restore is also faster, making the overall database restore process faster.
- If multiple databases are sharing same volume without being segregated in to separate LUNs, restore operation will affect all the databases hosted on the LUN. All databases will be restored to same point. It is always recommended to separate the production databases into independent LUNs/disks.
- This snapshot-based backup approach, combined with T-SQL, replaces the need for full and differential backups, while transaction log backups continue to follow the traditional method.
Clean Up
It is a best practice to delete resources that you are no longer using so that you do not incur unintended charges. You can clean up the following resources you created for this tutorial:
Conclusion
In this post, we demonstrated how to use T-SQL commands in conjunction with Amazon FSx for NetApp ONTAP snapshots to perform application consistent backups for SQL Server 2022. We also recommend having a look at Protect your SQL Server workloads using NetApp SnapCenter with Amazon FSx for NetApp ONTAP. We talked about how to achieve protection across SQL versions using SnapCenter, which also provides more granular control in defining backup policies.
AWS can help you assess how your company can get the most out of cloud. Join the millions of AWS customers that trust us to migrate and modernize their most important applications in the cloud. To learn more on modernizing Windows Server or SQL Server, visit Windows on AWS. Contact us to start your migration journey today.
AWS has significantly more services, and more features within those services, than any other cloud provider, making it faster, easier, and more cost effective to move your existing applications to the cloud and build nearly anything you can imagine. Give your Microsoft applications the infrastructure they need to drive the business outcomes you want. Visit our .NET on AWS and AWS Database blogs for additional guidance and options for your Microsoft workloads. Contact us to start your migration and modernization journey today.