Migration & Modernization
Simplify server migration to AWS with AWS Transform for VMware
NOTE: AWS Application Discovery Service is no longer open to new customers. Alternatively, use AWS Transform discovery tool or partner supported tool which provides similar capabilities. AWS Transform for VMware added new agentic AI capabilities for enterprise VMware migrations. Learn more about AWS Transform’s new experience.
Organizations migrating VMware workloads to AWS without specialized tools face numerous complex challenges that create significant business risk and operational overhead. Teams must spend weeks or months manually mapping dependencies, often missing critical application connections and struggling to determine optimal migration strategies. The traditional approach leaves organizations with limited visibility into compatibility issues, no clear way to predict AWS resource requirements, and high risk of extended downtime during migrations. These manual processes require deep expertise across multiple domains, consume significant staff resources, and provide no mechanisms to learn from previous migration experiences. AWS Transform for VMware eliminates these pain points through AI-powered automation and orchestration, automatically handling dependency mapping, determining optimal migration paths, and managing the entire migration process while minimizing risks. Its intelligent system learns from each migration, continuously improving outcomes while reducing the operational burden on IT teams, enabling organizations to accelerate their cloud transformation journey with confidence.
A common misconception is that AWS Transform’s capabilities are limited to VMware environments. Its core features – particularly AI-based network dependency mapping and automated wave planning – work effectively across various source infrastructures. Organizations can leverage these powerful automation capabilities regardless of their original environment, making it especially valuable for businesses struggling with application dependency discovery and server relationship mapping across any infrastructure type.
This blog explores how AWS Transform for VMware serves as a comprehensive solution for migrating virtual machines from various platforms like Oracle VirtualBox, Microsoft Hyper-V or other cloud providers to Amazon Web Services (AWS). I will demonstrate practical examples of cross-platform Virtual Machine (VM) migration, covering the step-by-step process, best practices, and key considerations for successful migration projects, including assessment planning, compatibility requirements, and network configurations. The article provides IT professionals and decision-makers with insights into streamlining their cloud migration journey while ensuring minimal business disruption, complete with real-world use cases of migrating workloads from any source platform to AWS with AWS Transform for VMware.
Solution Overview
The solution utilizes AWS Transform for VMware to perform the end-to-end migration of source Virtual Machines (VMs) to Amazon EC2 instances. AWS Transform will use Application Discovery Service (ADS) agents to perform the discovery along with automated inventory and dependency mapping for wave planning. For the migration phase, it will utilize AWS Application Migration service (MGN) agent for block level replication to Amazon EBS volumes which is utilized to launch the target Amazon EC2 instances. I will walk through the steps for AWS MGN Connector which is used for the automated Agent deployment to the source servers for replication. AWS Transform can be initialized from a centralized account which serves as a migration planning account with a connector to a different source discovery account and target account for migrated EC2 instances. The following architecture diagram shows the components involved in this migration:
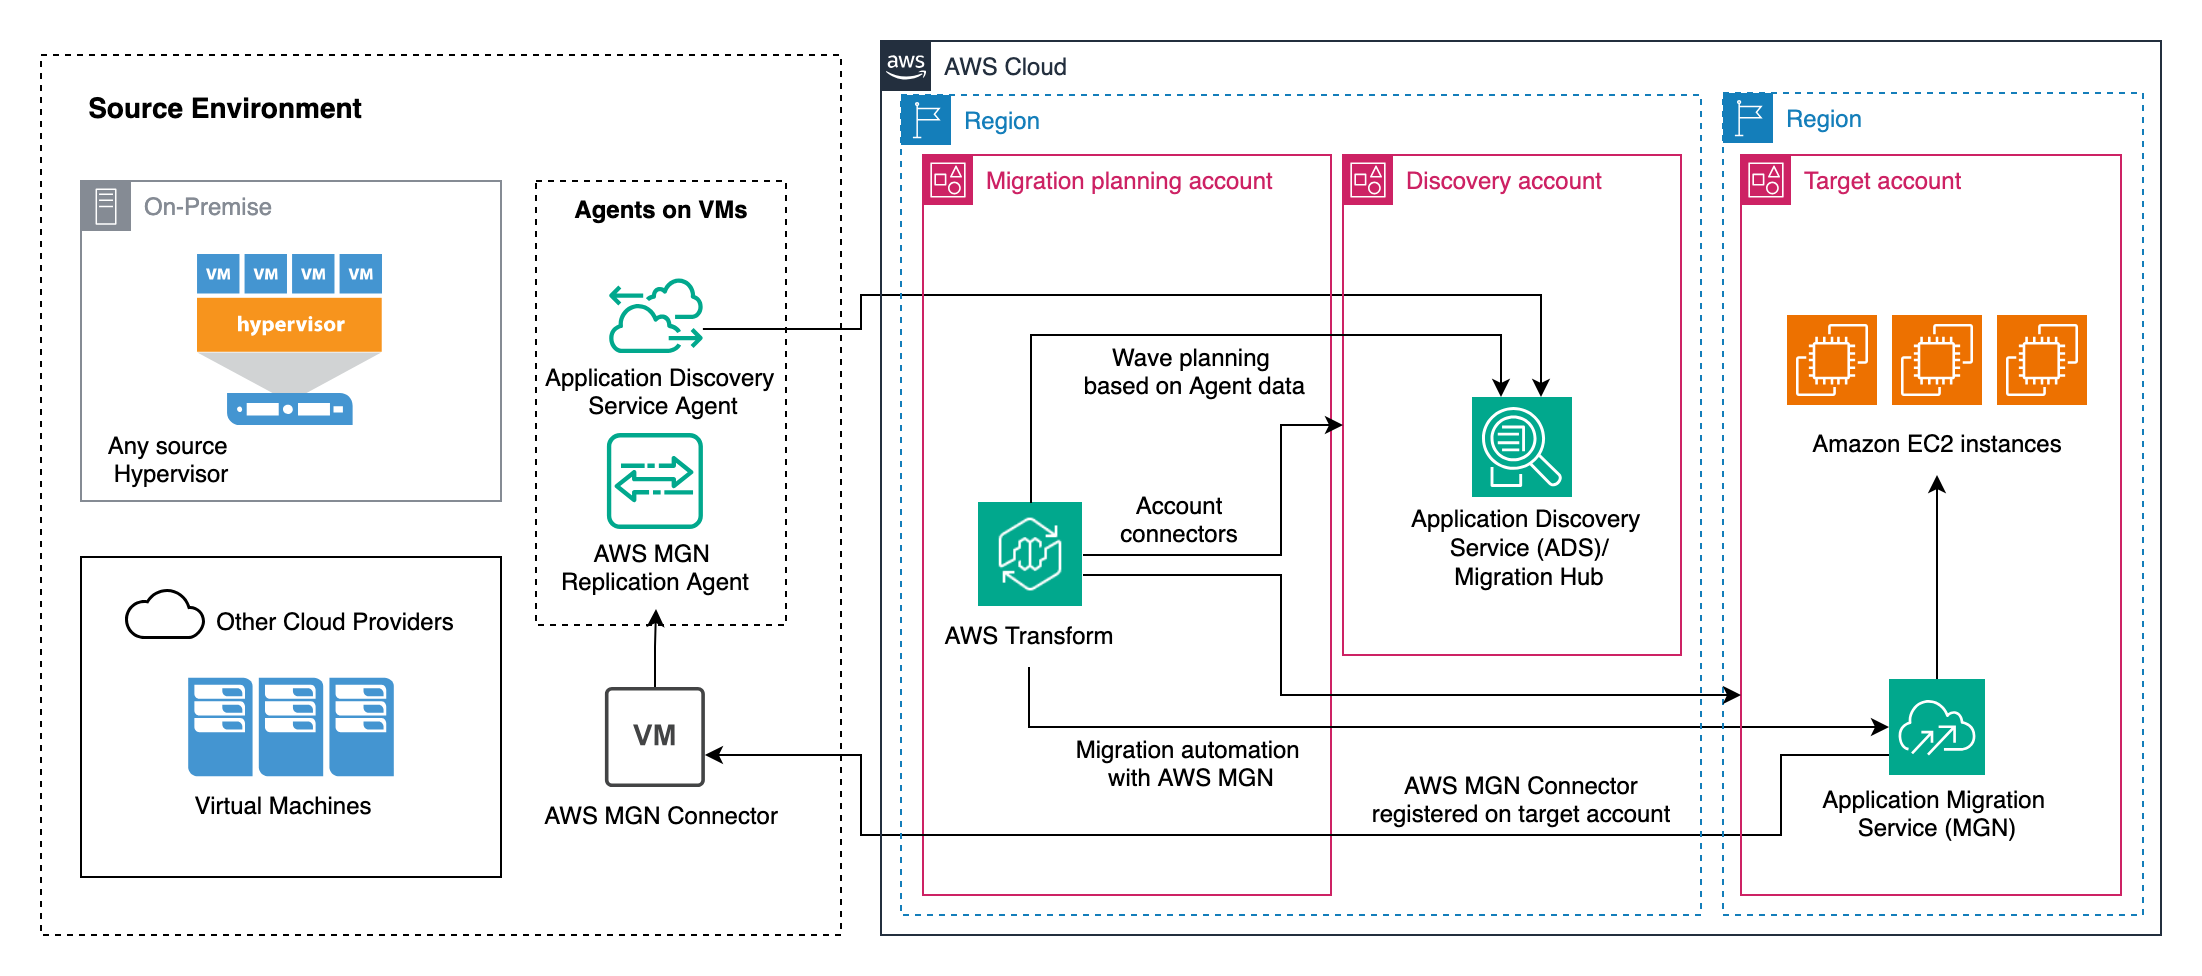
Figure 1: Architecture diagram
Prerequisites
- AWS Accounts:
- Discovery account – Stores the source infrastructure discovery information.
- Migration planning account – Serves as the control center for migration activates and orchestration. AWS Transform runs on this account.
- Target account – Destination account for your migrated workloads.
For enterprise scale migrations, it is recommended to have different accounts for each specific purpose as described above; however, you can also choose to combine functions into a single or a two-account setup. All accounts must be part of the same AWS Organization.
- Network connectivity from source to AWS (VPN, Direct Connect or internet)
- Set up AWS Migration Hub home region on the discovery account. This must be the same region as AWS Transform for VMware.
- IAM Identity center setup
Workflow
For this solution, I will walk through the step-by-step process for migrating source VMs to Amazon EC2 instances. Similar steps can be followed to migrate from any source platform or other cloud providers to Amazon EC2. The high-level steps are:
- Install ADS agent on source servers
- Set up AWS MGN connector (optional)
- Target VPC/Subnet setup
- Enable AWS Transform
- Create and run migration job
- Migrate, launch test and cutover instances
Application Discovery Service (ADS) agent installation
To begin with, you must install the ADS agent on the source servers for automated dependency mapping and wave planning. ADS agents ping Application Discovery Service at 15-minute intervals for the configuration information. For the installation, create an IAM user with permissions to install the agent and communicate to the ADS service. This must be performed on the discovery account.
Create an IAM user
- Navigate to IAM console and choose user. Choose Create user.
- Specify the username such as ads_agent and choose next.
- In the Set permissions page, choose Attach policies directly.
- Filter and choose AWSApplicationDiscoveryAgentAccess policy and choose Next.
- Choose Create user.
- Choose the created user ads_agent and navigate to Security credentials tab.
- Scroll down to Access keys (0) and chose Create access key.
- Choose Other and Next.
- On Set description tag page, enter the optional description such as “ADS Agent user keys”.
- Choose Create access key and Download .csv file. Store the file in a secure place.
Install the Agent:
- Connect to your source VMs over SSH (Linux) or RDP (Windows).
- Download and install the agent with the following commands. Replace the
regionwith your home region,aws-access-key-idandaws-secret-access-keywith the keys of the user created in the previous step.
Commands for Linux:
curl -o ./aws-discovery-agent.tar.gz https://s3-region.amazonaws.com/aws-discovery-agent.region/linux/latest/aws-discovery-agent.tar.gz
tar -xzf aws-discovery-agent.tar.gz
sudo bash install -r region -k aws-access-key-id -s aws-secret-access-key
Commands for Windows:
[Net.ServicePointManager]::SecurityProtocol = [Net.SecurityProtocolType]::Tls12
Invoke-WebRequest https://s3.region.amazonaws.com/aws-discovery-agent.region/windows/latest/AWSDiscoveryAgentInstaller.exe -OutFile c:\AWSDiscoveryAgentInstaller.exe -UseBasicParsing
cd 'C:\'
.\AWSDiscoveryAgentInstaller.exe REGION="region" KEY_ID="aws-access-key-id" KEY_SECRET="aws-secret-access-key" /quiet
The following screenshot shows the example ADS agent installation on source VM:
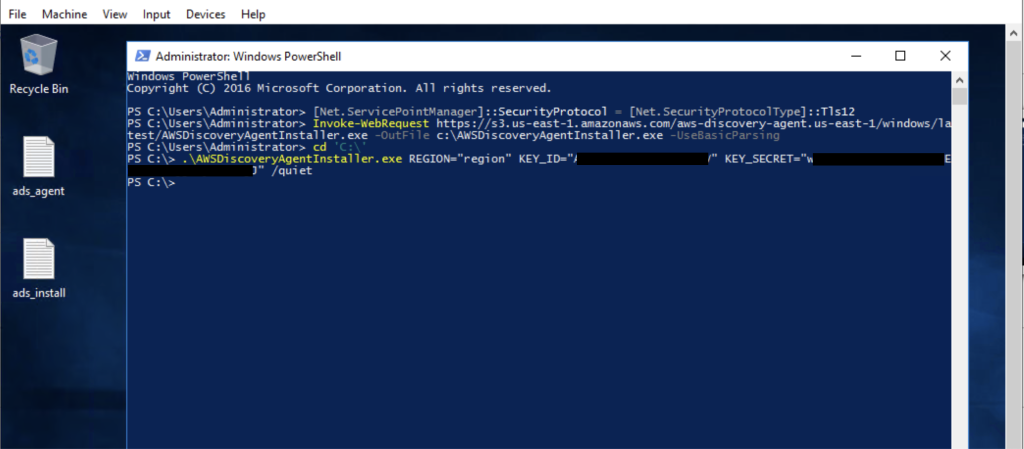
Figure 2: Installation on source virtual machine
Alternatively, consider using any automation tool such as Tanium, SCCM or scripts (deployed via GPO for Windows) to perform the installation of the agent on source machines. Once the agent is installed, the servers will appear on the AWS Migration Hub console, under the Discover section.
AWS MGN Connector Setup
To automate the installation of AWS MGN replication agent across multiple source servers, you can set up AWS MGN Connector. AWS MGN Connector is a VM running on the source environment which is registered to AWS with Systems Manager (SSM) hybrid registration and the AWS MGN connector software installed. This is a one-time task per source environment, and the connector is utilized to install AWS MGN agent on various source servers for different migration jobs.
You can opt to install the AWS MGN agent manually later during the migration instead of following these steps. For automation with AWS Transform, this must be deployed on the target account where the servers are migrated to EC2 instances. AWS MGN Connector deployment consists of following steps:
- Deployment of source VM
- Create IAM roles
- Create SSM Hybrid activation
- Generate temporary credentials for IAM roles
- Create AWS MGN Connector
- Register source server credentials
Source VM as AWS MGN Connector:
- Deploy a VM on your source environment in one of the following Linux flavors
- Ubuntu 18.x+ (64 bit) – 22.04 (x86_64)
- Amazon Linux 2 (x86_64)
- RHEL 8.x (x86_64)
- Allow network connectivity from this VM to the other source machines over port 22 (SSH) for Linux and port 5985/5986 (WinRM) for Windows.
- WinRM service must be configured and running on Windows source machines.
Create IAM roles
For the AWS MGN Connector, the following roles are required:
- MGNConnectorInstallerRole – Role to install the AWS MGN Connector
- AWSApplicationMigrationConnectorManagementRole – Role for AWS MGN Connector to assume
- AWSApplicationMigrationConnectorSharingRole_<ACCOUNT_ID> – Role to allow AWS MGN agent installation
The following CloudFormation template installs all the mentioned roles including the role to allow AWS MGN agent installation on the target account. To deploy the AWS MGN connector roles and the connector sharing role in different accounts, please follow the setup instructions.
- Download the CloudFormation template from the GitHub respository and deploy the Stack.
- In the parameters area, enter the following parameters:
- In AccountID, enter the target Account-ID
- In MGNConnectorInstallerRoleName, enter the user role that serves as the trusted entity to assume the MGNConnectorInstallerRole and install the connector.
- In S3LogsBucket, enter the S3 bucket to output the logs. Leave the field blank for no logging setup.
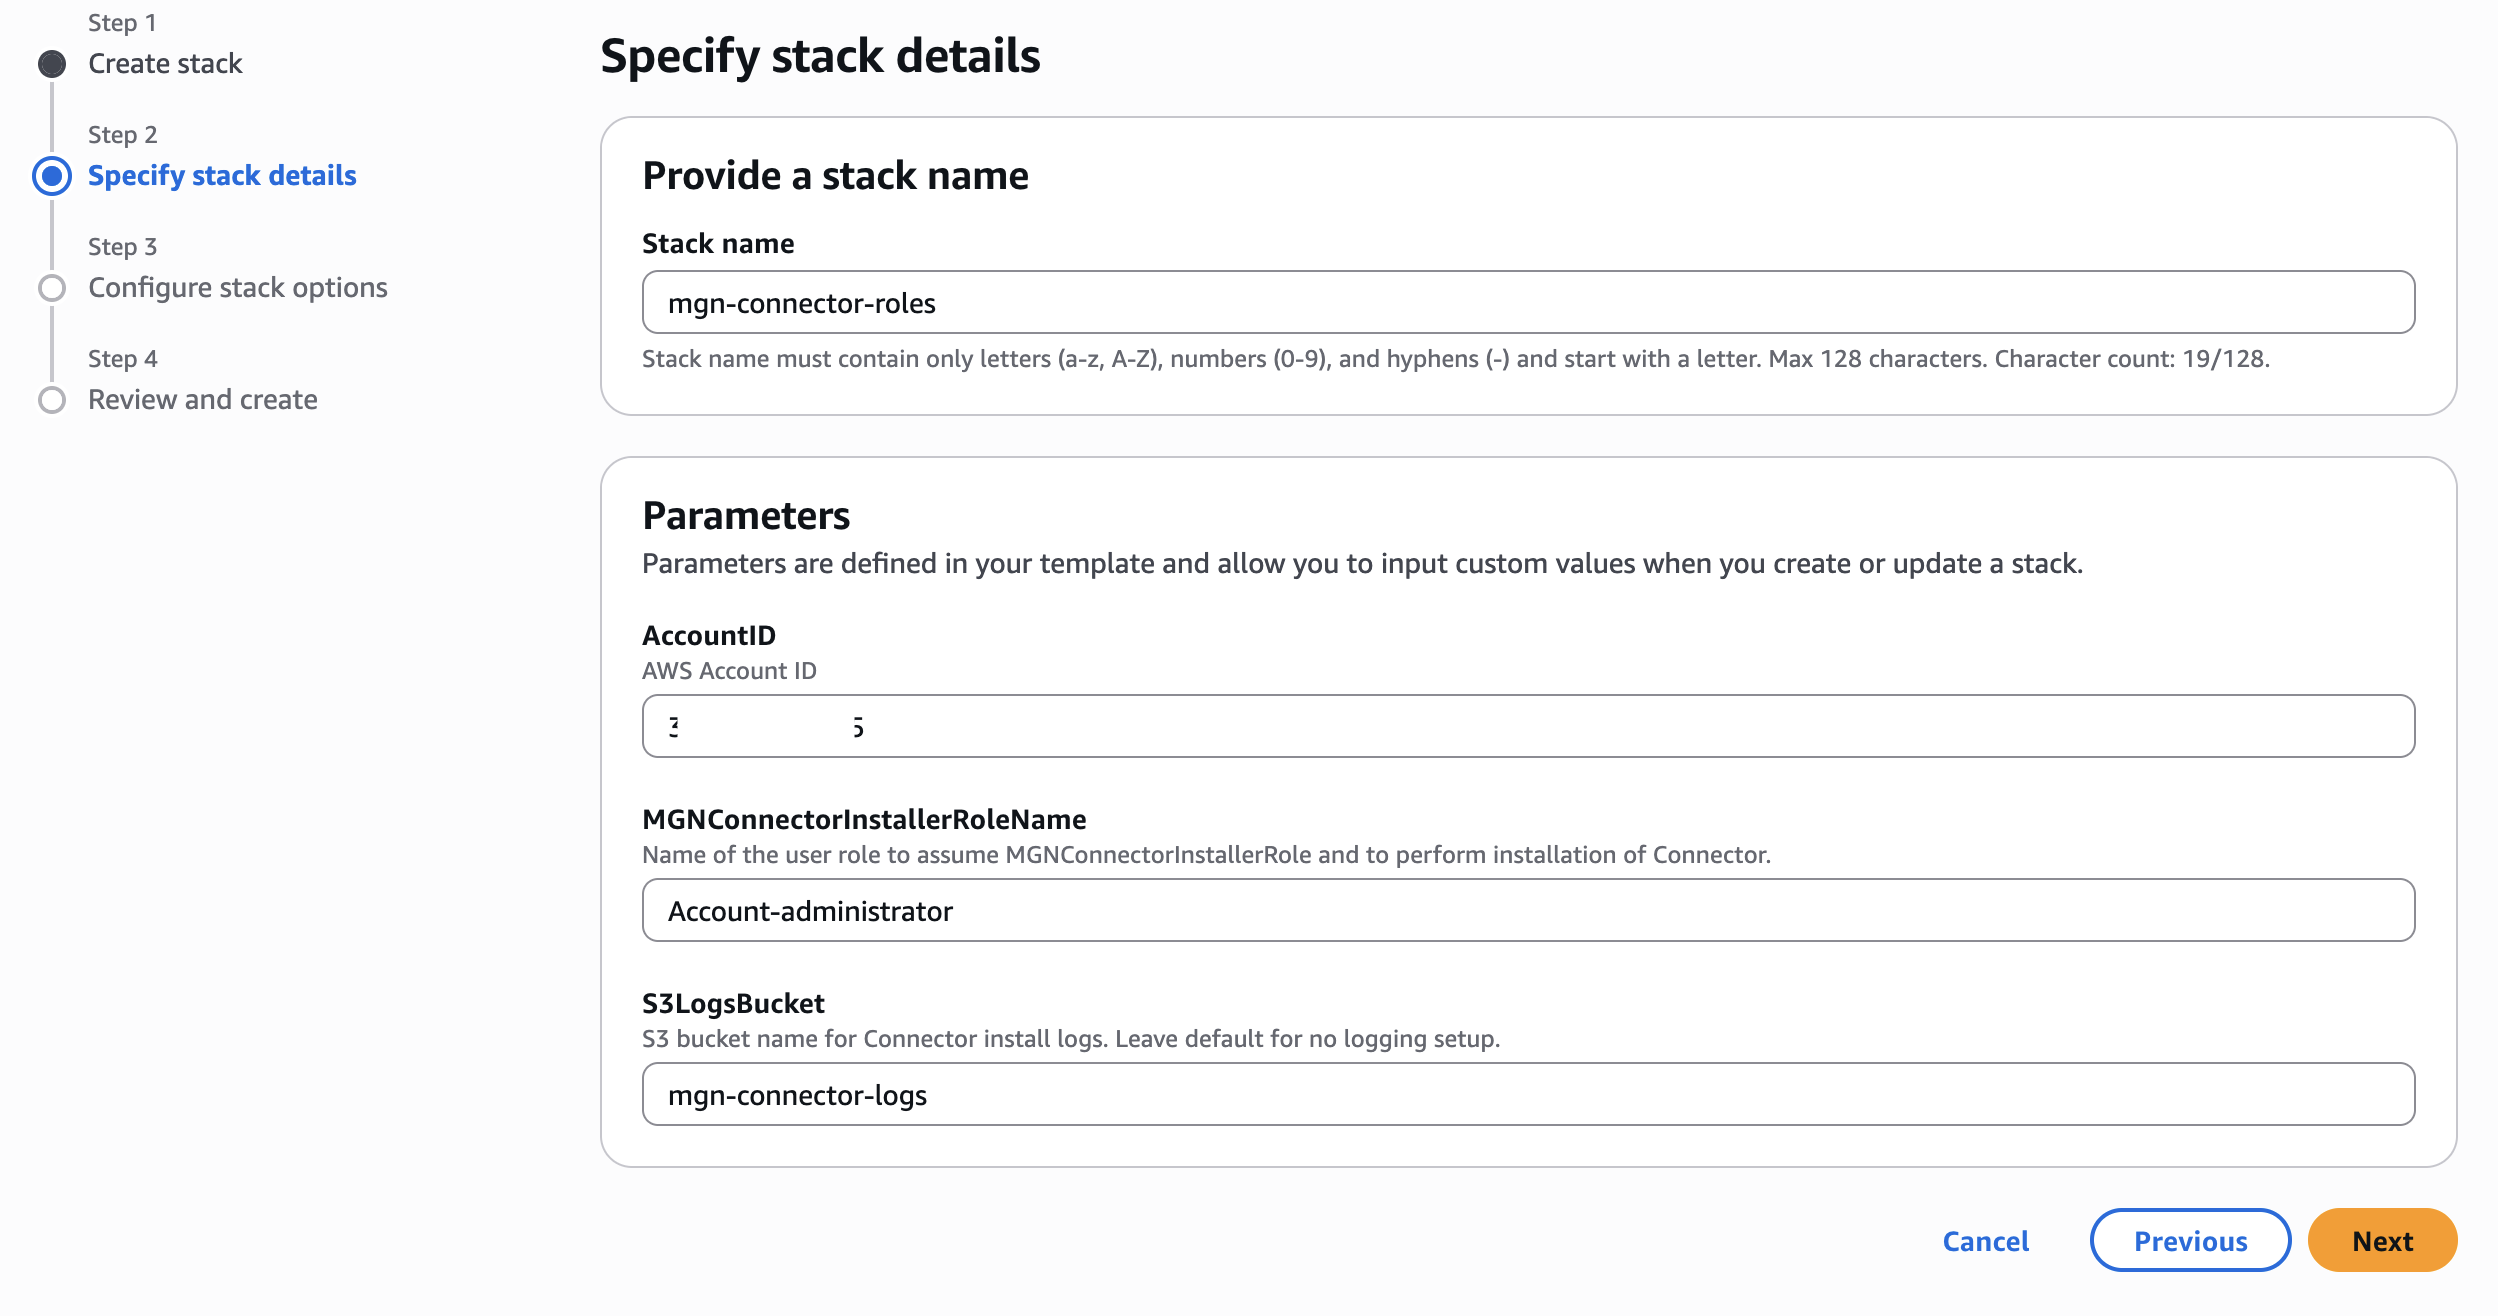
Figure 3: CloudFormation Template Parameters
After the CloudFormation deployment, add sts:AssumeRole permissions to the role mentioned on the CloudFormation for MGNConnectorInstallerRoleName as described below:
{
"Action": "sts:AssumeRole",
"Resource": "arn:aws:iam::*:role/MGNConnectorInstallerRole",
"Effect": "Allow"
},
If the AWS MGN Connector is managing the source servers from multiple accounts, you must setup the MGN global view feature and deploy the roles with the CloudFormation StackSets.
Create SSM Hybrid activation
Create the SSM hybrid activation for the AWS MGN connector with the following commands from CloudShell or AWS CLI:
Make note of the ActivationId and the ActivationCode from the command output. Alternatively, you can create this from the AWS Systems Manager console.
Generate the temporary credentials
To install the AWS MGN Connector, you must generate the temporary session credentials for MGNConnectorInstallerRole role. While authenticated with the role mentioned on MGNConnectorInstallerRoleName, run the following command from CloudShell or AWS CLI:
NOTE: Replace the ACCOUNT-ID with your account id.
Make note of the AccessKeyId, SecretAccessKey and SessionToken from the command output. The generated session keys are valid for 60 minutes by default and the next step to install AWS MGN connector must be completed before expiration of credentials.
Create AWS MGN Connector
Follow the steps to generate the AWS MGN connector commands from AWS console:
- Navigate to Application Migration Service (MGN)
- Select Get Started and Set up service to initialize the service.
- Navigate to MGN connectors from the left pane
- Choose Add MGN connector
- Enter the connector name, such as my-connector
- Under SSM hybrid activation credentials, enter the
ActivationIdandActivationCodeobtained from the hybrid activation command output. - Under IAM credentials, enter the
AccessKeyId,SecretAccessKeyandSessionTokengenerated in the previous step.
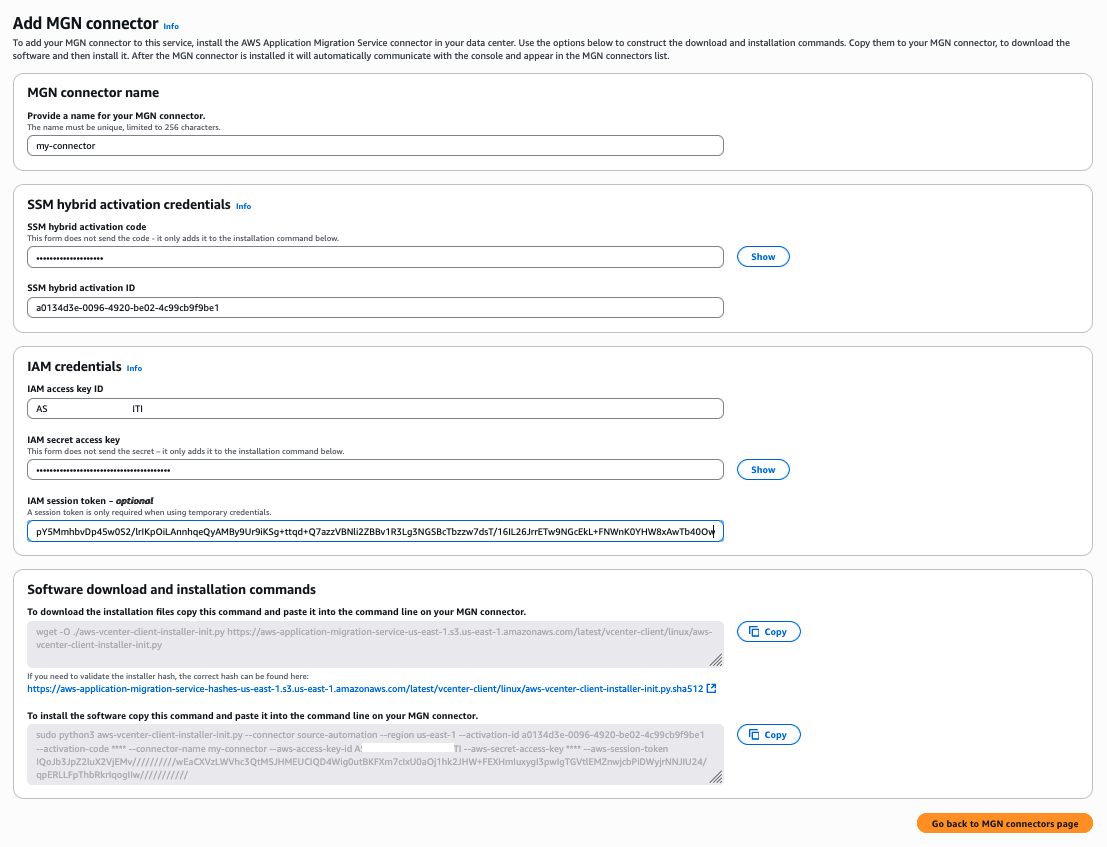
Figure 4: Create AWS MGN connector console
This will generate the software download and installation commands. Make note of the commands and connect to your source VM which is deployed for AWS MGN connector. Run the command to download the installation files and then to install the software. Once the installation is complete, you will see the connector on the AWS MGN Connectors console.
Register server credentials
To perform AWS MGN agent installation on the source servers, you must store the source server credentials in the AWS Secrets Manager. Windows and Linux credentials are stored as key value pairs in the Secrets Manager which is used by AWS MGN Connector to connect to your source servers for AWS MGN agent installation.
- Navigate to Secrets Manager
- Chose Store a new secret and select Other type of secret
- In the Key/value pairs, choose Plaintext
- Copy and paste the following key/value pairs:
{
    “WinConnectionProtocol”:”HTTPS”,
    “WinUserName”:”windows_username”,
    “WinPassword”:”windows_password”,
    “WinCertificateAuthority”:””,
    “WinCaValidation”:false,
    “LinuxUserName”:”linux_username”,
    “LinuxPassword”:”linux_password”,
    “LinuxPrivateKey”:”linux_private_key”,
    “LinuxHostKey”:”linux_host_key”,
    “LinuxHostKeyValidation”:false
}- Update the values as required for your source environment:
- WinConnectionProtocol – set as HTTP or HTTPS as per your WinRM configuration in source windows machines. HTTPS is recommended.
- windows_username – username to connect to your windows machines.
- windows_password – password to connect to your windows machines.
- WinCertificateAuthority and WinCaValidation – set if CA validation is enabled.
- LinuxUserName – username to connect to your Linux machines.
- LinuxPassword – password to connect to your Linux machines for password-based authentication. Ignore if private key is used.
- LinuxPrivateKey – private key to connect to your Linux machines for key-based authentication. Ignore if password is used.
- LinuxHostKey and LinuxHostKeyValidation – set if configured in your source environment.
NOTE: Following is a sample python script to extract private key from the pem file:
import base64
pkey = base64.b64encode("""<Copy PEM contents including begin lines>""".encode()).decode()
print(pkey)- Choose Next.
- Under Secret name and description, enter a secret name, such as mgn-source-credentials.
- Under Tags – optional, choose Add and enter the Key as AWSApplicationMigrationServiceManaged and no value. Choose Next.
- Choose Next and Store.
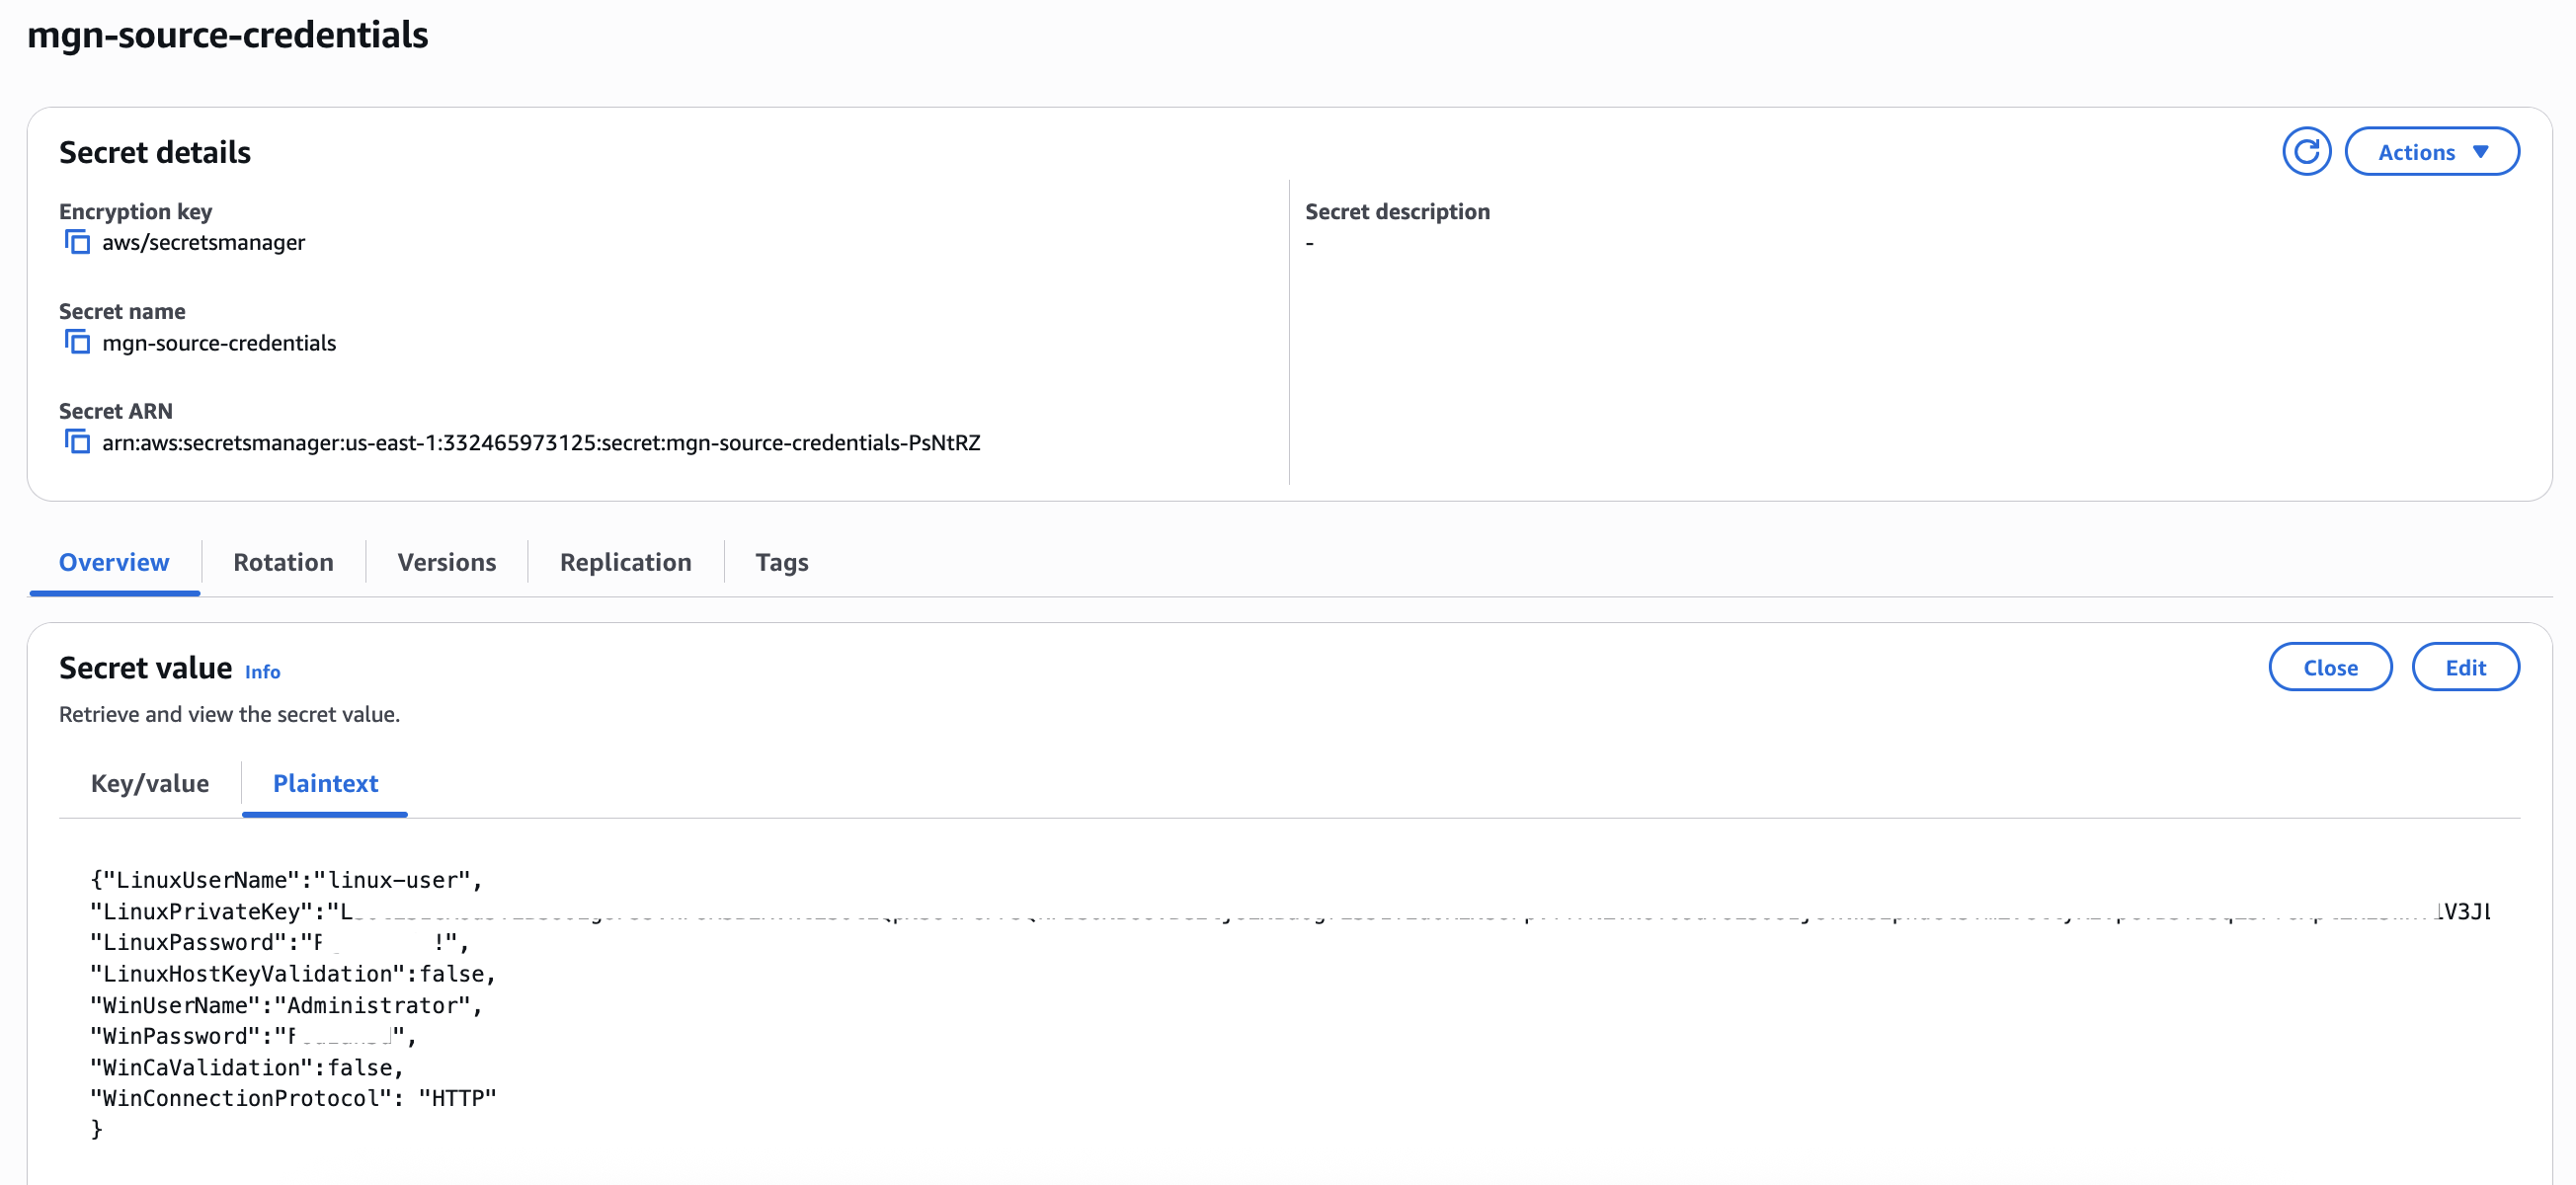
Figure 5: AWS Secrets Manager Secret
Target network/VPC setup
In AWS Transform, there are the following options to choose for target infrastructure:
- Convert existing on-premises network and deploy to target account using AWS Transform.
- Utilize existing VPC/subnet on the target account with same or different CIDR range.
In this blog, we will utilize existing VPC/subnet on the target account. Create the target VPC and subnets for the staging area and migrated EC2 instances. You can also consider using an existing VPC/subnet. Allow network connectivity between the source environment and the staging area as required by AWS MGN service.
Enable AWS Transform
NOTE: Ensure to have the IAM user/role, permissions to perform actions on AWS Transform as described here.
Follow the steps to enable AWS Transform and create a user in the migration planning account:
- In AWS Console, navigate to AWS Transform.
- Choose Get started.
- Choose the Encryption key and select Enable AWS Transform.
- Choose Manage users and choose Assign users or groups.
- Choose Add and assign new users. If you have users created in IAM identity center, choose Assign existing users and groups.
- Choose Next and enter the user details and a valid email address.
- Choose Next and Add to add the user. Choose Assign to assign the user to AWS Transform.
- Verify the email received and create the password for the user.
- Navigate to Settings from the left pane and copy the Web application URL.
- On a new browser tab/window, paste and navigate to the URL to open the AWS Transform Workspace.
Create and run migration job
Follow the steps to create a discovery and server migration job from AWS Transform web application console.
- On the home page, choose Create a workspace.
- Choose Edit to edit the name and set a name, such as server-migration.
- From the chat window, enter the prompt “create a VMware discovery and server migration job with the name server-migration”.
- Verify the details on the response and enter “yes”.
- Choose Create job.
- (Optional) On the step Invite project collaborators, add any IAM identity center users and assign appropriate role, if required. Choose Send to AWS Transform.
- On the Create or select connectors step, enter the discovery account id and region. Choose Next.
- Choose the encryption option for S3 bucket.
- Choose Copy verification link and open the link while logged in from the discovery account to authorize AWS Transform connector.
- Choose Approve to approve the connector creation request. Once approved, navigate to the Transform console and choose Send to AWS Transform.
- On the Perform discovery step, choose Continue to perform the discovery with the Application Discovery agents on source.
- On the Review source data for discovery step, verify the discovered servers. Choose Continue with existing data and Continue.
- AWS Transform analyzes the discovered servers based on the ADS agent data; it generates the wave planning automatically based on the network dependency. The next step is Plan and review migration waves to review and confirm the wave plan. Choose Download file to download the wave planning csv file.
- Extract the zip and open the .csv file. The file contains the generated wave plan in the columns Applications and ApplicationWave. As this is generated by AI, it is recommended to review and confirm the wave plan. If the auto-generated wave plan does not suit your requirement (for any use case such as, to group specific applications or servers together), consider modifying and overwriting the wave plan (example: app1, wave1, app2, wave2). Update the columns with the specific application and wave name for migration. AWS Transform will group the servers as per the wave. Ensure the applications and waves are consistent.

Figure 6: Wave planning file
- After the modifications, save and upload the csv file to AWS Transform.
- On the next step Connect target AWS account, enter the target AWS account id and the region. Choose Next and choose the encryption option for S3 bucket.
- Choose Copy verification link and open the link while logged in from the target account to authorize AWS Transform connector. Choose Approve to approve the connector.
- The next step is to setup AWS MGN service permissions. On the Initiate VM migration step, choose Copy URL to AWS Application Migration Service console and open the AWS MGN console in the target account.
- Initialize the service. You can optionally customize the replication and launch settings for AWS MGN.
- (Optional) If the servers are part of AWS Migration Acceleration Program (MAP), specify the MPE ID.
- On the next step, choose Tag network resources to allow AWS Transform to tag the network resources such as target VPC and subnets to launch the test and cutover instances. This allows AWS Transform to add the following tags:
Key:CreatedForValue:AWSTransform
Key:ATWorkspaceValue:<AWS Transform workspace ID>
Alternatively, you can manually add tags to the target network resources. - AWS Transform will prepare the migration waves.
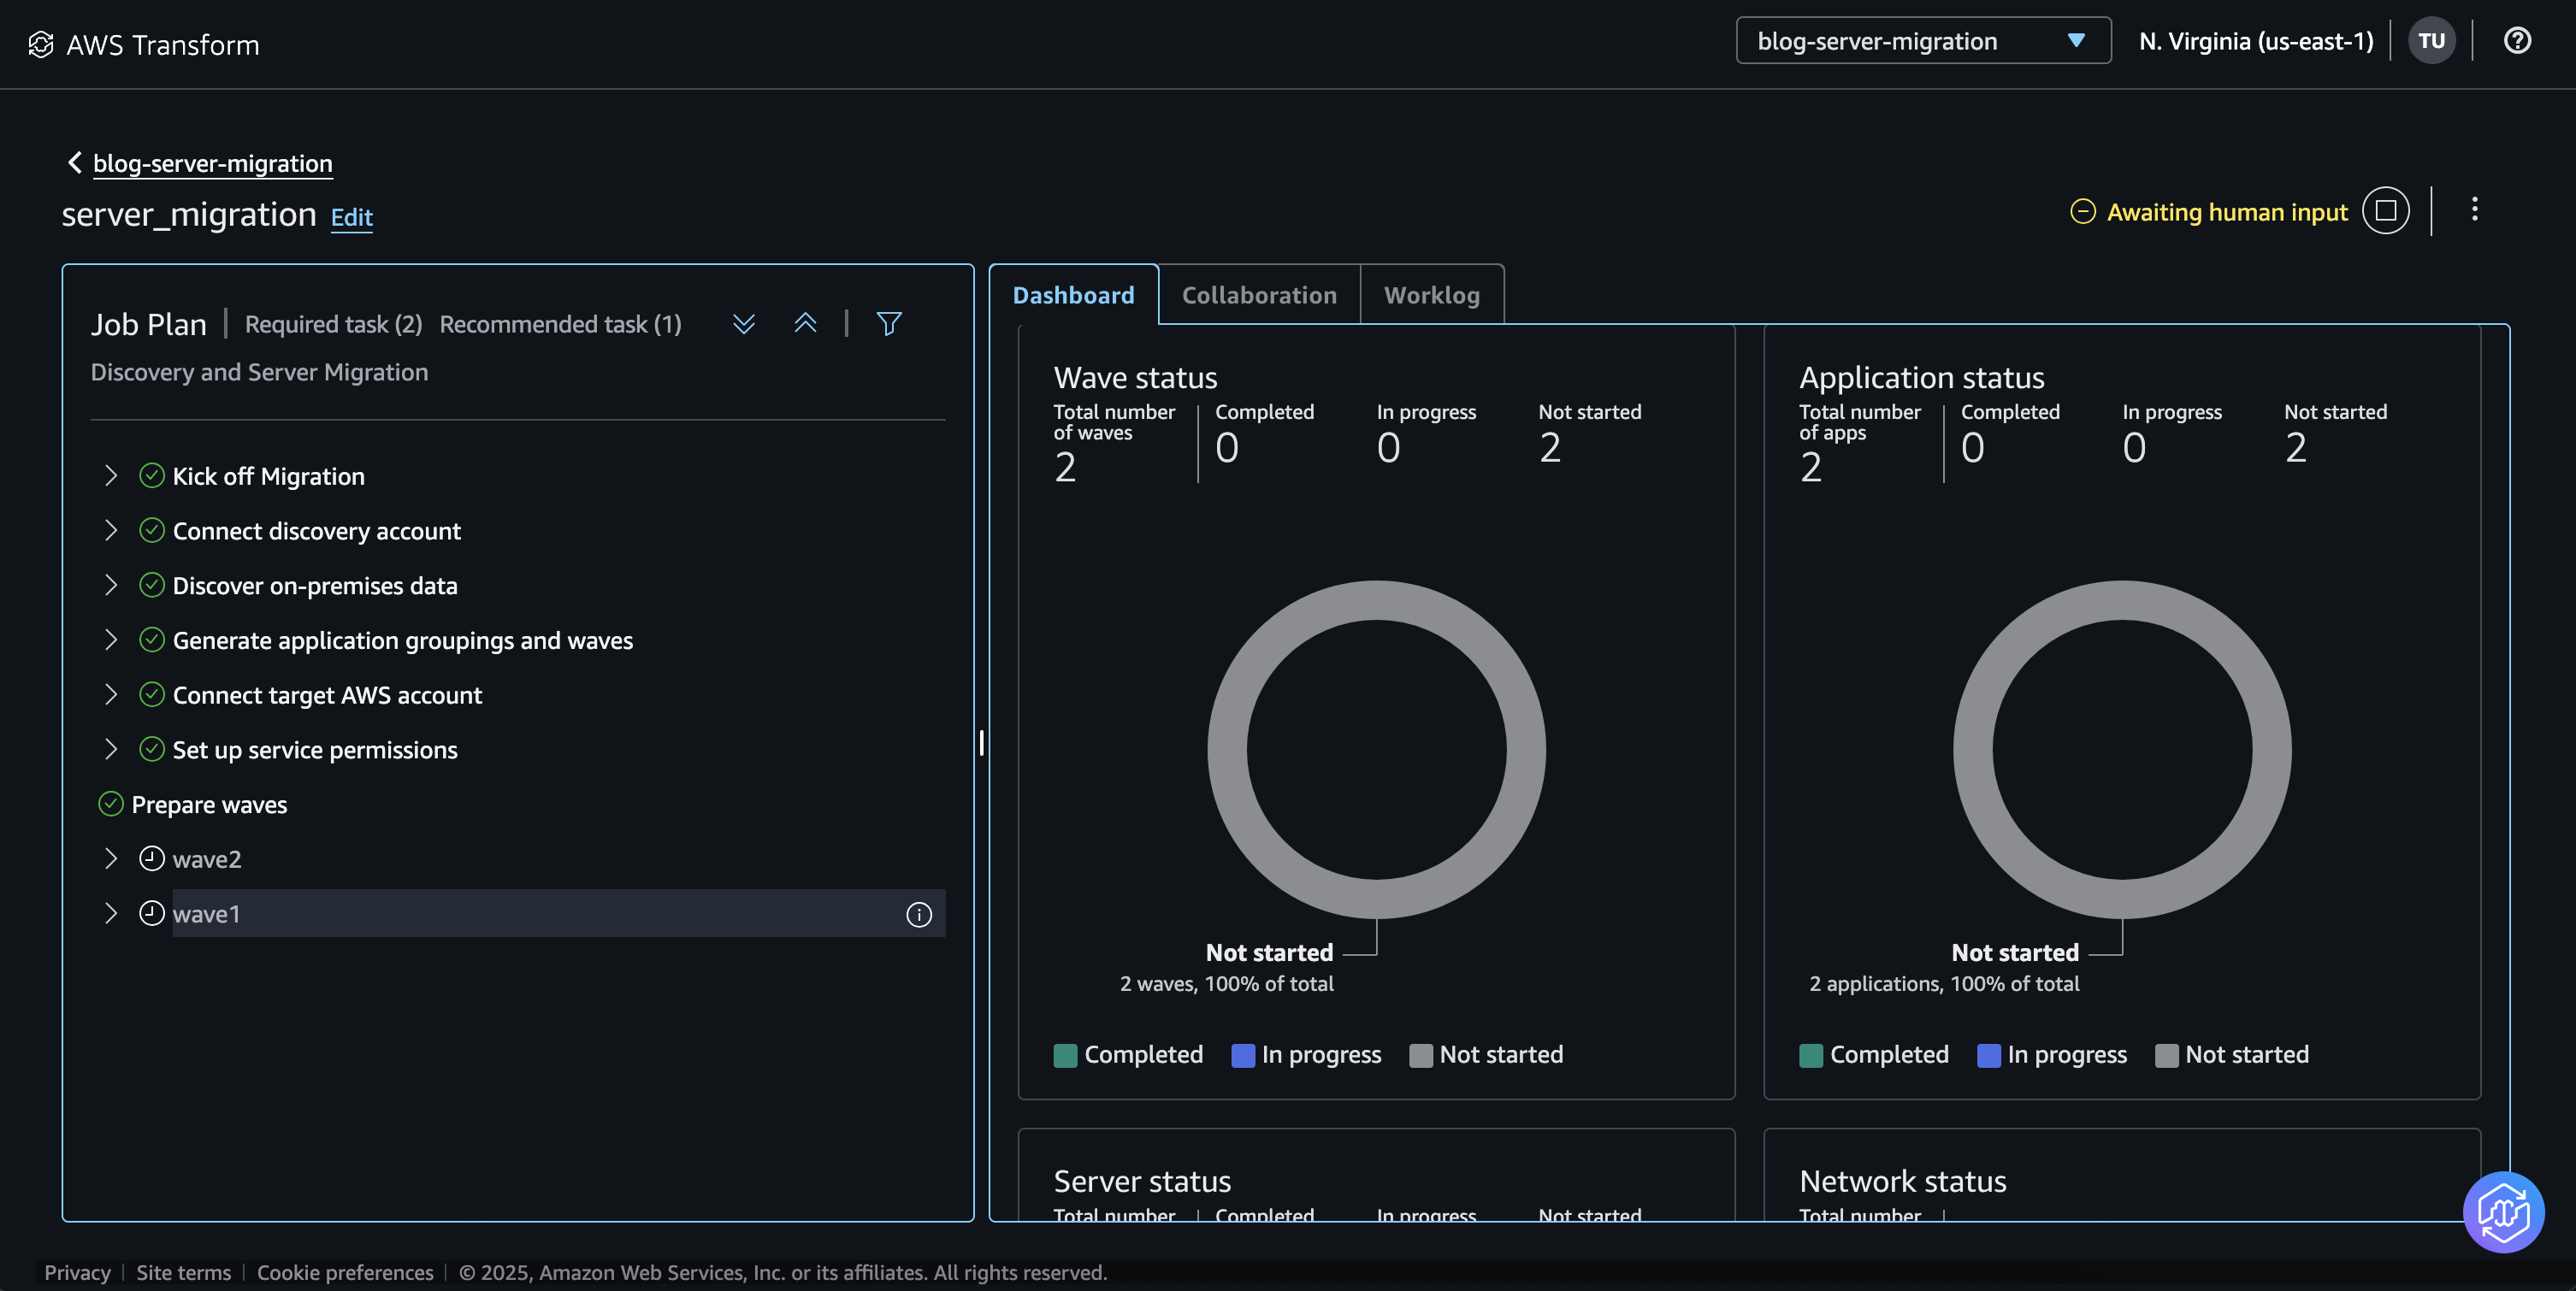
Figure 7: AWS Transform Waves
Migrate, launch test and cutover instances
- On wave1, step Set up migration wave, set the EC2 recommendation preference. AWS Transform utilizes Migration Hub EC2 recommendations.
- Under Staging area subnet, choose the subnet for the migration staging area resources. This is the subnet where AWS MGN Replication Servers will be created to replicate the data from your source servers.
- Under IP assignment, choose Assign a new IP using DHCP to auto assign IP address on the target subnet.
NOTE: If you would like to retain the source server IP, choose Assign a static IP from source server option. For this option, ensure your target VPC/subnet is configured with the same CIDR as source. - Under CPU/RAM sizing, choose the preferred option to determine the right sizing of target EC2 instances.
- (Optional) Under EC2 instance type exclusions, choose the instance type to exclude any specific target instance types.
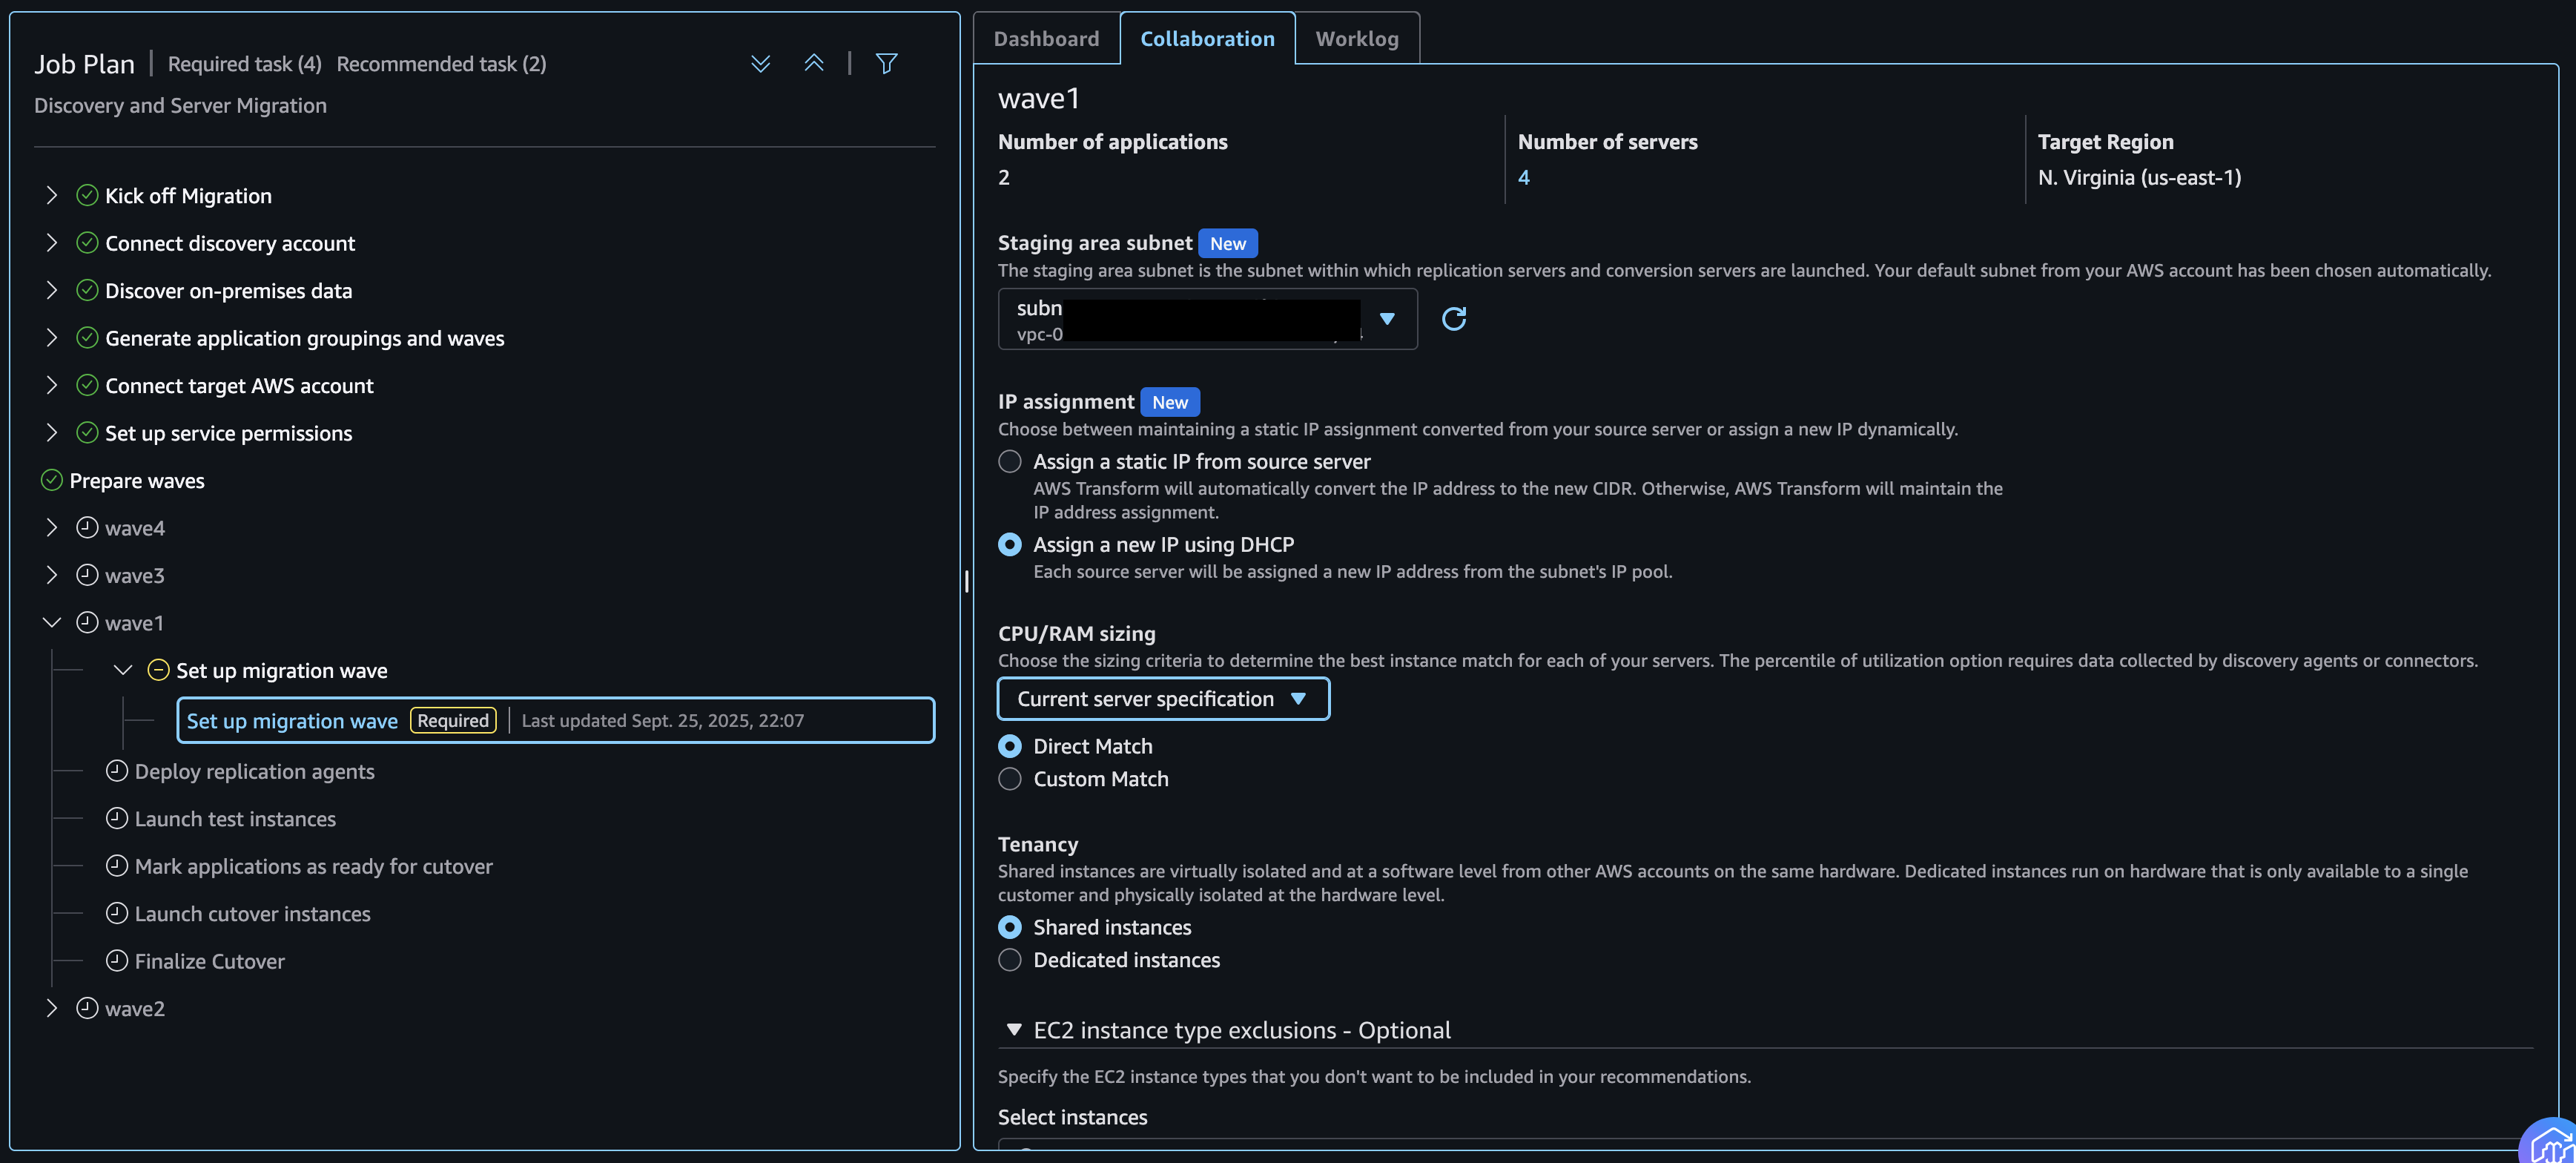
Figure 8: Setup migration waves
- Based on the preference, AWS Transform will select the target EC2 instance type. On the next step Confirm the discovered inventory for wave ‘wave1’, choose Download inventory file.
- Extract the zip file and open the inventory *-subnet_augmented_mgn-inventory.csv. The csv file contains the target account, region and EC2 instance information such as instance type, subnet, security group. Note the column
mgn:launch:nic:0:private-ip:0has[RESET_VALUE]which implies it would utilize DHCP for IP assignment. Do not modify this column.
Verify and update the following columns:
mgn:launch:nic:0:subnet-id– (Required) Add the primary subnet where the target EC2 instances would be launched.
mgn:account-id– (Conditional) If the csv file is opened in MS Excel, verify the Account id format.
You can choose to review other optional columns such as the following:
mgn:launch:nic:0:security-group-id:0– (Optional) Security group for the target EC2.
mgn:launch:instance-type– (Optional) Target EC2 instance type.
Refer to MGN import parameters for additional details on all import parameters and considerations.
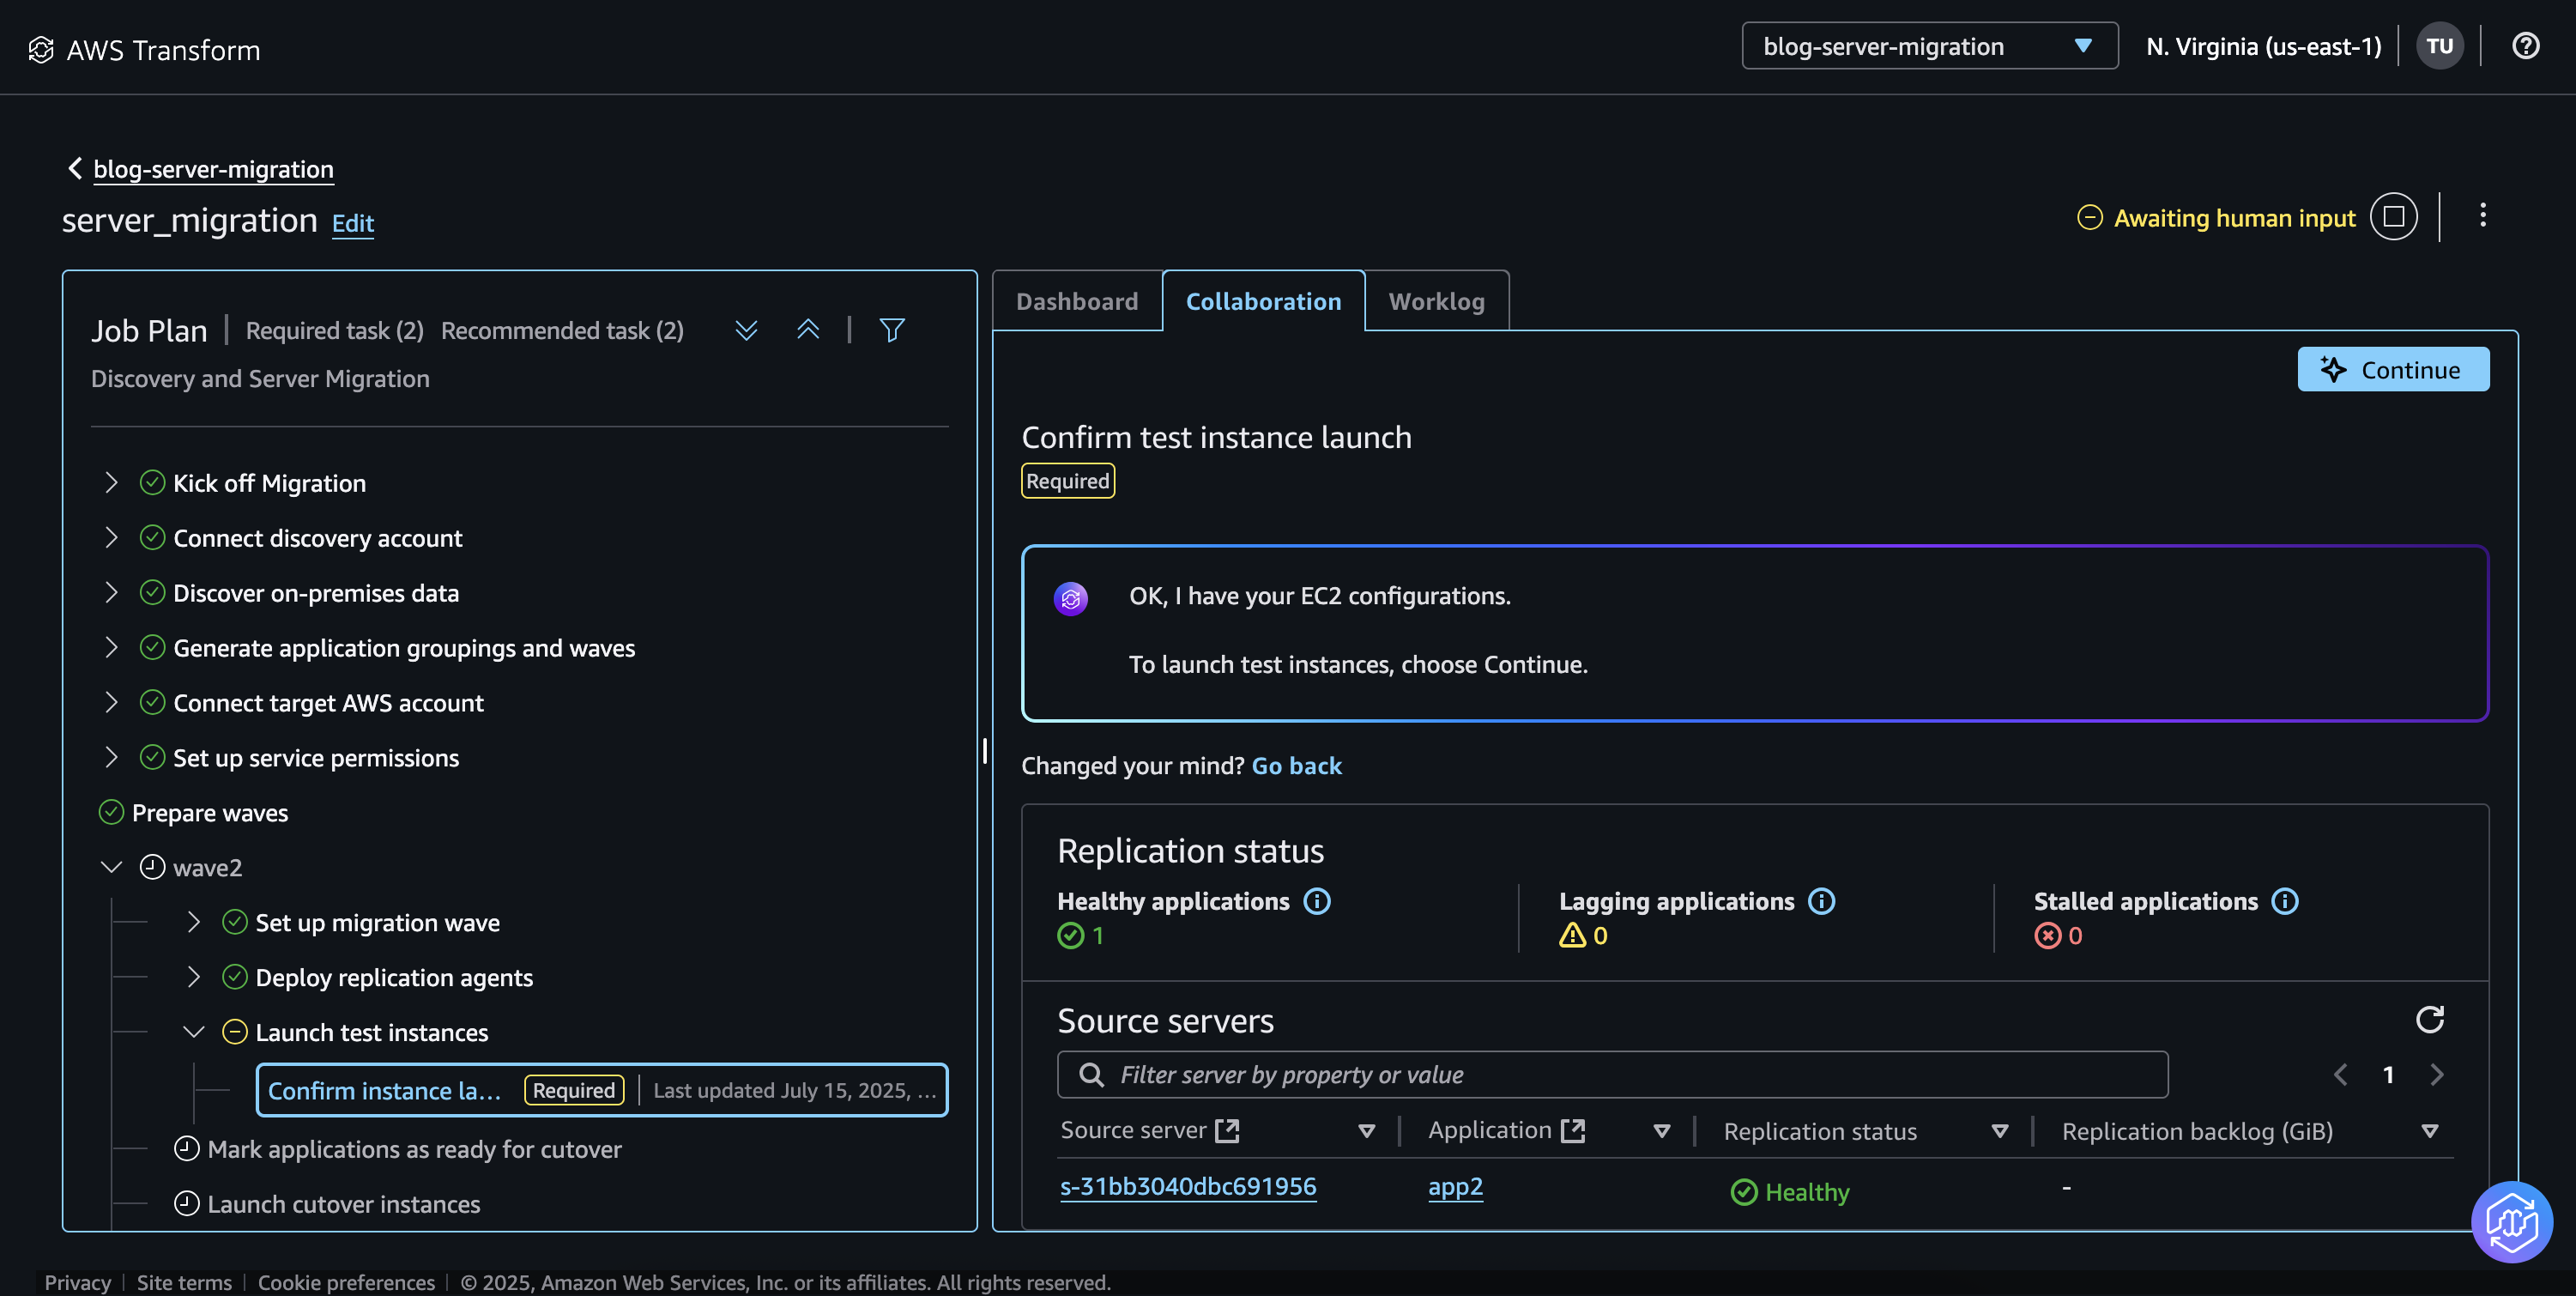
Figure 9: AWS MGN inventory file
- Choose Upload a modified inventory and upload the updated csv file.
- On the Deploy replication agents step, under Start replication agent deployment, choose Use AWS Transform to automate deployment.
- To use the AWS MGN Connector in the Transform workspace, you must tag the AWS MGN connector SSM managed node with Transform workspace ID. (you can skip this step if you choose to deploy AWS MGN agents manually)
-
- Open the Transform chat window and enter “what is this workpace ID”. Make note of the workspace ID from the response.
- Navigate to AWS Systems Manager console
- Under Node tools, choose Fleet Manager
- Choose the AWS MGN Connector managed node. Add the following tags:
Key:
CreatedForValue:AWSTransform
Key:ATWorkspaceValue:<AWS Transform workspace ID>
Replace the<AWS Transform workspace ID>with the Transform workspace ID. -
- Under Choose an MGN connector drop down, select the AWS MGN connector you have created in the target account. If you do not wish to use AWS MGN Connector, choose Deploy replication agents on your own and follow the steps to deploy the MGN agent manually on source servers.
- Under Choose an AWS Secrets Manager secret drop down, select the Secrets Manager secret created for the credentials of source server. Choose Continue for AWS Transform to deploy the agents.
- AWS Transform will verify the source servers and automatically deploy the AWS MGN replication agent using AWS MGN connector. Once deployed, the block level replication process begins, and the server replicates to the staging area in the target account.
- On the next step Launch test instances, the Replication status will show the replication health status of source servers and the inventory file for the configuration of test instances. If no changes are required, choose Continue with the current inventory. For any changes, download the inventory file, modify the required details and upload the modified inventory.
The Dashboard tab will report the overall migration status of the applications, waves and source servers.
Figure 10: Replication status of source servers
- Once the Replication status of the servers reports Healthy, choose Continue to confirm test launch instances. AWS Transform will launch the test instances in the target account. Validate the test instances and verify the applications. It is recommended to perform a test at least 2 weeks prior to the cutover, identify and resolve any potential problems.
NOTE: Consider possible hostname conflicts with test instances for Windows domain joined servers. In this case, you can use an isolated infrastructure for test instances by updating the settings on AWS MGN Launch templates. Ensure to update/validate it again before the cutover.
- After the test is complete, mark the servers ready for cutover in the step Mark applications as ready for cutover. This would terminate the previously launched test instances.
- On the next step Launch cutover instances, confirm the inventory file and launch cutover instances. Validate the target launched cutover instances.
- Once the cutover is successful, on the next step, choose Finalize cutover. This step will mark the migration wave as successfully completed for all servers included in this wave and the data replication will stop.
- Additionally, AWS MGN service will clean up the staging area resources used during the data replication, such as AWS MGN Replication Servers, EBS volumes, and S3 snapshots associated with the server replication on this wave.
- Follow similar steps to migrate additional waves on the migration job, such as wave2.
- After the migration cutover and validation is successful, shutdown the source servers manually. You can also shutdown the source servers before the cutover phase if you need to ensure that no changes happen on the source servers before the cutover and that all the latest data is replicated to the target servers, as the data would be fully replicated to the staging area.
The steps described here are repeatable and can be followed to perform migration jobs with AWS Transform to migrate hundreds and thousands of servers. You can create multiple Transform workspaces, migration jobs with wave planning, connectors to multiple discovery and target accounts to perform simultaneous migrations with ease.
The AWS MGN connector setup is a one-time task per source environment and is used to automate AWS MGN agent installation process on multiple source servers. AWS Transform utilizes ADS agents and AWS MGN connector to automate and simplify the large-scale migration process from any source environment to AWS.
Cleanup
To delete the resources created, follow the steps:
On the target AWS account:
- Navigate to the AWS CloudFormation console.
- Choose Stacks and choose stack named mgn-connector-roles. Choose Delete and Delete stack.
- Navigate to AWS MGN console and choose MGN connectors. Choose the created connector and choose Delete to delete the connector.
- Navigate to Secrets Manager console and choose the secret. Choose Actions and Delete secret to delete the secrets manager credentials.
On your source environment:
- Shutdown and delete the VM which is used as AWS MGN connector.
On the discovery AWS account:
- To clean up discovery data from Migration Hub, run the following command from AWS CloudShell:
This command gets the list of discovery server configurations and deletes all source servers discovered with ADS Agent. To delete manually, please run the list-configurations and start-batch-delete-configuration-task commands individually. For additional details, refer ADS discovery CLI.
Conclusion
AWS Transform for VMware significantly simplifies and accelerates the migration of virtual machines to AWS through its AI-driven orchestration and automation capabilities. By combining Application Discovery Service (ADS), AWS Application Migration Service (MGN), and intelligent wave planning, organizations can efficiently migrate workloads from various platforms to AWS with minimal disruption. The solution’s automated dependency mapping, streamlined workflow, and built-in testing capabilities help ensure successful migrations while reducing operational complexity and risk. Whether migrating a handful of VMs or thousands of servers, AWS Transform provides a repeatable, scalable approach that can help organizations accelerate their cloud transformation journey with confidence.