Migration & Modernization
Automate large-scale migration to Amazon EC2 using AWS Migration Hub Orchestrator
Introduction
Migrating VMware virtual machines to Amazon EC2 at scale presents significant challenges for organizations seeking to accelerate cloud benefits. AWS Migration Hub Orchestrator simplifies this process by providing a streamlined, automated approach to these complex migrations. In this blog post, we’ll guide you through a step-by-step process showing how Migration Hub Orchestrator effectively manages the entire migration workflow—from initial assessment to final cutover. Our practical demonstration will show how to transform the migration strategy from manual and complex to automated and efficient.
Solution architecture overview
The solution (Figure 1) shows the VMware vSphere infrastructure hosting the source virtual machines (VMs), and the target AWS environment. Several key components work together to coordinate the automated large-scale VMware migration to Amazon EC2.
The AWS Application Discovery Agentless Collector (Agentless Collector) collects information about the on-premises applications, including server profile information. AWS Migration Hub Orchestrator automates the servers’ migration. The Orchestrator plugin is in the VMware environment as an OVA. AWS MGN continuously replicates bock-level volume to AWS from each source VM; and AWS Migration Hub Orchestrator serves as the central orchestration service, managing and automating the migration workflow.
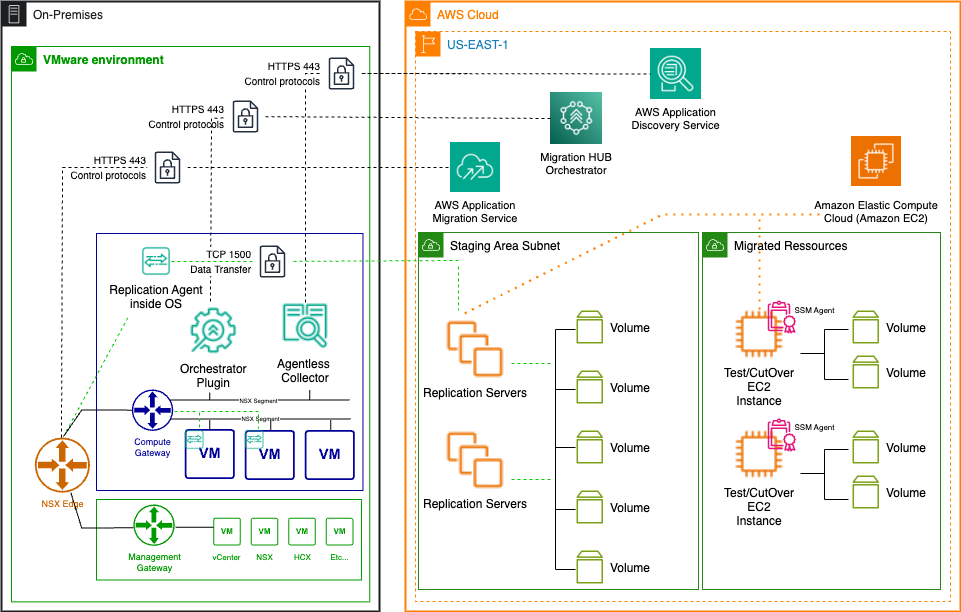
Figure 1 – On the left, the VMware vSphere infrastructure hosting the source VMs. On the right, AWS Migration Hub Orchestrator serves as the orchestration service using AWS MGN for server replication.
Implementation stages
This solution has four implementation stages:
- Prerequisites setup: configure Amazon Virtual Private Cloud (VPC) before deploying the AWS Application Migration Service (AWS MGN).
- Application Discovery Service agentless collector deployment: create an AWS Identity and Access Management (IAM) user for the collector before deploying the collector OVA file in the VMware vCenter. Eventually, connect vCenter to the newly deployed collector.
- Migration Hub Orchestrator plugin deployment: deploy the orchestrator plugin OVA in the vCenter environment. Access the plugin with Secure Shell (SSH) for configuration tasks.
- Migration workflow creation and execution: configure the workflow parameters and select the targeted applications for migration. Monitor the entire process using the orchestrator dashboard.
Stage 1 – Prerequisites setup
Before diving into automation, ensure AWS and on-premises environments are ready:
- Networking: Set up an Amazon VPC with its subnets, route tables, and security groups to host the migrated workloads.
-
- Include a staging area subnet & migrated resources subnet in the VPC.
- Setup up VPC Endpoints for AWS Systems Manager (SSM), Systems Manager messages, and Amazon Elastic Compute Cloud (EC2) messages.
- AWS Application Migration Service (MGN): Initialize AWS MGN. This includes:
- Configuring security groups to allow communication between source servers and the AWS replication environment.
- Setting up IAM roles and permissions for AWS MGN to access required AWS resources.
- VMware Environment: vCenter Server access with administrative credentials to deploy appliances and plugins.
Stage 2 – Deployment and Configuration of the Application Discovery Service Agentless Collector for Inventory and Planning
A successful migration starts with a comprehensive understanding of the current environment. The AWS Application Discovery Service Agentless Collector is a powerful tool that helps gather information about the on-premises VMware environment without installing agents on individual VMs.
What is the Application Discovery Service Agentless Collector Plugin?
- An on-premises virtual appliance (deployed as an OVA) that collects detailed inventory, configuration, and utilization data from the VMware VMs—without installing agents on each VM.
- It gathers information such as OS details, CPU, RAM, disk usage, and network traffic, helping the operator assesses readiness and plan the migration.
Stage 3 – Deployment and Configurations
Now, deploy the Application Discovery Service Agentless Collector:
- Create an IAM user for Agentless Collector.
- Download the Agentless Collector OVA from the AWS console.
- Deploy the OVA in the VMware vCenter environment.
- Sign in to the plugin using the following URL in the address bar: https:// <ip_address>, where <ip_address> is the IP address of the collector.
- Click Get Started.
Enter the collector configuration and choose Save configuration as shown in Figure 2.
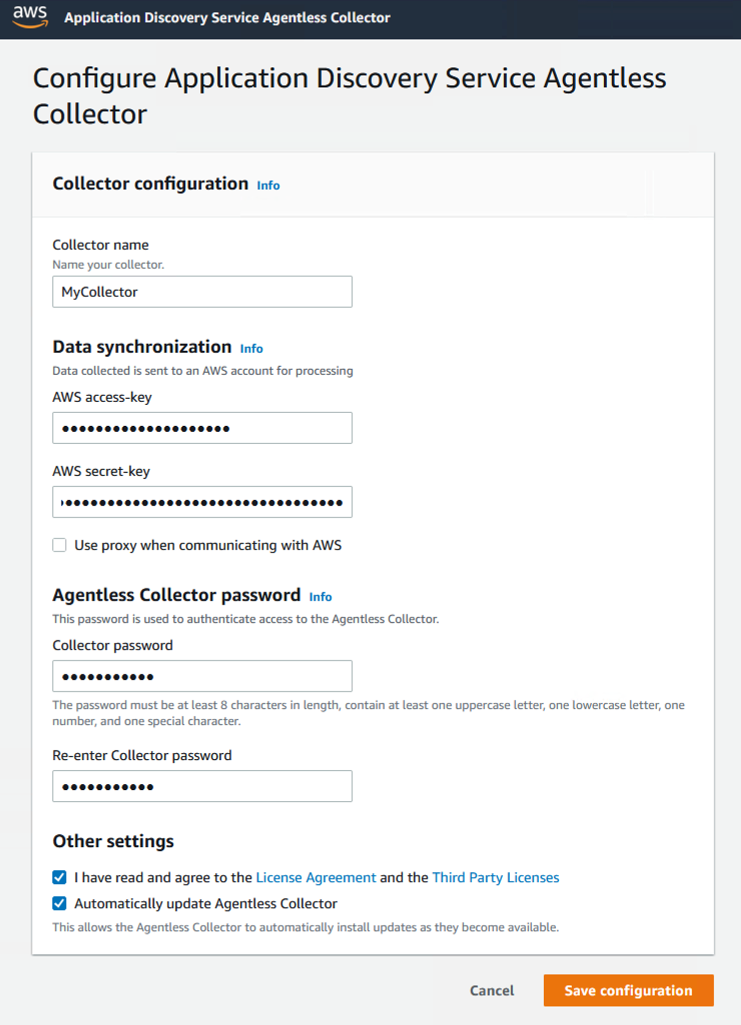
Figure 2 – Configure Application Discovery Service Agentless Collector
Validate that the connector can connect to AWS and connect the vCenter to the Collector to collect the data.
Setup the vCenter credentials and choose Set up.
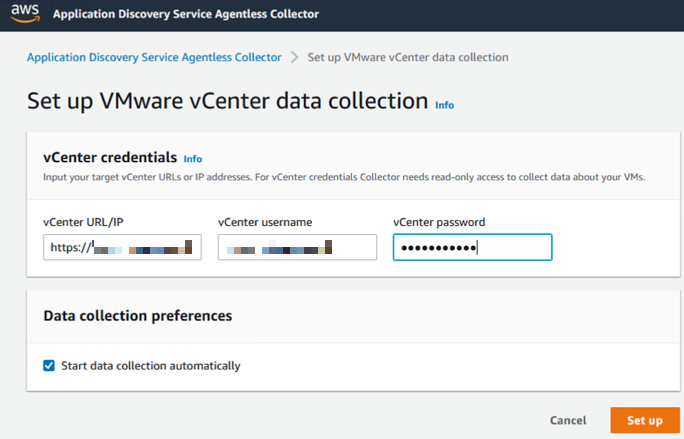
Figure 3 – Setting up vCenter credentials
The collector will then scan the environment, build an inventory of VMs, and send this data securely to AWS Application Discovery Service.
Integration with Migration Hub
- The collected data appears in AWS Migration Hub, where the operator can visualize the server inventory, group servers into applications, and plan migration workflows. This grouping is essential for orchestrating migrations at the application level, maintaining their dependencies.
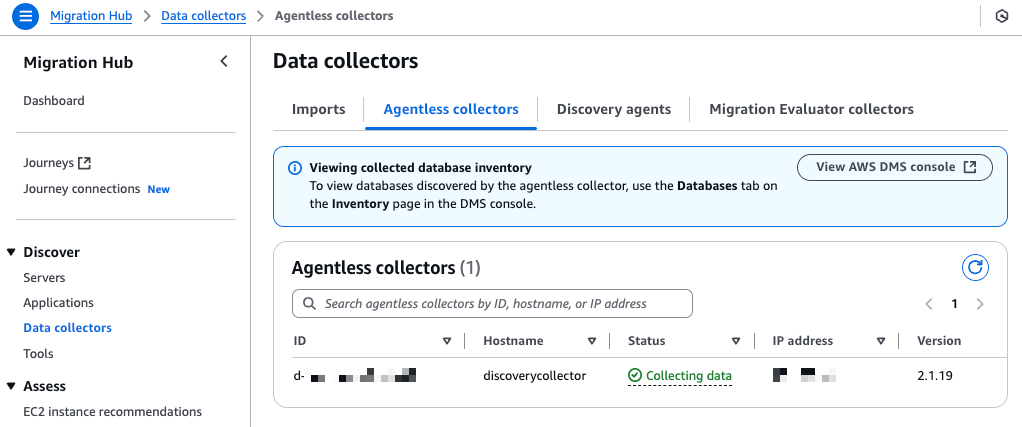
Figure 4 – Agentless Collector status
Use the search bar to find servers and create an application by selecting the servers and choose Group as application.

Figure 5 – The operator can search by server ID, hostname, etc.
Enter an Application Name, then choose Group. Now the application is ready to migrate.
Stage 4 – Deployment and Configuration of the Migration Hub Orchestrator Plugin for Automated Migration Workflow
What is the Migration Hub Orchestrator Plugin?
- A virtual appliance (OVA) installed in the VMware environment, enabling Migration Hub Orchestrator to automate migration tasks directly on the source environment.
- The plugin communicates with both on-premises environment and AWS, orchestrating steps such as agent installation, replication, and cutover.
Deployment and Configuration
Install Migration Hub Orchestrator plugin as a virtual appliance:
- Download the plugin OVA from the Migration Hub Orchestrator console.
- Deploy the OVA in vCenter, allocating at least 8 GB RAM and 4 CPUs.
- Sign in to the plugin using SSH client:
ssh ec2-user@PluginIPAddress - Configure the collector with vCenter credentials and network settings. When prompted for a password, enter the default password, plugin@123. The operator must change the password at first sign in.
- To set up the Migration Hub Orchestrator plugin, the operator will need to access its Docker container. Open a bash shell session by running this command:
- docker exec -it mhub-orchestrator-plugin bash
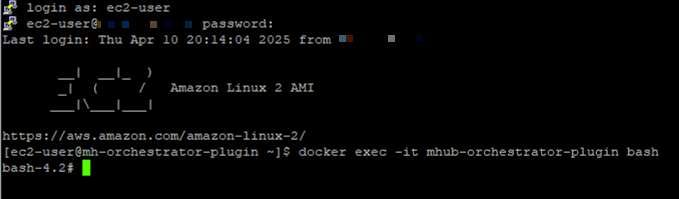
Figure 6 – Configure the Collector
- docker exec -it mhub-orchestrator-plugin bash
- The plugin setup command runs the following commands in succession. Alternatively, the operator can also run them individually:
- plugin setup —aws-configurations

Figure 7 – AWS configurations
- plugin setup —vcenter-configurations

Figure 8 – vCenter configuration
Creating and Customizing Migration Workflows
Workflow Templates
- Migration Hub Orchestrator provides predefined templates, such as “Rehost applications on Amazon EC2 template,” which encapsulate best practices for lift-and-shift migrations.
- These templates automate steps like environment validation, agent installation, replication, cutover, and post-migration validation.
Building The Workflow
- In the Migration Hub Orchestrator console, create a new workflow using the “Rehost on Amazon EC2” template.
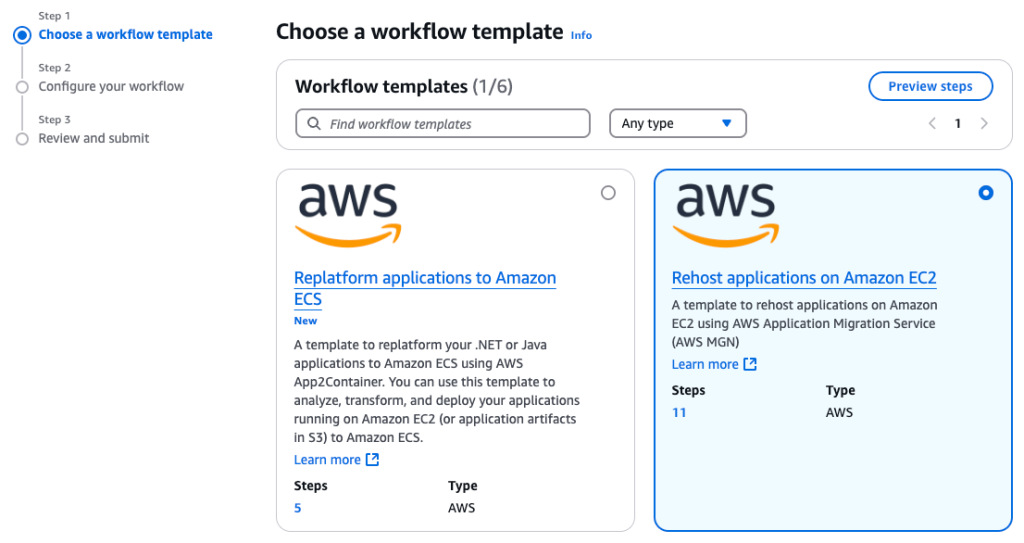
Figure 9 – Choose the workflow template
Configure the workflow and select the applications (grouped servers) to migrate as defined in Migration Hub from the discovery phase, then choose Next.
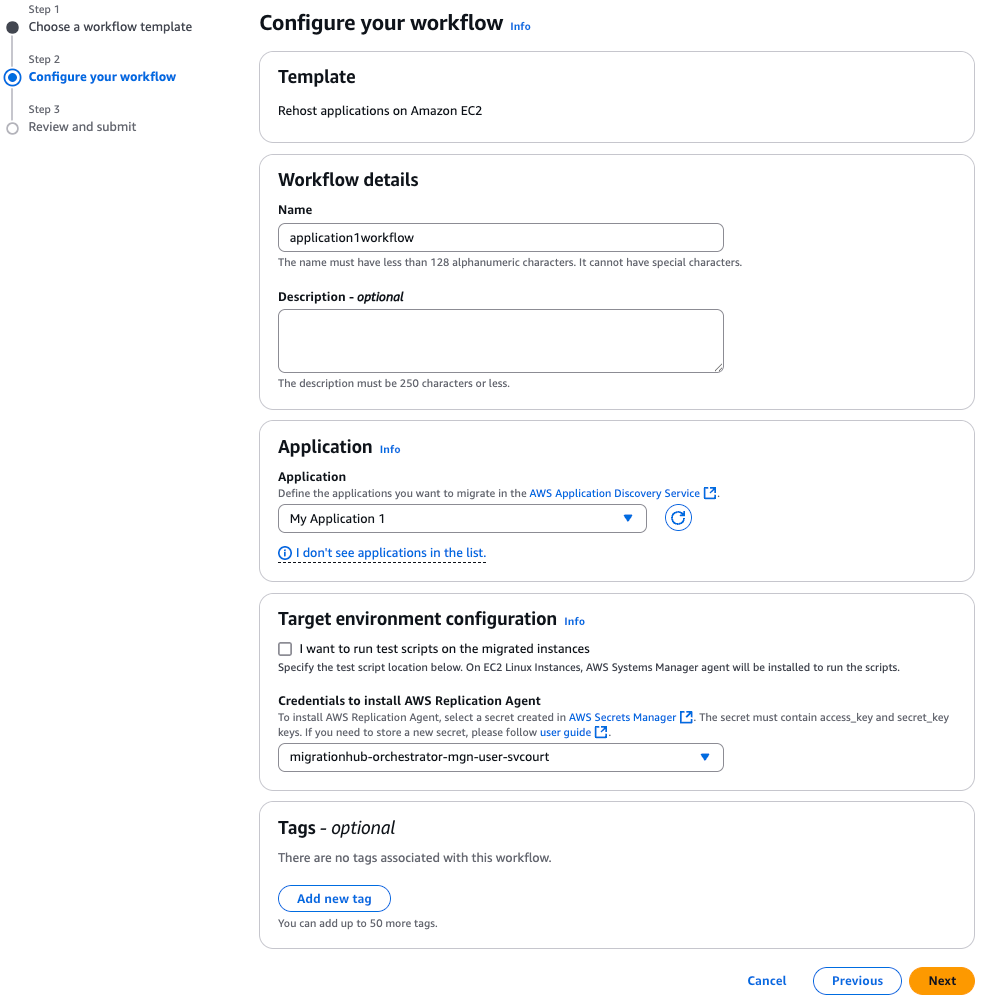
Figure 10 – Configure the workflow
Review the workflow, then choose Create.
Optionally, customize the workflow to add pre- or post-migration steps, notifications, or validation scripts. When ready, choose Run. The console shows the 12 steps of the workflow that will be executed by the orchestrator.
Automation and Advantages
- The orchestrator automates repetitive, error-prone tasks, reducing manual intervention and risk.
- It provides end-to-end visibility into the migration progress, with status tracking and notifications.
- Reuse workflows and adapt them for future migrations, accelerating large-scale projects.
Clean up
To avoid ongoing charges, ensure to clean up relevant resources, including:
- AWS components: Migration Hub Orchestrator finalizes the cutover, cleaning up AWS MGN resources. Remember to delete VPC endpoints.
- On-premises components:
-
- Power off Discovery Collector virtual appliance
- Power off Migration Hub Orchestrator Plugin virtual appliance
Conclusion
As shown throughout this post; by combining inventory discovery, intelligent application grouping, and end-to-end orchestration, organizations accelerate their cloud migration journey while reducing operational risks.
The automation capabilities we’ve explored deliver several tangible benefits:
- Reduced migration time – Tasks that typically take days or weeks of manual effort can complete in hours.
- Minimized human error – Standardized workflows ensure consistency across migrations.
- Enhanced visibility – Centralized tracking provides real-time status of all migration activities.
- Operational continuity – Automated testing and validation help ensure applications function properly post-migration.
- Scalability – The same workflows can be reused to migrate additional workloads, enabling migrations at enterprise scale.
We encourage to begin the migration journey by first establishing a discovery process, then building the initial workflows with the templates provided. As the operator gains experience, he can further customize these workflows to meet specific requirements and accelerate the cloud transformation.