Migration & Modernization
Archive your workloads using post launch action in AWS Application Migration Service
Background
Many customers are looking for cost-effective ways to archive their workloads. This workload archiving use case is driven by regulatory compliance across industries like healthcare, finance, and public sector. Also, organizations must archive data to meet industry compliance standards such as PCI-DSS, GxP, GDPR etc. Amazon S3 storage tiers, particularly Amazon S3 Glacier Deep Archive, offer cost savings up to 75% compared to traditional approaches of storing data on-premises. Beyond traditional storage systems like NAS and SAN, Amazon S3 also provides a versatile platform for storing both machine images and block device data.
In this blog post, we will look at how you can archive workloads running on x86 based on-premises servers into Amazon S3 using a post launch action in AWS Application Migration Service (AWS MGN). This comprehensive blogpost will help you optimize costs while maintaining compliance requirements, ensuring your data management practices meet both business and regulatory standards
Solution Overview
The following diagram illustrates how you can automatically archive a workload using post launch action in AWS MGN.
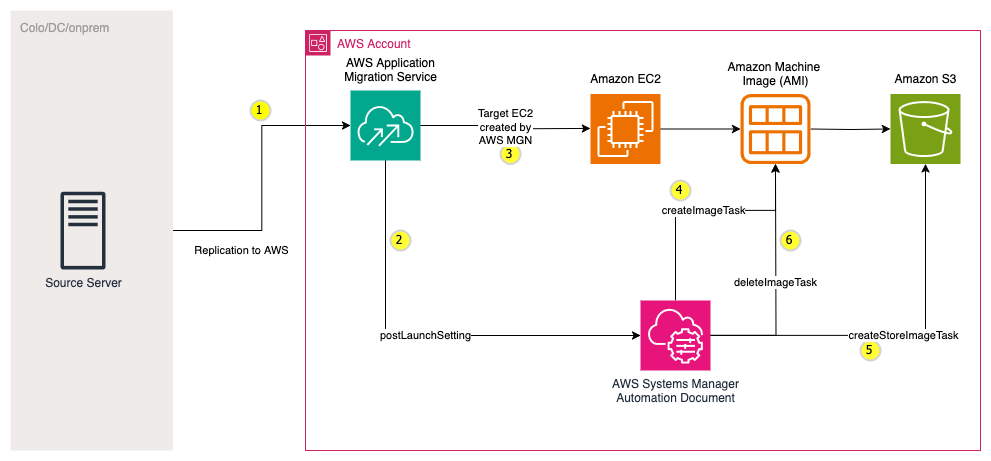
Fig 1. Workflow for archiving workloads using AWS MGN
Explanation of the steps from the diagram:
1. Customer installs AWS Replication agent on the source server and the data is replicated on the block device level to the AWS Staging environment.
2. MGN Post-launch settings are configured to run a Custom post-launch action. The AWS Systems Manager (SSM) Automation document assumes an AWS Identity and Access Management (IAM) role which it will use to perform actions. See Prerequisites section.
3. A test or cutover EC2 instance is launched and a target EC2 instance is created.
4. During the test or cutover or both, the post launch action runs the Automation document to create an Amazon Machine Image (AMI) of the target EC2 instance. At this point, note that the target EC2 instance is still running.
5. The Automation document then stores this AMI in Amazon S3 using ‘create-store-image-task’ API.
6. The Automation document deletes the previously created AMI.
Prerequisites
IAM role for SSM document
The Automation document requires an IAM role with permission to perform the required tasks. Create an IAM role with the following settings:
Trust Policy
{
    "Version": "2012-10-17",
    "Statement": [
        {
            "Sid": "Statement1",
            "Effect": "Allow",
            "Principal": {
                "Service": "ssm.amazonaws.com"
            },
            "Action": "sts:AssumeRole"
        }
    ]
}
Permissions
Note: Replace the <AWS-Account-ID>, <Region>, <S3-Bucket-Name>, your-custom-key-alias (for custom KMS key) with right values in the below policy. If you are using the default KMS key, remove the reference for custom key alias from the policy. For the S3 bucket, you can use an existing S3 bucket or create a new one.
{
    "Version": "2012-10-17",
    "Statement": [
        {
            "Effect": "Allow",
            "Action": [
                "ec2:CreateStoreImageTask",
                "ec2:DescribeTags",
                "ec2:DescribeSnapshots",
                "ec2:CreateImage",
                "ec2:DescribeImages",
                "ec2:DeleteImage",
                "ec2:DeregisterImage"
            ],
            "Resource": "*"
        },
        {
            "Effect": "Allow",
            "Action": [
                "ebs:ListSnapshotBlocks",
                "ebs:GetSnapshotBlock"
            ],
            "Resource": "arn:aws:ec2:<Region>::snapshot/*"
        },
        {
            "Effect": "Allow",
            "Action": [
                "ssm:GetAutomationExecution",
                "ssm:StartAutomationExecution"
            ],
            "Resource": "arn:aws:ssm:<Region>:<AWS-Account-ID>:automation-definition/*"
        },
        {
            "Effect": "Allow",
            "Action": [
                "s3:PutObject",
                "s3:GetBucketLocation"
            ],
            "Resource": [
                "arn:aws:s3:::<S3-Bucket-Name>",
                "arn:aws:s3:::<S3-Bucket-Name>/*"
            ]
        },
        {
            "Effect": "Allow",
            "Action": "s3:ListBucket",
            "Resource": "arn:aws:s3:::<S3-Bucket-Name>"
        },
        {
            "Effect": "Allow",
            "Action": [
                "ssm:GetParameters",
                "ssm:GetParameter",
                "ssm:GetParametersByPath"
            ],
            "Resource": "arn:aws:ssm:<Region>:<AWS-Account-ID>:parameter/*"
        },
        {
            "Effect": "Allow",
            "Action": [
                "kms:Decrypt",
                "kms:GenerateDataKey"
            ],
            "Resource": [
                "arn:aws:kms:<Region>:<AWS-Account-ID>:key/*"
            ],
            "Condition": {
                "StringLike": {
                    "kms:RequestAlias": [
                        "alias/aws/ebs",
                        "alias/your-custom-key-alias"
                    ]
                }
            }
        }
    ]
}
Implementation
Use the following steps to create the Automation document and configure MGN to run the document as a post-launch custom action:
Create Automation Document
1. On the AWS Systems Manager console, choose Documents in the navigation pane.
2. Choose Create document Automation.
3. Select the pencil icon and enter a document name.
4. Choose Code to move to code input screen.
5. Copy contents from aws-archive-image.json
6. Choose Create runbook.
The Automation document is visible in documents “Owned by me”. This document is only available to your AWS Account.
Activate Post-launch custom action
Post-launch settings must first be activated on the Post-launch template page.
1. On the MGN console, choose Source Servers in the navigation pane.
2. Choose the source server to configure with post-launch settings (Can also be configured as a Post-launch settings template to be applied to all newly added servers).
3. Choose Post-launch settings.
4. Choose Create action.
5. Provide a name for the Action and ensure Activate this action is checked.
6. For Systems Manager document name choose the Automation Document you created.
7. Ensure the Order number is correct.
8. Enter values for the Action Parameters. The NoReboot parameter is optional if you want to specify whether to reboot the target EC2 instance during AMI creation.
9. Choose Add action. This step creates the action.
When you launch a test or cutover instance from the MGN console, the service will automatically execute the actions defined in the specific server’s post-launch actions settings. You can track the progress of these actions from the source server’s migration dashboard page.
Conclusion
In this blogpost, I outlined how you can use the post-launch actions in AWS Application Migration Service to archive workloads into Amazon S3. By leveraging this solution, you can not only meet your regulatory and compliance requirements but also achieve significant cost savings.
Get started with AWS Application Migration Service today and explore our AWS Pricing Calculator to understand how much you can save compared to your current on-premises storage solution. Also, explore how to move these machine images from Amazon S3 standard tier into Amazon Glacier tiers using Lifecycle rules to further achieve cost savings.
We also launched AWS Transform, our first agentic AI experience purpose-built for VMware workload modernization, that integrates with AWS MGN service. Use AWS Transform with MGN connectors capability to do large VMware migrations and modernizations. Contact our AWS account teams to discuss your specific archiving needs and how we can tailor this solution to your organization’s compliance requirements.
About the Author