.NET on AWS Blog
Integrating C# Model Context Protocol servers with Amazon Q Developer CLI
This post shows how to create your own Model Context Protocol (MCP) server with C# and .NET. You will use Amazon Q Developer Command-Line Interface (Amazon Q CLI) as an MCP client.
The Model Context Protocol (MCP) is an open standard that lets Artificial Intelligence (AI) models safely interact with external tools and resources. MCP enhances how developers build AI-powered solutions by providing a standard way to connect AI systems with contextual information from repositories, databases, business data sources, and development environments.
Developers build MCP Servers using MCP Software Development Kits (SDKs) available for various programming languages. These servers expose MCP tools that MCP clients, like Amazon Q CLI, invoke to access specific data or perform tasks (Figure 1). This allows AI models to respond using current, accurate information beyond their training cutoff date, including specialized data that wasn’t part of their original training.
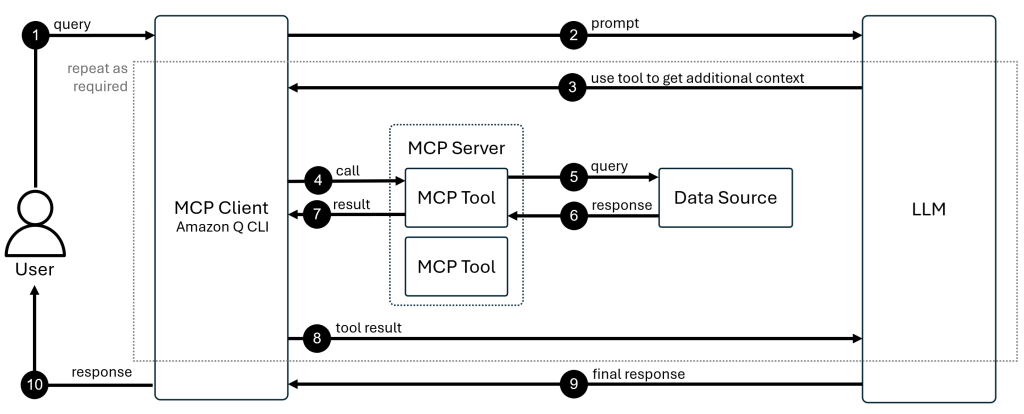
Figure 1: Workflow showing Amazon Q CLI invoking an MCP Server to plan a response
Instead of hand-crafting individual API calls, you register functions as MCP tools on your server. This creates a clean separation between the AI model’s natural language processing and running specific tasks. As a result, AI assistants perform complex operations (like booking flights, analyzing charts, or updating tickets) by invoking the appropriate MCP tools, eliminating the need for custom integration code.
To illustrate this, we will build an MCP server using the C# SDK for MCP that exposes MCP tools to retrieve location-based weather information. We will then configure Amazon Q CLI to connect to our MCP Server and use the tools. To be clear, this example isn’t about creating the next revolutionary weather app (sorry, meteorology enthusiasts). It’s about showing you how MCP servers work. We will write another post for C# developers in the future, where we’ll build a detailed implementation.
For now, use this blog post to configure your local development environment for building and testing C# MCP servers, enhancing your ability to create, iterate, and refine AI-powered applications.
Prerequisites
The following prerequisites are required on your system to test and deploy this solution:
- .NET 8.0 Software Development Kit (SDK)
- AWS Command-Line Interface (AWS CLI)
- Your preferred Integrated Development Environment (IDE) such as Visual Studio Code, Visual Studio, or Rider.
- AWS credentials for your AWS account configured locally
- Git
- Amazon Q Developer subscription
If you prefer a ready-to-use solution you can use the sample-developer-environment. This provides a browser-based Visual Studio Code workspace with all prerequisites installed, deployable with a single AWS CloudFormation template.
Building the MCP Server
In this section, we will develop a new MCP server that exposes two specialized MCP tools:
- GetWeatherAlertsForAState: Retrieves current weather alerts for any specified U.S. state.
- GetWeatherForecastForALocation: Provides detailed weather forecasts for specific locations within the United States, based on geographic coordinates (latitude and longitude).
Both tools will interface with the National Weather Service API to fetch accurate, up-to-date meteorological data for users to access official government weather information programmatically.
Initialize a new C# project
Start by opening your terminal and running the following commands:
mkdir weathermcp
cd weathermcp
dotnet new console
These commands will create a new C# project. Open the project in your IDE. Alternatively, create a C# application using the Visual Studio project wizard. After creating the project, add the following NuGet packages:
# Add the Model Context Protocol SDK NuGet package
dotnet add package ModelContextProtocol --prerelease
# Add the .NET Hosting NuGet package
dotnet add package Microsoft.Extensions.Hosting
Unless your MCP server needs HTTP capabilities, ModelContextProtocol is going to be the right fit for most projects. It provides hosting and dependency injection extensions. At the time of this writing, the ModelContextProtocol NuGet package is in preview. If you are using the Package Manager UI in Visual Studio to add these packages, make sure to select the Include prerelease checkbox when searching for the ModelContextProtocol NuGet package.
Creating the Server Foundation
Open the Program.cs file in your project and replace its contents with the following code:
using Microsoft.Extensions.DependencyInjection;
using Microsoft.Extensions.Hosting;
using System.Net.Http.Headers;

namespace WeatherMCPServer
{
    public class Program
    {
        public static async Task Main(string[] args)
        {
            var builder = Host.CreateEmptyApplicationBuilder(settings: null);

            // WithToolsFromAssembly() will scan the assembly for classes with the McpServerToolType attribute and register all methods with the McpServerTool attribute
            builder.Services.AddMcpServer()
                .WithStdioServerTransport()
                .WithToolsFromAssembly();

            builder.Services.AddSingleton(_ =>
            {
                var client = new HttpClient() { BaseAddress = new Uri("https://api.weather.gov") };
                client.DefaultRequestHeaders.UserAgent.Add(new ProductInfoHeaderValue("weather-tool", "1.0"));
                return client;
            });

            var app = builder.Build();

            // Get the HttpClient from the dependency injection container
            var client = app.Services.GetRequiredService<HttpClient>();


            await app.RunAsync();
        }
    }
}
Now, create a new file called HttpClientExt.cs in the same directory and insert the following code:
using System.Text.Json;

internal static class HttpClientExt
{
    public static async Task<JsonDocument> ReadJsonDocumentAsync(this HttpClient client, string requestUri)
    {
        using var response = await client.GetAsync(requestUri);
        response.EnsureSuccessStatusCode();
        return await JsonDocument.ParseAsync(await response.Content.ReadAsStreamAsync());
    }
}
This creates a minimal MCP server using .NET’s hosting and dependency injection frameworks. It configures the server to use standard input/output for communication and automatically registers MCP server tools by scanning the assembly for McpServerToolType and McpServerTool attributes. We also pre-configured HttpClient to access the National Weather Service API and registered it as a singleton service. The server will start asynchronously to handle incoming requests.
Implementing Weather Tools
Now that we’ve established the server foundation, let’s implement the specific weather tools that will provide the core functionality of our MCP server. These tools will connect to the National Weather Service API and deliver weather data to Amazon Q CLI.
To begin, create a new file named WeatherMCP.cs and insert the following code:
using ModelContextProtocol.Server;
using System.ComponentModel;
using System.Text.Json;
using System.Globalization;

namespace WeatherMCPServer
{
    [McpServerToolType]
    public static class WeatherTools
    {
        //McpServerTool has a Description which will be fed into any client connecting to the server. This description helps the client determine which tool to call.
        [McpServerTool, Description("Get weather alerts for a US state.")]
        public static async Task<string> GetWeatherAlertsForAState(
            HttpClient client,
            [Description("The US state to get alerts for.")] string state)
        {
            using var jsonDocument = await client.ReadJsonDocumentAsync($"/alerts/active/area/{state}");
            var jsonElement = jsonDocument.RootElement;
            var alerts = jsonElement.GetProperty("features").EnumerateArray();

            if (!alerts.Any())
            {
                return "No active alerts for this state.";
            }

            return string.Join("\n--\n", alerts.Select(alert =>
            {
                JsonElement properties = alert.GetProperty("properties");
                return $"""
                        Event: {properties.GetProperty("event").GetString()}
                        Area: {properties.GetProperty("areaDesc").GetString()}
                        Severity: {properties.GetProperty("severity").GetString()}
                        Description: {properties.GetProperty("description").GetString()}
                        Instruction: {properties.GetProperty("instruction").GetString()}
                        """;
            }));
        }

        [McpServerTool, Description("Get weather forecast for a location.")]
        public static async Task<string> GetWeatherForecastForALocation(
            HttpClient client,
            [Description("Latitude of the location.")] double latitude,
            [Description("Longitude of the location.")] double longitude)
        {
            var pointUrl = string.Create(CultureInfo.InvariantCulture, $"/points/{latitude},{longitude}");
            using var jsonDocument = await client.ReadJsonDocumentAsync(pointUrl);
            var forecastUrl = jsonDocument.RootElement.GetProperty("properties").GetProperty("forecast").GetString()
                ?? throw new Exception($"No forecast URL provided by {client.BaseAddress}points/{latitude},{longitude}");

            using var forecastDocument = await client.ReadJsonDocumentAsync(forecastUrl);
            var periods = forecastDocument.RootElement.GetProperty("properties").GetProperty("periods").EnumerateArray();

            return string.Join("\n---\n", periods.Select(period => $"""
                    {period.GetProperty("name").GetString()}
                    Temperature: {period.GetProperty("temperature").GetInt32()}°F
                    Wind: {period.GetProperty("windSpeed").GetString()} {period.GetProperty("windDirection").GetString()}
                    Forecast: {period.GetProperty("detailedForecast").GetString()}
                    """));
        }
    }
}
There are two methods marked with the [McpServerTool] attribute and a description. MCP clients use these descriptions to understand what each tool does.
The first method, GetWeatherAlertsForAState, takes a US state code (e.g., “OH” for Ohio, “CA” for California) as a parameter. It asynchronously fetches active weather alerts for the specified state from the National Weather Service API. The method parses the API response that is in JSON format, extracts the “features” array, and formats each alert’s details (event, area, severity, description, and instruction) into a readable string. If there are no alerts, it returns a message saying so.
The second method, GetWeatherForecastForALocation, takes a location’s latitude and longitude to fetch the forecast data, parse the response into a readable string which contains temperature, wind, and other weather information. At the conclusion of this implementation, you’ll observe how the Amazon Q CLI intelligently handles location data. When provided with only a city name, it automatically determines the coordinates before invoking this tool.
The complete solution is available for you to download in the dotnet-getai-samples GitHub repository.
Before moving on, make sure your project builds without errors by running the following command:
dotnet build
Once you’ve successfully built your MCP server project, you’re ready to integrate it with Amazon Q CLI.
Integration with Amazon Q CLI
Now, let’s configure Amazon Q CLI to use our new custom .NET MCP Server.
Based on your environment, follow the instructions from the Installing Amazon Q for command line section of the Amazon Q Developer user guide. Amazon Q CLI runs on macOS, Linux and Windows through Windows Subsystem for Linux (WSL). If you are testing this solution on a Windows machine, instructions to do so are part of the documentation linked above.
We setup our solution on a Mac using the default z shell on macOS. You will experience a consistent behavior regardless of which shell or operating system you are using.
Once you’ve installed Amazon Q CLI, verify the installation using the following command
q --version
While typing this command, you will also see the command completion feature that’s part of Amazon Q CLI (Figure 2).
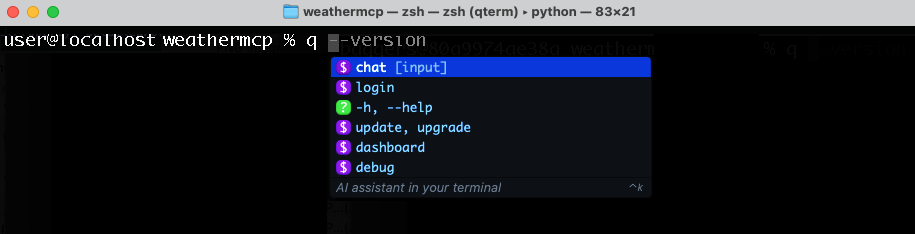
Figure 2: Amazon Q CLI command completion
After running the version command, you will see the current version of Amazon Q CLI displayed in your terminal (Figure 3). Your version may be newer than shown.

Figure 3: Amazon Q CLI version check
Now, run the q login command to authenticate with your AWS Builder ID, or with AWS IAM Identity Center, using the start URL provided by your account administrator.
Once you log in, run the q chat command in your terminal to start an interactive session (Figure 4).
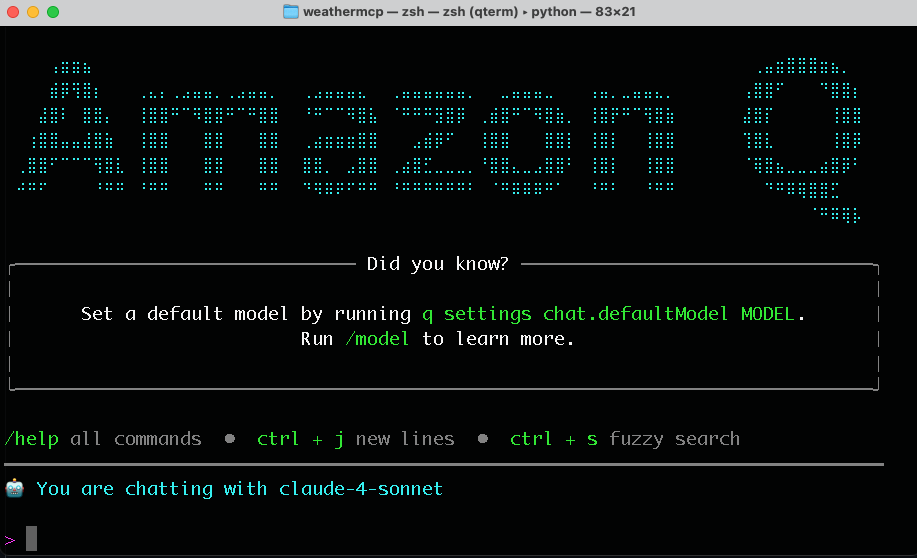
Figure 4: Amazon Q chat interface
Run the /tools command to see the built-in tools that come with Amazon Q CLI (Figure 5). To learn and manage tool permissions, go through the managing tool permissions section of the user guide.
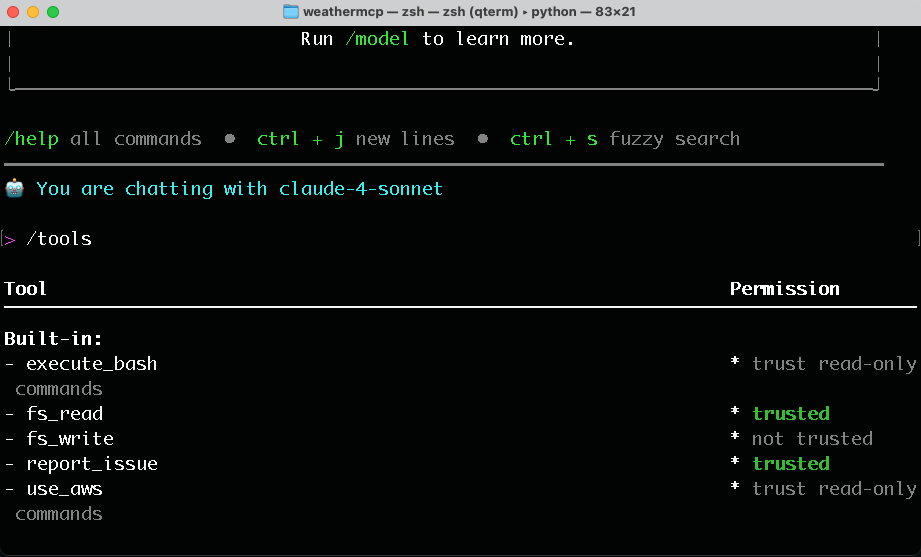
Figure 5: Amazon Q CLI built-in tools
Amazon Q CLI supports MCP server integration, which lets you extend its capabilities with custom tools and services. MCP servers use JSON format for configuration. For more details, refer to understanding MCP configuration files.
To integrate our custom .NET MCP tools with Amazon Q CLI, create or edit the global configuration file, mcp.json, in the ~/.aws/amazonq/ directory. Add the following configuration and save the file. Don’t forget to replace the <insert path to project> placeholder with the actual path to the .NET project we created earlier (e.g. /Users/yourusername/weathermcp).
{
    "mcpServers": {
        "weatheragent": {
        "type": "stdio",
            "command": "dotnet",
            "args": ["run", "--project", "<insert path to project>"]
        }
    }
}
An alternative to configure MCP servers is using Amazon Q CLI. Refer to the MCP configuration in the CLI section of the user guide.
Testing MCP Tool Integration
To test the configuration, you’ll need to exit your current q chat session (if you’re in one) by typing /quit. Then run the q mcp list command from the terminal. It will now list the newly configured MCP server from the global mcp.json configuration file (Figure 6).
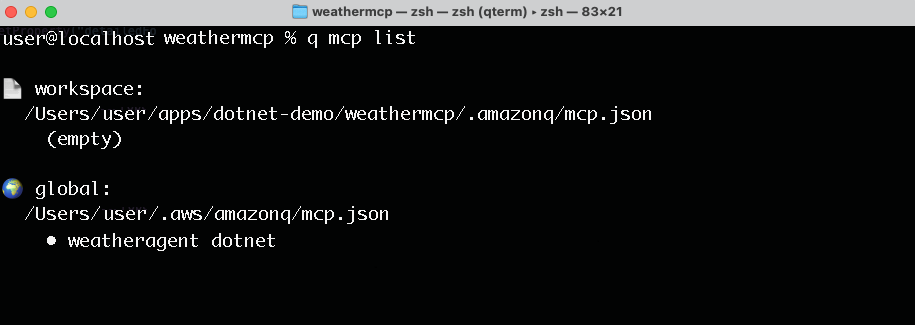
Figure 6: List of configured MCP servers
Start an Amazon Q chat session by running the q chat command. To list the tools now available, including the newly configured custom tools, run /tools from the Amazon Q chat prompt. Note the tool listed under weather_mcp_server (MCP) (Figure 7).
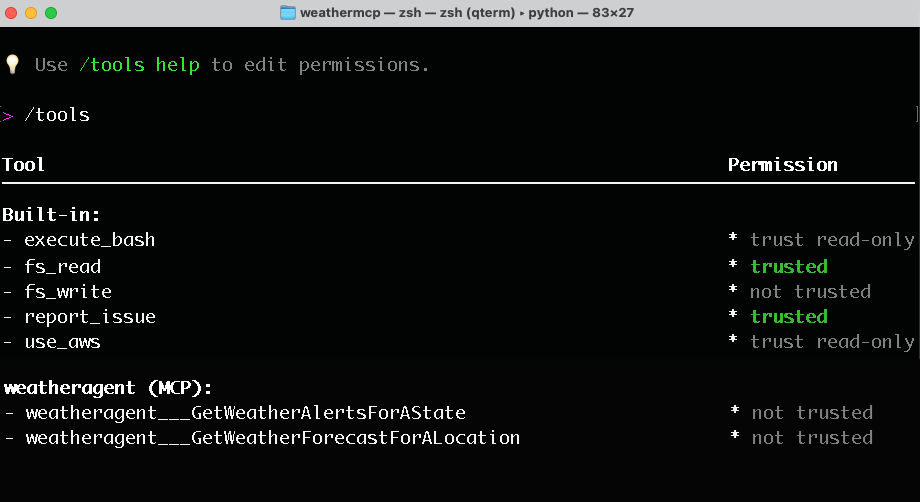
Figure 7: List of discovered MCP tools
Now, to test if Amazon Q CLI is using our tool and routing the right request to it, ask questions like:
- “Are there any weather alerts for Ohio? Use the state code”
- “Show me the weather forecast for San Francisco?”
You will receive an appropriate response like the one in Figure 8.
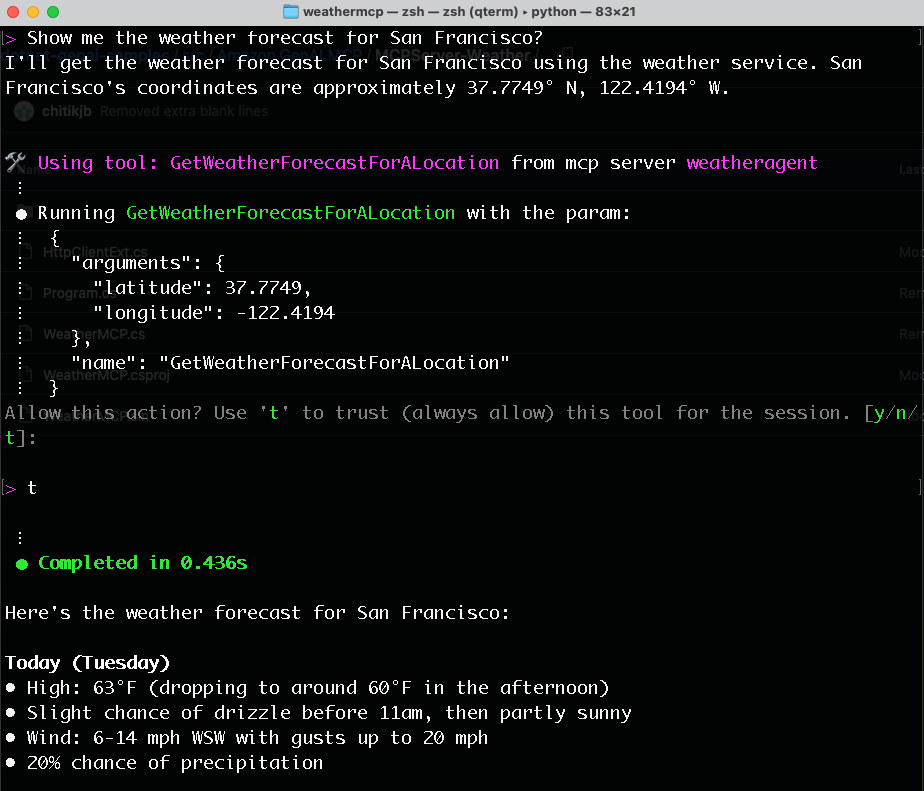
Figure 8: Amazon Q CLI invoking GetWeatherForecastForALocation MCP tool
When asking the second sample question, see how Amazon Q CLI uses the GetWeatherForecastForALocation tool by providing the latitude and longitude coordinates for San Francisco.
Conclusion
Integrating MCP servers with Amazon Q CLI represents an advancement in extending functionality. This combination empowers developers to provide contextual information from various data sources to Amazon Q CLI with minimal effort. By following the guidelines in this post, developers will easily build, test, and deploy MCP servers in C# to expose custom tools and data sources to Amazon Q CLI, enhancing its capabilities with domain-specific knowledge.
This C# and Amazon Q CLI integration offers several key benefits:
- Familiar development experience: C# developers leverage their existing skills and the .NET ecosystem to build powerful MCP servers.
- Enterprise integration: C# MCP servers easily connect Amazon Q CLI to existing business systems and data sources.
- Cross-platform deployment: Build once and deploy your MCP servers alongside Amazon Q CLI across different operating environments.
By starting with simple implementations like the weather example shown here, C# developers will gain experience with the MCP pattern before tackling complex enterprise integrations. Check the complete list of AWS MCP servers in our AWS Labs repository. The future of application development lies in these contextually aware systems that access and reason with specialized information from across your technology stack.