.NET on AWS Blog
Building AI-Ready Applications with Amazon Bedrock and .NET Aspire
In today’s rapidly evolving technology landscape, Amazon Bedrock and .NET Aspire help in integrating AI capabilities into your applications. Amazon Bedrock, a fully managed service offering access to various Foundation Models (FMs), combined with .NET 9, creates a robust foundation for building such applications. .NET Aspire is an opinionated, cloud-ready stack for building observable, production-ready, distributed applications. It provides .NET developers with a powerful toolkit for building cloud-native applications that can easily incorporate AI features.
In this blog post, you will explore how to use .NET Aspire to create AI-ready applications using Retrieval Augmented Generation (RAG) capabilities powered by Amazon Bedrock.
A Typical RAG powered AI Application
RAG is an AI architecture pattern that enhances Large Language Models (LLMs) by providing them with relevant information retrieved from external knowledge sources. Here’s how a typical RAG-powered AI application works:
Core Components of a RAG System:
- Data Processing Pipeline: Ingests data (documents, tables, etc.), breaks them into chunks, and preprocesses the text
- Vector Database System: Converts text chunks into vector embeddings and stores them for similarity search
- Retrieval Engine: Processes user queries, finds relevant document chunks, and ranks results
- Augmented Generation: Combines retrieved information with the user query to generate informed responses
Benefits of RAG:
- Provides up-to-date information beyond the LLM’s training cutoff
- Reduces hallucinations by grounding responses in factual information
- Enables domain specialization without model fine-tuning
- Offers transparency through source citation
- Provides cost efficiency compared to frequent model retraining
Solution Overview
In this example solution, AnyCompany application uses Amazon Bedrock Knowledge Bases to implement RAG architecture pattern, with Amazon OpenSearch Serverless providing vector database capabilities.
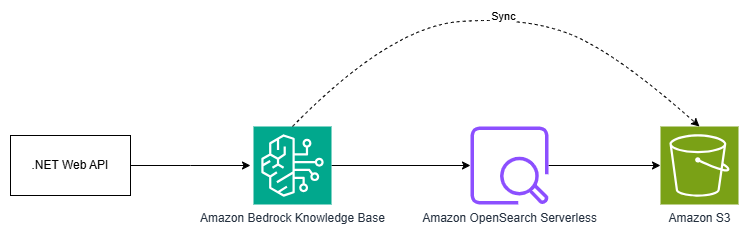
Figure 1: Solution Architecture
AWS services used
This solution combines the following AWS services to enable efficient prescription validation:
• Amazon Bedrock Knowledge Base – Bedrock Knowledge Base provides a fully managed RAG capability that enables developers to connect Foundation Models to their own proprietary data sources without writing a single line of code. The service handles the entire RAG workflow, from ingesting and chunking data from various sources like Amazon Simple Storage Service (Amazon S3), Confluence, and SharePoint, to generating embeddings, storing them in a vector database, retrieving relevant information based on user queries, and augmenting the prompts sent to the FMs. This end-to-end managed service significantly simplifies the implementation of RAG, allowing developers to focus on their core application logic rather than the complexities of the RAG pipeline.
• Amazon OpenSearch Serverless – This service acts as the Vector Database which stores embeddings generated by the Knowledge Base.
• Amazon S3 Bucket – The solution stores the documents and product data in a Amazon S3 bucket.
Solution Components
The sample application consists of several components:
- .NET Aspire AppHost Project: The orchestrator that defines how all services connect and what cloud resources they need
- Knowledge Base Stack: AWS Cloud Development Kit (AWS CDK) stack which provisions Amazon Bedrock and OpenSearch resources
- .NET Web API Service: Backend service that interfaces with Amazon Bedrock and OpenSearch
Step 1 – Set up the solution
To set up the solution:
- Create a new project using the .NET Aspire Empty App template in Visual Studio. This will create .NET Aspire AppHost and ServiceDefaults projects in your solution.
- Add the
Aspire.Hosting.AWSandAmazon.CDK.LibNuGet packages to the .NET Aspire AppHost project. - Create a new class file named
KnowledgeBaseStack.csin your AppHost project and copy the contents below in that file.
using Amazon.CDK.AWS.IAM;
using Amazon.CDK.AWS.OpenSearchServerless;
using Amazon.CDK.AWS.S3;
using Amazon.CDK.AwsBedrock;
using Constructs;
using static Amazon.CDK.AWS.OpenSearchServerless.CfnIndex;

public class KnowledgeBaseStack : Amazon.CDK.Stack
{
    //Declare the properties for Stack outputs
    public string BucketName { get; private set; }
    public string BedrockRoleArn { get; private set; }
    public string KnowledgeBaseId { get; set; }
    public string DataSourceId { get; set; }

    public KnowledgeBaseStack(Construct scope, string id) : base(scope, id)
    {
        // Create Amazon S3 bucket for storing the data
        var bucket = new Bucket(this, "AnyCompanySupportDataBucket", new BucketProps
        {
            Versioned = true,
            PublicReadAccess = false,
            BlockPublicAccess = BlockPublicAccess.BLOCK_ALL
        });

        // Create IAM role for Bedrock to access S3 and OpenSearch
        var bedrockRole = new Role(this, "BedrockKnowledgeBaseRole", new RoleProps
        {
            AssumedBy = new ServicePrincipal("bedrock.amazonaws.com"),
            Description = "Role for Bedrock Knowledge Base to access S3 and OpenSearch",
            InlinePolicies = new System.Collections.Generic.Dictionary<string, PolicyDocument>
            {
                { "BedrockAccessPolicy", new PolicyDocument(new PolicyDocumentProps
                    {
                        Statements = new []
                        {
                            new PolicyStatement(new PolicyStatementProps
                            {
                                Actions = new [] { "bedrock:InvokeModel" },
                                Resources = new [] { "arn:aws:bedrock:us-east-1::foundation-model/amazon.titan-embed-text-v2:0" }
                            })
                        }
                    })
                },
                { "OpenSearchAccessPolicy", new PolicyDocument(new PolicyDocumentProps
                    {
                        Statements = new []
                        {
                            new PolicyStatement(new PolicyStatementProps
                            {
                                Actions = new [] {
                                    "aoss:APIAccessAll"
                                },
                                Resources = new [] { "*" }
                            })
                        }
                    })
                }
            }
        });

        // Grant permissions to the role
        bucket.GrantReadWrite(bedrockRole);

        // Create OpenSearch Serverless Encryption Policy
        var encryptionPolicy = new CfnSecurityPolicy(this, "AnyCompanyEncryptionPolicy", new CfnSecurityPolicyProps
        {
            Name = "any-company-encryption-policy",
            Type = "encryption",
            Description = "Encryption policy for AnyCompany Support collection",
            Policy = "{\"Rules\":[{\"ResourceType\":\"collection\",\"Resource\":[\"collection/any-company-support-collection\"]}],\"AWSOwnedKey\":true}"
        });

        // Create OpenSearch Serverless Network Policy
        var networkPolicy = new CfnSecurityPolicy(this, "AnyCompanyNetworkPolicy", new CfnSecurityPolicyProps
        {
            Name = "any-company-network-policy",
            Type = "network",
            Description = "Network policy for AnyCompany Support collection",
            Policy = "[{\"Rules\":[{\"ResourceType\":\"collection\",\"Resource\":[\"collection/any-company-support-collection\"]}],\"AllowFromPublic\":true}]"
        });

        // Create OpenSearch Serverless Access Policy with improved permissions
        var accessPolicy = new CfnAccessPolicy(this, "AnyCompanyAccessPolicy", new CfnAccessPolicyProps
        {
            Name = "any-company-access-policy",
            Description = "Access policy for AnyCompany Support collection",
            Type = "data",
            Policy = "["
                + "{"
                + "  \"Rules\": ["
                + "    {"
                + "      \"ResourceType\": \"collection\","
                + "      \"Resource\": [\"collection/any-company-support-collection\"],"
                + "      \"Permission\": [\"aoss:DescribeCollectionItems\", \"aoss:CreateCollectionItems\",\"aoss:UpdateCollectionItems\"]"
                + "    },"
                + "    {"
                + "      \"ResourceType\": \"index\","
                + "      \"Resource\": [\"index/any-company-support-collection/*\"],"
                + "      \"Permission\": [\"aoss:CreateIndex\", \"aoss:UpdateIndex\", \"aoss:DeleteIndex\", \"aoss:DescribeIndex\", \"aoss:ReadDocument\",\"aoss:WriteDocument\"]"
                + "    }"
                + "  ],"
                + "  \"Principal\": ["
                + $"    \"arn:aws:iam::{this.Account}:role/Admin\","
                + $"    \"{bedrockRole.RoleArn}\""
                + "  ]"
                + "}"
                + "]"
        });

        // Create OpenSearch Serverless Collection with vector search configuration
        var collection = new CfnCollection(this, "AnyCompanySupportCollection", new CfnCollectionProps
        {
            Name = "any-company-support-collection",
            Type = "VECTORSEARCH",
        });

        // Add dependency to ensure policies are created before the collection
        collection.AddDependency(encryptionPolicy);
        collection.AddDependency(accessPolicy);
        collection.AddDependency(networkPolicy);

        //Create a OpenSearch Serverless Index with vector mappings
        var index = new CfnIndex(this, "AnyCompanySupportIndex", new CfnIndexProps
        {
            IndexName = "bedrock-knowledge-base-default-index",
            CollectionEndpoint = collection.AttrCollectionEndpoint,
            Mappings = new MappingsProperty
            {
                Properties = new Dictionary<string, object>
                {
                    ["AMAZON_BEDROCK_TEXT"] = new PropertyMappingProperty
                    {
                        Type = "text",
                        Index = true,
                    },
                    ["AMAZON_BEDROCK_METADATA"] = new PropertyMappingProperty
                    {
                        Type = "text",
                        Index = false,
                    },
                    ["bedrock-knowledge-base-default-vector"] = new PropertyMappingProperty
                    {
                        Type = "knn_vector",
                        Dimension = 1024,
                        Method = new MethodProperty
                        {
                            Name = "hnsw",
                            Engine = "faiss",
                            SpaceType = "l2",
                            Parameters = new ParametersProperty
                            {
                                M = 16,
                                EfConstruction = 512,
                            }
                        }
                    }
                }
            },
            Settings = new IndexSettingsProperty
            {
                Index = new IndexProperty
                {
                    Knn = true,
                    KnnAlgoParamEfSearch = 512
                }
            },
        });

        index.AddDependency(collection);

        // Create Bedrock Knowledge Base with OpenSearch Serverless as the storage configuration
        var knowledgeBase = new CfnKnowledgeBase(this, "AnyCompanySupportKnowledgeBase", new CfnKnowledgeBaseProps
        {
            Name = "AnyCompanySupportKnowledgeBase",
            Description = $"Knowledge Base for AnyCompany Support. It uses the {index.CollectionEndpoint} as its storage configuration.",
            RoleArn = bedrockRole.RoleArn,
            KnowledgeBaseConfiguration = new CfnKnowledgeBase.KnowledgeBaseConfigurationProperty
            {
                Type = "VECTOR",
                VectorKnowledgeBaseConfiguration = new CfnKnowledgeBase.VectorKnowledgeBaseConfigurationProperty
                {
                    EmbeddingModelArn = "arn:aws:bedrock:us-east-1::foundation-model/amazon.titan-embed-text-v2:0",
                }
            },
            StorageConfiguration = new CfnKnowledgeBase.StorageConfigurationProperty
            {
                Type = "OPENSEARCH_SERVERLESS",
                OpensearchServerlessConfiguration = new CfnKnowledgeBase.OpenSearchServerlessConfigurationProperty
                {
                    CollectionArn = collection.AttrArn,
                    FieldMapping = new CfnKnowledgeBase.OpenSearchServerlessFieldMappingProperty
                    {
                        MetadataField = "AMAZON_BEDROCK_METADATA",
                        TextField = "AMAZON_BEDROCK_TEXT",
                        VectorField = "bedrock-knowledge-base-default-vector"
                    },
                    VectorIndexName = index.IndexName,
                }
            }
        });

        knowledgeBase.AddDependency(index);

        // Create Data Source for the Knowledge Base. It uses the Amazon S3 bucket as the data source.
        var dataSource = new CfnDataSource(this, "AnyCompanySupportDataSource", new CfnDataSourceProps
        {
            Name = "AnyCompanySupportDataSource",
            Description = "Data Source for AnyCompany Support Knowledge Base",
            KnowledgeBaseId = knowledgeBase.AttrKnowledgeBaseId,
            DataSourceConfiguration = new CfnDataSource.DataSourceConfigurationProperty
            {
                Type = "S3",
                S3Configuration = new CfnDataSource.S3DataSourceConfigurationProperty
                {
                    BucketArn = bucket.BucketArn
                }
            }
        });

        dataSource.AddDependency(knowledgeBase);

        // Stack Outputs
        BucketName = bucket.BucketName;
        BedrockRoleArn = bedrockRole.RoleArn;
        KnowledgeBaseId = knowledgeBase.AttrKnowledgeBaseId;
        DataSourceId = dataSource.AttrDataSourceId;
    }
}
- Update the
Program.csfile of your AppHost project to look like the following code. This enables the AWS CDK outputs to be passed to any other service which needs it.
var builder = DistributedApplication.CreateBuilder(args);

// Setup a configuration for the AWS .NET SDK.
var awsConfig = builder.AddAWSSDKConfig()
    .WithProfile("default")
    .WithRegion(RegionEndpoint.USEast1);

var kbStack = builder.AddAWSCDKStack<KnowledgeBaseStack>("AnyCompanySupport-KnowledgeBaseStack", scope => new KnowledgeBaseStack(scope, "Aspire-KB"));
kbStack.AddOutput("BucketName", stack => stack.BucketName)
        .AddOutput("BedrockRoleArn", stack => stack.BedrockRoleArn)
        .AddOutput("KnowledgeBaseId", stack => stack.KnowledgeBaseId)
        .AddOutput("DataSourceId", stack => stack.DataSourceId)
        .WithReference(awsConfig);
builder.Build().Run();
The Aspire.Hosting.AWS NuGet package provides integrations with .NET Aspire for AWS. The AWS integrations focus on provisioning and working with AWS application resources in your development environment.
One of the key advantages of .NET Aspire is its ability to integrate with cloud infrastructure as code. In this example, I have used AWS CDK to define the infrastructure stack.
The KnowledgeBaseStack class defines all the AWS resources needed for our AI capabilities:
- An Amazon S3 bucket for storing knowledge base documents
- OpenSearch Serverless collection for vector search
- Amazon Bedrock Knowledge Base configuration
- IAM roles and policies for secure access
Step 2 – Set up AWS CDK
If you haven’t already done so, you will need to bootstrap your AWS environment. Bootstrapping ensures that your environment has the necessary resources and permissions for the AWS CDK to work with your AWS account.
To set up your AWS environment for AWS CDK:
- Open a terminal and navigate to the root directory of your .NET Aspire project.
- Run the following command to bootstrap your AWS environment:
cdk bootstrap
Once the command is successful, you can proceed to run the project using dotnet run or by pressing the F5 button in Visual Studio.
First Run Experience
When the application first starts, it deploys the AWS CDK stack. You can monitor the deployment using the .NET Aspire dashboard. The dependent services, which in our case is the Web API, wait for the cloud infrastructure provisioning to complete before starting. You can view the status of the deployment in the Aspire dashboard console (Figure 2), which shows the progress of the cloud infrastructure.
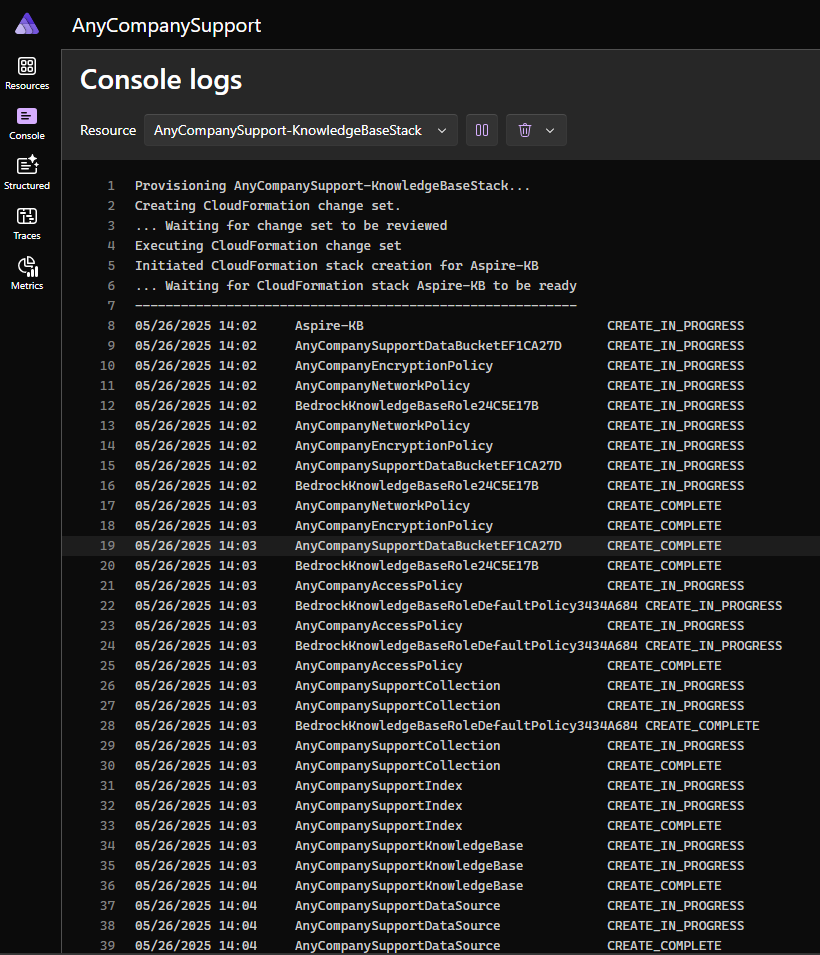
Figure 2: First launch Aspire console logs
In subsequent launches, start-up is faster because provisioning has already been done.
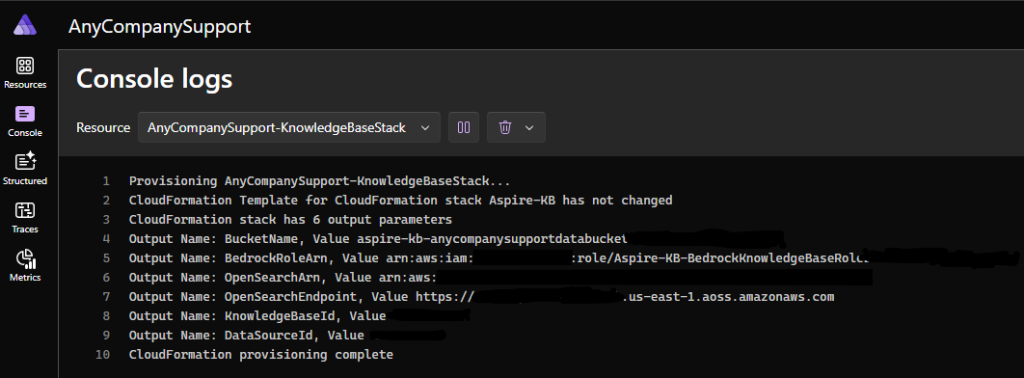
Figure 3: Subsequent launch Aspire console logs
This simplifies the developer workflow, and you can expect all the cloud resources to be provisioned and ready to go. This streamlined workflow reduces the time required to develop and maintain applications.
Step 3 – Upload data to Amazon S3 bucket
Once the AWS CDK stack is deployed, upload data to the Amazon S3 bucket created by your AWS CDK stack. This data can be in any of the supported formats.
To upload data to Amazon S3 bucket (console):
- Open the Amazon S3 console.
- Choose the Amazon S3 bucket created by running the AWS CDK stack in previous sections.
- Choose Upload and follow the on-screen instructions to upload your files to the bucket.
Step 4 – Pass AWS CDK Outputs to dependent services
.NET Aspire makes it easy to connect services and pass configuration between them. Outputs from AWS CDK are passed to the Web API service via environment variables, which are then used to configure the API service. This approach allows for a clean separation of concerns, making it easy to manage and update the configuration of the AI service without affecting the rest of the application.
To pass AWS CDK output to ASP.NET Core Web API:
- Add an ASP.NET Core Web API project to your solution.
- Add
AWSSDK.BedrockAgentandAWSSDK.BedrockAgentRuntimeNuGet packages to the project which will enable you to interact with the Knowledge Base provisioned in previous steps. - Update
Program.csof the AppHost project like this:
var api = builder.AddProject<Projects.AnyCompany_Api>("anycompany-webapi")
    .WaitFor(kbStack)
    .WithEnvironment("BucketName", kbStack.GetOutput("BucketName"))
    .WithEnvironment("BedrockRoleArn", kbStack.GetOutput("BedrockRoleArn"))
    .WithEnvironment("KnowledgeBaseId", kbStack.GetOutput("KnowledgeBaseId"))
    .WithEnvironment("DataSourceId", kbStack.GetOutput("DataSourceId"))
    .WithHttpsHealthCheck("/health");
builder.Build().Run();- Set up Dependency Injection in your API project to make relevant services available to your application.
builder.Services.AddSingleton<IAmazonBedrockAgent, AmazonBedrockAgentClient>();
builder.Services.AddSingleton<IAmazonBedrockAgentRuntime, AmazonBedrockAgentRuntimeClient>();
builder.Services.AddHealthChecks();

var app = builder.Build();
app.UseHealthChecks("/health");
Notice how I am using the WithHttpsHealthCheck method to establish a custom health check endpoint, ensuring that other dependent services can monitor the health of our API service. For this to work ensure that your Web API exposes a health check at the /health path.
The WithEnvironment method passes configuration values from the infrastructure stack to our services.
Step 5 – Sync Knowledge Base Data Source
Next step is to trigger a Data Ingestion Job to sync Amazon S3 data source to Amazon Bedrock Knowledge Base. This sync automatically parses, chunks and creates embedding from the data stored in Amazon S3 and makes it available in OpenSearch Vector collection.
To start a Data Ingestion Job to sync Amazon S3 data source to Amazon Bedrock Knowledge Base:
-
- Create a new Web API endpoint in your API project.
- Add the following code to the endpoint you just created.
app.MapGet("/sync", async () =>
{
    var startIngestionJobRequest = new StartIngestionJobRequest
    {
        KnowledgeBaseId = knowledgeBaseId,
        DataSourceId = dataSourceId
    };
    var _bedrockAgent = app.Services.GetService<IAmazonBedrockAgent>();
    var startIngestionJobResponse = await _bedrockAgent.StartIngestionJobAsync(startIngestionJobRequest);
    return Results.Ok();
});
Step 6 – Query data from the Amazon Bedrock Knowledge Base
Once the data sync completes, you can start querying the data from the Amazon Bedrock Knowledge Base.
To query data from Knowledge Base:
-
-
- Create a new Web API endpoint in your API project.
- Add the following code to the endpoint you just created.
-
app.MapGet("/query", async (string textToSearch) =>
{
    var queryRequest = new RetrieveRequest
    {
        KnowledgeBaseId = knowledgeBaseId,
        RetrievalQuery = new KnowledgeBaseQuery { Text = textToSearch },
        //GuardrailConfiguration - Optional Guardrail for retrieving results
    };
    var _bedrockAgentRuntime = app.Services.GetService<IAmazonBedrockAgentRuntime>();
    var queryResponse = await _bedrockAgentRuntime.RetrieveAsync(queryRequest);
    StringBuilder responseBuilder = new StringBuilder();
    queryResponse.RetrievalResults.ForEach(result =>
    {
        responseBuilder.AppendLine(result.Content.Text);
    });

    return Results.Ok(responseBuilder.ToString());
});
Notice how the Amazon Bedrock Knowledge Base abstracts away the RAG complexities. You don’t have to worry about managing the RAG pipeline or the underlying infrastructure. You can simply focus on your application’s core logic.
Step 7 – Run the Application
Follow these steps to run the application:
1. Navigate to the Aspire Dashboard and open the URL of the Web API project.
2. Navigate to the /sync endpoint. This will trigger Amazon Bedrock Knowledge Base data sync.
3. Log in to AWS Console.
4. Navigate to Amazon Bedrock Knowledge Base screen and monitor the data sync.
5. Once the sync is completed, navigate back to the Web API screen.
6. Navigate to /query?textToSearch=<text> and you should be able to see the results returned by Amazon Bedrock Knowledge Base for your query. Figure 4 shows a response to search text backpack.

Figure 4:RAG Results by Amazon Bedrock Knowledge Base
Clean Up
To clean up AWS resources provisioned by the application:
-
-
- Log in to the AWS Console.
- Navigate to CloudFormation.
- Identify the AWS CDK stack deployed by the solution and choose Delete.
- Navigate to Amazon S3.
- Identify the bucket created by the solution.
- Empty and then delete the bucket.
-
Conclusion
.NET Aspire provides a powerful foundation for building AI-ready applications in .NET. By combining .NET Aspire with AWS services like Amazon Bedrock and OpenSearch, you can create sophisticated AI applications with minimal infrastructure code. As AI continues to evolve, frameworks like .NET Aspire will become increasingly important for developers looking to integrate these capabilities into their applications. By providing a structured approach to building distributed applications, .NET Aspire helps manage the complexity of modern AI-powered systems.
In this blog post, you have seen how .NET Aspire simplifies the development of AI applications by providing:
-
-
- Seamless Cloud Integration: The ability to provision and configure cloud resources directly from your application code
- Dependency Management: Clear definition of service dependencies and startup order
- Configuration Propagation: Automatic passing of configuration between infrastructure and application services
- Developer Experience: A comprehensive dashboard for monitoring application components during development
-
The combination of .NET Aspire’s cloud-native approach with AWS powerful AI services create a compelling platform for building intelligent applications.