AWS Database Blog
Implement row-level security in Amazon Aurora MySQL and Amazon RDS for MySQL
Row-level security (RLS) is a security mechanism that enhances data protection in scalable applications by controlling access at the individual row level. It enables organizations to implement fine-grained access controls based on user attributes, so users can only view and modify data they’re authorized to access. RLS is relevant across industries: in multi-tenant applications, it isolates each customer’s data; in healthcare, it supports HIPAA compliance by restricting patient data access; in HR, it segments employee information for appropriate managerial oversight; in financial services, it compartmentalizes client account data for advisor-specific access; and in education, it limits teachers’ access to only their students’ records. This approach strengthens security posture, simplifies access management, and helps enforce regulatory compliance while maintaining data privacy across various sectors.
This post focuses on implementing a cost-effective custom RLS solution using native MySQL features, making it suitable for a wide range of use cases without requiring additional software dependencies. This solution is applicable for both Amazon Relational Database Service (Amazon RDS) for MySQL and Amazon Aurora MySQL-Compatible Edition, providing flexibility for users of either service.
Solution overview
In the following sections, we demonstrate how to implement row-level security in Amazon Aurora and RDS for MySQL using MySQL Workbench. MySQL (including Amazon Aurora MySQL-Compatible Edition) doesn’t natively support row-level security on tables. Instead, we implement a workaround solution using a combination of views, stored functions, and triggers to achieve equivalent functionality.
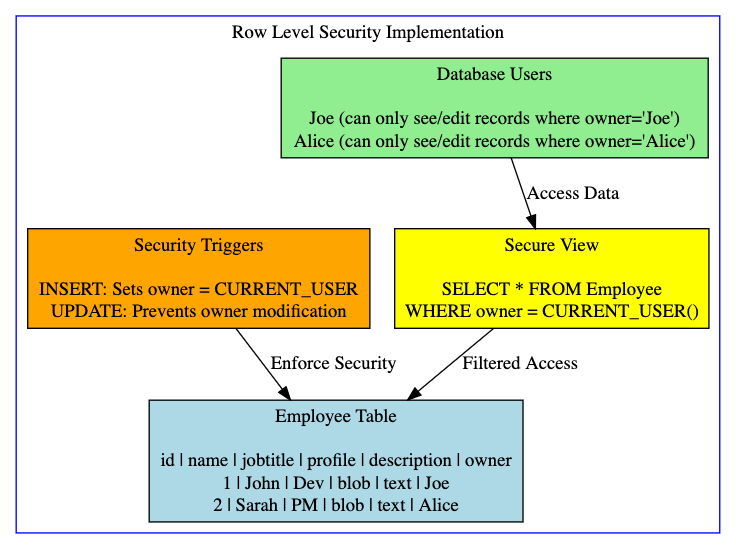
- Database Structure Enhancement: The solution begins by adding an ownership column to tables requiring protection. This column stores the username of the authorized user for each row.
- Security View Layer: Instead of direct table access, queries are routed through specially constructed database views. These views contain WHERE clauses that filter results based on the CURRENT_USER() MySQL function, automatically limiting returned rows to those owned by the requesting user.
- Query Execution Flow: When a user executes a query against the security view, MySQL’s query processor evaluates the view definition, applies the ownership filter condition, and returns only authorized rows. This filtering happens before results reach the application layer.
- Automatic Ownership Assignment: When new records are inserted, a BEFORE INSERT trigger intercepts the operation, captures the current user’s identity using CURRENT_USER(), and automatically populates the owner field. This makes sure security is maintained without requiring application code to handle ownership.
- Permission Boundary Enforcement: The security model revokes direct table access permissions and grants rights only to the filtered views. This creates a security boundary that helps prevent users from bypassing the row-level filters through direct table queries.
Prerequisites
You should have the following prerequisites:
- An AWS account with AWS Identity and Access Management (IAM) permissions to create an Aurora MySQL or RDS for MySQL database.
- An Aurora MySQL instance (version 3.0 or higher) or an RDS for MySQL instance (version 8.0 or higher).
- Administrative database access with CREATE VIEW, CREATE TRIGGER, and ALTER TABLE privileges.
- Verify your RDS instance has properly configured security groups that allow database connections only from authorized IP addresses.
Consider you have a list of employee information stored in a single table so that each employee is managed by a user. Each user should be able to work only with their own employee data and should not be able to see, edit, or delete the employee data managed by other users. The figure below shows the Row Level Security Implementation.
For our example use case, the initial definition of the table used to store information about employees is as follows:
In the following sections, we demonstrate how to add an auxiliary column, create a view to return only the relevant data to each user, configure user permissions, and create triggers.
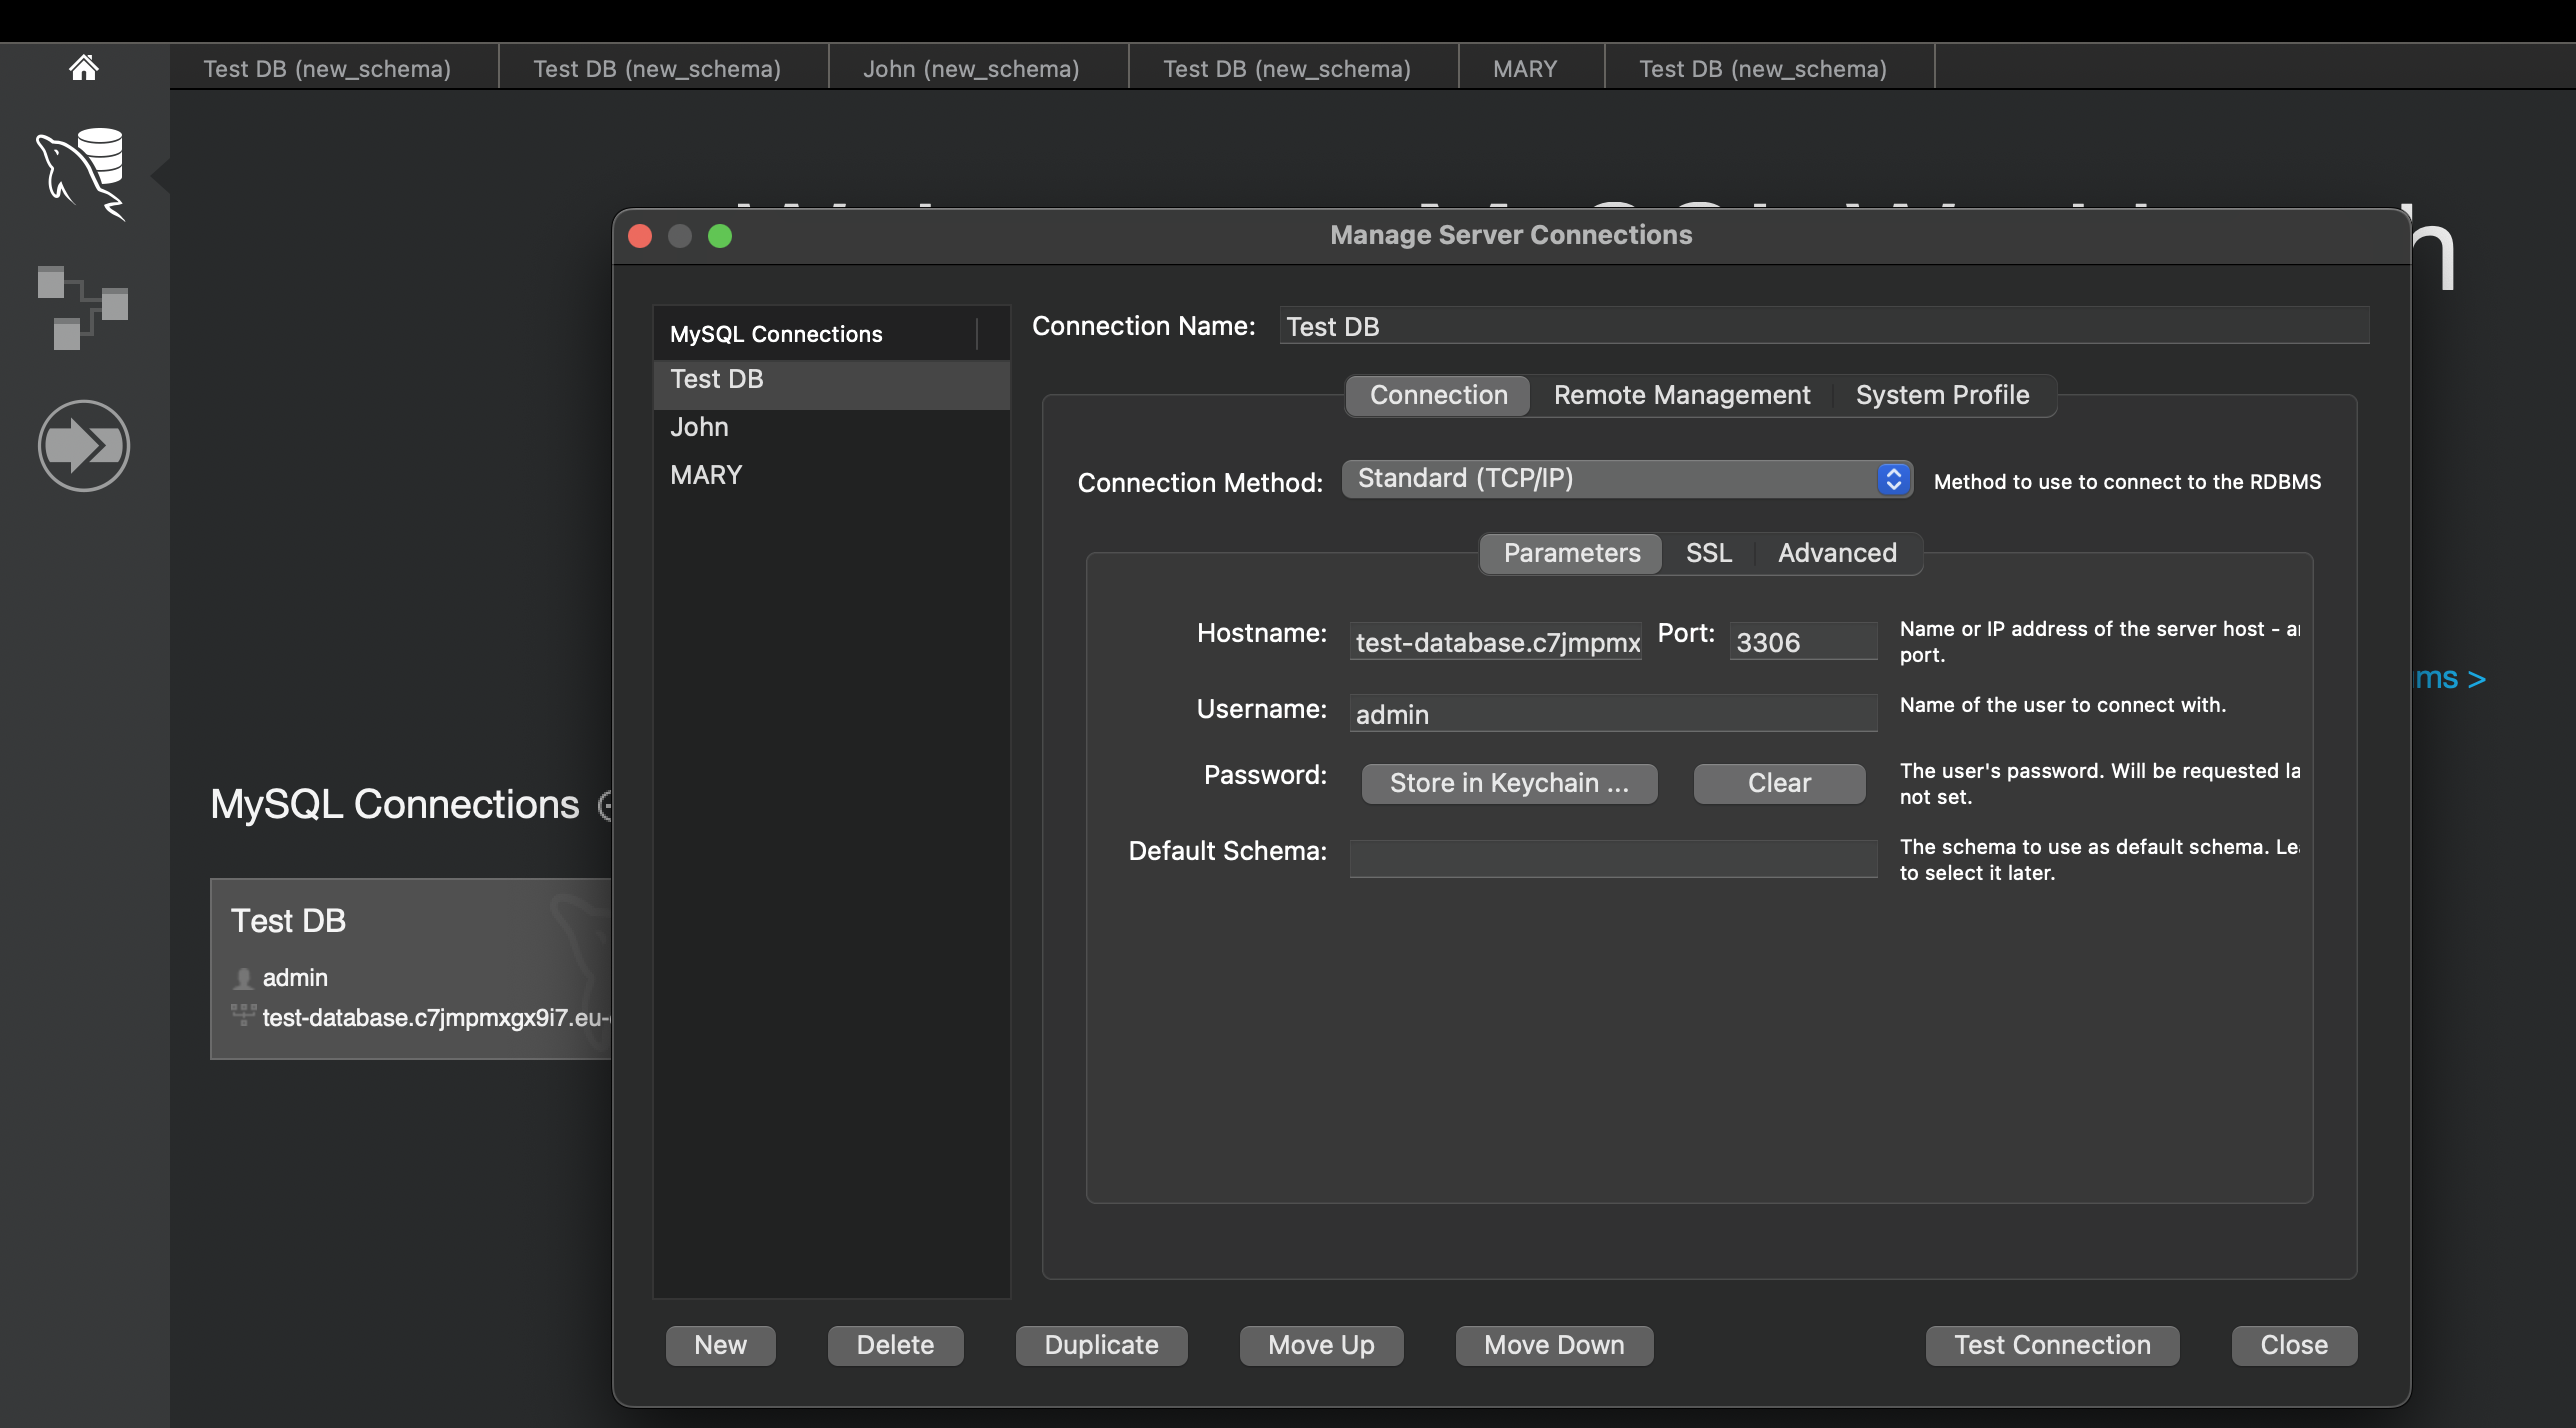
Connect to your Aurora or RDS for MySQL database
Complete the following steps to connect to your RDS for MySQL instance:
- Open MySQL Workbench from your source machine.
- On the connections page, enter the RDS instance endpoint for Host name and provide the port as 3306.
- Enter the password used to connect to the database.
Add an auxiliary column to the table
Add an additional column owner to the table Employee to hold the user’s name (if you don’t already have this column). Our example table definition is shown as follows:
If you have an existing table, you can add this column using the below command:
Create a view to return only the relevant data to each user
Create a view with a WHERE clause in the definition, so that the view returns only the relevant data to each user. In our example table, the view definition looks like the following:
Configure user permissions
Configure permissions for the users created: For our example, we assume we have two users (Joe and Emma) who have access this database.
Create triggers
Create the following trigger to make sure that each new row is automatically assigned to its designated owner:
To help prevent owner replacement, create a trigger to be activated whenever a row is modified:
With this setup in place, if user Joe connects to the database, he can only see rows inserted by him and can only modify or delete rows that were inserted by him. He will not see other users’ data in the same table.
Test the solution
To test the solution, we create three new Employee entries from users Joe and Emma by accessing the view Employee_Data.
Example Records Created by Joe
Example Records Created by Emma
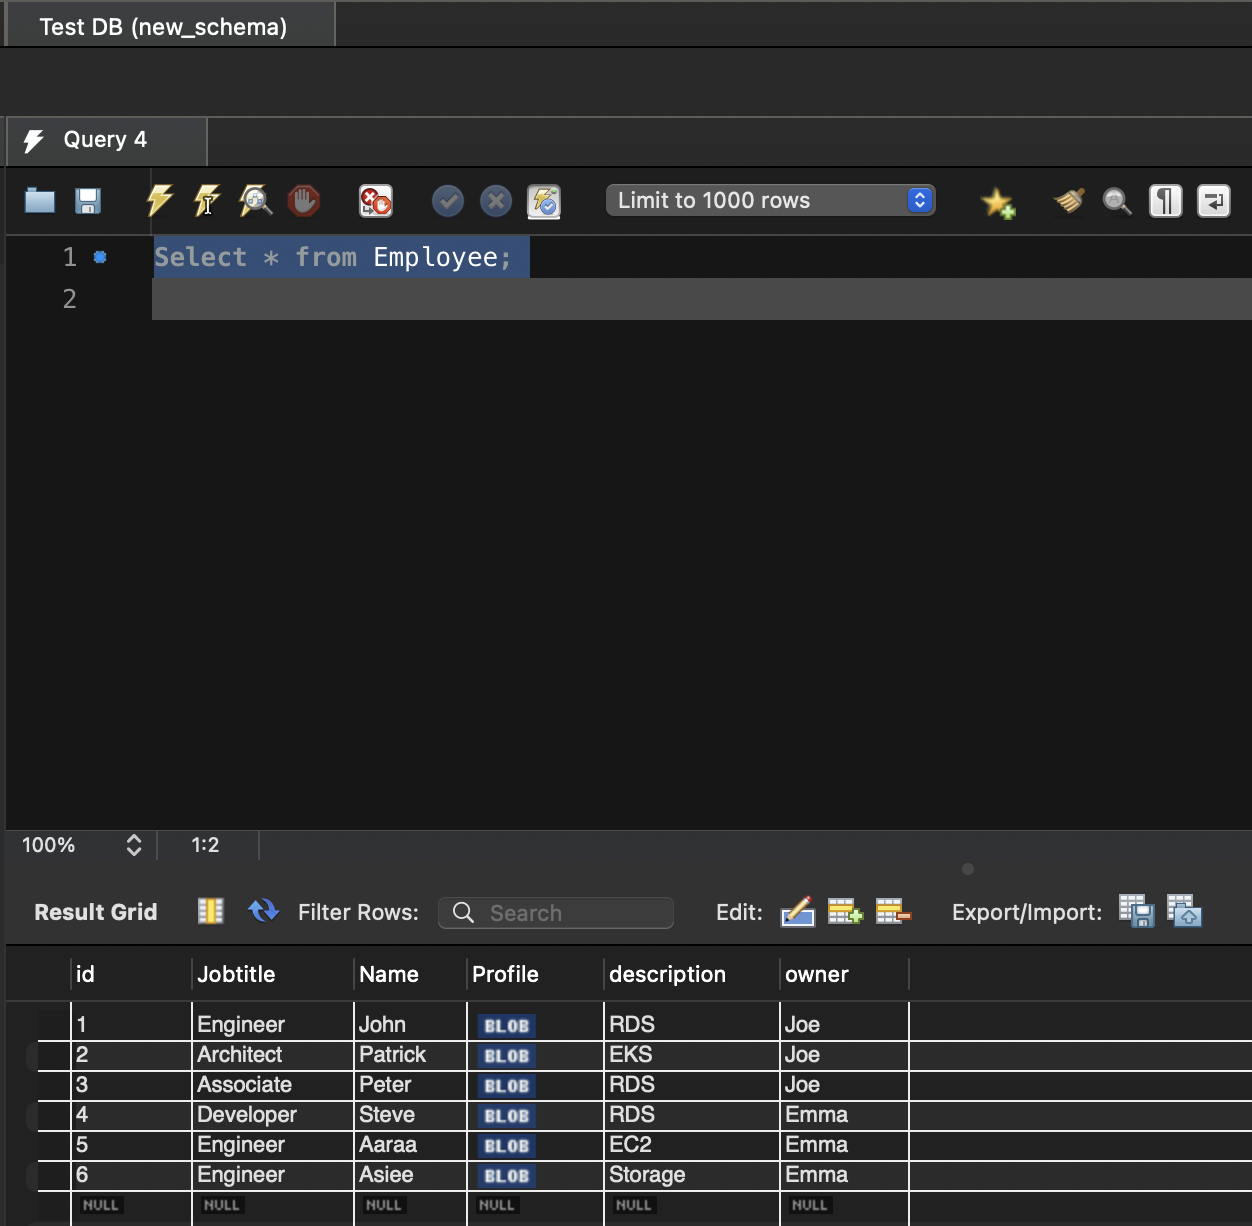
By querying the table from the admin or root user, we can see the six records.
Now we query the view Employee_Data from each user to see what is visible.
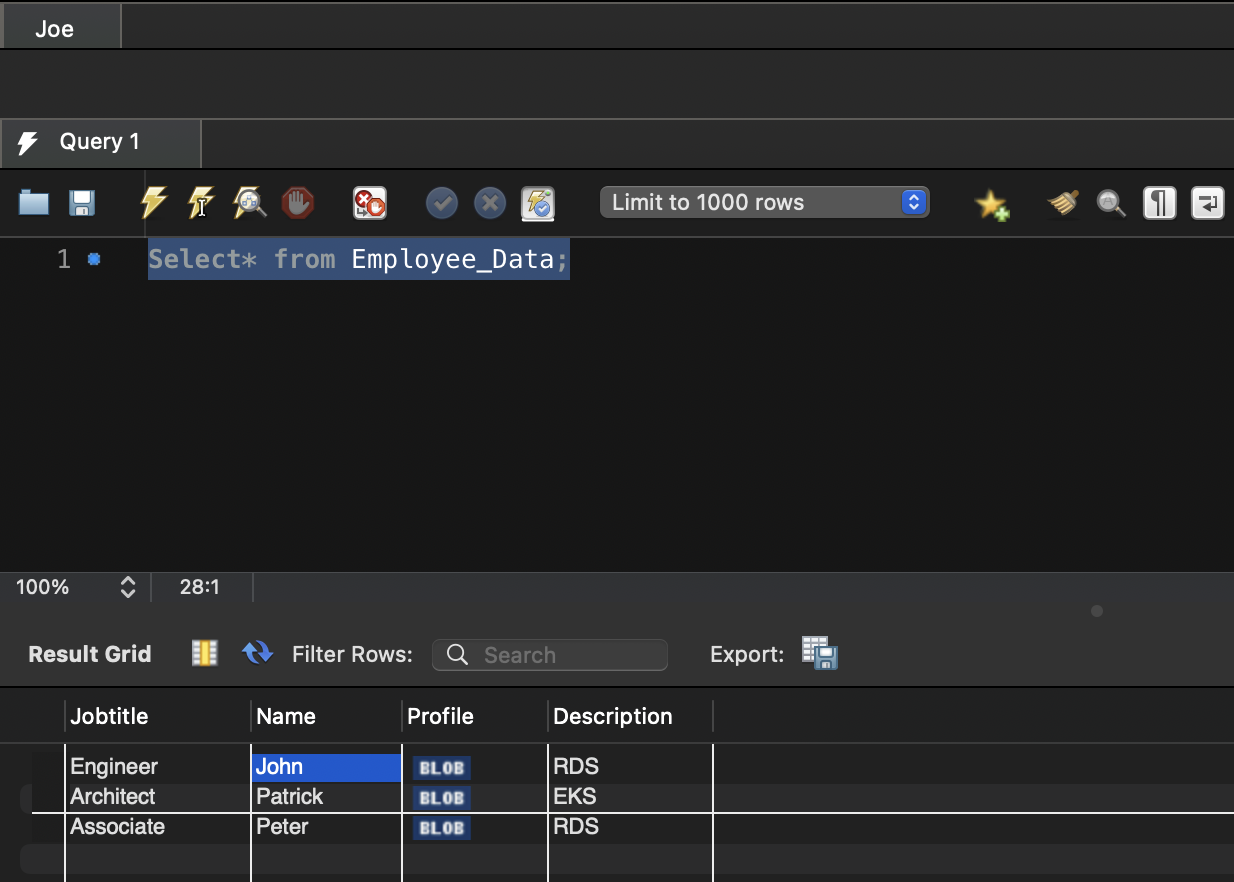
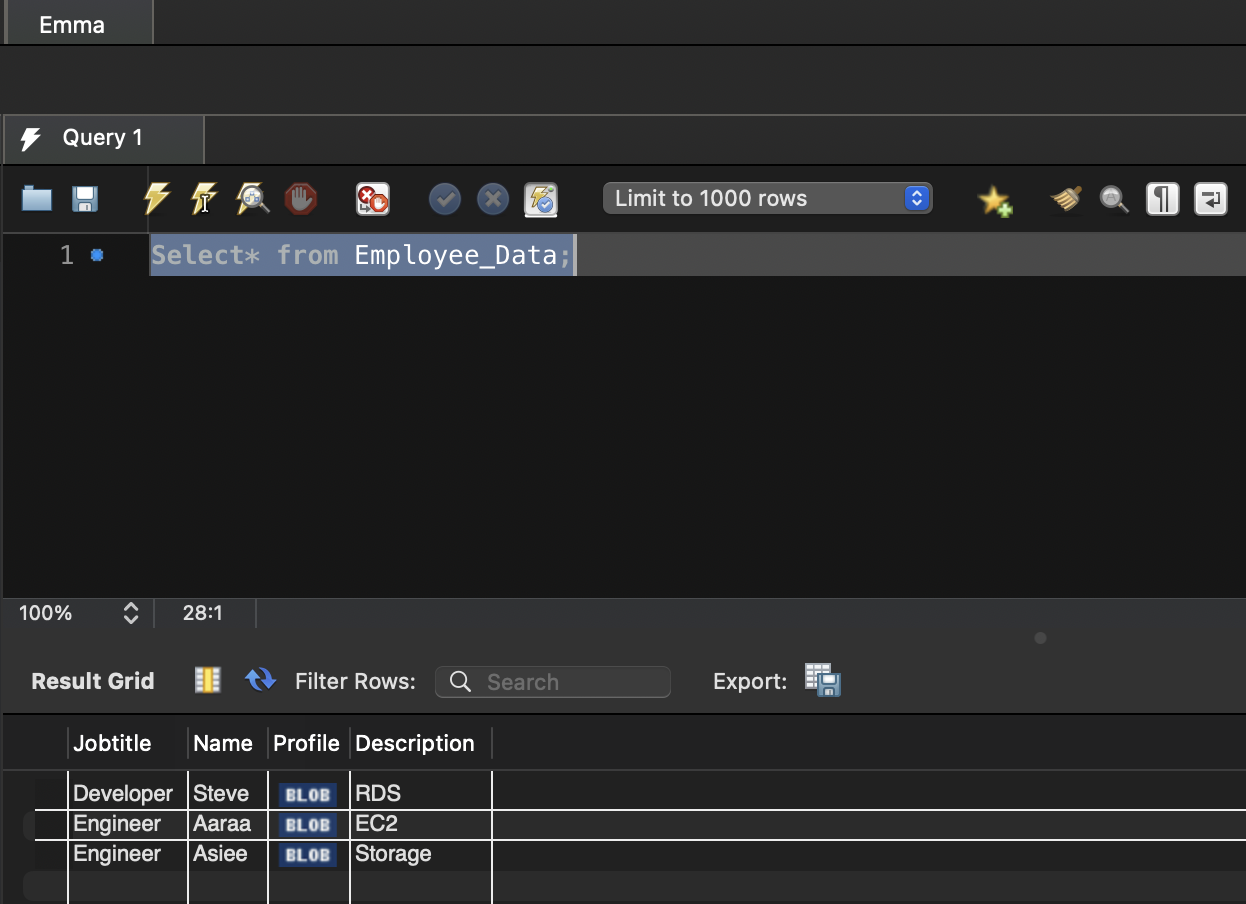
We can confirm that the users are only able to see and manage the rows they have inserted. They are not allowed to manage the rows inserted by other users.
Performance considerations
When implementing this solution, consider the following performance aspects:
- Index usage – Make sure the owner column is properly indexed to optimize filtering.
- Query complexity – Complex RLS policies can lead to slower query execution. Monitor and optimize as needed.
- Data volume – As data grows, RLS filtering might become more resource-intensive. Consider partitioning for large tables.
- Query plan analysis – Regularly analyze query execution plans to identify performance bottlenecks related to RLS.
- Monitoring – Use MySQL performance_schema to monitor RLS impact on query performance.
Clean up
To avoid incurring future charges, delete the resources you created in the prerequisites section.
- Delete the database views:
- Remove the triggers:
Note: Replace
view_nameandtrigger_namewith your actual resource names.
Conclusion
In this post, we demonstrated how to implement row-level security on Amazon Aurora and RDS for MySQL databases using views and triggers. This approach enhances the security posture of multi-tenant applications and enables the use of shared databases for workloads with complex access requirements.
We encourage you to implement this solution for your specific use case and to learn more, visit our Aurora MySQL Documentation or RDS for MySQL Getting Started Guide for detailed instructions on setting up and managing your database.