AWS Database Blog
Deploy Amazon Timestream for InfluxDB instances with AWS CloudFormation and HashiCorp Terraform
Amazon Timestream for InfluxDB is a managed time series database engine that you can use to run InfluxDB databases on AWS for real-time time series applications using open source APIs. If you’re seeking a highly flexible, extensible Timestream for InfluxDB infrastructure, AWS CloudFormation and HashiCorp Terraform provide the tools that meet your needs. The solution these tools offer dynamically adapts to changing Regional requirements and evolving workload demands.
In this post, we show how you can use AWS CloudFormation and Terraform to automate Timestream for InfluxDB instance deployment and teardown.
Solution overview
For our example use case, a multitude of sensors generate time series data during an automotive sporting championship, whose races take place in multiple countries worldwide. This time series data includes track temperatures, lap times, driver positions, and car speed. This global event requires Timestream for InfluxDB instances in different AWS Regions across the globe to store this data effectively.
During races, time series data tracking cars, drivers, intervals, laps, and weather are sent to a Timestream for InfluxDB instance. The Timestream for InfluxDB instances need to be located as close to the event as possible to provide the most accurate, up-to-date information on the races and to address potential data sovereignty requirements in different countries.
Timestream for InfluxDB accepts line protocol data. Line protocol data is comprised of the following, in order:
- A measurement (an indicator of what is being measured)
- A tag set (a set of metadata attributes)
- A field set (a set of values)
- A Unix timestamp
The following is an example of a hypothetical line protocol point for a driver during a race event:
The code contains the following parameters:
circuit_paul_ricardis the measurement. In this case, it’s the name of a race circuit in France.driver_numberis a tag with a number uniquely identifying the car’s current driver.rpmis a field with the revolutions per minute of the car’s engine.speedis a field with the car’s current speed in kmph.throttleis a field with the percentage of the car’s engine being used.- The final component is the Unix timestamp when this data point was generated.
To provide the most up-to-date data, the Timestream for InfluxDB instance must be deployed in the Region closest to where the race is taking place. During the race, the instance simultaneously receives time series data from multiple aspects of the competition, including telemetry, driver statistics, and environmental conditions.
The following diagram shows an example of a Timestream for InfluxDB instance in the Europe (Paris) Region (eu-west-3) receiving line protocol data during a race event at Circuit Paul Ricard. The data is generated by the cars and relayed through on-track monitoring systems and infrastructure that capture and forward the telemetry information.
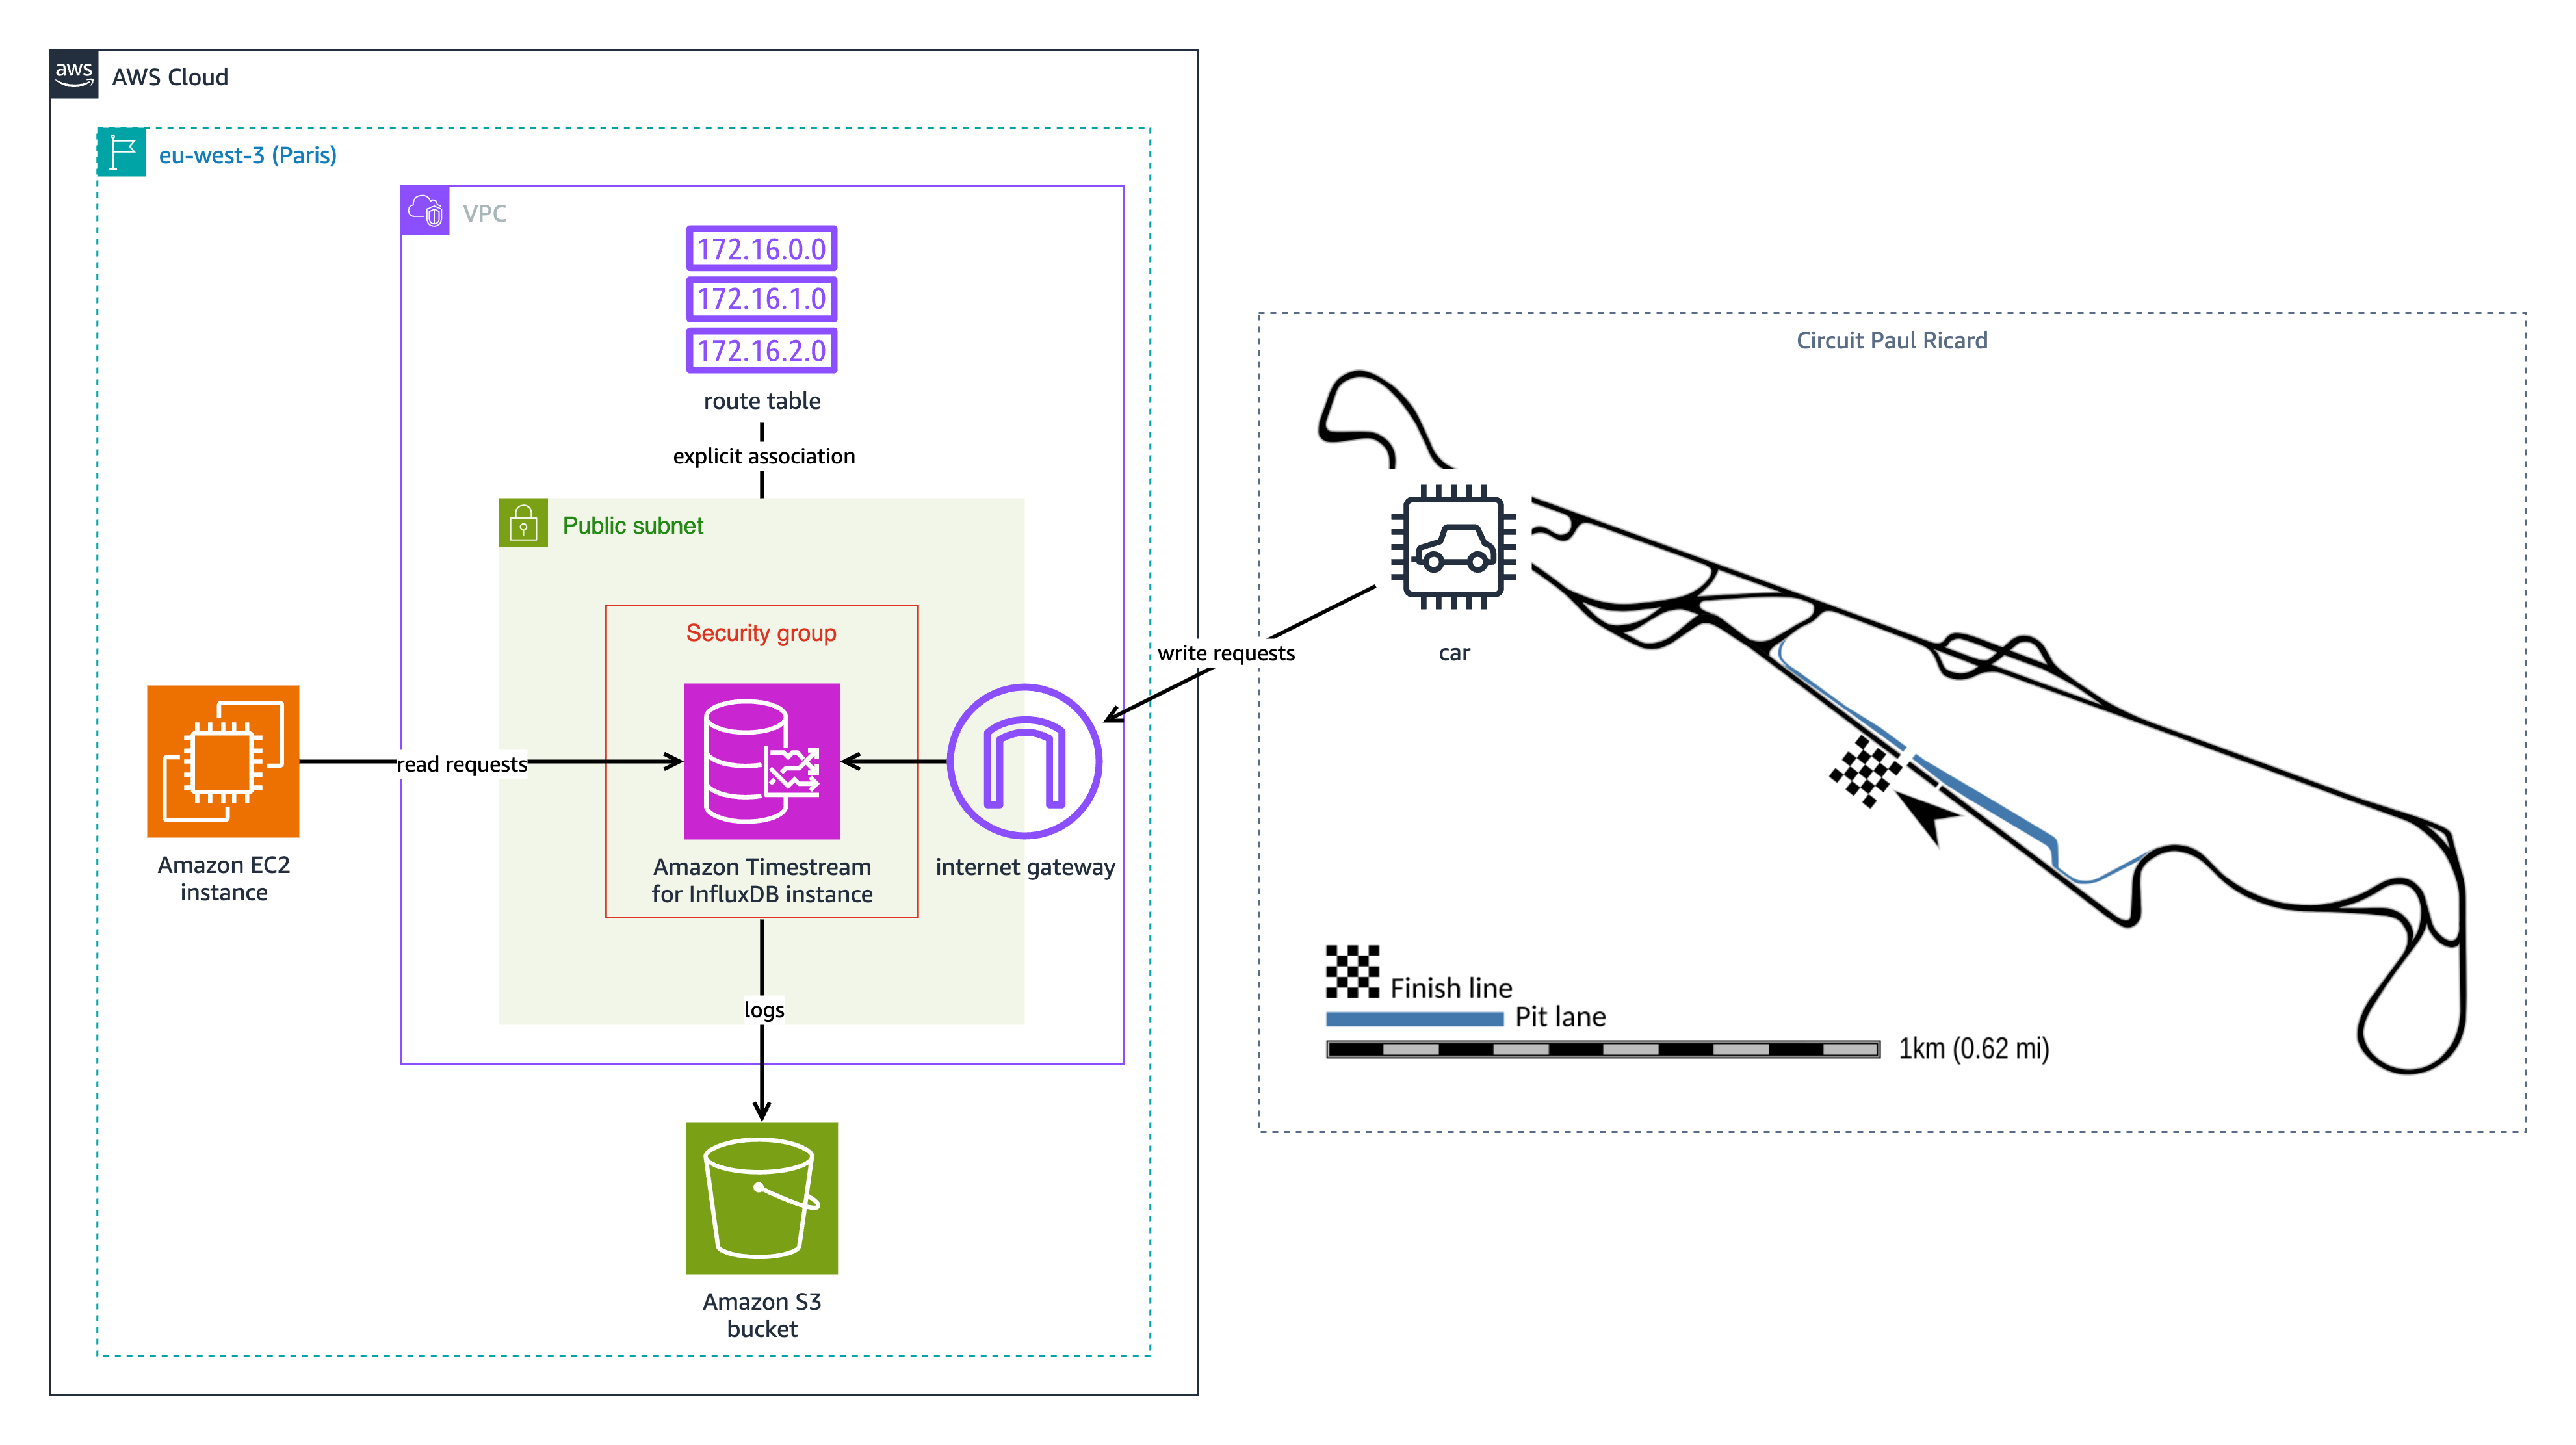
The following resources are used in this scenario:
- An internet gateway, public subnet, and route table provide public internet access to the database instance, allowing incoming telemetry data to be written. If you deploy your database instance in a public subnet, make sure to follow security best practices.
- With an Amazon Elastic Compute Cloud (Amazon EC2) instance, the data relayed through on-track monitoring systems is used for real-time analysis and visualization.
- An Amazon Simple Storage Service (Amazon S3) bucket stores database logs.
The solution in this post is different from this scenario. This solution in this post places the database instance in a private subnet and grants access only to the EC2 instance, increasing security.
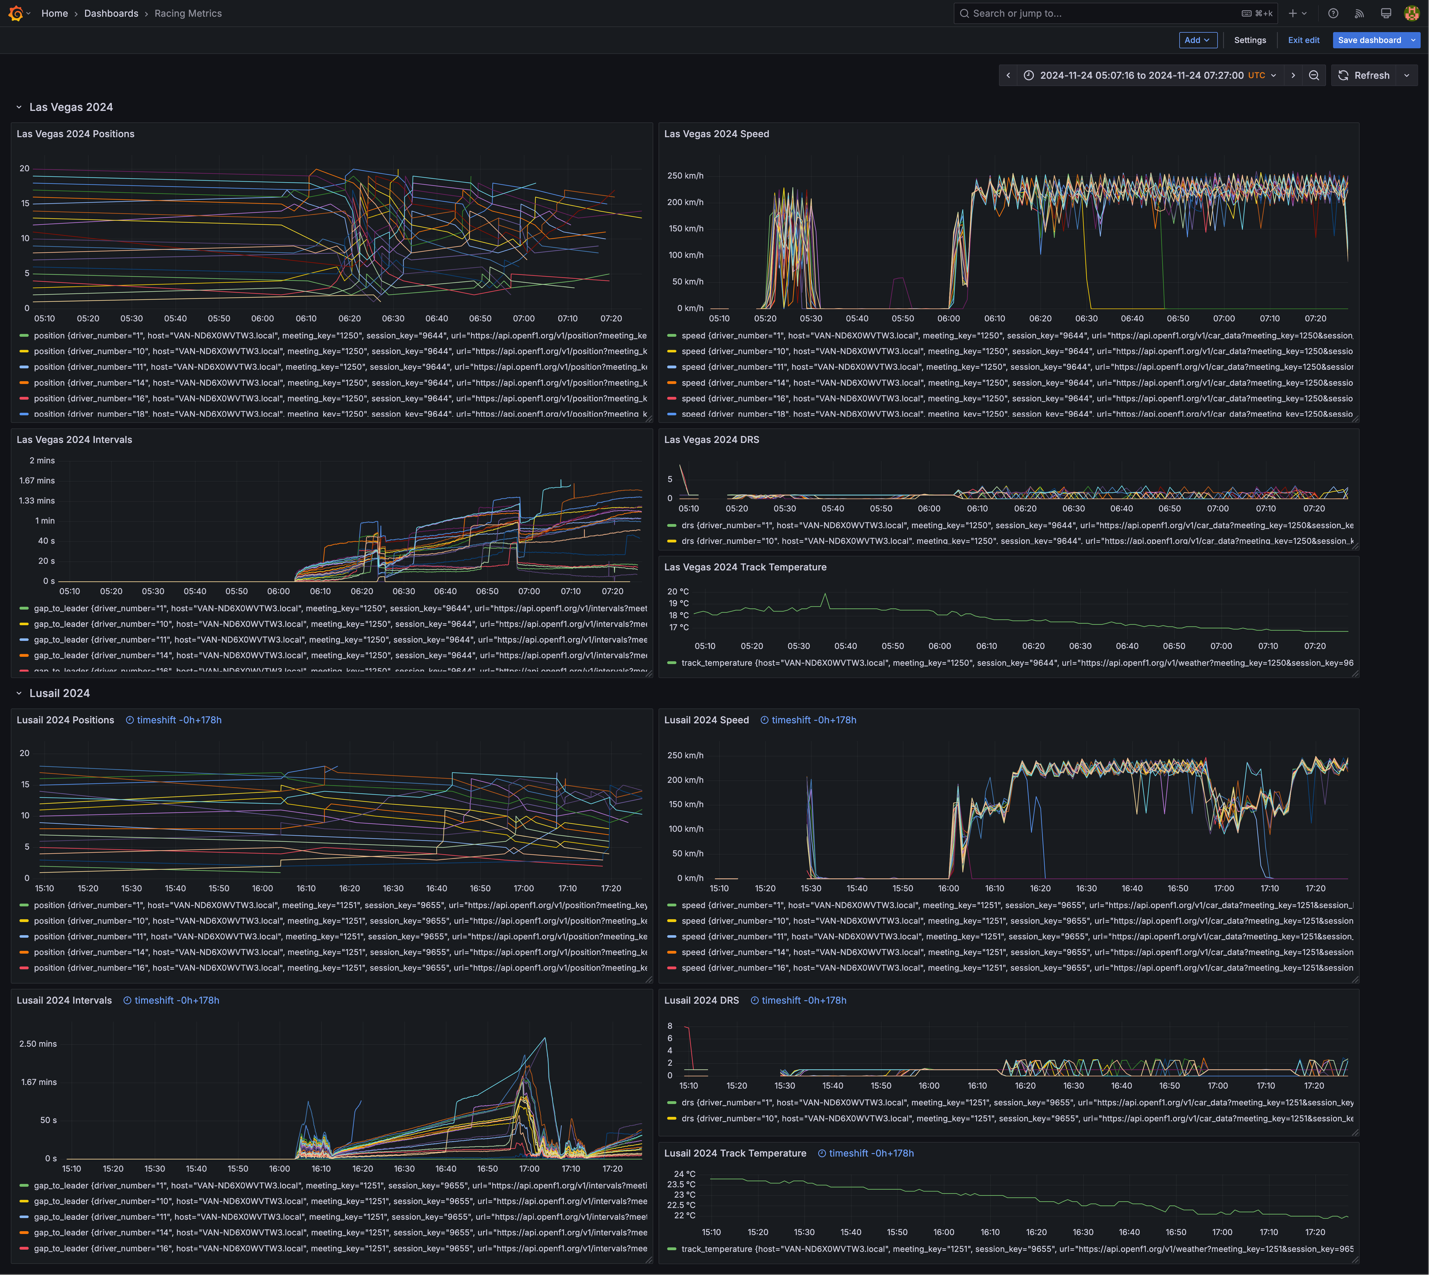
The following is an example Grafana dashboard displaying racing data from two races, ingested into separate Timestream for InfluxDB instances in different Regions. The data includes racer positions, speed, and track temperatures.
When the race ends and another race begins in a different country and Region, you can do one of the following actions with the original instance depending on the location of the next race:
- If the next race is geographically close to the place of the last race, you can delete the Timestream for InfluxDB instance on the Region (to clean its data) and recreate it in the same Region for the next race
- If the next race is closer to another Region, you can delete the Timestream for InfluxDB instance on the Region and recreate it in the new Region for the next race
In both cases, you must decide if you want to send the existing data (from previous races) to the new instance or not. You can use the Influx CLI or the Influx migration script, which can store backup data on Amazon S3, to migrate data between instances.
In the following sections, we show you how this is possible with either AWS CloudFormation or Terraform.
The solution of this post uses the following AWS resources:
- An EC2 instance
- A CloudFormation stack
- Amazon Virtual Private Cloud (Amazon VPC)
- Two VPC security groups
- Two VPC subnets
- A Timestream for InfluxDB instance
You will incur charges for the AWS resources used in the solution. Running this solution with default configuration values in the US West (Oregon) Region for 1 hour costs approximately $0.3436. See the Amazon Timestream pricing and Amazon EC2 pricing pages for more information.
Prerequisites
Regardless of whether you use CloudFormation or Terraform to deploy resources, several prerequisites must be met:
- Either create an EC2 instance or use your own device to deploy AWS resources. The solution in this post will deploy another EC2 instance as a bastion host in order to follow security best practices.
- Files used to deploy resources are hosted in the following GitHub repo. Clone this repository with the following command:
- Configure your AWS credentials for use by the AWS SAM CLI and Terraform. For more information, refer to Security best practices in IAM.
Automate the solution using AWS CloudFormation
The CloudFormation template template.yml, in amazon-timestream-tools/integrations/cloudformation/ec2-private-influxdb/, defines a set of resources that allow the deployment of an EC2 instance and a private Timestream for InfluxDB instance. We will deploy resources using the SAM CLI.
Install the SAM CLI
On your own device or EC2 instance that you are using to execute commands, make sure that you satisfy the prerequisites for the SAM CLI. Then download and install the SAM CLI.
Verify the installation with the following command:
You will get a result similar to the following:
Deploy the CloudFormation stack
Navigate to amazon-timestream-tools/integrations/cloudformation/ec2-private-influxdb/. From this location, run the following command to deploy a stack named Ec2PrivateInfluxDb:
Provide the following information in the placeholders:
- For
<desired AWS Region name>, provide your desired Region. - For
<username>, provide your desired user name, for example, admin. This will be the user name for the initial admin user in your Timestream for InfluxDB instance. - For
<password>, provide your desired password. - For
<EC2 key name>, provide the name of the existing key pair that you want to use to connect to your EC2 instance. - For
<client IP>, provide the public IPv4 address of your own device, for example, 192.0.2.1. A subnet mask of 32 will be used for the IP addresses. Providing your device’s public IPv4 address will make sure that only it can connect to your deployed EC2 instance with SSH.
The following is a truncated example output:
Review the Parameters section in the template.yml file to examine the available parameters and their default values.
When the CloudFormation stack has finished deploying, two outputs will be provided:
TimestreamInfluxDBURL: The full URL of your Timestream for InfluxDB instance, including its scheme and port. You can use this URL to write to Timestream for InfluxDB using the InfluxDB v2 API. Later, you will use this endpoint to write to your Timestream for InfluxDB instance.EC2PublicIP: The public IPv4 address if your EC2 instance. Later, you will use this address to connect to your EC2 instance using SSH.
When the racing championship moves to a different country, you can change the --region parameter value in the SAM CLI deployment command to the new Region to create a new Timestream for InfluxDB instance. Refer to the cleanup instructions later in this post if you no longer need your previous instance.
Automate the solution using Terraform
Terraform is an infrastructure as code (IaC) tool. With Terraform, you use the declarative language HashiCorp Configuration Language (HCL) to define the configuration you want for your infrastructure and let Terraform take care of the rest. You can now use Terraform to manage Timestream for InfluxDB instances with the aws_timestreaminfluxdb_db_instance resource in the AWS provider.
Deploy Terraform resources
To use Terraform to deploy an EC2 instance and private Timestream for InfluxDB instance, complete the following steps:
- Install Terraform.
- Navigate to
amazon-timestream-tools/integrations/terraform/ec2-private-influxdb/. - Run the following command:
The following is example output:
- To deploy resources, several variables must be configured. There are a few ways to set variables:
- When applying changes, enter variable values when prompted:
Variables with default values defined in
variables.tfwill not require input. - Provide variable values to Terraform when applying changes:
- Edit
variables.tf, setting default values, for example:
- When applying changes, enter variable values when prompted:
- Run the following command to get a preview of what resources will be deployed:
The following is a truncated example output:
- If there are no errors and everything is as you expect, run the following command to deploy the resources, entering yes when prompted:
The following is a truncated example output:
- Wait for the resources to deploy.
When Terraform has finished deploying, two outputs will be provided:
instance_url: The full URL of your Timestream for InfluxDB instance, including its scheme and port. You can use this URL to write to Timestream for InfluxDB using the InfluxDB v2 API. Later, you will use this endpoint to write to your Timestream for InfluxDB instance.ec2_public_ip: The public IPv4 address if your EC2 instance. Later, you will use this address to connect to your EC2 instance using SSH.
More examples, including how to do a Multi-AZ deployment and enable Amazon S3 logging, can be found in the documentation for the aws_timestreaminfluxdb_db_instance resource.
Modify resources
You can modify a deployed resource by changing the main.tf and variables.tf files and repeating the deployment steps. Although some changes update resources in-place, other changes cause the deletion and recreation of resources. One such change is changing the Region your resources are on. To deploy your resources on a different Region, update the region variable in variables.tf to your desired Region:
Follow the deployment steps to delete and recreate your resources in the new Region.
With version 6.0.0 of the AWS provider for Terraform, many resources are Region-aware. If you want to maintain multiple resources in different Regions at once, you can add new resource definitions to main.tf with different region values. For example:
Send data to your instance
Follow these steps to simulate time series data from an automotive sporting championship and ingest it into your deployed instance:
- From your device, copy the Lap Times dataset from the Amazon Timestream Tools repository to your EC2 instance.This line protocol file contains lap times from the 2012 British Grand Prix. The data was assembled from the Formula 1 World Championship (1950 – 2024) Kaggle dataset and includes calculated timestamps for each lap that don’t exist in the original dataset.
Replace
<path to key>with the path to the key you chose to use with the instance and<EC2 public IP>with the public IP address if your EC2 instance. - Connect to your EC2 instance using SSH:
Replace <path to key> with the path to the key you chose to use with the instance and <EC2 public IP> with the public IP address if your EC2 instance.
- Download and install the Influx CLI, replacing
<version>with the latest version of the Influx CLI: - To access your Timestream for InfluxDB instance, you will need an operator token. Create one with the following commands:
For more information, see Creating a new operator token for your InfluxDB instance.
- To ingest the data into your Timestream for InfluxDB instance, run the following command, replacing
<Timestream for InfluxDB instance URL>with your Timestream for InfluxDB instance’s URL including the scheme and port,<organization name>with the name of the organization that you specified for your instance,<token>with a token from your instance that allows writes to your bucket, and<Timestream for InfluxDB bucket name>with the name of a Timestream for InfluxDB bucket in your instance: - To view ingested data, using the Influx CLI, run the following command:
Clean up
As part of this post, you will have deployed several resources. The cleanup method depends on how these resources were created.
Clean up CloudFormation resources
To delete resources deployed with AWS CloudFormation, including the time series data your instance might contain, complete the following steps:
- Navigate to
amazon-timestream-tools/integrations/cloudformation/ec2-private-influxdb/. - Delete your stack with the SAM CLI, replacing
<desired AWS Region name>with the Region you deployed the stack in:The following is example output for the preceding command:
Clean up Terraform resources
To delete resources deployed with Terraform, complete the following steps:
- Navigate to
amazon-timestream-tools/integrations/terraform/ec2-private-influxdb/. - Use the following command, entering yes when prompted:
The following is truncated example output:
Conclusion
In this post, we showed how to automate the deployment of Timestream for InfluxDB instances with AWS CloudFormation and Terraform, so you can deploy, delete, or update your instance configuration with minimal effort.
Start automating your Timestream for InfluxDB deployments for your own use case and share your feedback in the comments section.