AWS Database Blog
Build graph applications faster with Amazon Neptune public endpoints
Developing applications on Amazon Neptune Database historically required users setup access into the VPC where it is hosted and use either 3rd party drivers or direct HTTP requests. In this post, we discuss how two key features, public endpoints and the Neptune Data API, solve these common challenges in Amazon Neptune application development. Public endpoints are available starting with engine version 1.4.6.0. Prior to version 1.4.6.0, Neptune was restricted to only being accessible from inside a virtual private cloud (VPC), complicating access to it. This new feature complements existing developer-friendly capabilities in Neptune, including support for Neptune Data API by the AWS SDK (neptunedata) used to manage data within a Neptune cluster, simplifying the process to build and test graph applications.
Neptune is a fast, reliable, and fully managed graph database service for building and running applications with highly connected datasets, such as knowledge graphs, fraud graphs, identity graphs, and security graphs. Neptune provides developers the most choice for building graph applications with three open graph query languages: openCypher, Apache TinkerPop Gremlin, and the World Wide Web Consortium’s (W3C) SPARQL 1.1.
With the release of Neptune 1.4.6.0, you can now create Neptune clusters with public endpoints, removing a significant barrier to development and testing, and it integrates with the AWS SDK to provide a streamlined development experience. In this post, we show you how you can use public endpoints and the AWS SDK to access the Neptune Data API to simplify and accelerate development on Neptune.
Public endpoints
At Amazon Web Services (AWS), we frequently say security is job zero, meaning that it’s even more important than any number one priority. When Neptune was released, clusters could only be accessed from within a VPC for security. While this protected your data, it created development challenges. Developers needed AWS Site-to-Site VPN, AWS Direct Connect, or AWS Transit Gateway to connect from their local machines. Teams wanting internet-accessible clusters (like linked data repositories) had to manage additional infrastructure like load balancers and proxy servers.
Neptune 1.4.6.0 addresses this with public endpoints. When you enable AWS Identity and Access Management (IAM) authentication on your cluster, you can also enable public endpoints on instances, eliminating the need for these extra networking steps while maintaining security through IAM controls. New Neptune databases are created with public endpoints disabled, and you can use IAM policies to control who can create or modify clusters with public access.
Creating a cluster with public accessibility using the Neptune console
In version 1.4.6.0, we simplify developer connectivity by introducing Neptune public endpoints. If you have at least one public subnet in your Neptune DB subnet group, you can create Neptune instances in the public subnet. Remember that one public subnet is the minimum. In production settings, we recommend at least 2 public subnets to allow for high availability. Comprehensive prerequisites for creating a Neptune cluster can be found in the documentation. In this section we highlight what has changed specifically to enable public accessibility.
If you are using the Neptune console, a new option has been added in the Network and Security section when creating or modifying a cluster to select if you want the cluster to be publicly accessible (see the following screenshot). The console allows you to specify this at the cluster level for simplicity, but it is configured at the instance level and you can control which instances are publicly accessible or not using the AWS CLI or SDK as we show later.

IAM database authentication is required for publicly accessible clusters. On the Neptune console, the Additional Settings section contains the option Turn on IAM Authentication (see the following screenshot). Security is job zero and we want to make sure you will not accidentally expose your database to the world without any security controls.

Before fully creating a Neptune cluster to run this example, review the Neptune pricing as billing will start upon creating your cluster.
IAM authentication
Neptune supports user- and role-level security through IAM and this is one of the key recommendations for protecting your data in Neptune. The common workflow is:
- create IAM policies reflecting Neptune job roles and the permissions from both administrative (managing databases) and data access (accessing data in databases) perspectives.
- assigned the policies users or applications (service accounts) to grant least-privilege permission, so if credentials are compromised then minimal access is granted. Neptune also supports using temporary security credentials to reduce risk of compromised credentials even further.
- manage access to Neptune using your own third-party identity provider with Amazon Cognito identity pools. Associate third-party identity providers with IAM roles and get credentials from the identity pool to access Neptune.
If you use the AWS SDKs we discuss later in this post, they provide functions to use IAM without special configuration or libraries to sign requests. If you use other libraries or methods to access Neptune, we have resources to assist you in using AWS Signature Version 4 to sign your requests. To learn more, see Connecting to your Amazon Neptune database using AWS Identity and Access Management authentication.
Creating a public cluster with public accessibility using the AWS CLI
If your IAM role has permission to create a Neptune cluster and a VPC and security group exist configured for Neptune, create a cluster using the AWS Command Line Interface (AWS CLI). Run the aws neptune create-db-cluster command. You can specify the configurations using options with the command. Some of the options you can configure are which AWS Region you want the cluster to be placed in and how to identify the Neptune cluster. The options used for this example can be found in the following code:
The preceding command creates the cluster without any compute instances. The cluster manages a group of 1 primary (writer) instance and up to 15 read replica (reader) instances, associated with a managed storage volume shared by all instances. The following command and options create a single primary instance in your cluster:
In the preceding code, the last option we specify is the –-publicly-accessible option. This feature is new as a part of version release 1.4.6, which we identified should be set using the --engine-version parameter. The response from the command will show details of the cluster, including “DBInstanceStatus” : “creating”.
Periodically check the status of the instance using the command aws neptune describe-db-instances --region us-east-1 --db-instance-identifier my-cluster-name-instance1 for the status to change to “DBInstanceStatus”: “available”. When this status changes, you can now access your cluster from AWS CloudShell or your local desktop. The endpoint url you will use can be obtained by calling aws neptune describe-db-clusters --db-cluster-identifier my-cluster-name --query "DBClusters[0].join('',['https://',Endpoint,':',to_string(Port)])" and supplying that value as the endpoint-url property.
If your requests to Neptune time out, verify the following:
- The
db-describe-instancescommand shown previously contains"PubliclyAccessible": true - Your cluster was created in public subnets containing an internet gateway available within the route tables
- The security group assigned to the Neptune cluster contains a rule allowing access to the port allocated to Neptune (port 8182 by default) from your source
- Use Amazon Virtual Private Cloud’s Reachability Analyzer to verify your cluster is accessible or see what component is blocking it
If you are receiving a 401 Forbidden exception, make sure the credentials you are using to allow access to the cluster are set up correctly for Neptune, or if you are not using AWS tools that manage encryption for you such as the CLI or SDK, make sure the tools support AWS Signature Version 4 authentication.
The following diagram shows the architecture of a Neptune cluster created with public endpoints on the instances. Corporate Data Center is a placeholder for a public network, including your home network or a public endpoint.
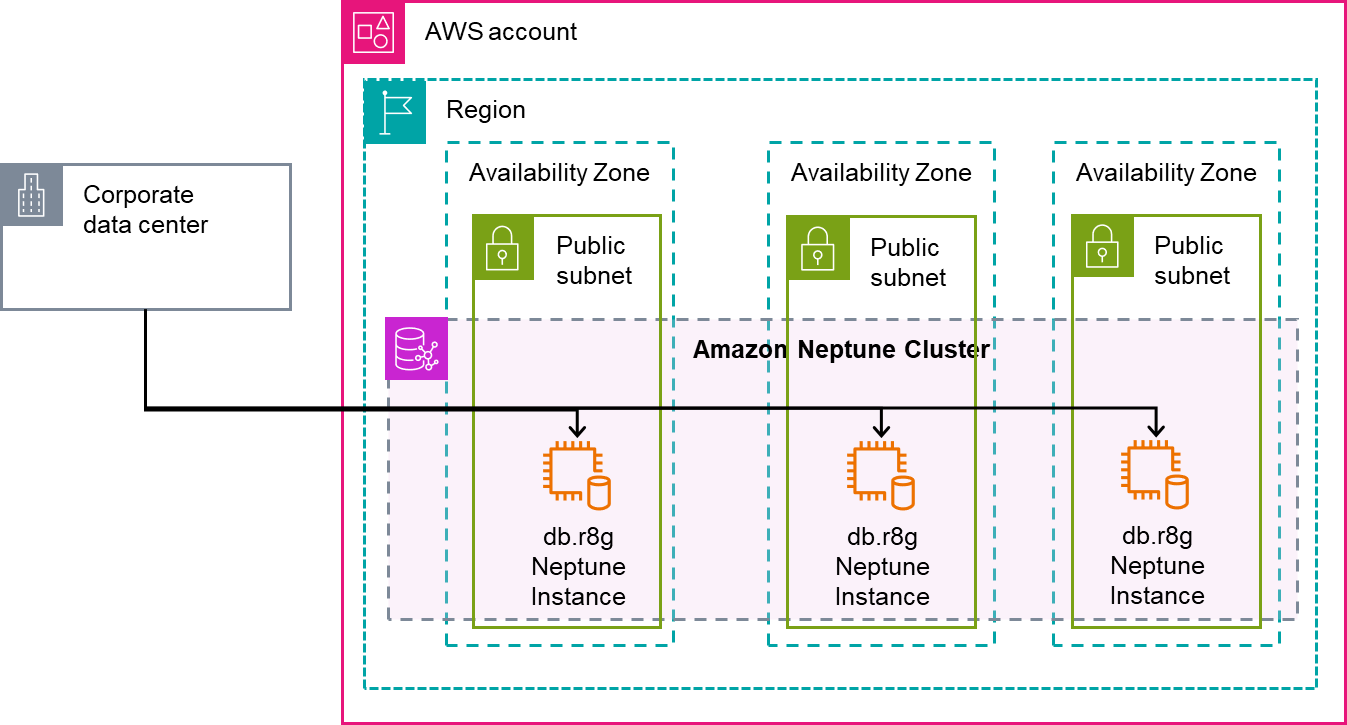
If you enable Neptune Database public accessibility, we recommend additional security and access controls to protect your database from potential threats from internet. For example, you should configure inbound security group rules to only allow trusted IP addresses. Publicly accessible or not, it is a best practice to make sure the database is regularly updated to newer engine and operating system releases to receive security updates.
Neptune Data API
The Neptune Data API is used to interact with data within your database including querying, managing bulk loading operations, and retrieving metadata about the data in your cluster. Using AWS managed clients like the CLI and SDKs further eases Neptune interactions encapsulating common functionality like signing requests, connection pooling, connection management, and auto-retry. Prior to the Neptune Data API, you had to identify and implement third-party libraries like Apache TinkerPop Gremlin clients, RDFLib, or Neo4j Bolt drivers. These drivers are not Neptune specific and often require additional steps to implement AWS specific protocols like AWS Signature Version 4. With the introduction of the Data API, you can now perform data actions with Neptune using the AWS CLI, AWS SDK for Python (Boto3), and other AWS SDKs for Java, JavaScript, .NET, Ruby, Rust, C++, Kotlin, PHP, Swift, and Go.
The Neptune Data API supports most of the actions you can perform using the Neptune REST API today. The following table lists the actions supported.
The following are examples of common actions you can do with the neptunedata service within the AWS SDKs for Go, Python, and Javascript. Each SDK example includes some best practices for using the Neptune Data API, including disabling automatic retrying because some functions aren’t idempotent, and making sure the client timeout is at least as long as the instance’s neptune_query_timeout parameter to support long-running queries.
Neptune Data API calls must have the --endpoint-url parameter. The endpoint URL is the endpoint name of the cluster and can be found by running the following command:
This will produce your endpoint URL, something like https://my-cluster-name.cluster-abcdefgh1234.region.neptune.amazonaws.com:8182.
The following example illustrates running a query using both property graph languages, Gremlin and openCypher. You must have the following permissions on your IAM role for your cluster to complete this example: neptune-db:ReadDataViaQuery and neptune-db:WriteDataViaQuery.
First we can examine our Neptune cluster using the AWS CLI to verify it contains no data using the following Gremlin query:
The output of this call will confirm that there are no records in the cluster.
Now we insert a new record in our cluster using the Gremlin language and the AWS SDK for Go. The action required for this is the ExecuteGremlinQuery action. With the ExecuteGremlinQuery action, we can query the database using the AWS SDK instead of having to craft the HTTP REST query directly or install one of the TinkerPop Gremlin libraries. The following code example, using AWS SDK for Go, uses the ExecuteGremlinQuery command. With the Neptune Data API, you run Gremlin queries in string format similar to the HTTPS REST endpoint. The interface supports the Gremlin version as determined by your Neptune cluster (see the gremlin.version property from the GetEngineStatus action to determine what version of Gremlin your cluster supports). The code in Go is as follows:
The output of this call is the Gremlin query result serialized using the serializer specified in serializer variable (application/vnd.gremlin-v1.0+json;types=false for simplified viewing here). The following code is a snippet of the response:
This is the same output as if you had used the HTTPS REST endpoint with the same serializer header. For example, using awscurl, the equivalent REST command looks like the following code:
This is just one example; refer to the neptunedata service in the AWS SDK for Go v2 documentation for more details.
Because property graph data can be used interchangeably between the supported languages Gremlin and openCypher, you can write an openCypher query to retrieve that same data you just entered. You must have neptune-db:ReadDataViaQuery permissions on your IAM role for your cluster to complete this example. Using the ExecuteOpenCypherQuery command and the AWS SDK for Python (Boto3), you can run the following code:
The output of this call is as follows:
Refer to the Boto3 documentation for the NeptuneData service for more functions and examples.
Finally, we demonstrate GetPropertyGraphSummary. You must have neptune-db:GetGraphSummary permissions on your IAM role for your cluster to complete this example. This function returns summary statistics regarding the property graph nodes in your cluster. The following code shows how you can use the AWS SDK for JavaScript V3 to call this function:
As shown in the following output, there is just the single node you added:
Again, you could call the service using the same --endpoint-url parameter using the REST API, but using the SDK better integrates with the programming language instead of having to parse the response directly:
The response is a JSON-formatted summary of the graph statistics from the REST API:
Refer to the NeptunedataClient service in the AWS SDK for JavaScript v3 for an extensive list of what is supported.
To review, we have shared examples of three common operations you can run with the Neptune Data API (neptunedata), which can be used in addition to the Neptune Management API (neptune) to programmatically interact with Neptune using your favorite SDK. Unlike the Management APIs, the Dataplane API operations do require direct access to the Neptune cluster endpoint, so you must run these from a publicly accessible cluster or from a client with access into the same VPC that Neptune is running in.
Clean up
Be sure to delete any Neptune instances and clusters you created to avoid ongoing instance and storage charges. IAM users or roles you created don’t have an ongoing cost, but you might want to consider disabling or deleting them for security purposes.
Conclusion
In this post, we showed you how the latest release from Amazon Neptune simplifies building graph applications. Beyond the features listed, you can find a complete list of improvements and fixes in the release notes. The following are a few ways to get started with this release:
- Create your first Neptune cluster as part of the AWS Free Tier
- Upgrade your existing Neptune cluster to take advantage of the latest features
- Run the open source graph-notebook library on Jupyter or JupyterLab notebooks, which include the Data API through Boto3, and interact with Neptune
You can also check out more code examples, including using the AWS SDKs for other languages, on the GitHub repository.