Containers
Simplify network connectivity using Tailscale with Amazon EKS Hybrid Nodes
This post was co-authored with Lee Briggs, Director of Solutions Engineering at Tailscale.
In this post, we guide you through integrating Tailscale with your Amazon Elastic Kubernetes Service (EKS) Hybrid Nodes environment. Amazon EKS Hybrid Nodes is a feature of Amazon EKS that enables you to streamline your Kubernetes management by connecting on-premises and edge infrastructure to an EKS cluster running in Amazon Web Services (AWS). This unified approach allows AWS to manage the Kubernetes control plane in the cloud while you maintain your hybrid nodes in on-premises or edge locations.
We demonstrate how to configure a remote pod network and node address space. Install Tailscale on your hybrid nodes, set up a subnet router within your Amazon Virtual Private Cloud (Amazon VPC), and update your AWS routes accordingly. This integration provides direct, encrypted connections that streamline the network architecture needed for EKS Hybrid Nodes.
Although EKS Hybrid Nodes streamlines the Kubernetes management challenge, network connectivity between your on-premises infrastructure and AWS remains a critical requirement. Tailscale can help streamline this network connectivity between your EKS Hybrid Nodes data plane and Amazon EKS Kubernetes control plane. Unlike traditional VPNs, which tunnel all network traffic through a central gateway server, Tailscale creates a peer-to-peer mesh network (known as a tailnet). It enables encrypted point-to-point connections using the open source WireGuard protocol, connecting devices and services across different networks with enhanced security features.
However, you can still use Tailscale like a traditional VPN. Tailscale’s architecture eliminates complex network configurations when connecting hybrid infrastructure, remote devices, and edge workloads. After completing these steps, you can follow the EKS Hybrid Node instructions with confidence that your networking foundation has enhanced security, is performant, and scalable.
This guide demonstrates manual installation and configuration steps for clarity. However, in production environments, it is recommended that these processes should be automated using infrastructure as code (IaC) tools such as Terraform, Ansible, or your preferred configuration management solution.
Prerequisites
Before we begin the implementation, the following prerequisites are necessary:
- EKS cluster: For creating a cluster and setting up appropriate tools, follow the EKS cluster creation guide and the Prerequisite setup for hybrid nodes,
- A Tailscale account: For creating network connections with enhanced security features, you can set up Tailscale through the AWS Marketplace or directly with Tailscale.
- On-premises servers or virtual machines (VMs): For your hybrid nodes, these should run an Amazon EKS-validated operating system.
- Hybrid Nodes network planning: Appropriate network configuration for your environment is needed, guidance can be found in Prepare networking for hybrid nodes. You must know your on-premises network CIDR ranges to avoid conflicts.
- Administrative access: Appropriate security access is needed for both your AWS account and on-premises infrastructure. The preceding guidance provides details for security groups needed, AWS Identity and Access Management (IAM), etc. The following are references to the articles above:
If you are familiar with the EKS Hybrid Nodes setup, then you may have completed most of these requirements. Our guide focuses on the added Tailscale integration to enhance your network connectivity.
Cost and security
You can estimate the costs that may be incurred for this implementation using the AWS Pricing Calculator.
Security and compliance is a shared responsibility between AWS and the user. Please review this to learn more about the AWS model.
Architecture overview
The following diagram provides an architectural overview and aligns with the following steps.
- Remote pod network and node network: You will define these address spaces so that the Kubernetes control plane knows how to reach the nodes and pods running in your hybrid environment.
- Tailscale on the EKS Hybrid Node: We install Tailscale to enhance the security of the hybrid node connection to your Tailscale mesh.
- Tailscale subnet router in Amazon VPC: This acts as the link between your Amazon VPC and the Tailscale network.
- Route table updates: Configure your AWS route tables to send traffic bound for the remote networks (pod and node addresses) through the Elastic Network Interface (ENI) of the Tailscale subnet router.
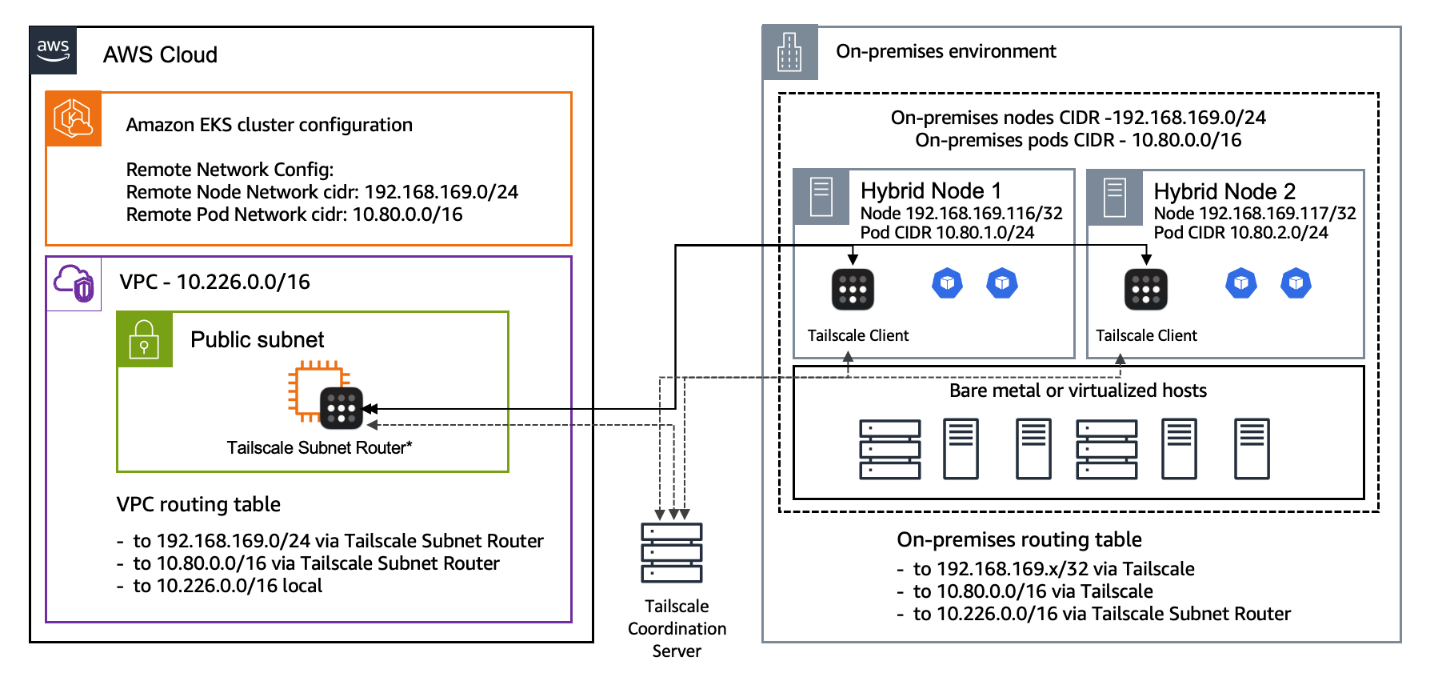
Figure 1: EKS Hybrid Nodes/Tailscale architectural reference
Step 1: Define a remote pod, and node network
Your EKS Hybrid Nodes have local IP addresses that need to be provided as remote node addresses on the cluster. You can define this remote node network as a broad subnet CIDR for your layer 3 network or provide a more specific /32 address to minimize routing complexity.
The preferred setup for a Kubernetes cluster is to have Tailscale installed on each host with /32 addressing, while advertising the same /24 pod CIDR. This allows all nodes to connect to the tailnet independently and enables Cilium to manage pod-to-pod communication across the cluster through the Tailscale network.
For example:
- Remote Node Network: 192.168.169.0/24 (as an example)
The key point here is that your Amazon EKS network needs to be aware of the remote network for the nodes that connect to Amazon EKS.
When planning to run pods on an EKS Hybrid Node, you need to define a separate CIDR for the remote pod network. For directness, we can assume:
- Remote Pod Network: 10.80.0.0/16 (as an example)
EKS Hybrid Nodes supports Calico or Cilium CNI’s, and more information can be found in the post Configure a CNI for hybrid nodes. In your CNI configuration, include your remote pod CIDR. This allows for the Amazon EKS control plane to be aware that pods with IPs in 10.80.0.0/16 are part of the cluster. For detailed guidance on this configuration, refer to the official AWS documentation:
Each environment is unique. Make sure the remote pod network does not overlap with existing CIDRs in your Amazon VPC or on-premises environment.
Step 2: Install Tailscale on your EKS Hybrid Node
Once the prerequisites for EKS Hybrid Nodes are complete and you’ve connected a hybrid node to your cluster, install Tailscale using the following process:
Tailscale install
For Debian/Ubuntu-based systems, the following command is used to install Tailscale. Further guidance can be found here.
Tailscale configuration
When Tailscale is installed, authenticate and configure it. You can find guidance here for generating an authentication key. Furthermore, the following documentation provides guidance for finding your hostname. You can execute the following command, making sure to input the authentication key and hostname accordingly.
--advertise-routes lets other Tailscale peers know that this node can route traffic for the specified networks (the remote pod network and the remote node’s IP).
Make sure that you replace <TAILSCALE_AUTH_KEY> and <YOUR_UNIQUE_NODE_HOSTNAME> with the appropriate values for your environment. You also need to approve the advertised route from within the Tailscale admin console.
Step 3: Add a Tailscale subnet router inside your Amazon VPC
Next, add a Tailscale subnet router within the Amazon VPC. This instance bridges communication between your Amazon VPC and the EKS Hybrid Node connected to your Tailscale network by advertising the VPC CIDR (10.226.0.0/16) that the EKS control plane resides in. Reference documentation can be found here.
The steps in this guide deploy a single subnet router to a single AWS Availability Zone (AZ). Multiple subnet routers can be deployed across multiple AZs and configured to advertise the same routes to achieve high availability failover. The reference documentation can be found here.
Launch an Amazon Elastic Compute Cloud (Amazon EC2) instance (for example Amazon Linux 2023) in a public subnet of your VPC. Devices with Tailscale on them that are on a public subnet benefit from having direct connections to other devices, as opposed to routing through Designated Encrypted Relay for Packets (DERP) servers. This results in optimal performance by providing better throughout and reduced latency.
Install Tailscale
The following command installs Tailscale on your EC2 instance. Further guidance can be found here.
Enable IP forwarding
Tailscale subnet routers use IP forwarding to pass traffic to remote networks. Enabling IP forwarding depends on your operating system but can be configured broadly as shown in the following.
Configure Tailscale with subnet router mode
The following command configures your Tailscale EC2 instance as a subnet router.
The parameter --snat-subnet-routes=false helps to enforce the source NAT not being applied. This allows your remote node addresses, for example 192.168.169.116/32, to remain visible on the network without appearing as if they are inside of the Amazon VPC. You also need to approve the advertised route from within the Tailscale admin console.
Note the Elastic Network Interface (ENI) attached to this EC2 instance, because you reference it in the route table updates.
Step 4: Update subnet routes in the Amazon VPC
Now that you have a Tailscale subnet router in the Amazon VPC, you must update the Amazon VPC route tables to direct traffic for the remote networks, 10.80.0.0/16 for pods, 192.168.169.116/32 for nodes to the Tailscale router EC2 instance.
Identify or create a route table associated with the subnets that need to reach the remote networks. The following command helps to identify the appropriate route table IDs.
Note the RouteTableId that corresponds to the subnets from which you want to route traffic to Tailscale.
Create or modify routes for both the remote pod network and remote node address space. You can create appropriate routes using the following command references.
Validate route has been created
Validate route has been created
Replace:
<ROUTE_TABLE_ID>with the ID from yourdescribe-route-tablesoutput.<TAILSCALE_ROUTER_ENI_ID>with the ENI attached to the Tailscale subnet router EC2 instance.
If the routes already exist, then use aws ec2 replace-route instead of create-route.
Step 5: Verify connectivity between the two Tailscale devices
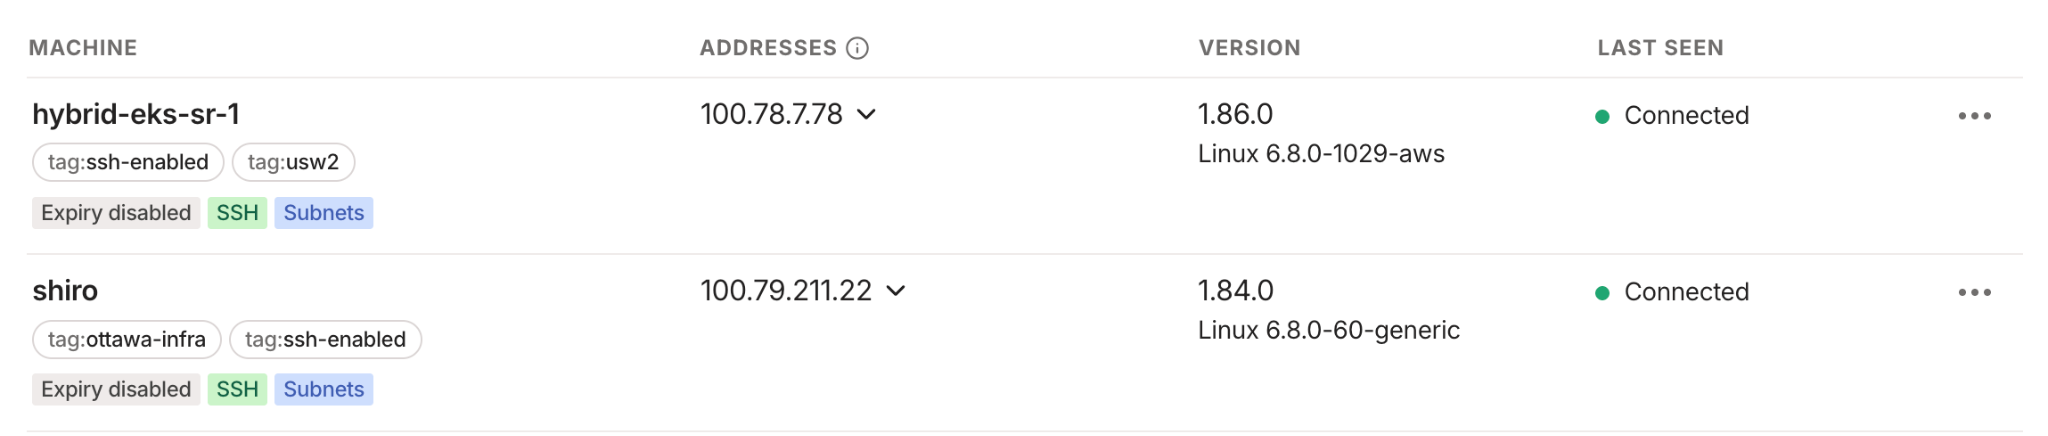
The hybrid nodes subnet router advertising the pod CIDR 10.80.0.0/16 and its own node IP 192.168.169.116/32, as well as your VPC subnet, are connected to Tailscale. You can confirm that you see both nodes via the Tailscale’s admin console, and that they are part of the same tailnet Tailscale network.
First, ensure that both devices are shown as connected to the tailnet within the admin console.
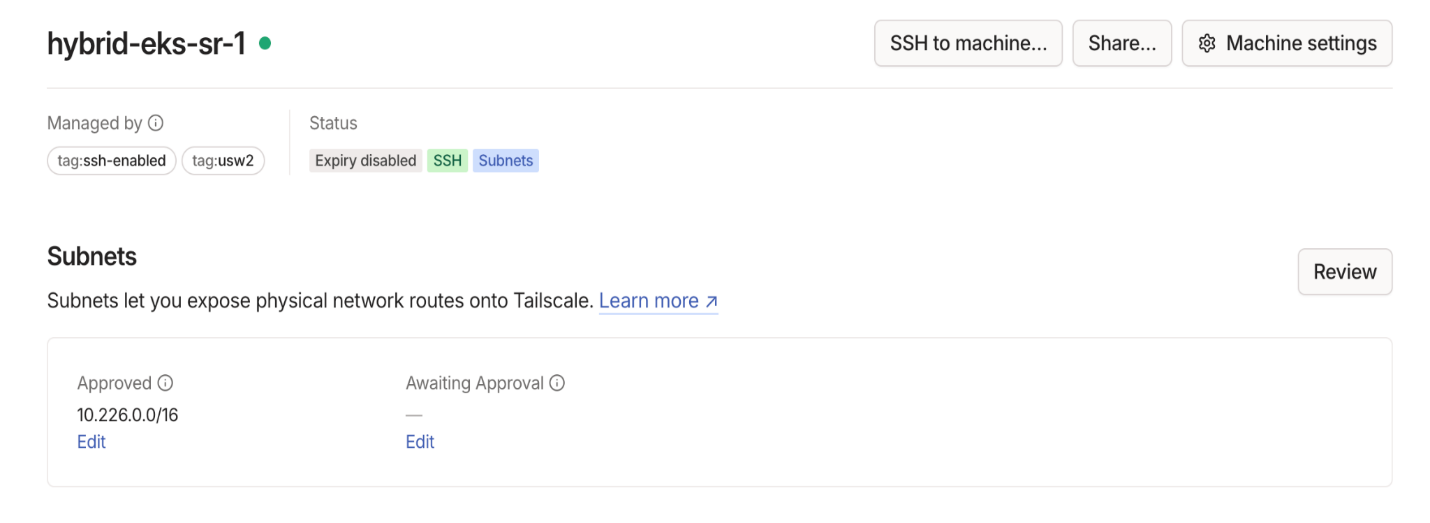
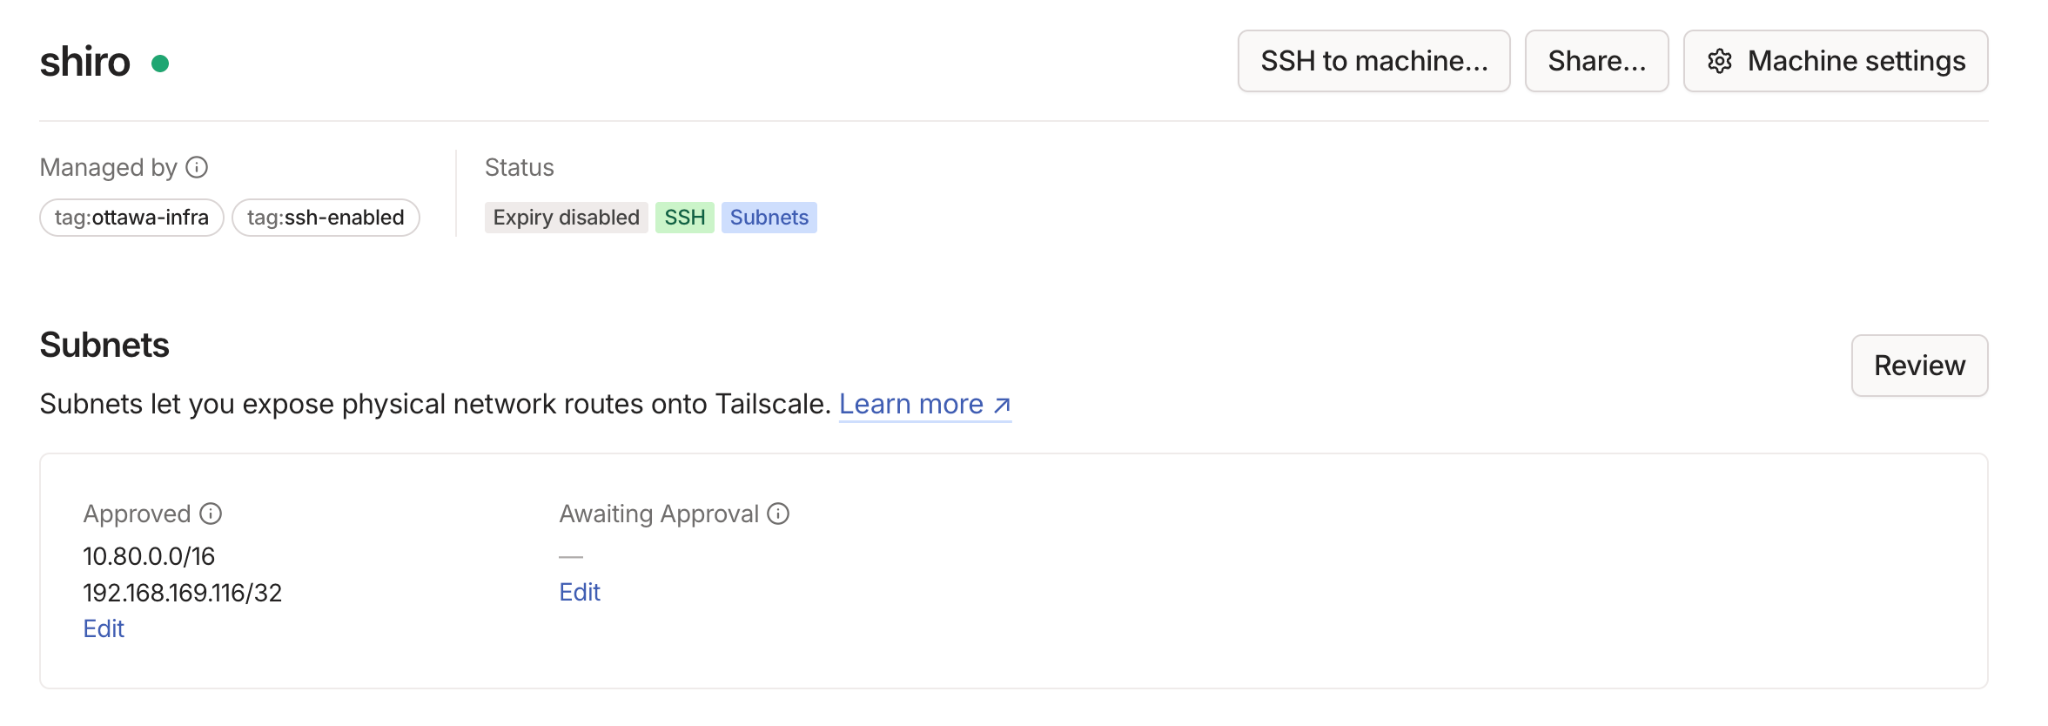
You can click on each device and ensure the subnets are being advertised by each subnet router on each side.
AWS CloudShell connectivity test:
You can also bring up an AWS CloudShell instance within the VPC/subnet and ensure it can ping the hybrid node on-premises via the node IP.
- First, set up a CloudShell instance within the VPC/subnet.
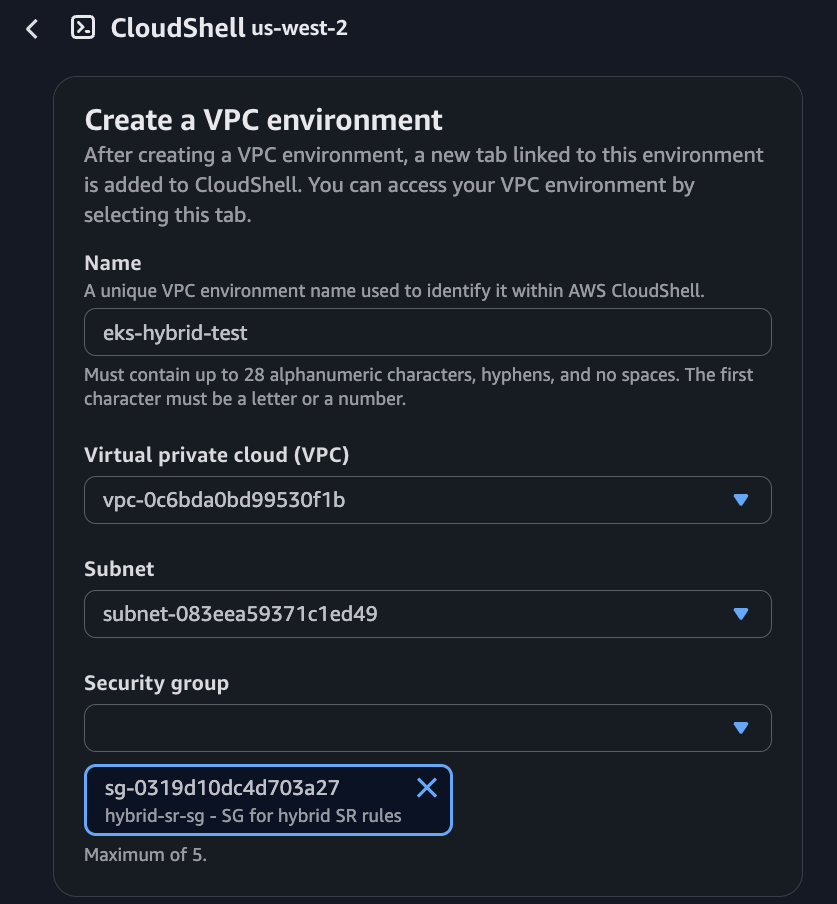
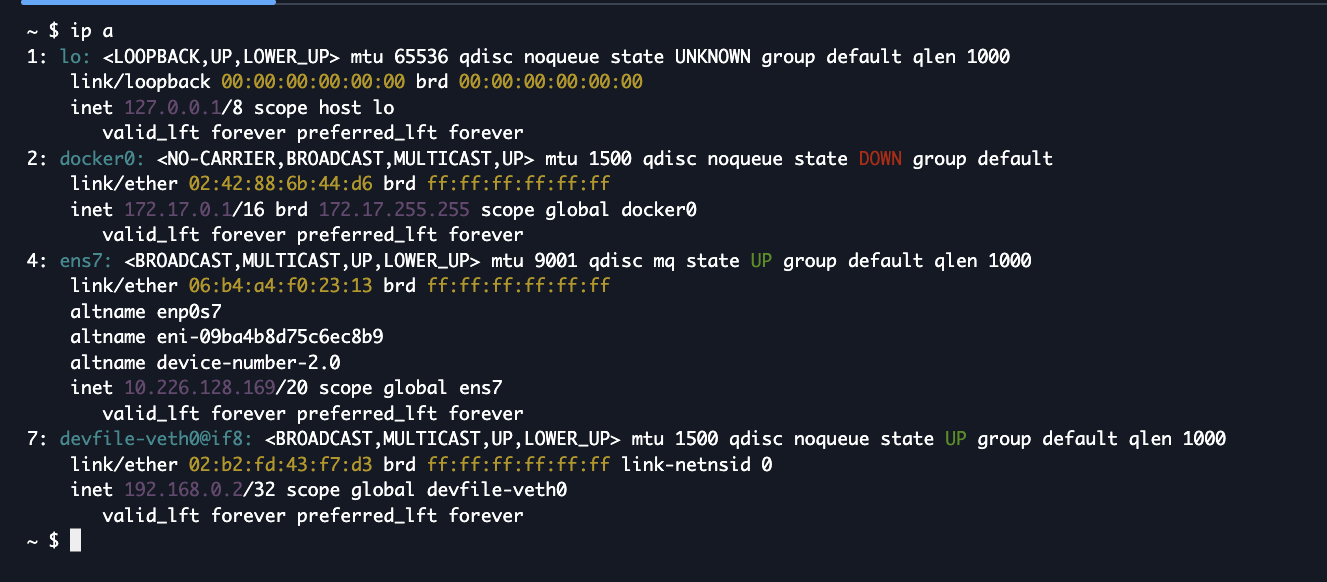
- Check the source IP of the CloudShell instance you are in, it should be within the correct VPC 10.226.0.0/16.
- Ping the hybrid node.

Step 6: Instructions for EKS Hybrid Nodes
You can continue with the Amazon EKS Hybrid Nodes setup now that the prerequisites for hybrid nodes and networking foundation for hybrid nodes are in place.
Once the cluster is up and running, and the hybrid node has been joined to the cluster, you will see under ‘Compute’ in the EKS Clusters console that it is ‘Ready’.

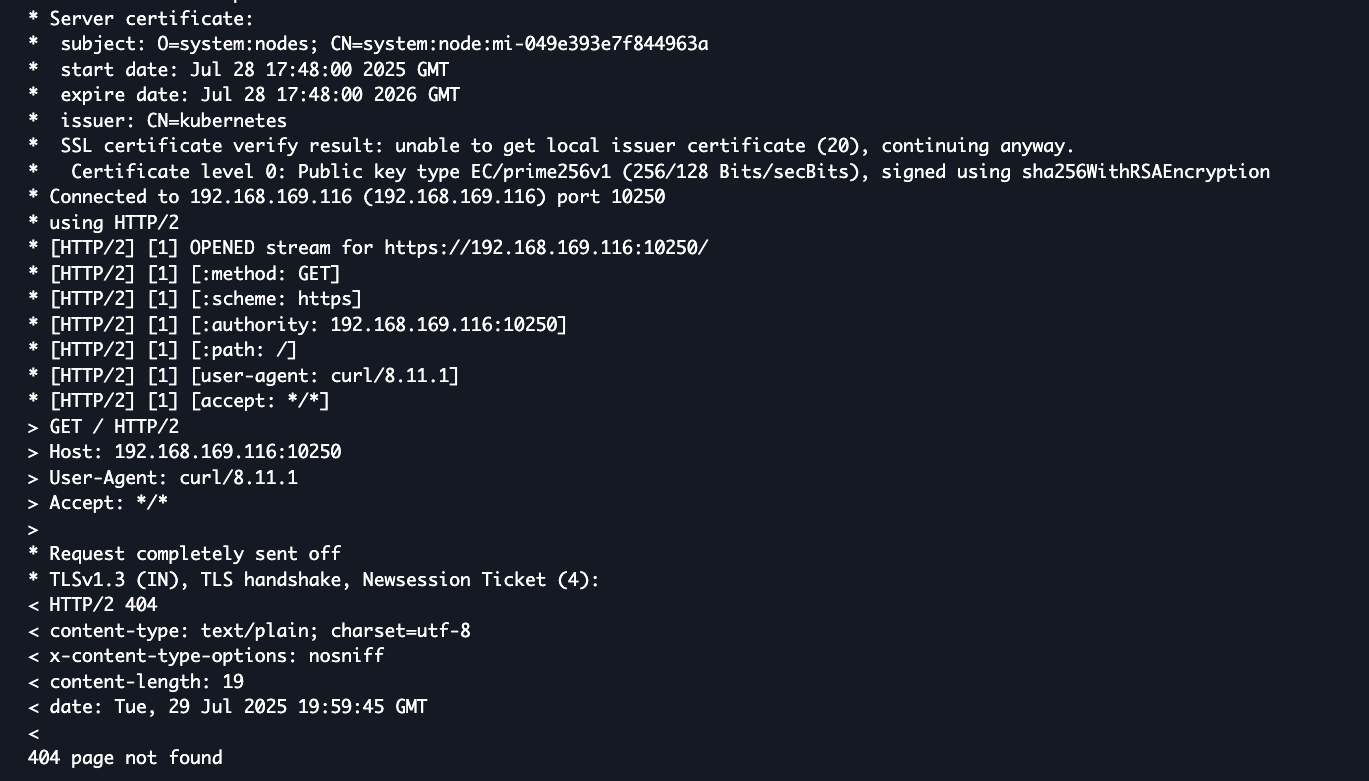
Using CloudShell, you can also query the kubelet on the node to verify connectivity.
- Run a curl test to the kubelet API on port 10250 on the hybrid node from CloudShell to validate that it can reach the node IP via the subnet route successfully. You will get a 404 response, but it proves connectivity is there.

- Running curl with -v shows the server certificate of our hybrid node.
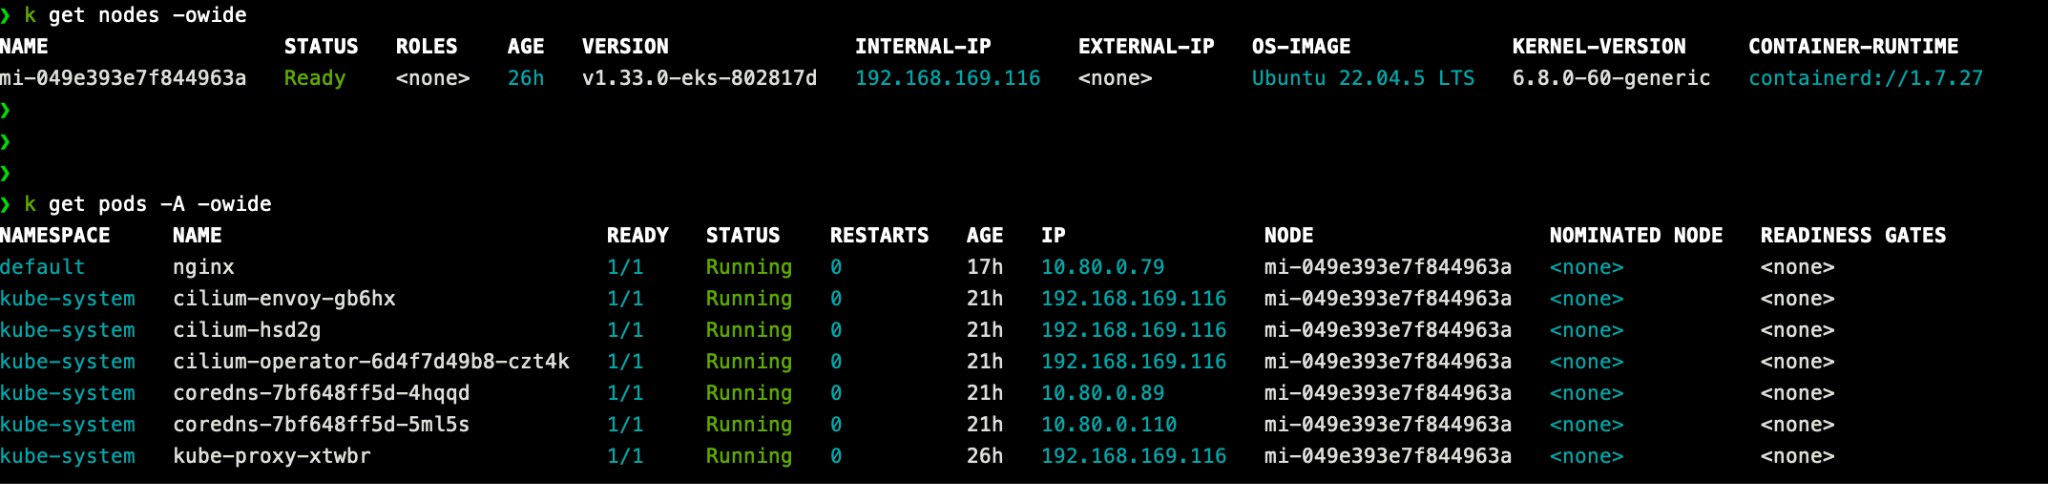
- You can also run
kubectl get nodesandkubectl get pods -A -owideto verify that the pod CIDR that was specified is being used for IPAM. The pods are running and that too for any sample workload pods you deploy.
Cleaning up
Tailscale instance, Amazon EKS resources, and route tables can be removed using the following steps.
Remove Tailscale from EKS Hybrid Nodes
Follow these steps to Uninstall Tailscale from your EKS Hybrid Nodes.
Remove EC2 instance/Tailscale router
The following commands can be used to remove your Tailscale router/EC2 instance/Tailscale router and validate removal.
Validate removal using the following command:
EKS cluster removal
The following guide provides the process for cluster removal: Delete an EKS cluster.
Remove route tables
The following commands can be used to disassociate routes, delete route tables used in this implementation, and confirm deletion.
Conclusion
In this post, you have set remote networking parameters on an Amazon EKS cluster, installed Tailscale on your hybrid nodes and a subnet router within your Amazon VPC, and updated your Amazon VPC’s route tables. You now know how to seamlessly connect your on-premises or external environment to your Amazon EKS cluster. This approach uses Tailscale’s mesh networking with enhanced security features and allows you to streamline routing with minimal overhead, especially when assigning /32 addresses.
Amazon EKS Hybrid Nodes enables you to use on-premises and edge infrastructure as nodes in EKS clusters. This unifies Kubernetes management across cloud, on-premises, and edge environments. Make sure that you follow AWS best practices for security, patching, and monitoring to maintain a healthy hybrid deployment. Furthermore, you can review the security best practices for Amazon EKS.
Next steps
- Explore Tailscale documentation for more advanced configurations.
- Contact Tailscale to learn more.
About the authors
 Lee Briggs is the Director of Solutions Engineering at Tailscale, where he helps organizations simplify secure networking in complex, distributed environments. Lee is passionate about open-source software, developer experience, and reducing complexity in modern infrastructure. Outside of work, he enjoys writing blog posts on tough engineering lessons, playing and watching soccer, and rescuing retired racing Greyhounds.
 Jason Janiak is a Partner Solutions Architect at AWS. Jason contributes to partner success through collaboration/creating opportunities to further their growth/integration with AWS. Outside of work he enjoys hiking, travel, and meditation.
 Curtis Rissi serves as WW Principal AppMod PSA at AWS, where he helps partners build the capabilities needed to guide their customers through meaningful cloud journeys. His mission is to make application modernization accessible and impactful for organizations of all sizes by creating scalable partner practices that deliver real business value.