AWS Contact Center
Tailored support at scale: Turning a unified Salesforce KB into LOB-focused AI agents
In today’s hyper-connected world, customer support teams must juggle an ever-growing portfolio of products and services all within a single CRM like Salesforce. Agents need instant access to the right information, yet they too often find themselves wading through a monolithic, consolidated knowledge base that spans every line of business (LOB) from telecom billing to insurance claims to retail returns. Valuable seconds turn into minutes as agents click, scroll, and filter, and those delays translate directly into longer calls, lower first-call resolution rates, and frustrated customers
The business challenge & solution
When Salesforce Knowledge syncs into Amazon Q in Connect, it traditionally imports all articles into one unified repository. While this consolidated approach works well for smaller teams or single-line businesses, organizations managing multiple lines of business face unique challenges at scale. In these complex environments, you can leverage AI agents in Amazon Q in Connect to automatically segment your Salesforce Knowledge into multiple, line-of-business (LOB) specific knowledge bases. Each LOB KB maintains seamless Salesforce integration while existing as its own logical repository with domain-specific AI prompts. This approach delivers key benefits including hyper-relevant search results, optimized AI performance, and faster resolution times – letting agents focus on exactly what matters for each customer interaction rather than wading through unrelated content
What you’ll learn in this blog
This post will guide you through the process of enhancing your customer support infrastructure using Amazon Q in Connect and Salesforce Knowledge. We’ll start by exploring the solution architecture, showing you how to seamlessly integrate Salesforce Knowledge with Amazon Q in Connect. You’ll learn how to define multiple LOB-specific knowledge bases and associate them with custom AI Agents and AI prompts, tailoring your knowledge management to each distinct area of your business.
We’ll then dive into a step-by-step implementation guide to configure the Salesforce connector to ensure smooth data flow. We’ll walk you through the process of automating data import and LOB classification, ensuring that your knowledge is organized efficiently and accurately. Finally, we’ll show you how to craft and deploy AI agent prompts for each knowledge base, optimizing the ability to retrieve and present relevant information to your support agents.
By the end of this blog, you’ll have a comprehensive understanding of how to transform your knowledge management system into a powerful, AI-driven tool that enhances agent performance and customer satisfaction across all your lines of business.
Measuring success
Key metrics: reduced agent search time, improved first-call resolution, and higher customer satisfaction dashboards and reporting best practices
By the end of this post, you’ll have a clear blueprint for transforming your monolithic Salesforce Knowledge import into a segmented, AI-driven framework in Amazon Q in Connect empowering your agents to resolve issues faster, maintain conversational flow, and elevate the customer experience across every line of business.
Overview of the solution
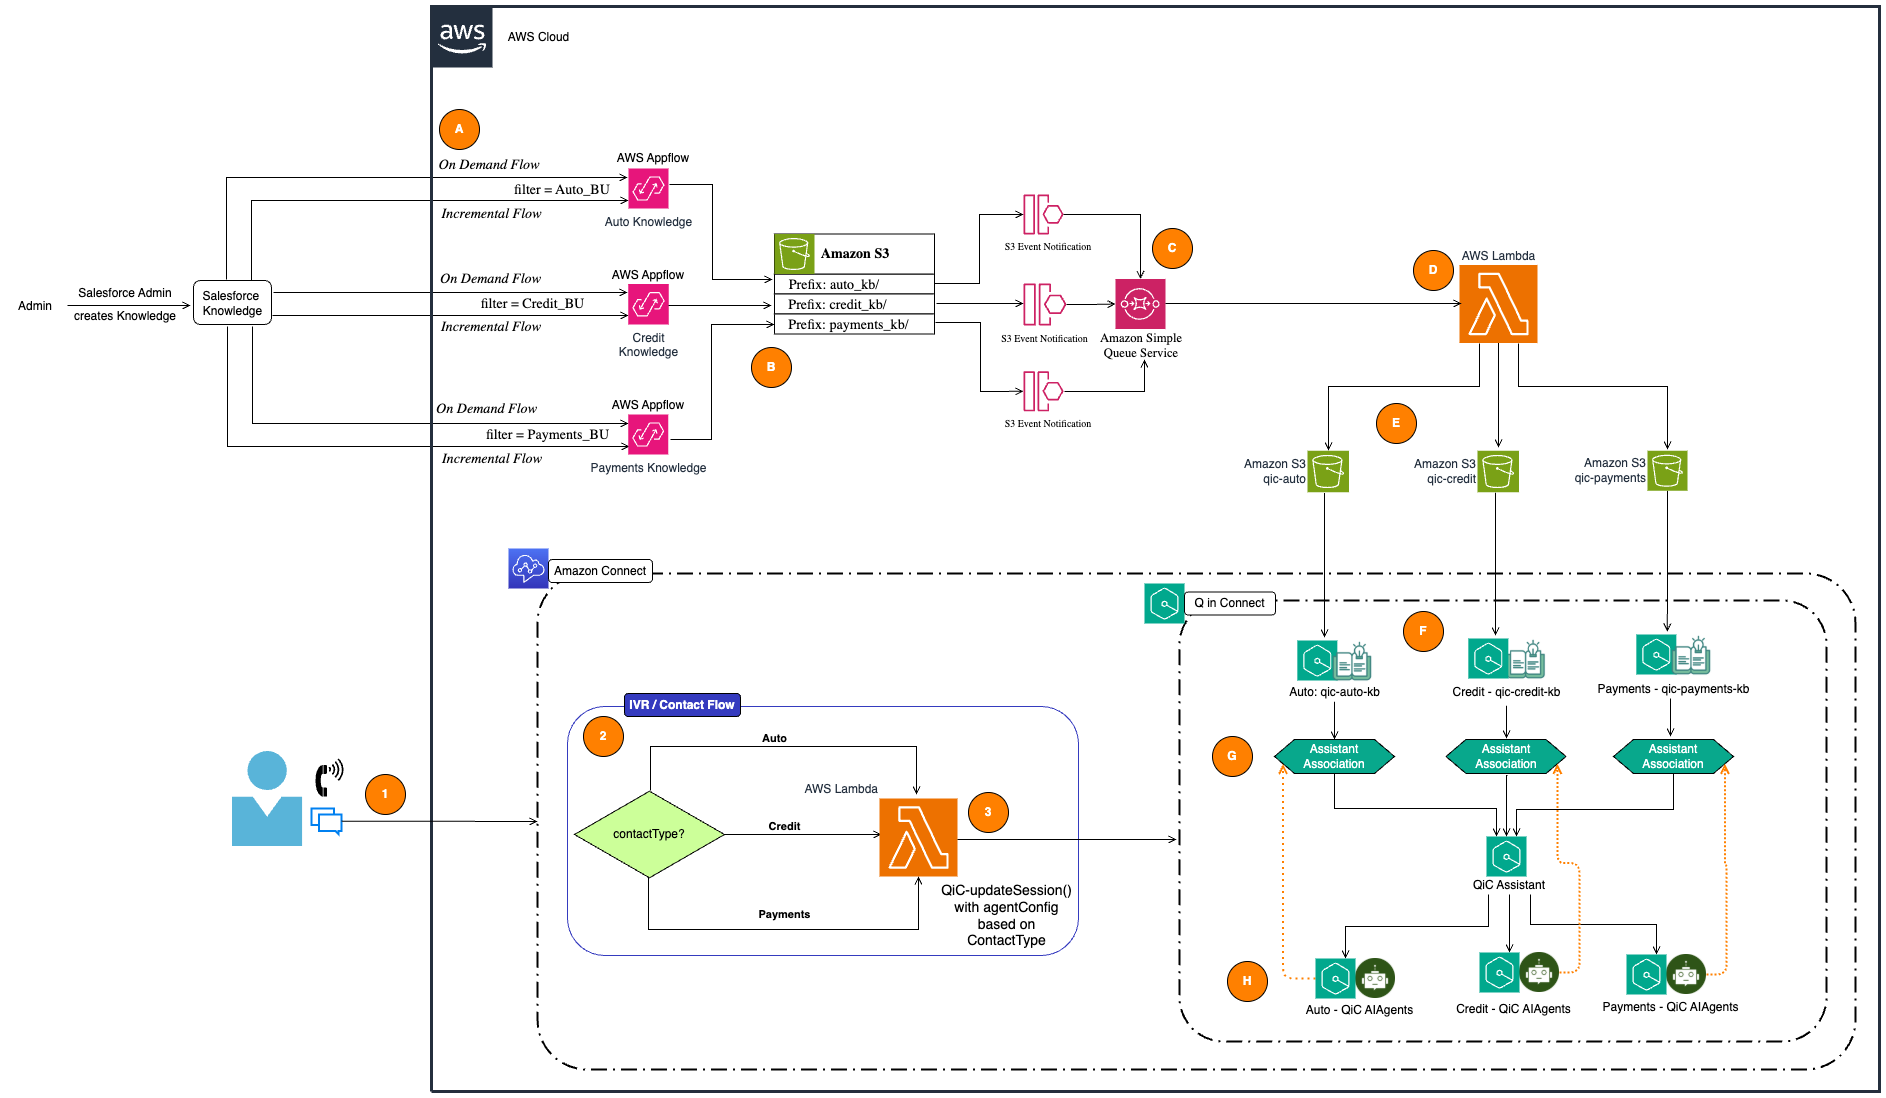
Walkthrough
A: Salesforce Integration with AWS AppFlow
- Salesforce Knowledge data is transferred using AWS AppFlow.
- Separate flows handle different business units (BUs):
- Auto BU (
auto_kb) - Credit BU (
credit_kb) - Payments BU (
payments_kb)
- Auto BU (
- AppFlow processes both on-demand and incremental flows with appropriate filters to fetch only specific BU related Knowledge from Salesforce and the data is stored in Amazon S3 with respective prefixes.
- On Demand Flow is required to fetch all the relevant KB for a particular BU.
- Incremental Flow is required to periodically poll Salesforce for any updates to the Knowledge in Salesforce for that BU
B: Data Segregation in Amazon S3
- Data from Salesforce is stored in an S3 bucket with BU specific prefixes:
auto_kbcredit_kbpayments_kb
- S3 Event Notifications are configured for each prefix, which triggers the next stage.
C: S3 Event Notification to Amazon SQS
- Whenever new data is added to the S3 bucket, an S3 Event Notification sends a message to an Amazon Simple Queue Service (SQS) queue.
- The SQS queue ensures decoupling and reliable message delivery downstream.
D: AWS Lambda Processing
- The SQS message triggers an AWS Lambda function, which processes the incoming data.
- Lambda performs sanitization of the HTML content in each of the knowledge article and writes it the records as separate HTML files to specific S3 buckets:
- Auto Knowledge (
qic-auto) - Credit Knowledge (
qic-credit) - Payments Knowledge (
qic-payments).
- Auto Knowledge (
- The Lambda is also triggered on periodical fetches from Salesforce when knowledge articles in Salesforce are:
- Updated and Published – The Lambda performs the sanitization of the HTML of the content in the record and overwrites the file in the specific S3 bucket.
- Archived – The Lambda deletes the HTML file from the respective S3 bucket.
E: Updated Knowledge Bases in S3
- The Lambda function outputs cleaned and categorized data into the appropriate S3 buckets:
qic-autoqic-creditqic-payments.
F: Amazon Connect Integration
Each of the S3 buckets are associated with Q in Connect Knowledgebase.
- qic-auto-kb
- qic-credit-kb
- qic-payments-kb
The KBs in Q are of type EXTERNAL – this means that QiC KB automatically syncs with the S3 bucket. When any content that is added or deleted to and from the associated S3 bucket, QiC will automatically manage the updating and deletion of its contents within its KB.
- The knowledge bases are accessed to assist agents during customer interactions.
The AI Agents for both Manual Search and Answer Recommendation are created with custom AI Prompts and associated with the assistant as well as the KBs – The AI Agents will be invoked during customer interaction.
- Customer Interaction – A customer contacts the business through Amazon Connect.
- IVR Flow Decision
- The IVR/Contact Flow in Amazon Connect determines the type of call and query based on the customer’s input either in the IVR or understanding the intent or via 3rd party look ups for determining the BU:
- Auto
- Credit
- Payments
- The contact type is passed to an AWS Lambda function for further processing.
- The IVR/Contact Flow in Amazon Connect determines the type of call and query based on the customer’s input either in the IVR or understanding the intent or via 3rd party look ups for determining the BU:
- Lambda Updates the Agent Session
- Lambda invokes the QiC API:
updateSession()API with the agent configuration based on the contact type. - This ensures that the correct knowledge base is loaded for the session:
- Auto Knowledge
- Credit Knowledge
- Payments Knowledge.
- Lambda invokes the QiC API:
G: Assistant Association
- The appropriate QIC Knowledge Base (KB) is linked to the session using the assistant association.
H: Agent Support
- Amazon Connect Agents (QIC AI Agents) access the relevant knowledge base through the QIC Assistant:
- Sales agents use the Auto Knowledge Base.
- Tech Support agents use the Credit Knowledge Base.
- HR agents use the Payments Knowledge Base.
Pre-requisites
- AWS Environment
- Active AWS Account with appropriate access
- AWS CLI installed and configured
- AWS CDK CLI installed
- Target region access and permissions
- Amazon Connect
- Active Amazon Connect instance
- Configured Connect queue
- Connect administrator access
- Salesforce
- Salesforce org with API access
- Knowledge base implementation
- Appropriate Salesforce access
- Connected App setup permissions – https://help.salesforce.com/articleView?id=connected_app_overview.htm
- AppFlow
- Salesforce Connector for AppFlow – https://docs.aws.amazon.com/appflow/latest/userguide/salesforce.html#salesforce-setup
- Development Environment
- Python 3.x
- Git
- Code editor
- AWS CDK development experience
- Security Access
- Appropriate IAM permissions
- Appropriate Salesforce access
- Amazon AppFlow Service access
Configuration & deployment
- Clone Project
- repository-url: https://github.com/aws-samples/sample-sf-qic-multi-lob-intgr
# Clone the repository
git clone <repository-url>
cd <project folder>
- repository-url: https://github.com/aws-samples/sample-sf-qic-multi-lob-intgr
- Install Dependencies
-
pip install -r requirements.txt
pip install -r requirements-dev.txt
-
- Salesforce AppFlow Configuration
- Create AppFlow connection
- To create an AppFlow connection with Salesforce, refer the following steps: https://docs.aws.amazon.com/appflow/latest/userguide/flow-tutorial-connection.html
- For more details on configuration options when creating a connection, refer section: Connecting Amazon AppFlow to your Salesforce account in this additional reference: https://docs.aws.amazon.com/appflow/latest/userguide/salesforce.html
- Required permissions for Salesforce:
- As a Salesforce administrator review appropriate Salesforce documentation for the following:
- Knowledge object read access
- API access enabled
- OAuth scopes configured
- As a Salesforce administrator review appropriate Salesforce documentation for the following:
- Create AppFlow connection
- AWS Configuration
Provide the AWS account id, region and a name for the environment. For the purpose of the blog, we will assume “dev” as our environment. Hence, in the config.dev.json file in the config/ folder, ensure that the following values are updated for each of the attributes:{ "account": "Your-AWS-Account-ID", "region": "Your-Target-Region", "env_name": "Environment-Name" //dev } - Amazon Connect Setup
Provide your Connect instance id and queue id. The CDK will deploy a Contact Flow, and needs to know which instance to deploy this to and what queue to include in the Contact Flow.{ "connect": { "instance_id": "Your-Connect-Instance-ID", "queue_id": "Your-Connect-Queue-ID" } } - Knowledge Base Mapping
- Define your Lines of Business (LOBs)
"LOBs": [ "LOB1", "LOB2", "LOB3" ]- The following is needed to specify the unique identifier field of the Content in Salesforce for each LOBs. For e.g. In Salesforce you may have a field such as “ProgramId__c” or “LOB__c” to differentiate the knowledge bases.
"businessUnitFilters": { "YourLOB1": { //e.g. Credit "field": "Your-Classification-Field", //e.g ProgramId__c "value": "LOB1-Value" //e.g. Credit Dept } // Add more LOBs as defined in the "LOBs" section above } - AppFlow-Salesforce Configuration
From Step 1 above, copy the connection name that was created and update the following configuration:{ "connection_name": "dev-sf-connection", // Replace with your AppFlow connection name "object_name": "Knowledge__kav", } - Knowledge Article Fields
The Custom Field section in the snippet below needs to be updated here. These are the additional fields that you will be importing from Salesforce and will need to be listed on the configuration. DO NOT CHANGE the System Required Fields"projections": [ // System Required Fields {"field": "Id", "data_type": "id"}, {"field": "LastModifiedDate", "data_type": "datetime"}, {"field": "ArticleNumber", "data_type": "string"}, {"field": "PublishStatus", "data_type": "picklist"}, {"field": "UrlName", "data_type": "string"} // Custom Fields - Replace with your actual fields {"field": "Your-Title-Field", "data_type": "string"}, {"field": "Your-Content-Field", "data_type": "textarea"}, // Add additional fields as needed ] - Salesforce Knowledge FilterLeave the following as is. If there are additional filters you want to specify, add them here. Additional references:
https://docs.aws.amazon.com/appflow/latest/userguide/flow-tutorial-salesforce-s3.html#change-data-capture-salesforce
https://docs.aws.amazon.com/appflow/latest/userguide/salesforce.html"filters": [ { "field": "PublishStatus", "operator": "EQUAL_TO", "values": ["Online", "Archived"] } // Add additional filters as needed ] - Salesforce Knowledge Validation RulesUpdate the field attribute with the Salesforce field that holds the content of the knowledge. This field must be in the list of Projections in Step 6. This configuration is needed to ensure we do not import empty content into QiC.
"validations": [
  {
    "field": "Your-Content-Field", // Replace with your content field. Must be in the list of Projections above
    "operator": "VALIDATE_NON_NULL",
    "action": "DropRecord"
  }
  // Add additional validations as needed
]
Important Notes:
-
- The connection_name must match your Amazon AppFlow-Salesforce connection name exactly
- The object_name should be Knowledge__kav
- Ensure the AppFlow connection has proper permissions to access the specified object
- Test connection and object access before deployment
- Document any custom object names or connection names used
- Keep configuration consistent across environments
- Validate object permissions and field accessibility
-
- Bootstrap CDK EnvironmentIf this is your first time using CDK in this account/region:
cdk bootstrap aws://ACCOUNT-NUMBER/REGION - Review CDK Diff
cdk diff - Deploy the Stack
cdk deployThe deployment will create the following resources:
- Amazon AppFlow flow for Salesforce integration
- Lambda functions for data processing
- IAM roles and policies
- Amazon Q knowledge bases
- Amazon Connect integration components
Verify deployment
After deployment completes:
- Check AWS CloudFormation console for stack status
- Verify AppFlow flow creation
- Confirm Lambda functions deployment
- Check Amazon Q knowledge bases setup
- Validate Amazon Connect integration
Post-deployment steps
- Link the Q in Connect Knowledge Bases to your Connect Instance using the following CLI commands
- First, list your Knowledge Bases
- Next, for each Knowledge Base, create a Connect Integration Association. Note that the first CloudFormation created Knowledge Base may already be associated and the AWS CLI may error out due to this. You can simply ignore these steps for any such Knowledge Base
- Finally, tag each Knowledge Base to be Amazon Connect Enabled
- First, list your Knowledge Bases
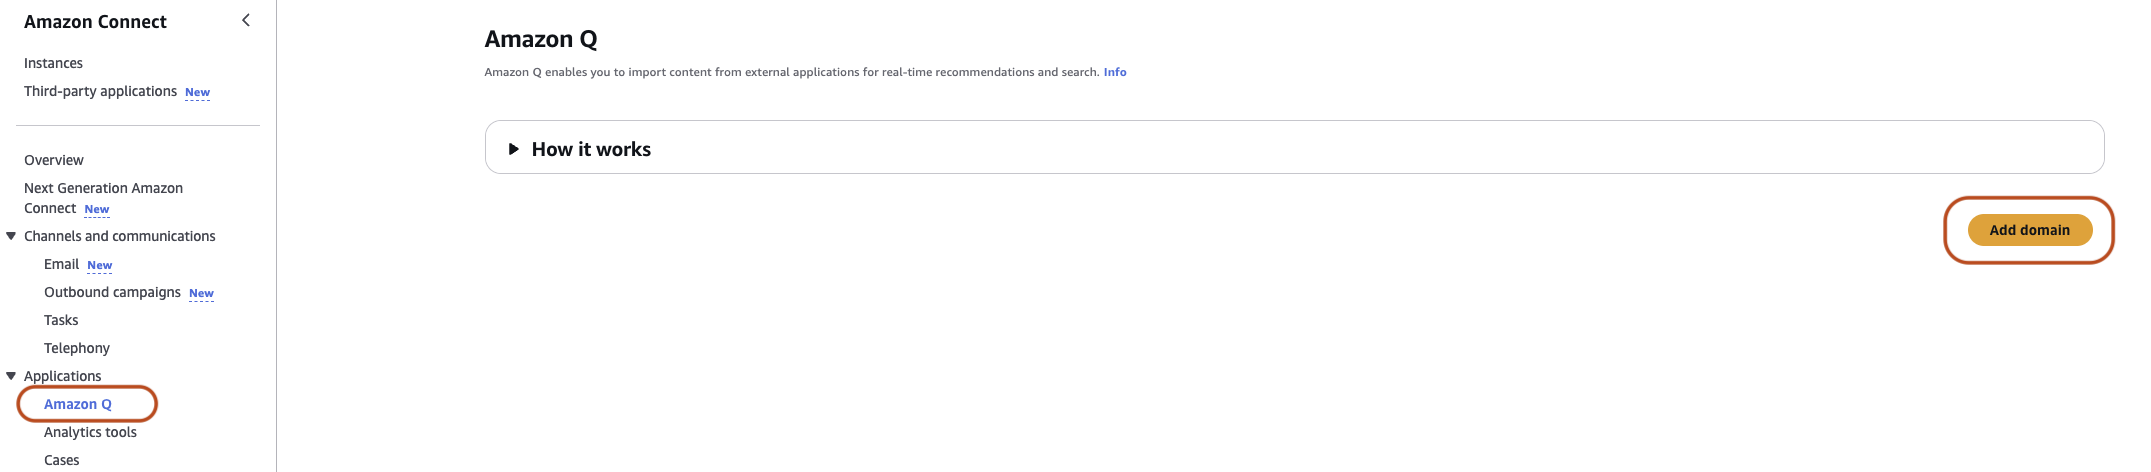
- In the Amazon Connect Console, navigate to Amazon Q, and click on Add Domain:
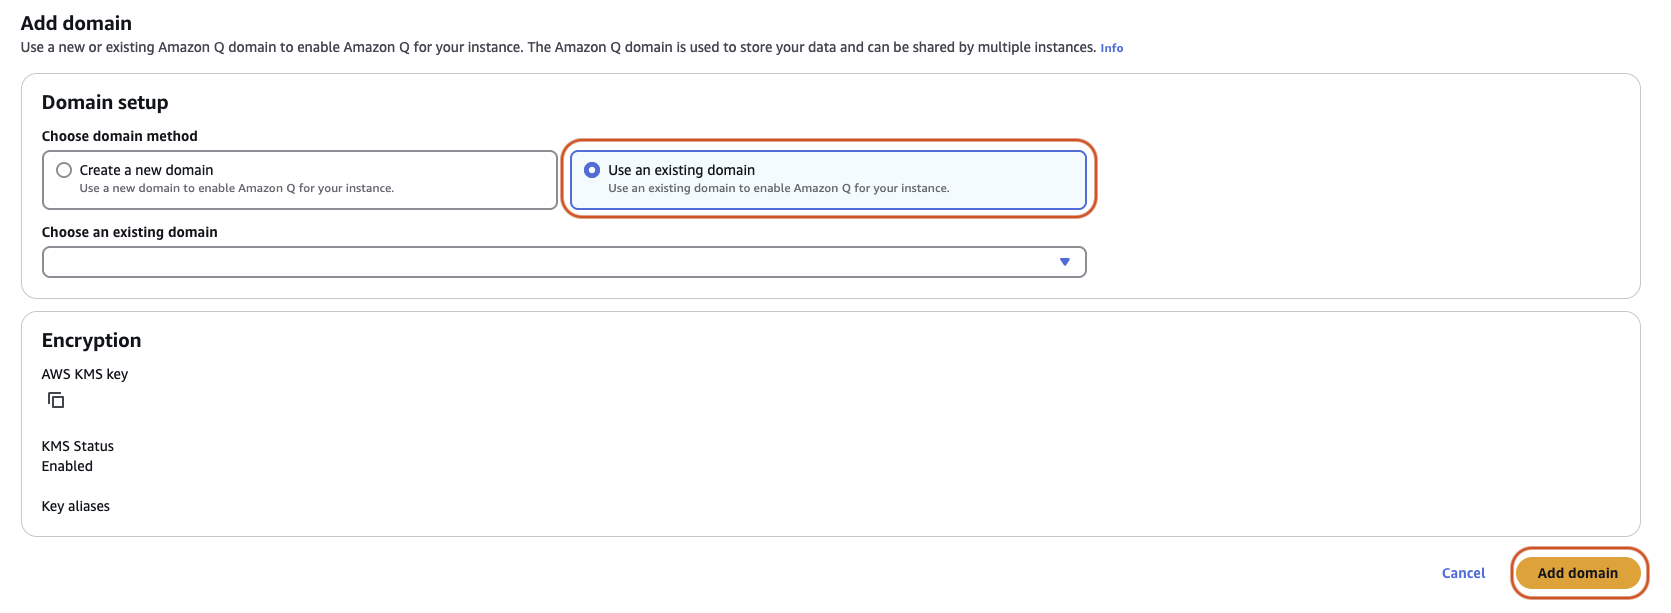
- In the Add Domain Page, Choose Use an existing domain, and choose the domain that was created by the deployment from the dropdown and click Add Domain:
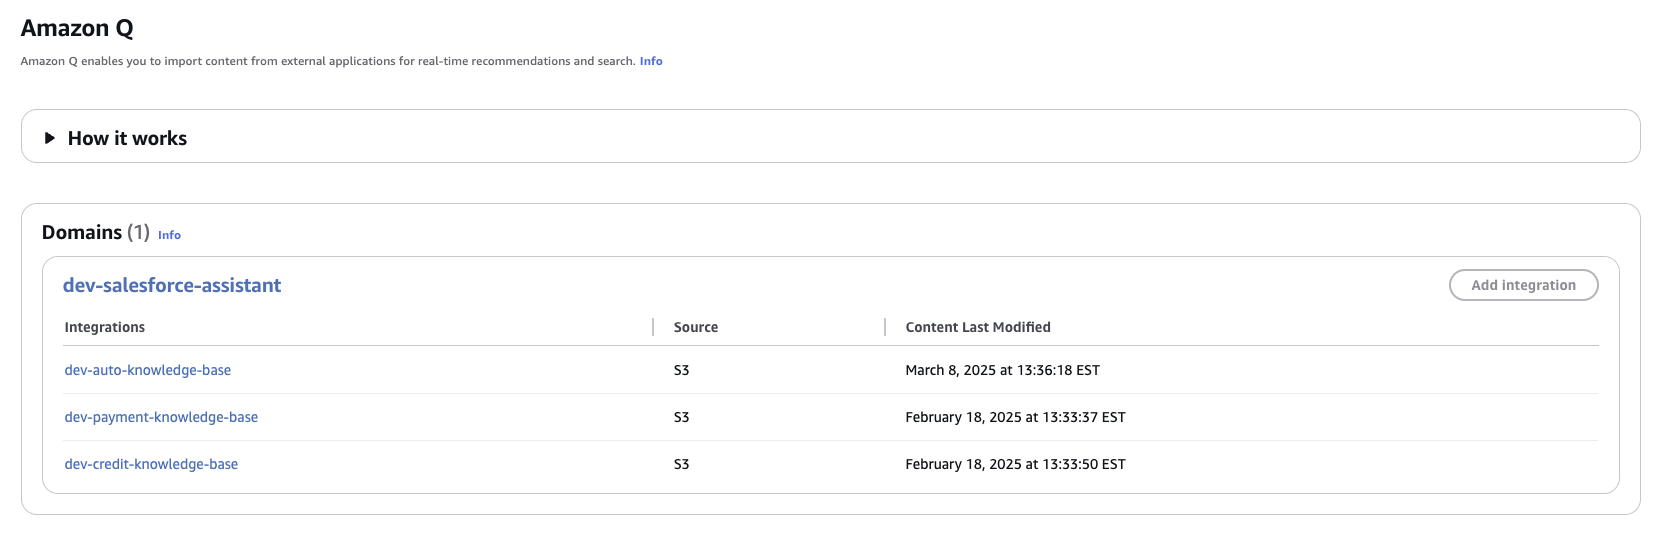
- Once the Domain is added, you should see a page with the Domain and Associated Knowledge bases as shown below:
- Run the AppFlows
- Sign in the AWS Management Console and open the Amazon AppFlow console at https://console.aws.amazon.com/appflow/
- In the navigation pane on the left, choose Flows. The console shows the Flows page. This page contains a table that summarizes the flows that are created.
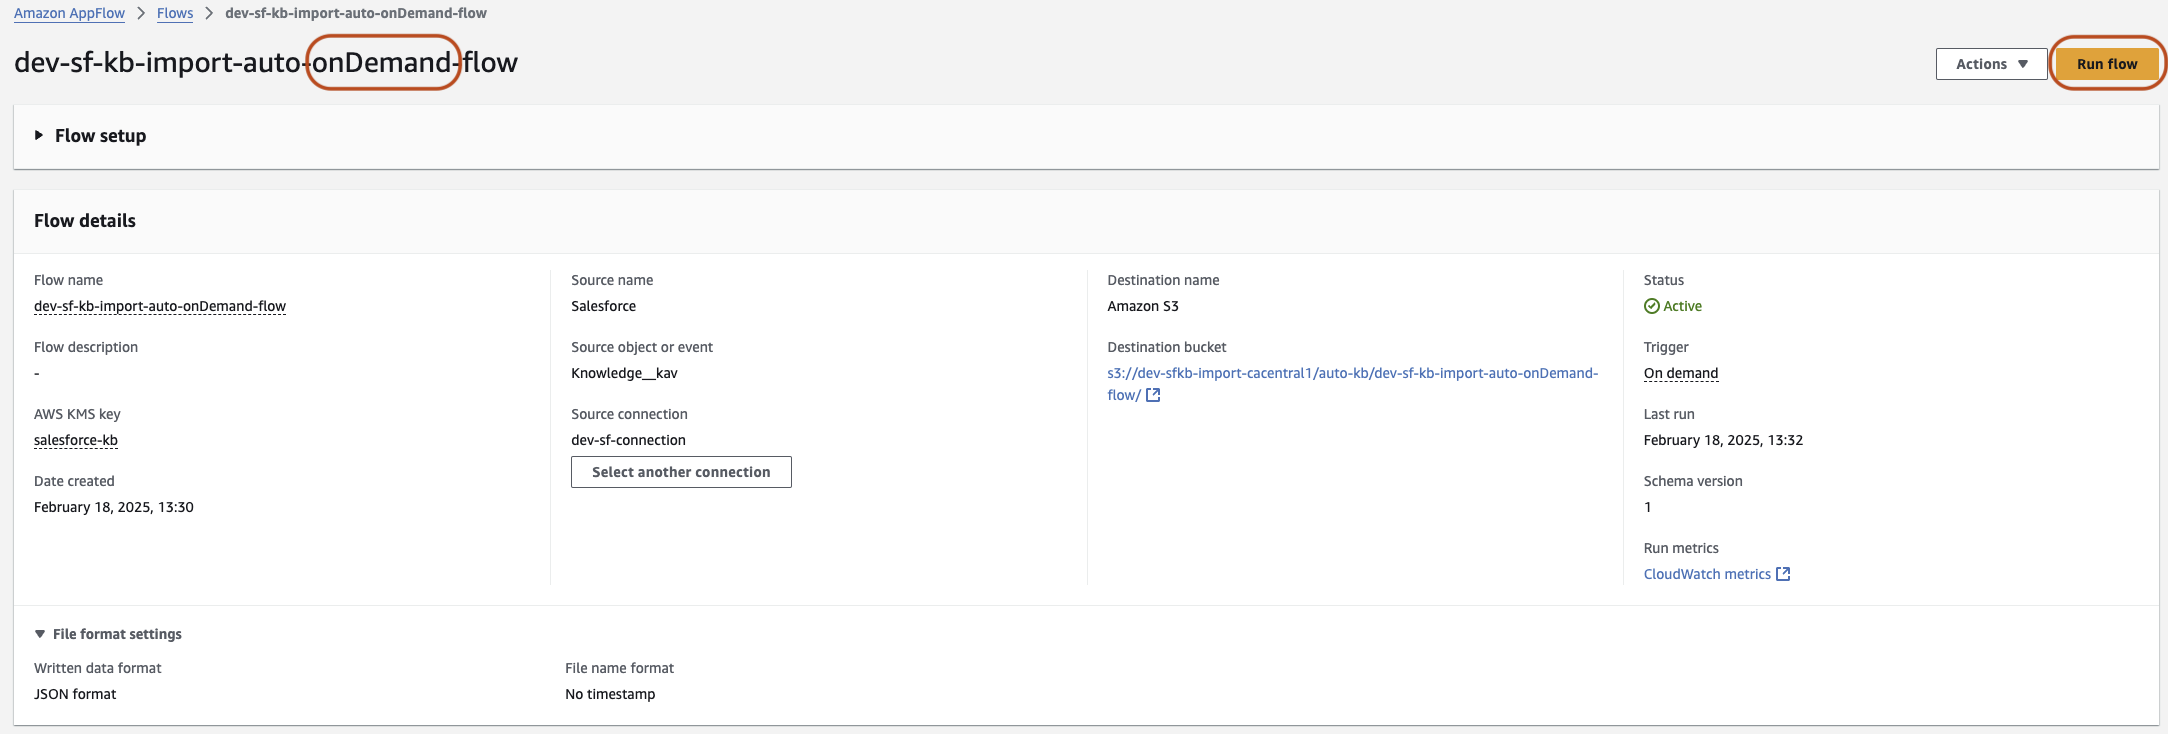
- To initiate a flow, you activate or run it. We have 2 types of flows created: OnDemand and Scheduled
- For each LOB, Select the OnDemand flow and choose View Details.
- Choose Run flow to run the flow
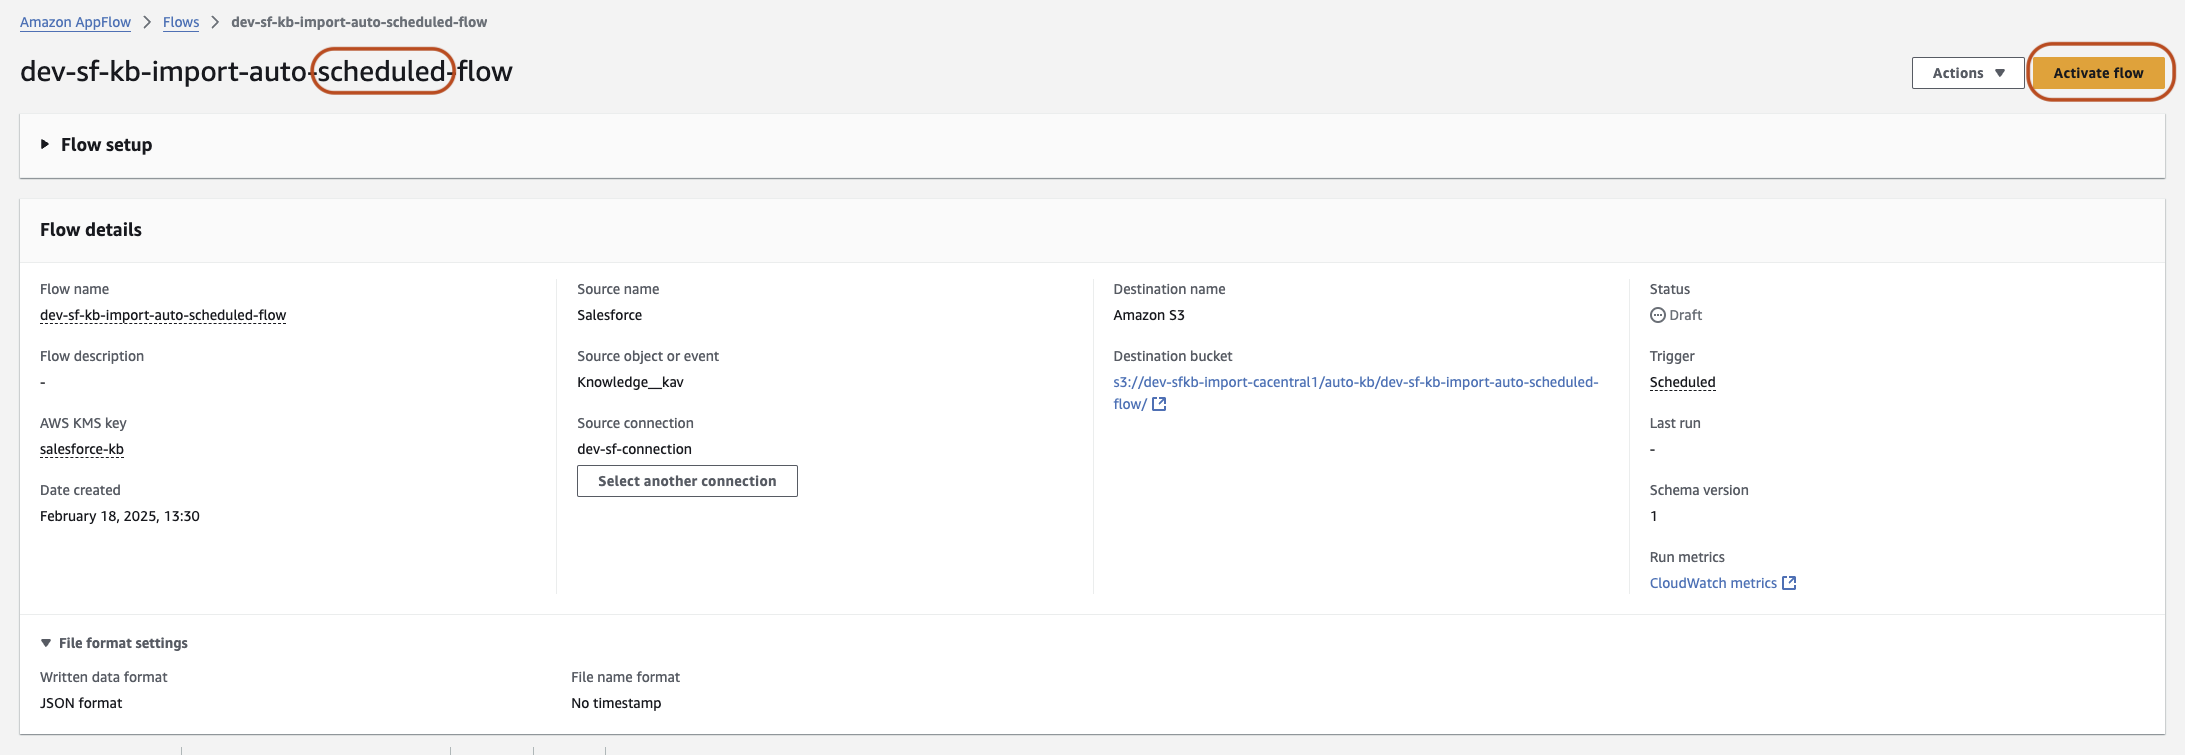
- For each LOB, Select the Scheduled flow and choose View Details
- Choose Activate to activate the flow
- Review and update the Amazon Connect contact flow
- Log in to your Amazon Connect instance
- Under Routing, choose Contact Flows.
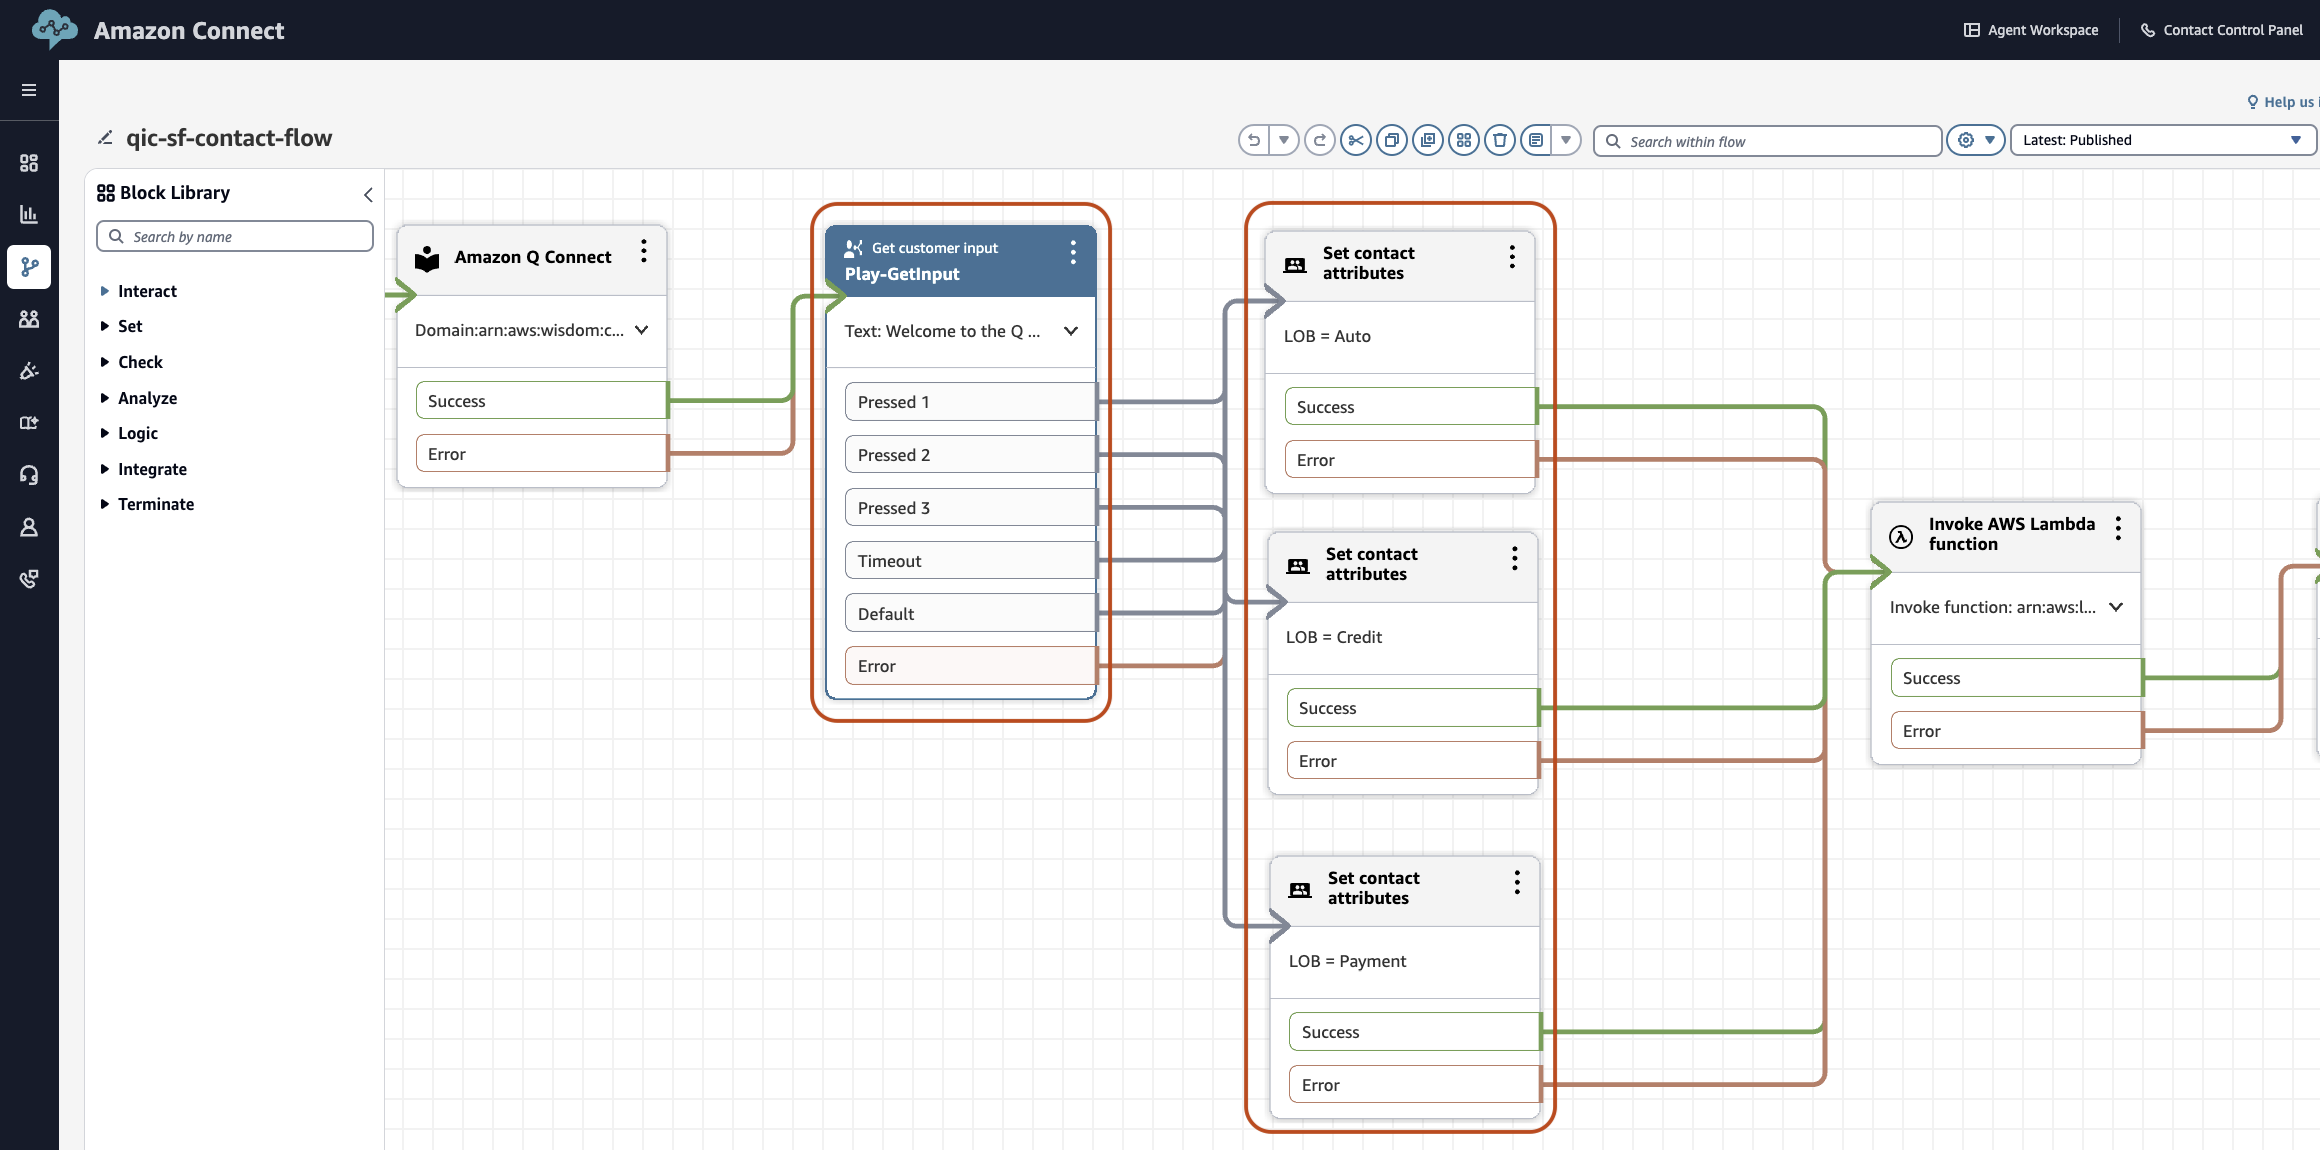
- Choose the flow named: qic-sf-contact-flow
- Navigate to the Get customer input Block
- Update the Prompts to include your BUs or LOBs
- Update the Set contact attributes block for each options. The LOB attribute is mandatory, and the value should be the same as the ones provided in the CDK configuration at the time of deployment
- Click Save to save the flow
- Click Publish to publish the flow
- Verify the AppFlow flow status
- Trigger the OnDemand Flow first – to retrieve the existing knowledge content from Salesforce
- Start the Scheduled Flow – to periodically poll Salesforce Knowledge to import any additions/updates to the Salesforce Knowledge.
- Verify target s3 buckets for Salesforce data synchronization
- Monitor CloudWatch logs
Troubleshooting tips
Common issues and solutions
- AppFlow connection issues
- Verify connection_name in config
- Check Salesforce credentials
- Validate OAuth token
- Permission errors
- Review IAM roles
- Verify Salesforce API access
- Knowledge base sync issues
- Validate object_name configuration
- Check field mappings
Cleaning up
To avoid incurring future charges, delete the resources using following steps:
- Ensure to unmap the Contact Flow created by the deployment from the phone number.
- In your terminal, ensure you are in the project folder
- Run command:
cdk destroy
Conclusion
In conclusion, integrating Salesforce Knowledge with Amazon Q in Connect enhances agent assistance and addresses some core challenges faced by contact centers. This integration empowers organizations to enhance their operations through the deployment of LOB-specific AI agents, ensuring real-time, contextual assistance tailored to the unique needs of different business units.
Additional references: