AWS Contact Center
Resolve customer issues via two-way SMS (text messaging) in Amazon Connect
Introduction
As of 2023, short messaging service (SMS) has a global reach of approximately 5 billion unique users. With 80% of adults using text messaging for communication, it is an essential tool for reaching a wide audience. Amazon Connect two-way short messaging service (SMS) capabilities enabling you to resolve customer issues via text messaging. It offers a convenient channel for customers while enabling you to deliver personalized experiences at a lower cost.
Most consumers are already familiar with SMS messaging for personal communications. Customers can easily initiate conversations or respond to SMS notifications or appointment reminders to get help from an agent.
In this blog post, we will demonstrate how to use SMS capabilities with your Amazon Connect contact center. This solution enables your customers to respond to your SMS campaigns. Your agents can receive and respond to customers’ SMS messages from the same agent workspace they use for other channels like voice, chat, and tasks.
Solution overview and architecture
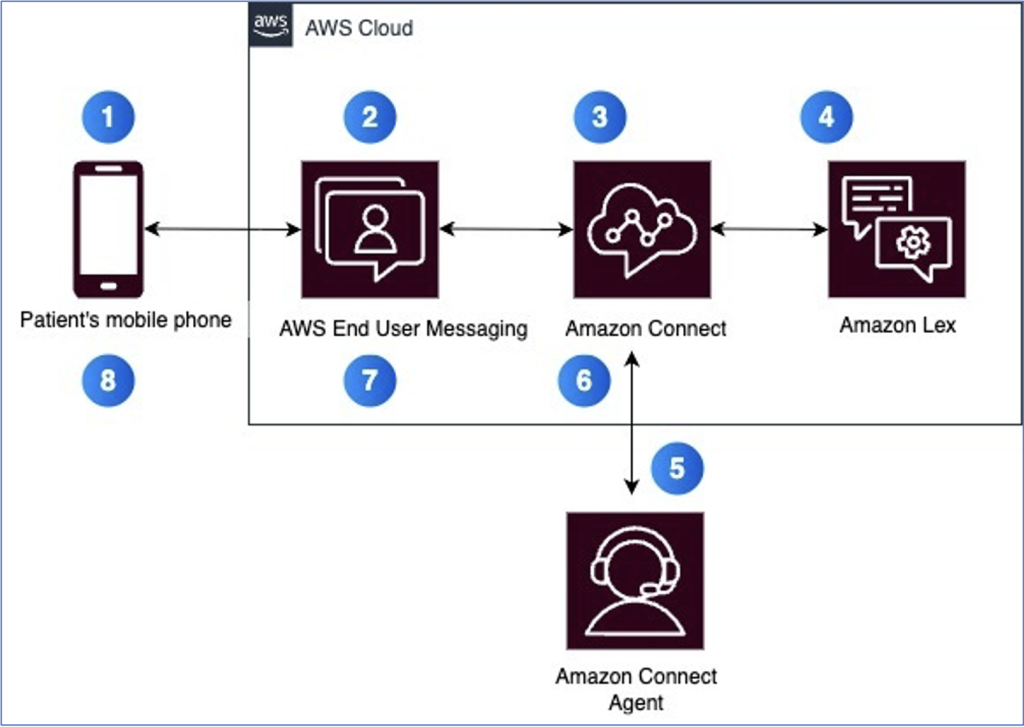 Figure 1: Solution architecture
- Customer sends SMS from their mobile device to an SMS enabled phone number on Amazon Connect.
- AWS End User Messaging delivers the SMS as a chat contact to Amazon Connect.
- Customer interacts with the Amazon Lex bot via SMS, which gathers information through a series of questions. When the customer requests agent assistance, the conversation proceeds to the next step.
- Amazon Connect routes the contact to an agent, along with all information previously collected by the Amazon Lex bot. The agent can then begin responding to customer SMS messages.
- Amazon Connect routes agent’s responses to the customer via AWS End User Messaging.
- AWS End User Messaging delivers the responses to the customer’s mobile phone as an SMS message
Prerequisites
For this walkthrough, you should have the following prerequisites:
- An AWS account with administrator access to the following services – Amazon Connect, AWS End User Messaging, Amazon Lex
- An Amazon Connect Instance
- Amazon Connect two-way SMS
- Agent created and associated with Basic routing profile and Basic Queue. Make sure that the Routing Profile has Chat enabled under Channel Availability
Deploying the solution
This blog talks about a patient contacting the Health Clinic to schedule an appointment. Patient sends an SMS message to the clinic’s number. The patient interacts initially with a bot and then gets transferred to a live agent for additional help.
Step 1: Create Amazon Lex Bot
- Sign in to the AWS Management Console and navigate to the Amazon Lex console.
- If this is your first bot, choose Get Started; otherwise, on the Bots page, under Action, choose Import from dropdown list. For more information, use Importing and Exporting bots in Amazon Lex V2 guide.
- Add the Bot name as AppointmentScheduler.
- Download the bot from this link.
- Choose Browse file and then select the bot that you downloaded in step 4
- The Password is optional
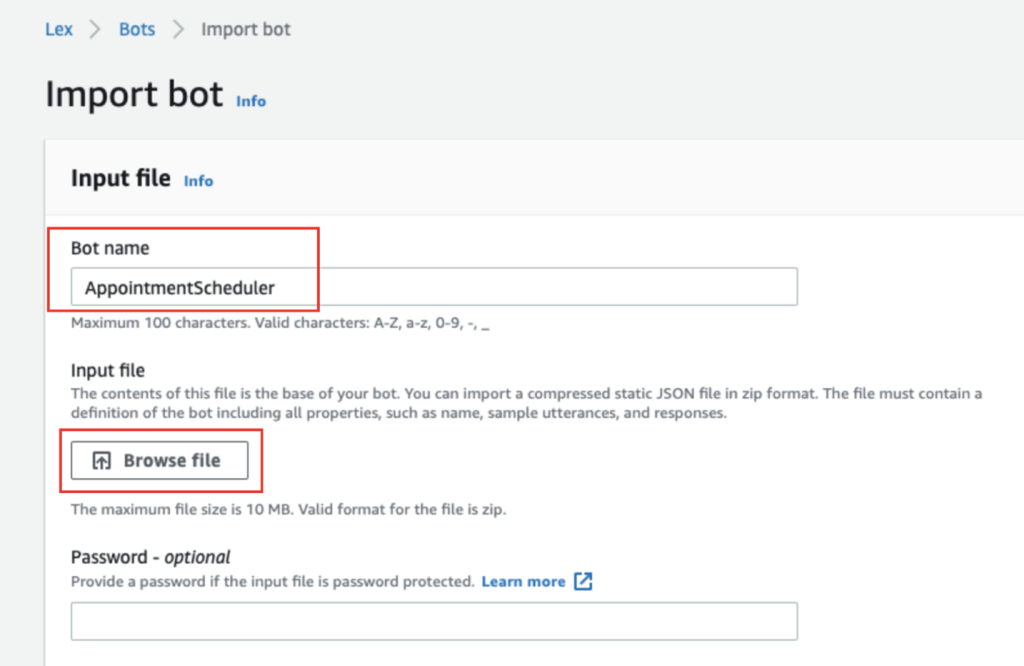 Figure 2: Importing Amazon Lex V2 bot
- For IAM permissions, choose Create a role with basic Amazon Lex permissions.
- For COPAA, choose No
- Leave Idle session timeout as the default value
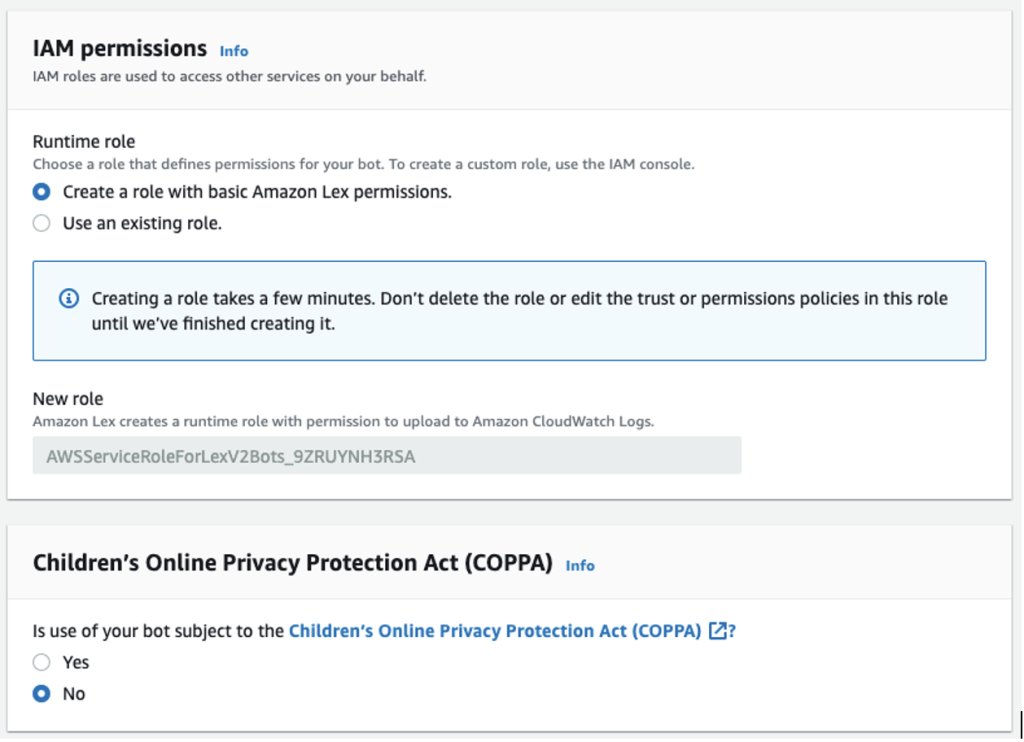 Figure 3: Importing Amazon Lex V2 bot – IAM permissions and COPPA
- Advanced settings are optional, and no changes are needed
- Leave the default value for check box Warn before overwriting existing bots with the same name
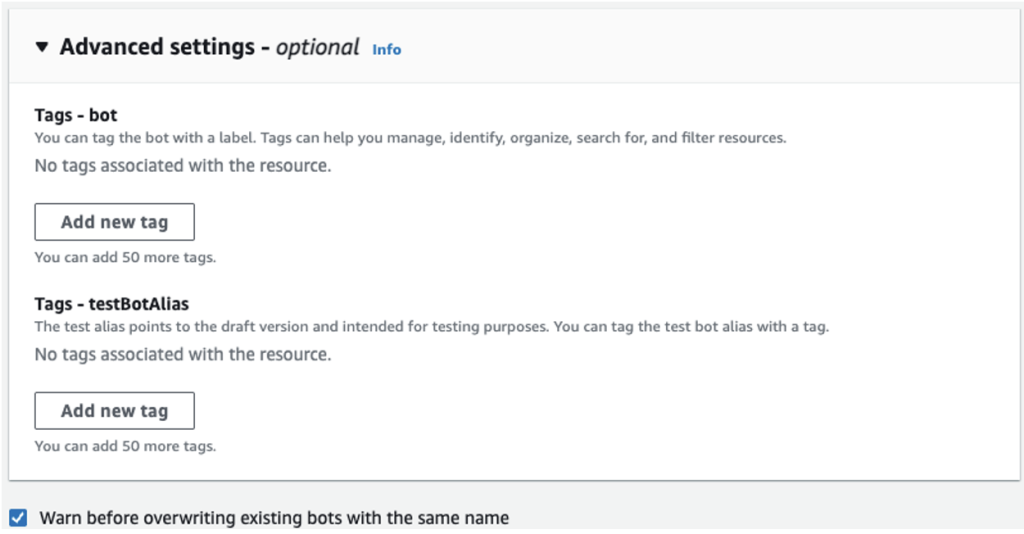 Figure 4: Importing Amazon Lex V2 bot – Advanced settings
- Choose Import. You will receive confirmation “Successfully imported file and created bot AppointmentScheduler”
![]() Step 2: Build Amazon Lex Bot
Step 2: Build Amazon Lex Bot
- Navigate to the Amazon Lex console and choose Bots
- Click on AppointmentScheduler bot
- Under All languages, select English (US)
- Choose Build
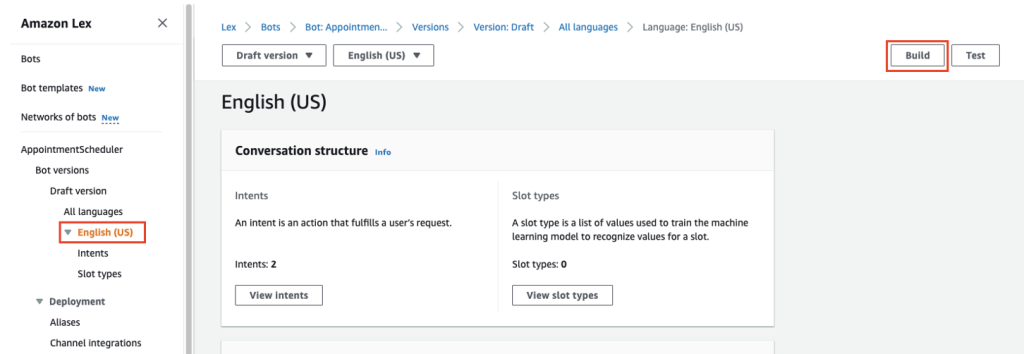
Figure 5: Building Amazon Lex V2 bot
Step 3: Add Amazon Lex Bot to the connect instance
- To open the Amazon Connect console, search for Amazon Connect in the search bar and select Amazon Connect
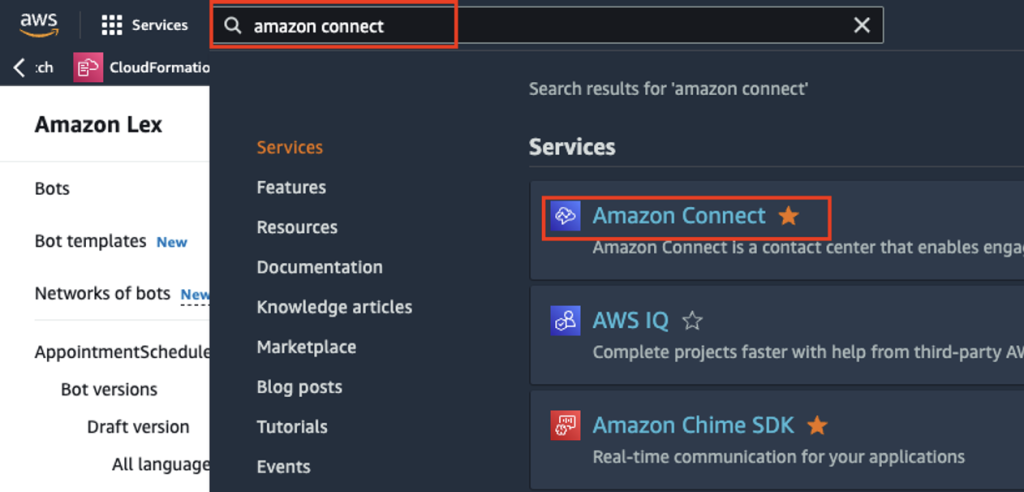 Figure 6: Searching and selecting Amazon Connect
- Select the Amazon Connect instance that you want to integrate with your Amazon Lex bot
On the navigation menu, choose Flows
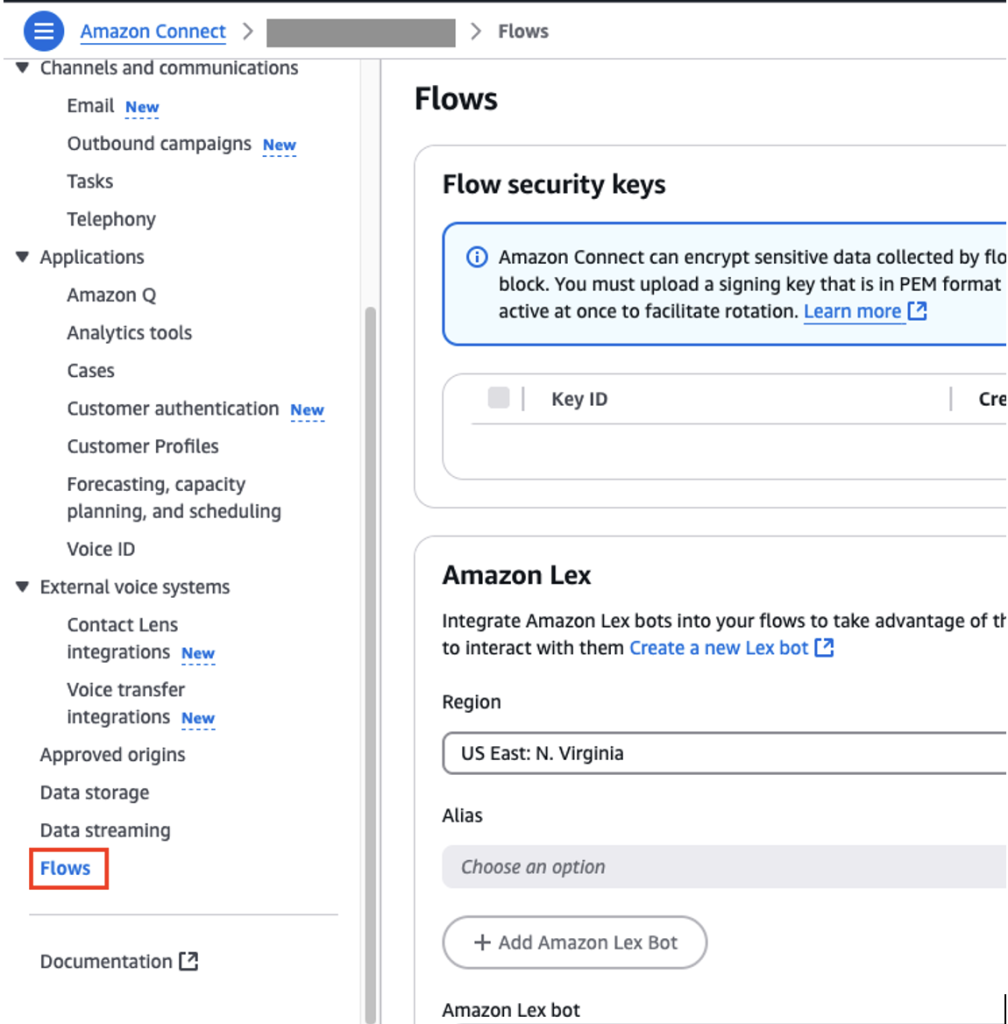
Figure 7: Flows configuration for Amazon Connect instance
- Under Amazon Lex, use the dropdown list to select the Region of your Amazon Lex bot, and then select your Amazon Lex bot, AppointmentScheduler
- Select the Amazon Lex bot alias name from the dropdown list TestBotAlias, and then choose + Add Amazon Lex bot.
Note: Create a new alias for production and do not use TestBotAlias

Figure 8: Adding Amazon Lex bot to Amazon Connect instance
Step 4: Create Amazon Connect Flow
- Log in to your Amazon Connect instance with an account that has permissions for Amazon Connect Flows and Amazon Lex bots
- Download the flow from this link
- On the navigation menu, choose Routing and then Flows
- Click on Create Flow
- Click on dropdown list next to Save, choose Import (beta)
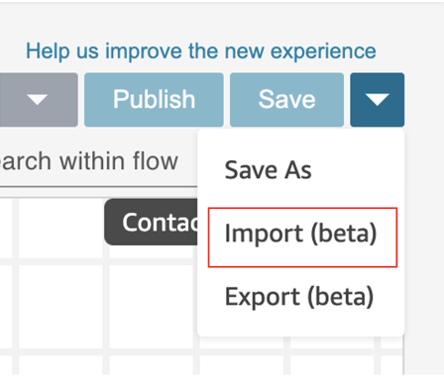
Figure 9: Creating Connect Flow
- Click on Choose File, browse the file that you downloaded in step 2, and choose Import
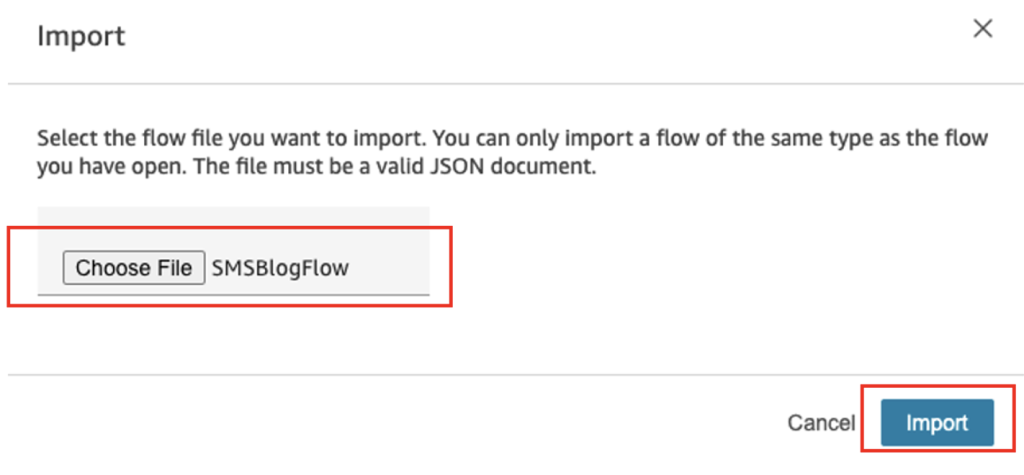
Figure 10: Importing the Connect Flow
- After importing the flow successfully
- Click on the block Get Customer Input and select AppointmentScheduler for Lex bot and TestBotAlias for Alias
- Click Save
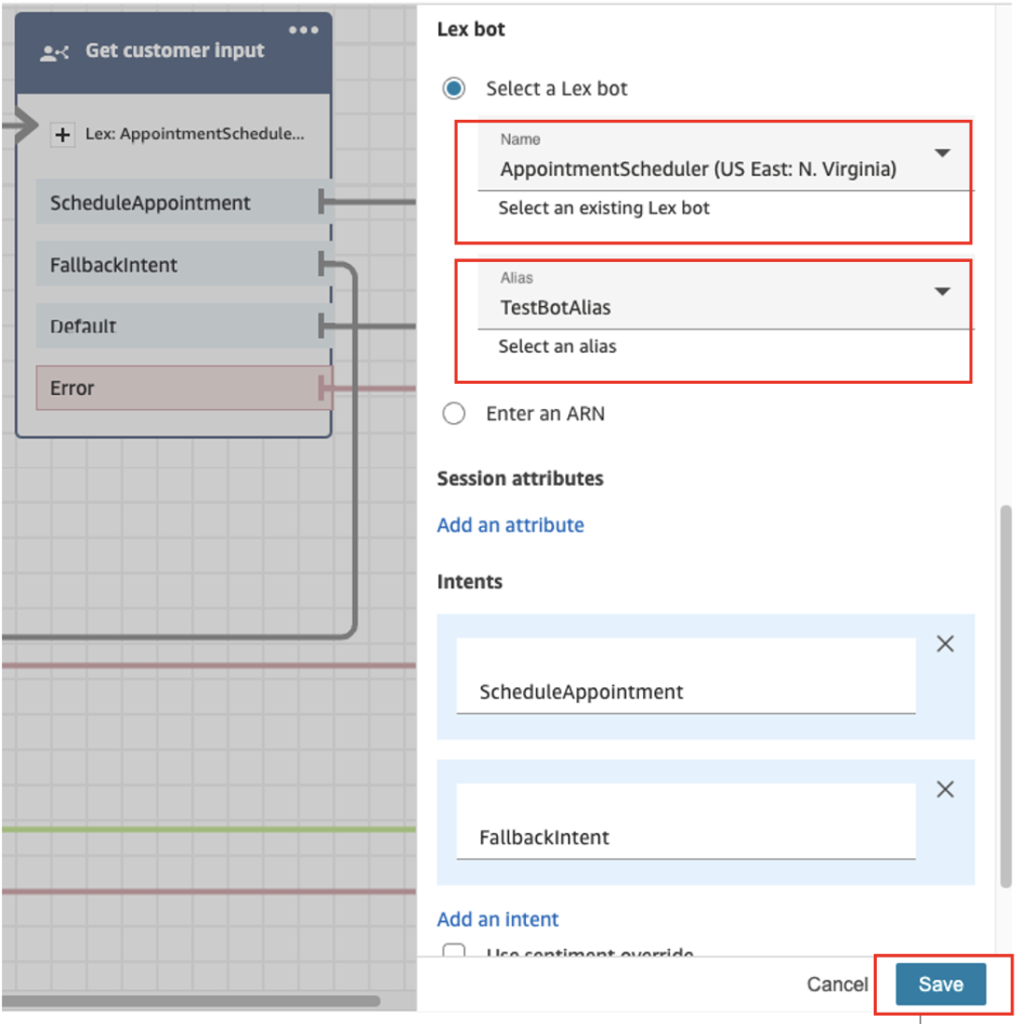
Figure 11: Modifying Get customer input block
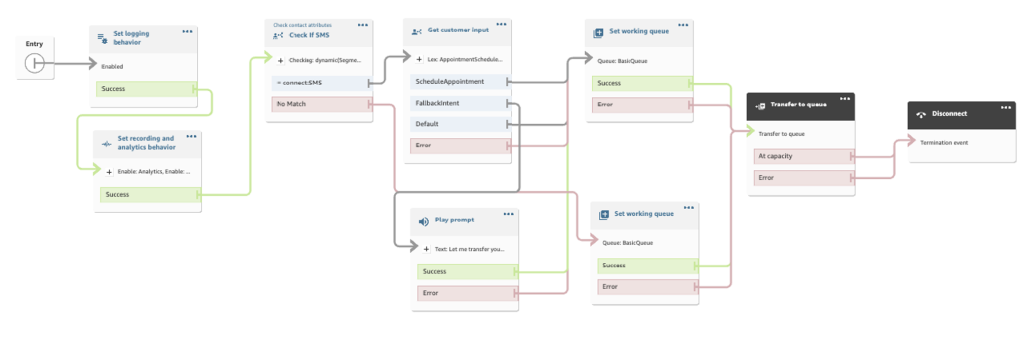
- Choose Set Working Queue block and select Basic Queue as shown in the following figure.

Figure 12: Modifying Set working queue block
- Choose Save and then Publish the flow
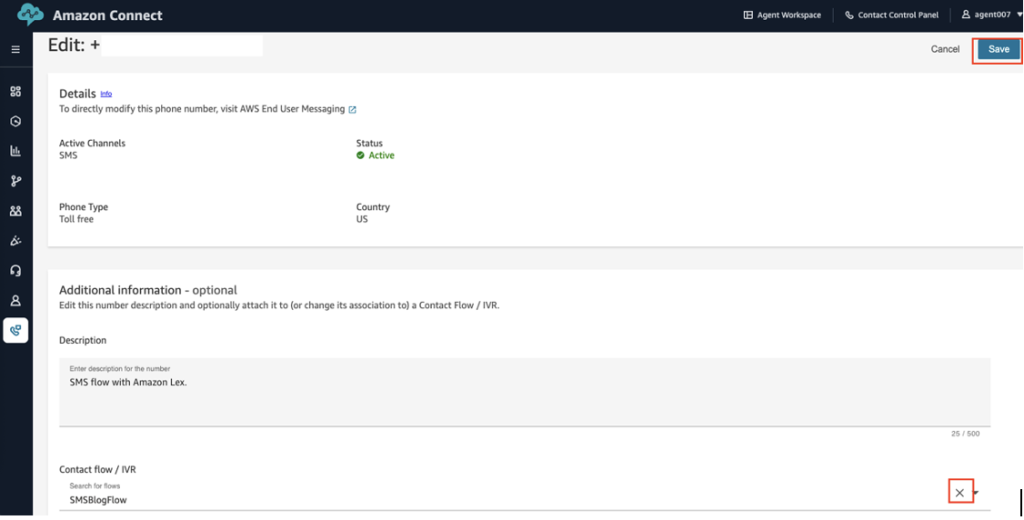
Step 5: Associate Amazon Connect flow to an SMS phone number
- In the menu on the left, navigate to Channels and then choose Phone numbers
- Click on the phone number enabled for SMS
- Under Contact flow/IVR, select the SMSBlogFlow flow from the dropdown list and click Save
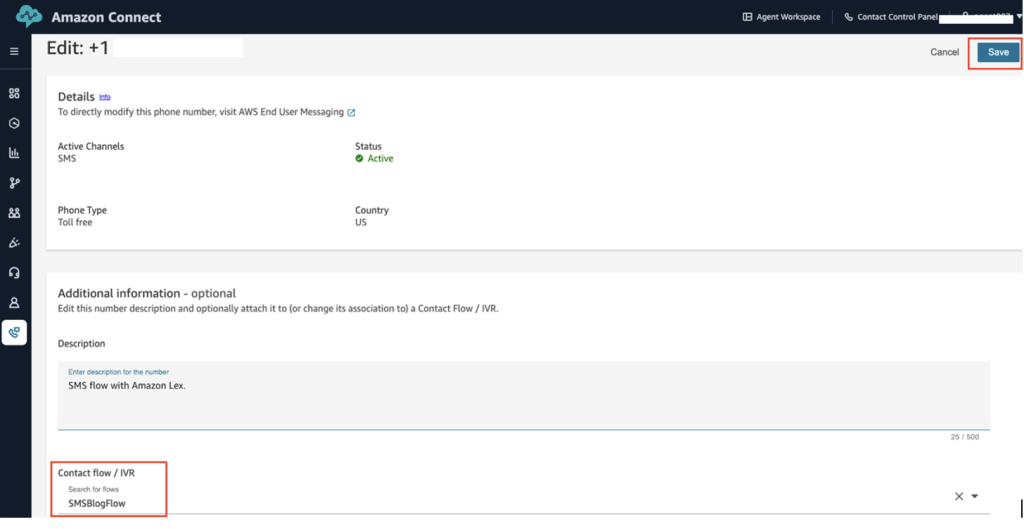 Figure 13: Associating Connect Flow with SMS phone number
Congratulations! You’ve successfully added SMS capabilities to your Amazon Connect Contact Center.
Following are screenshots of a patient interacting from their mobile phone using SMS.
- Patient contacts via SMS to the Health Clinic number and chats with a bot
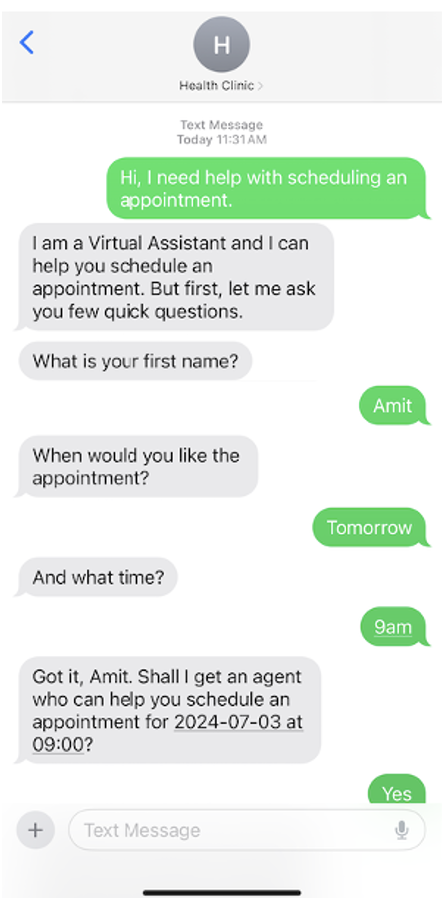
Figure 14: Patient interaction with Amazon Lex bot via SMS
- Patient is then transferred over to a live agent who continues to help them
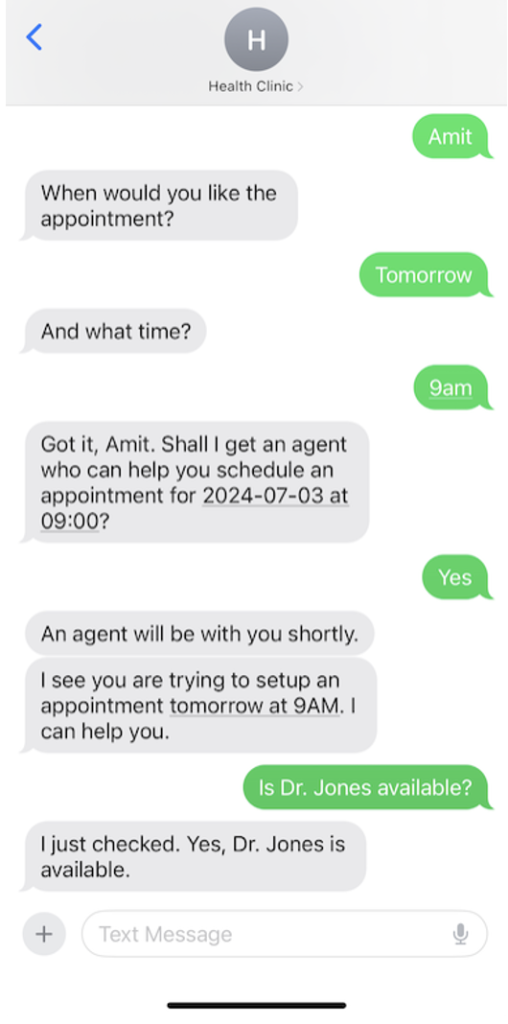
Figure 15: Patient’s interaction with Amazon Lex bot and live agent via SMS
- Agent uses Amazon Connect CCP (Contact Control Panel) and responds to SMS messages from the patient
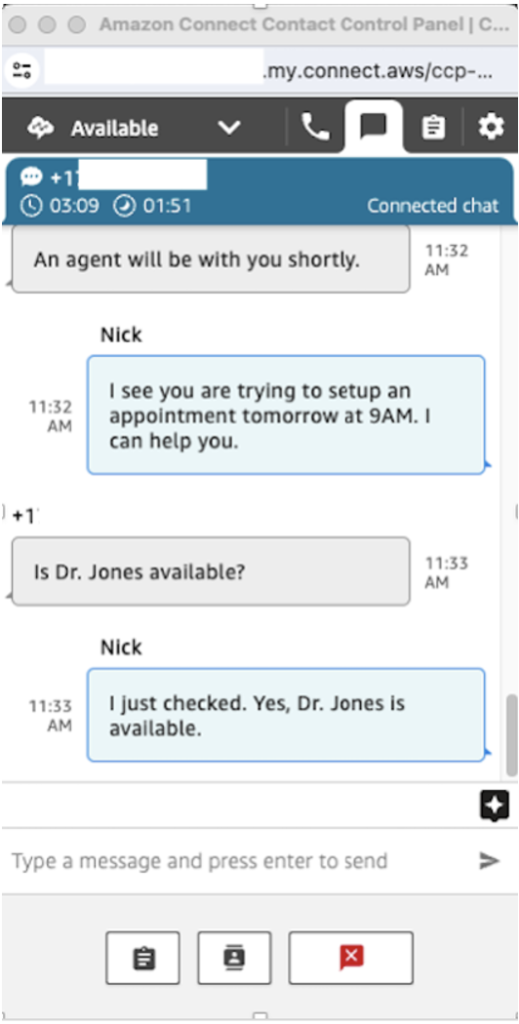
Figure 16: Agent CCP showing patient interaction with a live agent via SMS
Clean up
- If desired, export the latest version of your Lex bot and save it
- If desired, export the SMSBlogFlow Connect contact flow from Amazon Connect
- Disassociate the SMS enabled phone number from the SMSBlogFlow contact flow
- In the menu on the left, navigate to Channels and then select Phone numbers
- Click on the phone number that you used for testing the SMS flow
- Under Contact flow/IVR, click on the X on the far end and Save
- Delete the Amazon Lex bot that you imported
- Archive and delete the Amazon Connect Flow you imported
Conclusion
In this blog post, we demonstrated how to enhance your Amazon Connect contact center with SMS messaging capabilities. This solution simplifies customer engagement by enabling direct SMS responses, creating a more efficient and convenient experience for your customers.
As businesses continue to prioritize customer experience, adding support for SMS messaging can drive customer satisfaction and reduce operational costs. Get started with setting up SMS messaging for your Amazon Connect Contact Center.
If you require assistance in setting up this solution, AWS Professional Services is available to provide guidance and support. Additionally, you can seek assistance from Amazon Connect partners located worldwide, who specialize in implementing and optimizing Amazon Connect solutions.
We recommend the Amazon Connect Administrator Guide, which provides detailed information and instructions to enhance your understanding of Amazon Connect and explore more features.
Author Bio
 |
Amit Gupta is a Specialist Solutions Architect for Amazon Connect at Amazon Web Services. Amit has deep expertise in the Contact Center technology space and is passionate about modernizing customer and agent experiences. |
 |
Abhishek Pandey is a Principal Solutions Architect with Amazon Web Services based in Houston, TX. Abhishek is passionate about architecting creative solutions that support business innovation across different industries. Outside of work, he loves to hang out with family and friends. |