AWS Compute Blog
Use Amazon EC2 for cost-efficient cloud gaming with pay-as-you-go pricing
July 2025c2: This post was reviewed for accuracy.
Cloud gaming enables access to high-performance gaming without upfront hardware investment, using pay-as-you-go pricing instead. Cloud gaming platforms such as Amazon Luna are an entryway, but users are limited to the games available on the service. Furthermore, many users also prefer to own their games, or they already have a sizable collection. For those use cases, vendor-neutral software such as Amazon DCV (formerly NICE DCV), Parsec, or Moonlight are powerful solutions for streaming your games from anywhere.
In this post, we will show you a way to stream video games from the AWS Cloud to your local machine. We also demonstrate how you can provision a powerful gaming machine with pay-as-you-go pricing that allows you to play even the most demanding video games with zero upfront investment in gaming hardware.We have provided code examples on GitHub that let you follow along and replicate this post in your AWS account.
In this example, we use the AWS Cloud Development Kit (AWS CDK), an open source software development framework, to model and provision cloud application resources. Using the AWS CDK can reduce the complexity and amount of code needed to automate resource deployment. As part of this we use the AWS CloudFormation metadata capabilities AWS::CloudFormation::Init, cfn-init, and cfn-signal to provide a consistent and repeatable Amazon Elastic Compute Cloud (Amazon EC2) bootstrap installation.
Solution overview
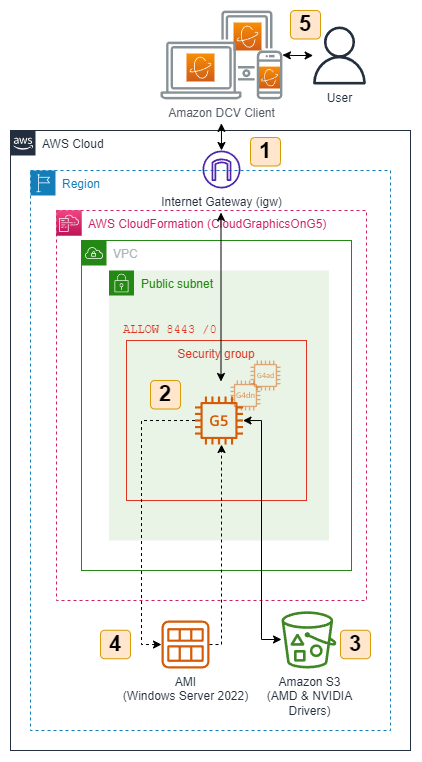
The following list describes the key components of this solution. During this post, We explain each component in detail and deploy this architecture with the sample AWS CDK project that comes with this post.
- An Amazon Virtual Private Cloud (Amazon VPC) that lets you launch AWS resources in a logically isolated virtual network. This includes network configuration through VPC Security Groups that lets you connect with instances in your VPC over UDP/Quick UDP Internet Connections (QUIC) protocol port 8443.
- An Amazon EC2 instance with GPU capabilities. You can choose from instance families such as G4dn, G4ad, G5, G6, G6e, or Gr6 depending on your performance requirements. For example, G5 Instances deliver up to three times higher performance as compared to G4dn, while G6 provides up to two times higher graphics performance than G4dn instances, and G6e offers up to two and half times better performance than G5 instances.
- Access to Amazon S3 bucket. Amazon S3 is an object storage that contains the graphics drivers needed for GPU instances and Amazon DCV License.
- EC2 Launch Templates for creating and using personal gaming Amazon Machine Images (AMIs). Launch templates store all your instance configuration parameters, such as instance type, security groups, and network settings. After setting up your gaming environment once, you can create an AMI and use the launch template to quickly spin up identical gaming instances on demand, preserving all your installed games and settings without repeating the configuration process.
- Using the Amazon DCV client to connect to your EC2 instance. When an Amazon DCV connection is established, the Amazon DCV server software compresses the visual output of the application and streams it back to the client application in an encrypted pixel stream over the QUIC protocol over port 8443.
Walkthrough
The following sections walk through the steps needed to set up your personal gaming AMI. You only must do this once. For this, we will use an Amazon Linux bash terminal. Some commands may differ when using Windows terminal.
For this walkthrough, you need:
- An AWS account
- Installed and authenticated AWS Command Line Interface (AWS CLI) (authenticate with an AWS Identity and Access Management (IAM) user or an AWS Security Token Service (AWS STS) Security Token)
- Installed and setup AWS CDK
- Installed Node.js, TypeScript, and git
- Amazon Elastic Compute Cloud (Amazon EC2) KeyPair (.pem)
Use an existing EC2 key pair for the initial instance setup. List your available key pairs with the following CLI command:
Alternatively, create a new key pair with the CLI. You need the created .pem file later, so make sure to keep it.
Checkout and deploy the sample stack
- After completing the prerequisites, clone the associated GitHub repository by running the following command in a local directory: git clone https://github.com/aws-samples/cloud-gaming-on-ec2-instances.git
- Open the repository in your preferred local editor, then review the contents of the *.ts files in cdk/bin/ and cdk/lib/directories.
- In
gaming-on-ec2-instances.ts, you find six AWS CDK stacks: G6Stack, G6EStack, GR6Stack, G5Stack, G4DNStack, and G4ADStack. An AWS CDK stack is a unit of deployment. All AWS resources defined within the scope of a stack, either directly or indirectly, are provisioned as a single unit.
The architecture for the stacks are similar, and only differ in the instance type and instance size for the GR6Stack that is deployed. G6Stack, G6EStack, GR6Stack, G5Stack, and G4DNStack share parameters that determine the configuration of the EC2 instance, the VPC network, and the preinstalled software. The stacks come with defaults for some parameters. We recommend keeping the default values. Make sure to change the ACCOUNT, REGION, and EC2_KEYPAIR_NAME, otherwise the stack may fail during deployment.
Global:
- ACCOUNT: (needed) The account ID in which you want to deploy the stack.
- REGION: (needed) The AWS Region in which you want to deploy the stack.
- tags: A list of resource tags that are added to every taggable resource in the stack.
EC2:
- InstanceSize: Sets the size of the EC2 instance. Defaults to g6.xlarge, g6e.xlarge, gr6.4xlarge, g5.xlarge, g4dn.xlarge, and g4ad.xlarge respectively. Check AWS CDK Reference Documentation for a list of valid configurations.
- EC2_KEYPAIR_NAME: (needed) The name of the EC2 key pair you use to connect to the instance. Make sure to have access to the respective .pem file.
- VOLUME_SIZE_GIB: The size of the root Amazon Elastic Block Store (Amazon EBS) volume. Approximately 20 GB is used for the Windows installation, and the rest is available for your software. Some EC2 instance types include instance store, which can be initialized.
VPC:
- associateElasticIp: Controls if an Elastic IP address is created and added to the EC2 instance.
- OPEN_PORTS: Access from these ports is allowed. Per default this only allows access for Amazon DCV on port 8443.
- ALLOW_INBOUND_CIDR: Access from this CIDR range is allowed. By default, this allows access from /0. However, I recommend that you restrict this to your IP address only.
Software:
- NICE_DCV_DISPLAY_DRIVER_URL: The download URL of the Amazon DCV Virtual Display Driver for Amazon EC2.
- NICE_DCV_SERVER_URL: The download URL of the Amazon DCV Server.
- CHROME_URL: Installs Google Chrome Enterprise x64.
For G6, G6e, Gr6, G5, and G4.dn instances, two more parameters are needed (see process of installing NVIDIA drivers):
- GRID_SW_CERT_URL: The NVIDIA driver needs a certificate file, which is downloaded from Amazon S3.
- SEVEN_ZIP_URL: Update to the latest 7zip.msi version, because it is needed for the automated NVIDIA driver install.
Choose an instance type based on your performance and cost requirements, then adapt the config accordingly. If you want the lowest hourly instance cost, then we recommend starting with the G4DNStack. If you need more graphics performance, then choose the G4ADStack for up to 40% improvement in graphics performance, or the G5Stack which delivers up to three times higher performance for graphics-intensive applications as compared to EC2 g4dn instances. For even better performance, consider the G6Stack that provides up to two times higher graphics performance than g4dn instances, the GR6Stack for graphics workloads with higher memory requirements (1:8 vCPU:RAM ratio), or the G6EStack that offers two times higher GPU memory than G6 and delivers up to two and a half times better performance as compared to G5 instances.
After choosing an instance type and populating the parameters in the gaming-on-ec2-instances.ts file, follow these steps to deploy your stack:
- Navigate to the AWS CDK directory and install dependencies:
- Bootstrap your AWS environment (only needed once per account/Region):
- Deploy your preferred stack:
For more configuration options and troubleshooting information, refer to the README.md located in the GitHub repository.
The AWS CDK creates a new Amazon VPC with a public subnet. It also configures security groups to allow inbound traffic from the CIDR range and ports specific in the config. By default, this allows inbound traffic from any IP address. We recommend restricting access to your current IP address by going to checkip.amazonaws.com and replacing 0.0.0.0/0 with <YOUR_IP>/32 for the allowInboundCidr config parameter.
Besides the security groups, the AWS CDK also manages all necessary IAM permissions to access relevant S3 buckets.It creates the following resources in your VPC:
- An EC2 accelerated compute instance with an attached GPU running Windows Server 2025. Depending on the stack you chose, the default instance type is g6.xlarge, g6e.xlarge, gr6.4xlarge, g5.xlarge, g4dn.xlarge, or g4ad.xlarge. You can override this in the gaming-on-ec2-instances.ts template.
- When the EC2 instance is launched, the AWS CDK runs an instance-specific PowerShell User Data script. This PowerShell User Data initiates the cfn-init helper script, installed by default on the Amazon provided AMIs for Windows Server. This reads template metadata from the AWS::CloudFormation::Init key in the CloudFormation template and acts accordingly to automatically fetch and parse metadata from CloudFormation, extract and write files to disk, install packages and drivers, restart the instance, and signal script status back to CloudFormation. Check the code in /lib/base.ts to see the full script or add your own commands.
- An Amazon EBS gp3 volume with your defined size (default: 200 GB).
- An EC2 launch template.
- (Optionally) An Elastic IP address as a static public IP address for your gaming instances.
After the stack has been deployed, you should see the following output:

Choose the first link [Credentials], and use the GamingOnEc2.pem file from the previous step to receive the instance password.Alternatively, copy the [InstanceId] into the following command to get the decrypted Windows Administrator password.
You are presented with an output containing the decrypted password.
Output:
Install your software
After receiving the SUCCESS signal from cfn-signal running on the EC2 instance, the CloudFormation stack enters the CREATE_COMPLETE state. You can connect from your local machine to your EC2 instance with the Amazon DCV Client. The Amazon DCV bandwidth-adaptive streaming protocol allows near real-time responsiveness for your applications without compromising the image accuracy. This is the recommended way to stream latency sensitive applications.
Download the Amazon DCV client and connect to your EC2 instance with the credentials:
- Hostname/IP Address: <Public_IP> (see CloudFormation Output)
- Username: Administrator
- Password: (see <PASSWORD_DATA> output from the previous command)
After testing the Amazon DCV connection, you are now all set to install your games and tools on the EC2 instance. Make sure to install it on the C: drive, as you create an AMI with the contents of C: later.When gaming you may notice the mouse moving inadvertently. Make sure to enable relative mouse position by using Shift+Ctrl+F8, or choosing the option in the top left corner of the logged in Amazon DCV Client.
Start and stop your instance on demand
At this point, you have a fully set up EC2 instance for cloud gaming on AWS. You can now start and stop the instance when needed. The following CLI commands are all you need to remember:
This uses the regular on-demand capacity of Amazon EC2, and you are billed per second charges for the time that your instance is running. If your instance is stopped, then you are only be charged for the EBS volume and the Elastic IP address if you chose to use one.
Launch instances from AMI
Make sure you have installed all the applications you need on your Amazon EC2, and create your personal gaming AMI by running the following AWS CLI command:
Use the following command to get details about your AMI creation. When the status changes from pending to available, then your AMI is ready:
The AWS CDK created an EC2 launch template when it deployed the stack. Run the following AWS CLI command to spin up an EC2 instance from this template:
This command starts a new EC2 instance with the exact same configuration as your initial Amazon EC2, but with all your software already installed.
Network performance and latency optimization
For an optimal cloud gaming experience, network latency and bandwidth are critical factors. Amazon DCV is designed to deliver low-latency streaming, but several factors can impact your experience:
Expected performance
- Latency: For the best gaming experience, aim for total round-trip latency under 50 ms. Action games typically remain playable up to 100 ms, while turn-based or strategy games can tolerate higher latency.
- Bandwidth requirements: We recommend a minimum of 25 Mbps downstream connection for 1080p gaming at 60 Frames Per Second (FPS). For 4K gaming, aim for 50+ Mbps.
- Regional proximity: Choose the Region closest to your physical location. Every 100 miles of distance adds approximately 1-2 ms of network latency.
Built-in performance optimizations
The AWS CDK deployment automatically configures several performance-enhancing settings:
- Amazon DCV optimizations:
- Enables QUIC protocol for improved network performance
- Configures frame queue weights for better responsiveness
- Removes FPS limitations to maximize performance
- Sets optimal rendering parameters for gaming workloads
- NVIDIA GPU optimizations (for G4dn, G5, G6, G6e, and Gr6 instances):
- Disables Error Correction Code (ECC) memory checking for improved performance
- Configures optimal GPU clock speeds (G5: 1710 MHz, G4dn: 1590 MHz)
- Enables NVIDIA Gaming Marketplace optimizations through registry settings
Optimizing your setup
- Instance selection: g6e instances offer the lowest processing latency for demanding titles, while g4dn instances provide a good balance of performance and cost.
- AWS Edge Services for ultra-low latency:
- AWS Wavelength: Deploy your supported gaming instances (g4dn.2xlarge) on Wavelength Zones embedded within 5G carrier networks for single-digit millisecond latencies. This is ideal if you’re using 5G as your internet connection, effectively bringing the cloud gaming server to the edge of the mobile network.
- AWS Local Zones: For urban areas with Local Zone availability, deploy your supported gaming instances (G4dn, G5) for sub-10 ms latency. This provides near-local gaming performance without maintaining your own hardware.
- Instance availability: The selection of GPU instances in Wavelength Zones and Local Zones continues to expand. For the most current list of supported instance types and locations, refer to the AWS Wavelength documentation and AWS Local Zones documentation.
- Network configuration:
- Connect your client device through Ethernet rather than Wi-Fi when possible.
- Enable Quality of Service (QoS) on your home router, prioritizing UDP traffic on port 8443.
- Amazon DCV settings:
- Adjust streaming quality based on your available bandwidth
- Enable H.264 video compression standard in the Amazon DCV server settings
- Configure your preferred frame rate (30, 60, or 120 FPS) based on your network capabilities.
- Game-specific settings: Lower in-game visual settings that impact frame rate, such as shadows and reflections, because streaming already introduces some visual compression.
Cost
When you know how much you, or your team games, you may want to look for ways to save more money. If you are gaming the full 8760 hours per year, then using a commitment-based purchasing model, such as Savings Plans and Reserved Instances makes a lot of sense. This is because you can save up to 72% off of regular On-Demand Instances, in exchange for a commitment to use a specific amount of compute power (measured in $/hour).
Therefore, going with a conservative estimate of playing five hours each day, every week, in a year, we can see significant cost savings already.
To bring the cost down even further, you can start using EC2 Spot Instances, because it is an excellent way to save up to 90% off on-demand pricing with no need for commitment or upfront costs. EC2 Spot lets you use unused Amazon EC2 capacity in the AWS Cloud. The only difference between On-Demand Instances and Spot Instances is that Spot Instances can be interrupted by Amazon EC2, with two minutes of notification, when Amazon EC2 needs the capacity back.
Using the AWS Pricing Calculator, you can see the average pricing Spot Instance pricing for all EC2 Instances such as all GPU instance families (G6, G6e, Gr6, G5, G4dn, and G4ad). Calculating your cost based on five hours a day and the average cost of Spot Instance pricing you can already see a much improved cost reduction by choosing the correct instance type and pricing method.
There is still more you can do. For example, you can share the Amazon EC2 instance with a friend or team where multiple people can use the same EC2 instance at the same time, further reducing the cost per person.Choosing the right instance type and picking your pricing model allows you to get great price for performance when gaming on Amazon EC2. To perform this calculation, run the 3DMark Time Spy benchmark on your EC2 instance and divide the score by the price per hour of the respective EC2 instance type. Go to the README.md for more up to date on benchmark scores.
Conclusion
This post walked you through creating your personal cloud gaming stack. You are now all set to stream video games from the cloud to all your local devices and enjoy high-end gaming without high upfront investment into a gaming PC. Whether you are a casual gamer or running gaming specific workloads such as e-sport viewing tournaments. Amazon EC2 is the service to do it.
Visit the EC2 g6 instances service page to learn more about how AWS continues to push the boundaries of cost-effectiveness for graphic-intensive applications.