AWS Big Data Blog
Introducing Jobs in Amazon SageMaker
Processing large volumes of data efficiently is critical for businesses, and so data engineers, data scientists, and business analysts need reliable and scalable ways to run data processing workloads. The next generation of Amazon SageMaker is the center for all your data, analytics, and AI. Amazon SageMaker Unified Studio is a single data and AI development environment where you can find and access all of the data in your organization and act on it using the best tools across any use case.
We’re excited to announce a new data processing job experience for Amazon SageMaker. Jobs are a common concept widely used in existing AWS services such as Amazon EMR and AWS Glue. With this launch, you can now build jobs in SageMaker to process large volumes of data. Jobs can be built using your preferred tool. For example, you can create jobs from extract, transform, and load (ETL) scripts coded in the Unified Studio code editor, code interactively in a Unified Studio Notebooks, or create jobs visually using the Unified Studio Visual ETL editor. After being created, data processing jobs can be set to run on demand, scheduled using the built in scheduler, or orchestrated with SageMaker workflows. You can monitor the status of your data processing jobs and view run history showing status, logs, and performance metrics. When jobs encounter failures, you can use generative AI troubleshooting to automatically analyze errors and receive detailed recommendations to resolve issues quickly. Together, you can use these capabilities to author, manage, operate, and monitor data processing workloads across your organization. The new experience provides an experience that’s consistent with other AWS analytics services such as AWS Glue.
This post demonstrates how the new jobs experience works in SageMaker Unified Studio.
Prerequisites
To get started, you must have the following prerequisites in place:
- An AWS account
- A SageMaker Unified Studio domain
- A SageMaker Unified Studio project with an Data analytics and AI-ML model development project profile
Example use case
A global apparel ecommerce retailer processes thousands of customer reviews daily across multiple marketplaces. They need to transform their raw review data into actionable insights to improve their product offerings and customer experience. Using SageMaker Unified Studio visual ETL editor, we’ll demonstrate how to transform raw review data into structured analytical datasets that enable market-specific performance analysis and product quality monitoring.
Create and run a visual job
In this section, you’ll create a Visual ETL Job that processes the review data from a Parquet file in Amazon Simple Storage Service Amazon S3. The job transforms the data using SQL queries and saves the results back to S3 buckets. Complete the following steps to create a Visual ETL Job:
- On the SageMaker Unified Studio console, on the top menu, choose Build.
- Under DATA ANALYSIS & INTEGRATION, choose Data processing jobs.
- Choose Create Visual ETL Job.
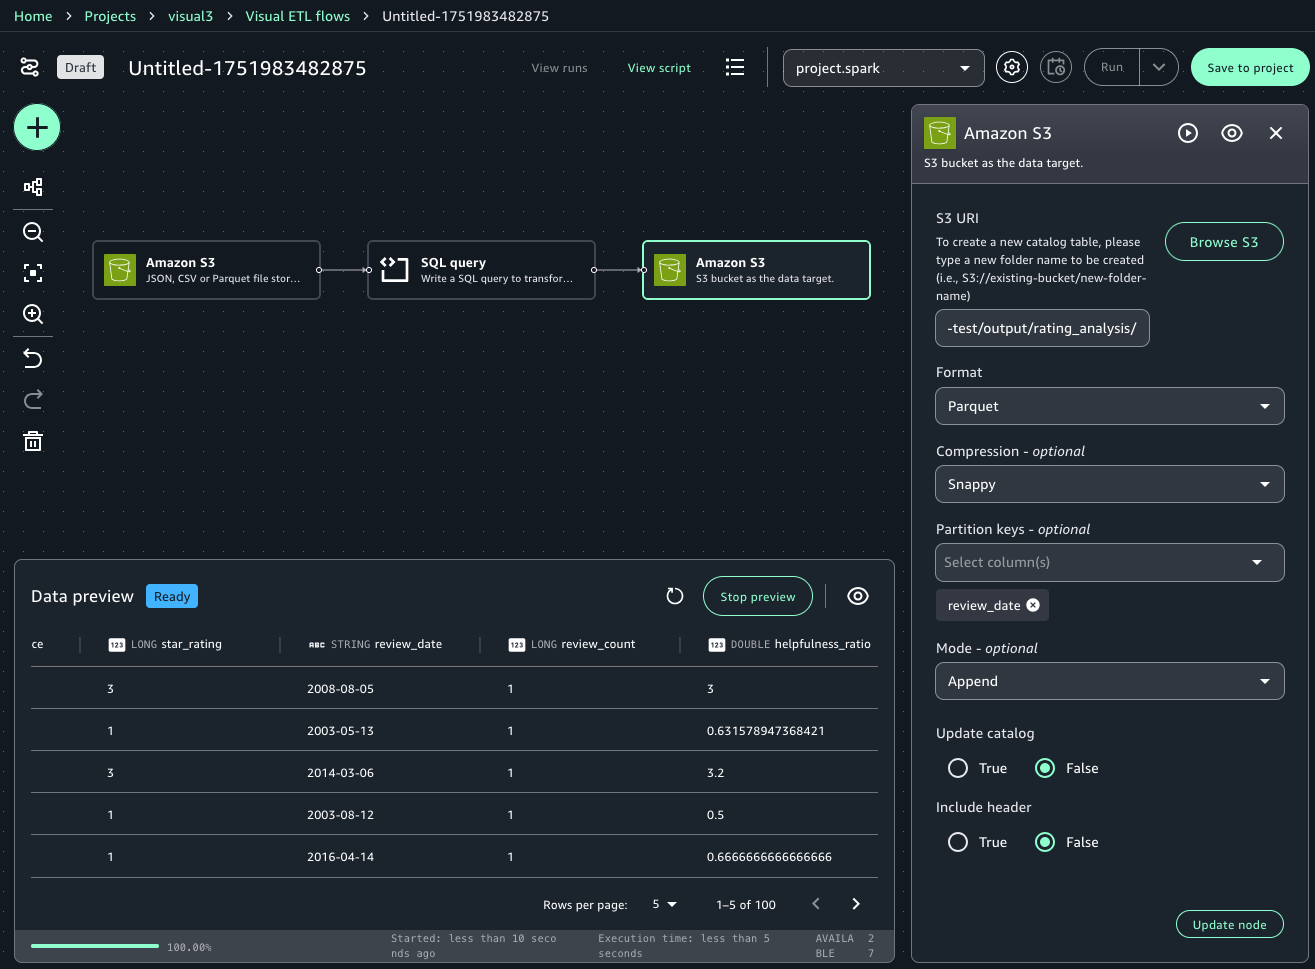
You’ll be directed to the Visual ETL editor, where you can create ETL jobs. You can use this editor to design data transformation pipelines by connecting source nodes, transformation nodes, and target nodes.
- On the top left, choose the plus (+) icon in the circle. Under Data sources, select Amazon S3.
- Select the Amazon S3 source node and enter the following values:
- S3 URI:
s3://aws-bigdata-blog/generated_synthetic_reviews/data/product_category=Apparel/ - Format: Parquet
- S3 URI:
- Select Update node.
- Choose the plus (+) icon in the circle to the right of the Amazon S3 source node. Under Transforms, select SQL query.
- Enter the following query statement and select Update node.
- Choose the plus (+) icon to the right of the SQL Query node. Under Data target, select Amazon S3.
- Select the Amazon S3 target node and enter the following values:
- S3 URI: Choose the Amazon S3 location from the project overview page and add the suffix “
/output/rating_analysis/”. For example,s3://<bucket-name>/<domainId>/<projectId>/output/rating_analysis/ - Format: Parquet
- Compression: Snappy
- Partition keys: review_date
- Mode: Append
- S3 URI: Choose the Amazon S3 location from the project overview page and add the suffix “
- Select Update node.
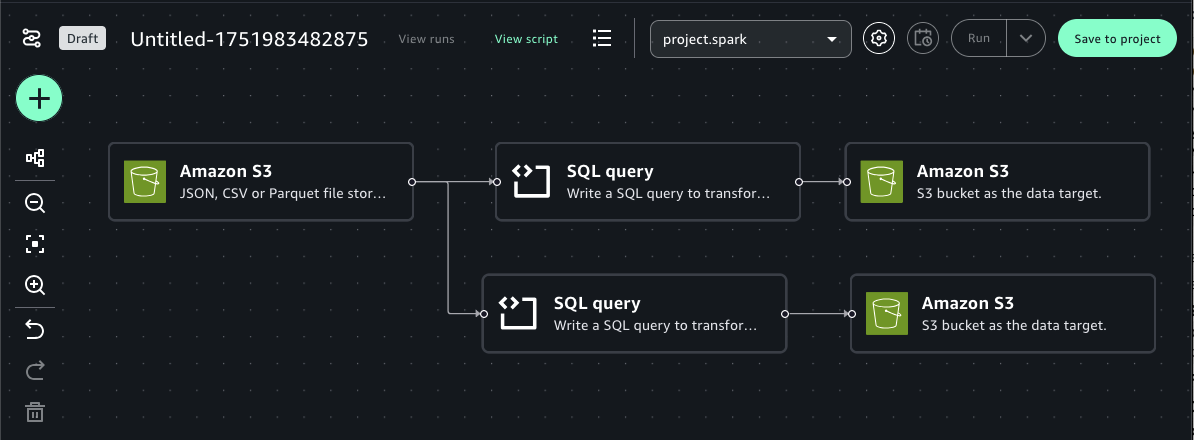
Next, add another SQL query node connected to the same Amazon S3 data source. This node performs a SQL query transformations and outputs the results to a separate S3 location.
- On the top left, choose the plus (+) icon in the circle. Under Transforms, select SQL query, and connect the Amazon S3 source node.
- Enter the following query statement and select Update node.
- Choose the plus (+) icon to the right of the SQL Query node. Under Data target, select Amazon S3.
- Select the Amazon S3 target node and enter the following values:
- S3 URI: Choose the Amazon S3 location from the project overview page and add suffix “
/output/product_analysis/”. For example,s3://<bucket-name>/<domainId>/<projectId>/output/product_analysis/ - Format: Parquet
- Compression: Snappy
- Partition keys: marketplace
- Mode: Append
- S3 URI: Choose the Amazon S3 location from the project overview page and add suffix “
- Select Update node.
At this point, your end-to-end visual job should look like the following image. The next step is to save this job to the project and run the job.
- On the top right, choose Save to project to save the draft job. You can optionally change the name and add a description.
- Choose Save.
- On the top right, choose Run.
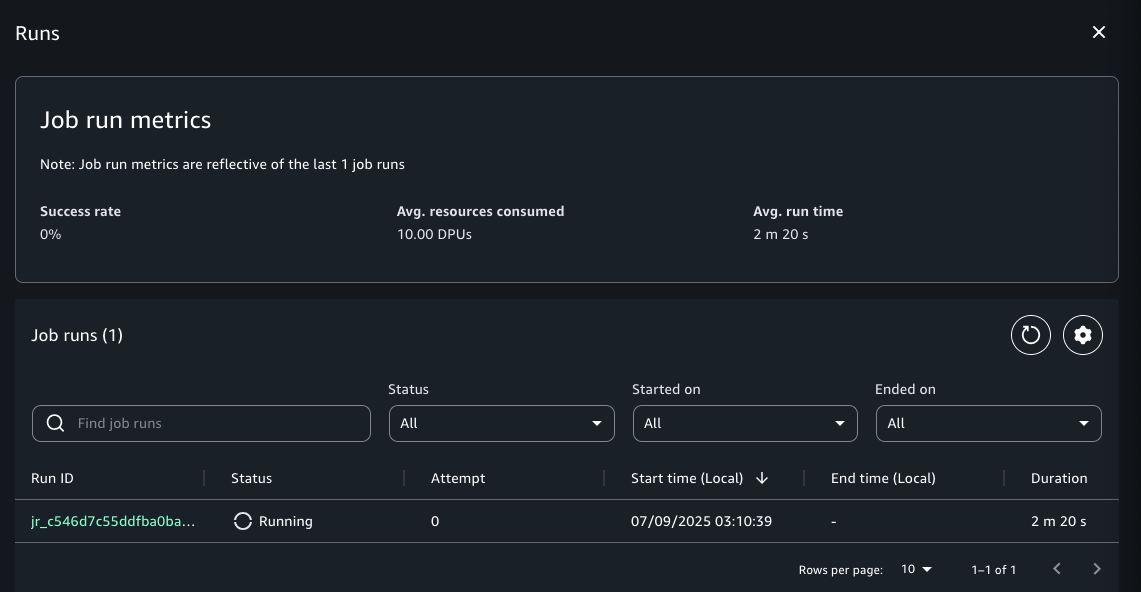
This will start running your Visual ETL job. You can monitor the list of job runs by selecting View runs in the top middle of the screen.
Create and run a code based job
In addition to creating jobs through the Visual ETL Editor, you can create jobs using a code-based approach by specifying Python script or Notebook files. When you specify a Notebook file, it automatically converts to a Python script to create the job. Here, you’ll create a notebook in JupyterLab within SageMaker Unified Studio, save it to the project repository, and then create a code-based job from that notebook. First, create a Notebook.
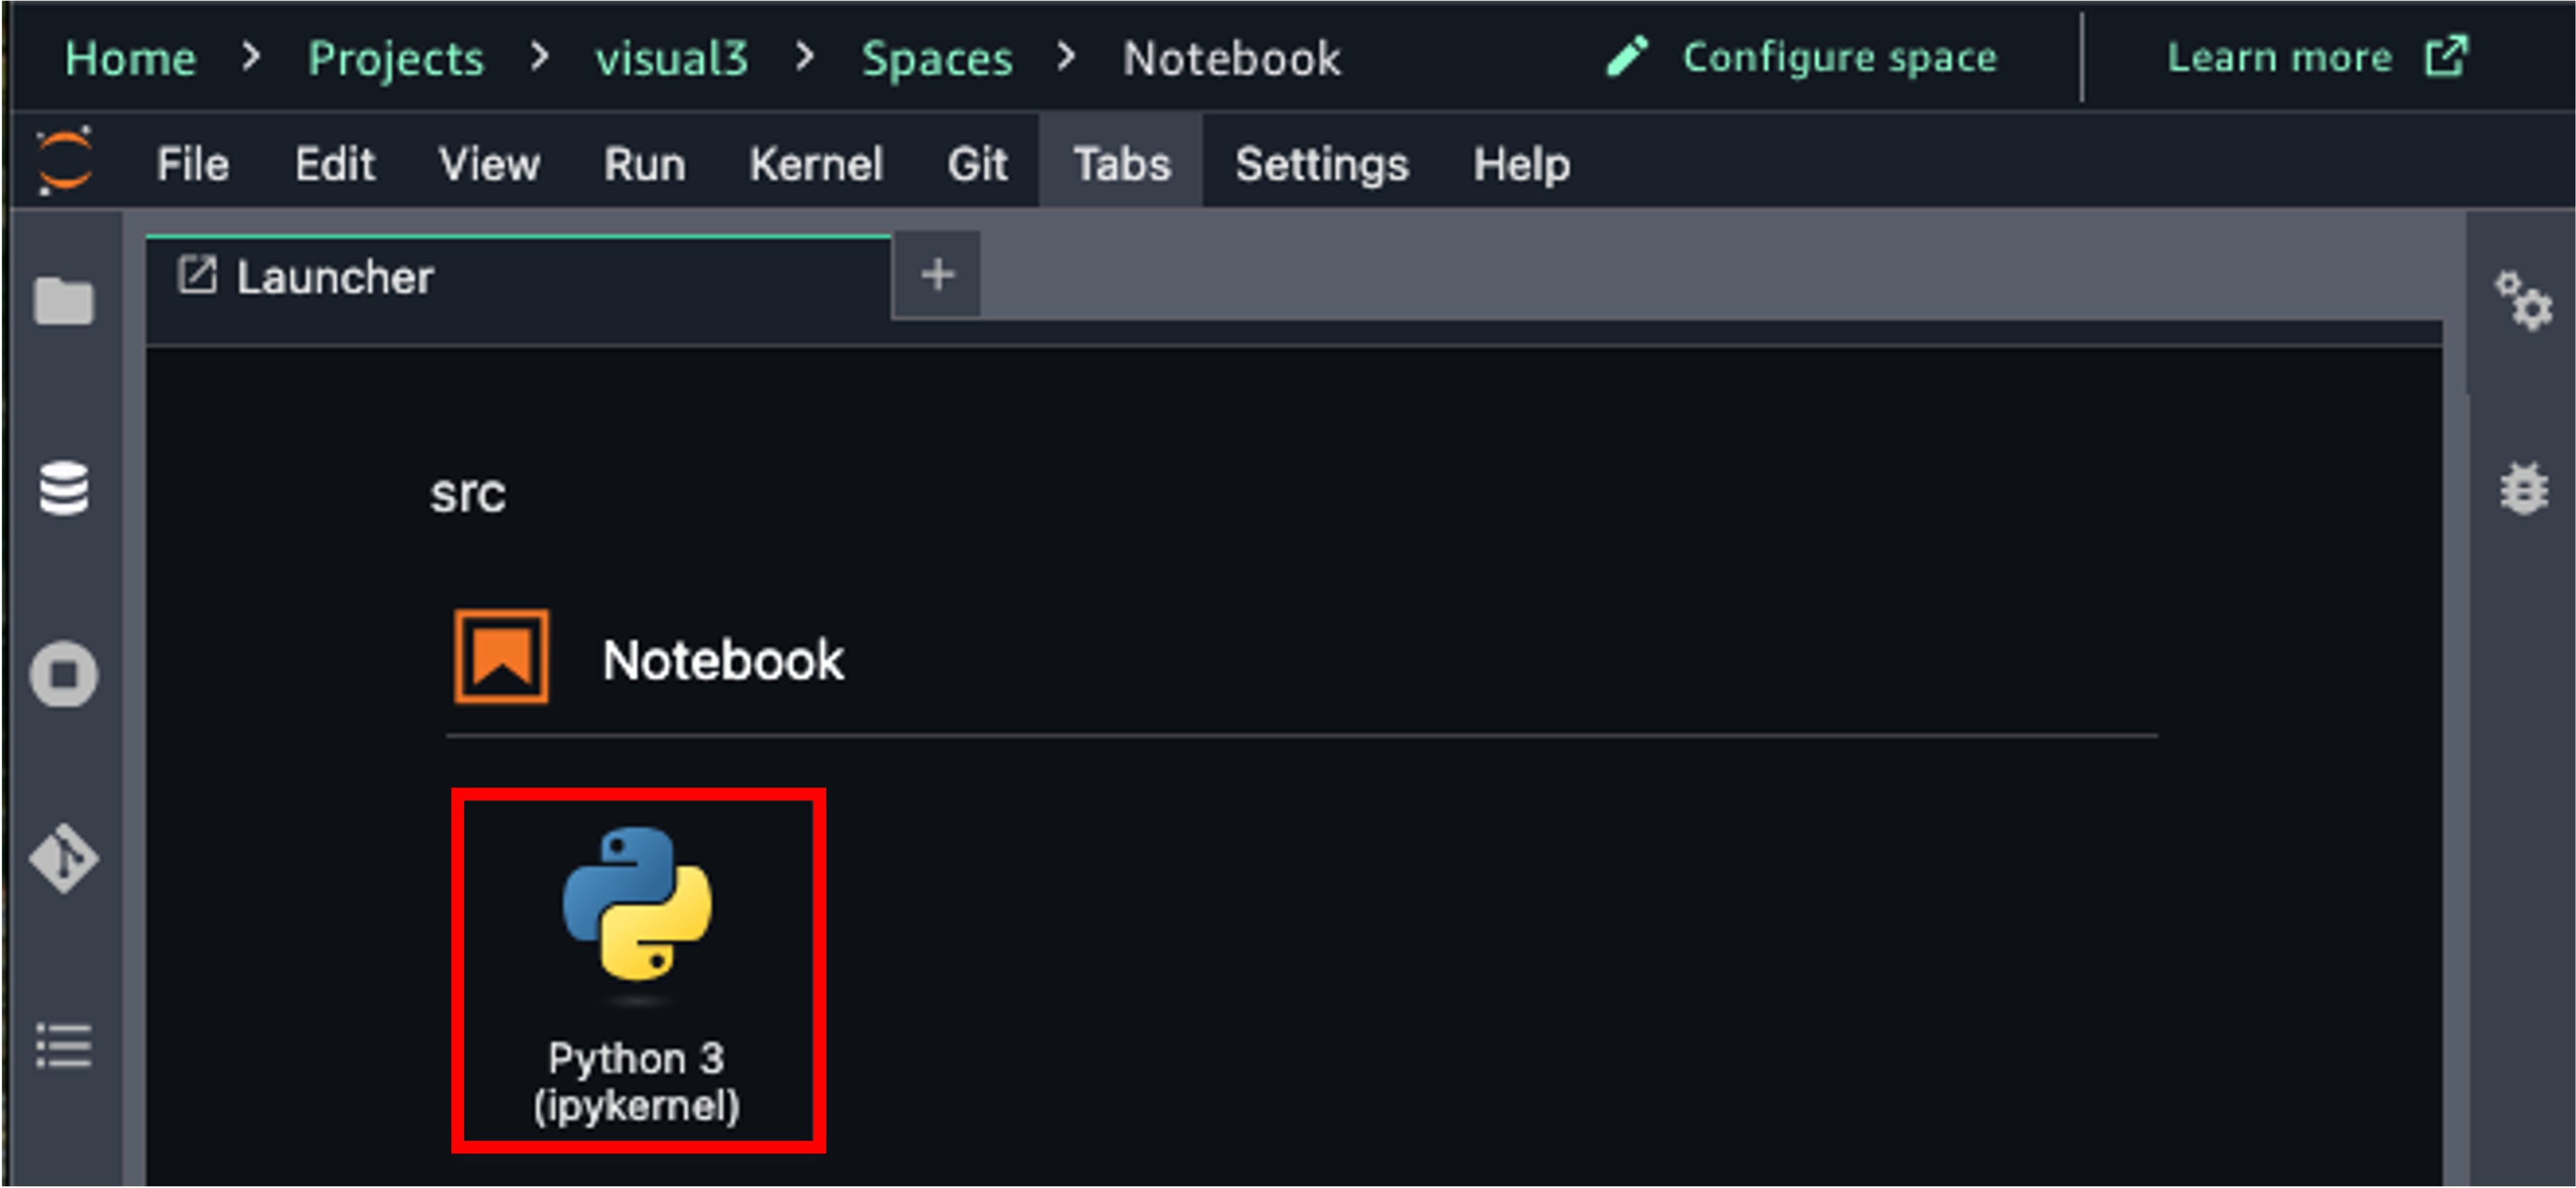
- On the SageMaker Unified Studio console, on the top menu, choose Build.
- Under IDE & APPLICATIONS, select JupyterLab.
- Select Python 3 under Notebook.
- For the first cell, select Local Python, python, enter following code:
- For the second cell, select PySpark, project.spark.compatibility, enter following code. This performs the same processing as the Visual ETL job you created above. Replace the S3 bucket and folder names for output_path.
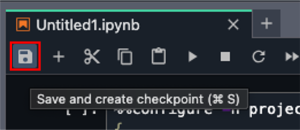
- Choose the File icon to save the notebook file. Enter the name of your notebook.
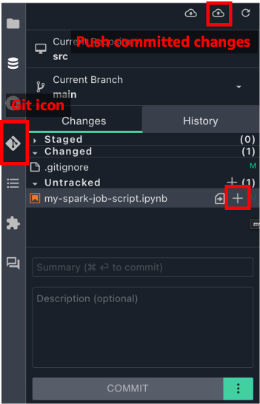
Save the notebook to the project’s repository.
- Choose the Git icon in the left navigation. This opens a panel where you can view the commit history and perform Git operations.
- Choose the plus (+) icon next to the files you want to commit.
- Enter a brief summary of the commit in the Summary text entry field. Optionally, enter a longer description of the commit in the Description text entry field.
- Choose Commit.
- Choose the Push committed changes icon to do a git push.
Create the Code-based Job from the Notebook file in the project repository.
- On the SageMaker Unified Studio console, on the top menu, choose Build.
- Under DATA ANALYSIS & INTEGRATION, choose Data processing jobs.
- Choose Create job from files.
- Choose Choose project files and choose Browse files.
- Select the Notebook file you created and choose Select.
Here, the Python script automatically converted from your notebook file will be displayed. Review the content.
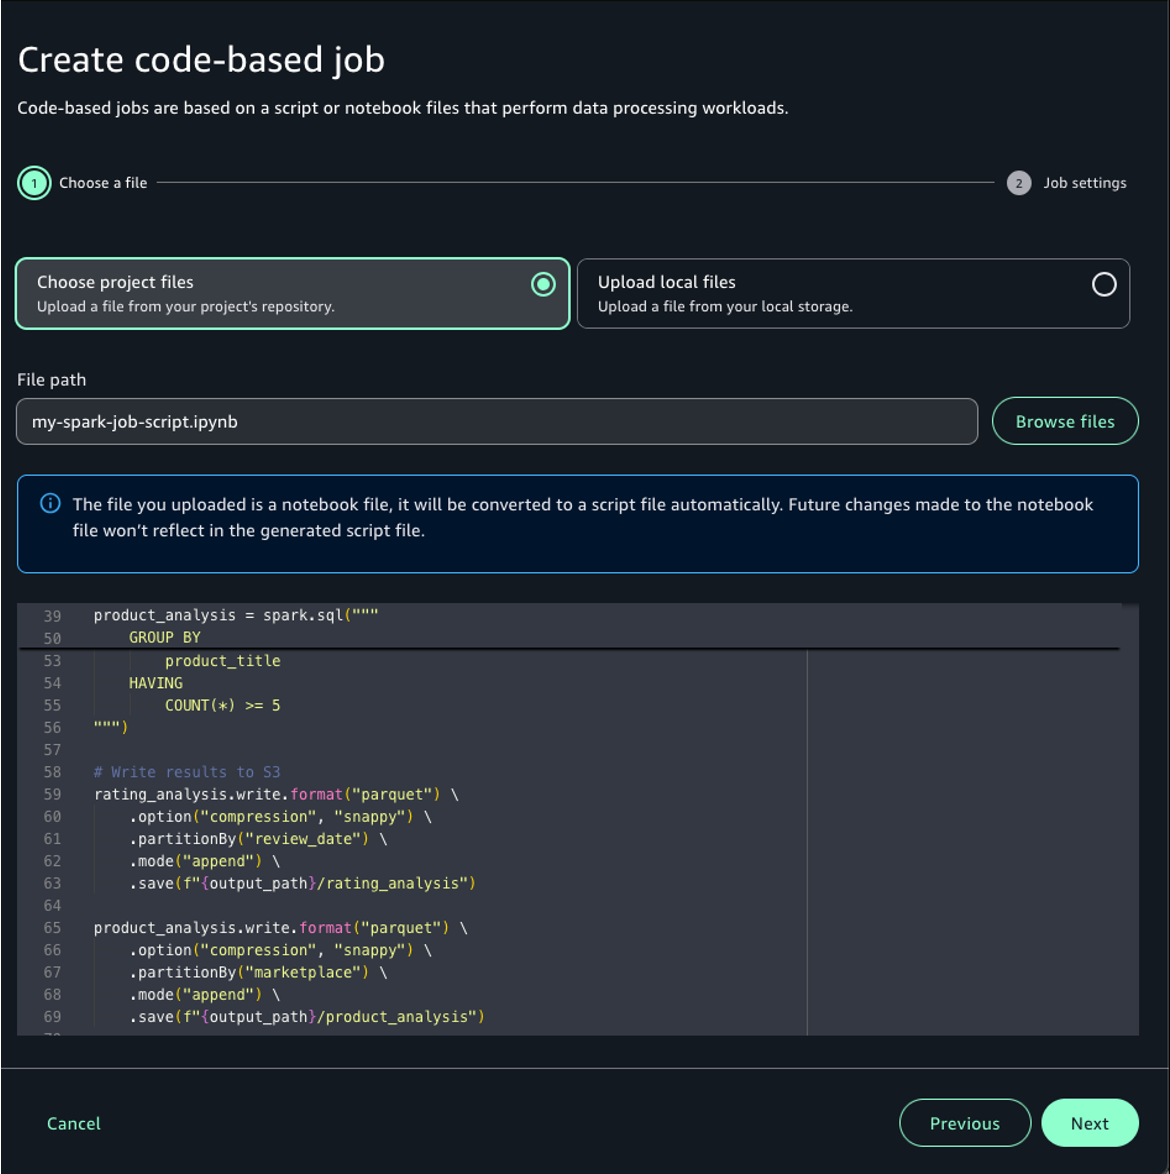
- Choose Next.
- For Job name, enter the name of your job.
- Choose Submit to create your job.
- Choose the job you created.
- Choose Run job.
Convert existing Visual ETL flows to jobs
You can convert an existing visual ETL flow to a job by saving your existing Visual ETL flow to the project repository. Use the following steps to create a job from your existing visual ETL flow:
- On the SageMaker Unified Studio console, on the top menu, choose Build.
- Under DATA ANALYSIS & INTEGRATION, select Visual ETL editor.
- Select the existing Visual ETL flow.
- On the top right, choose Save to project to save the draft flow. You can optionally change the name and add a description.
- Choose Save.
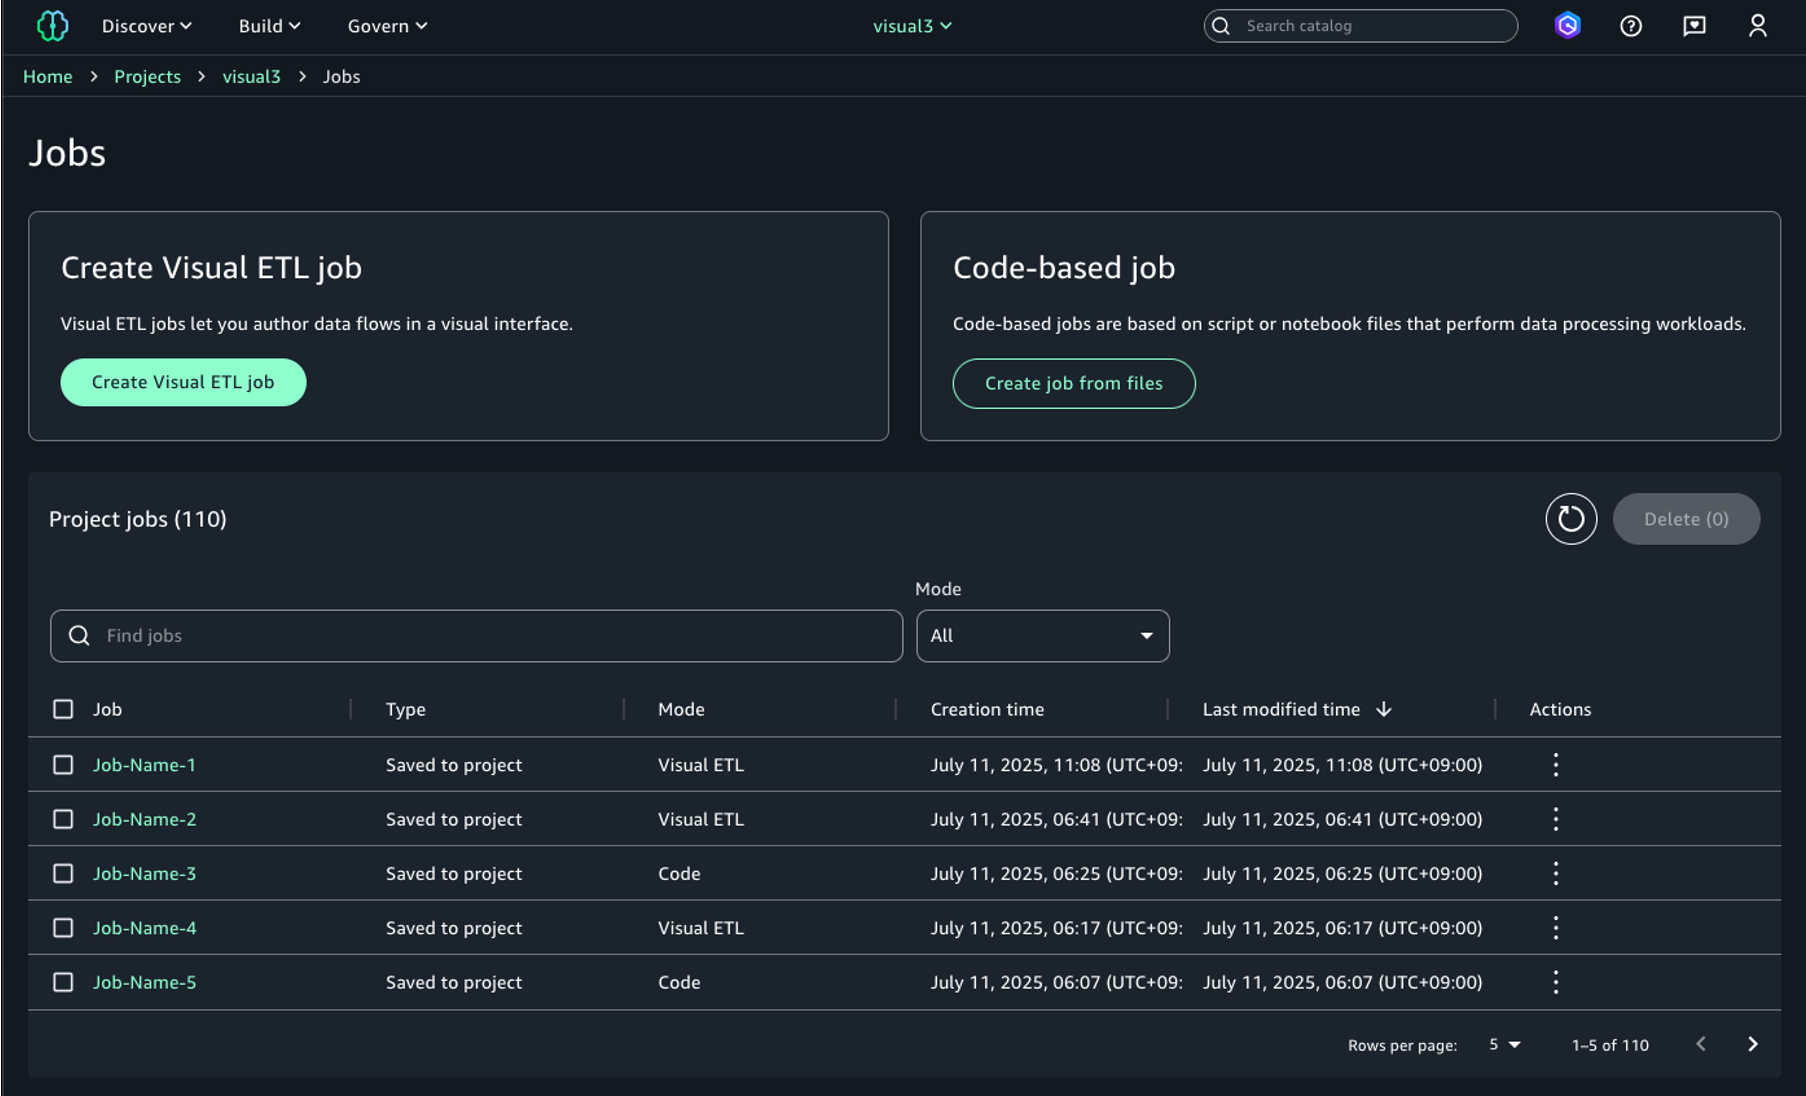
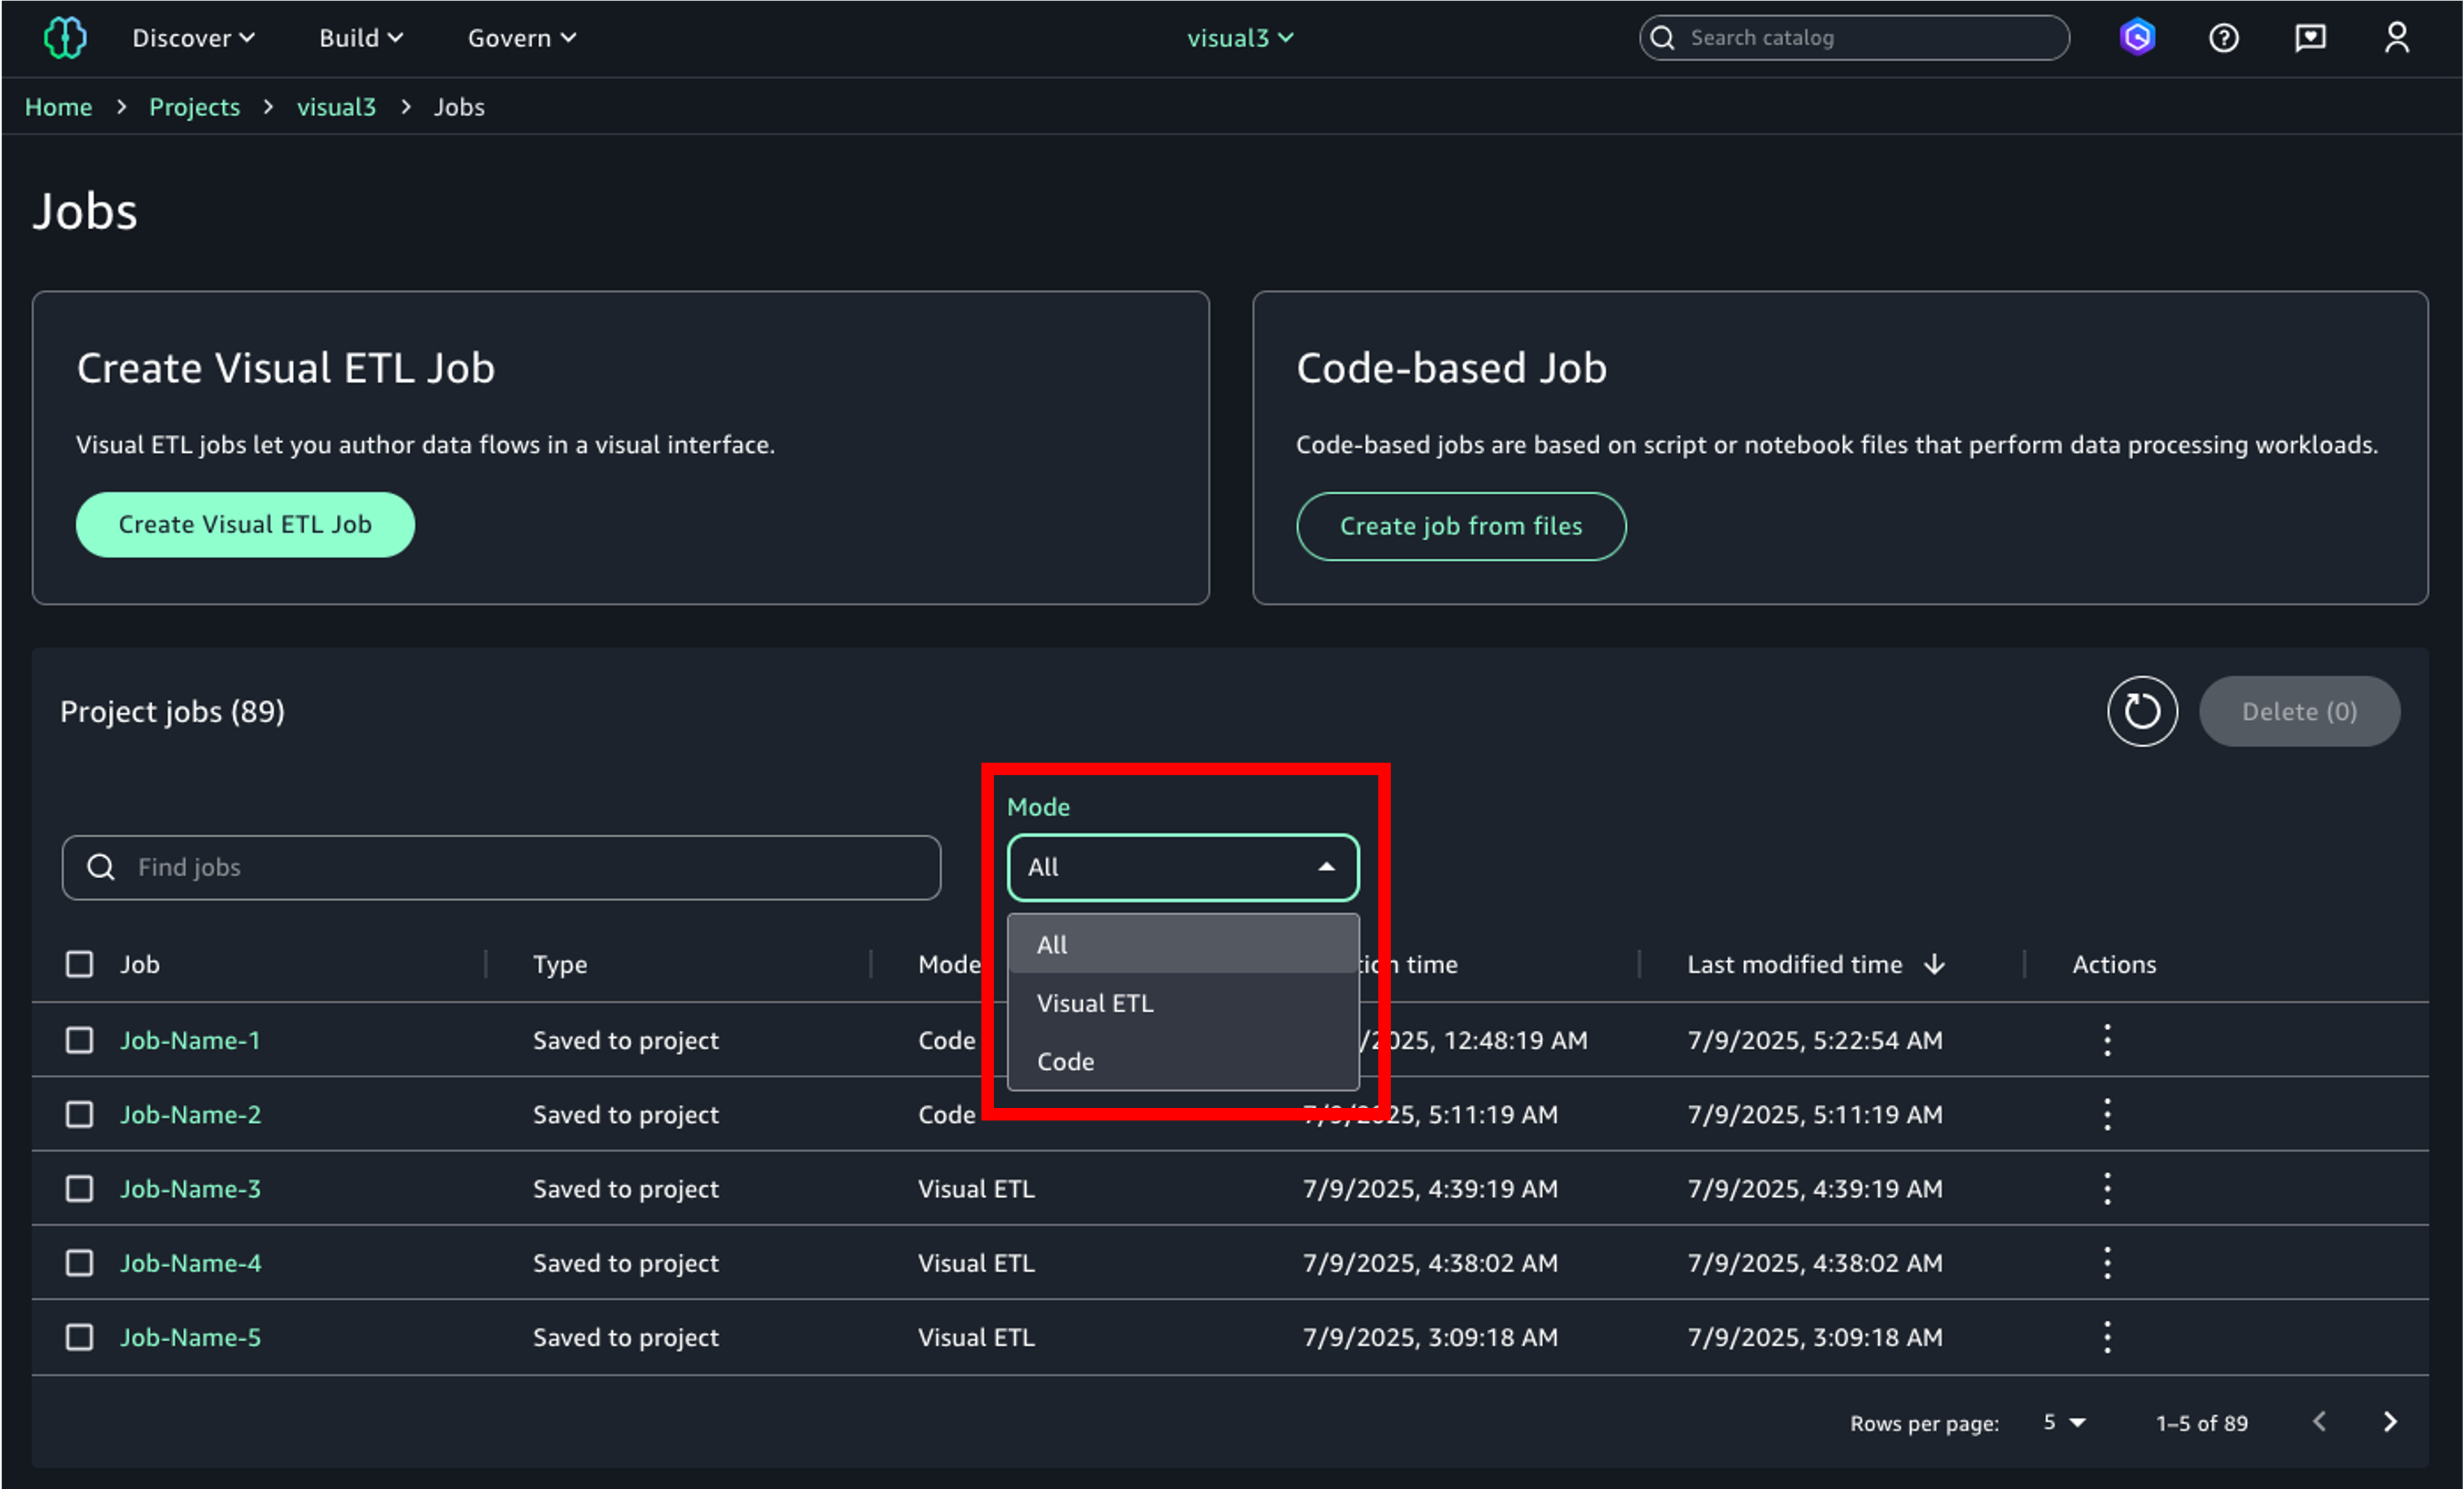
View jobs
You can view the list of jobs in your project on the Data processing jobs page. Jobs can be filtered by mode (Visual ETL or Code).
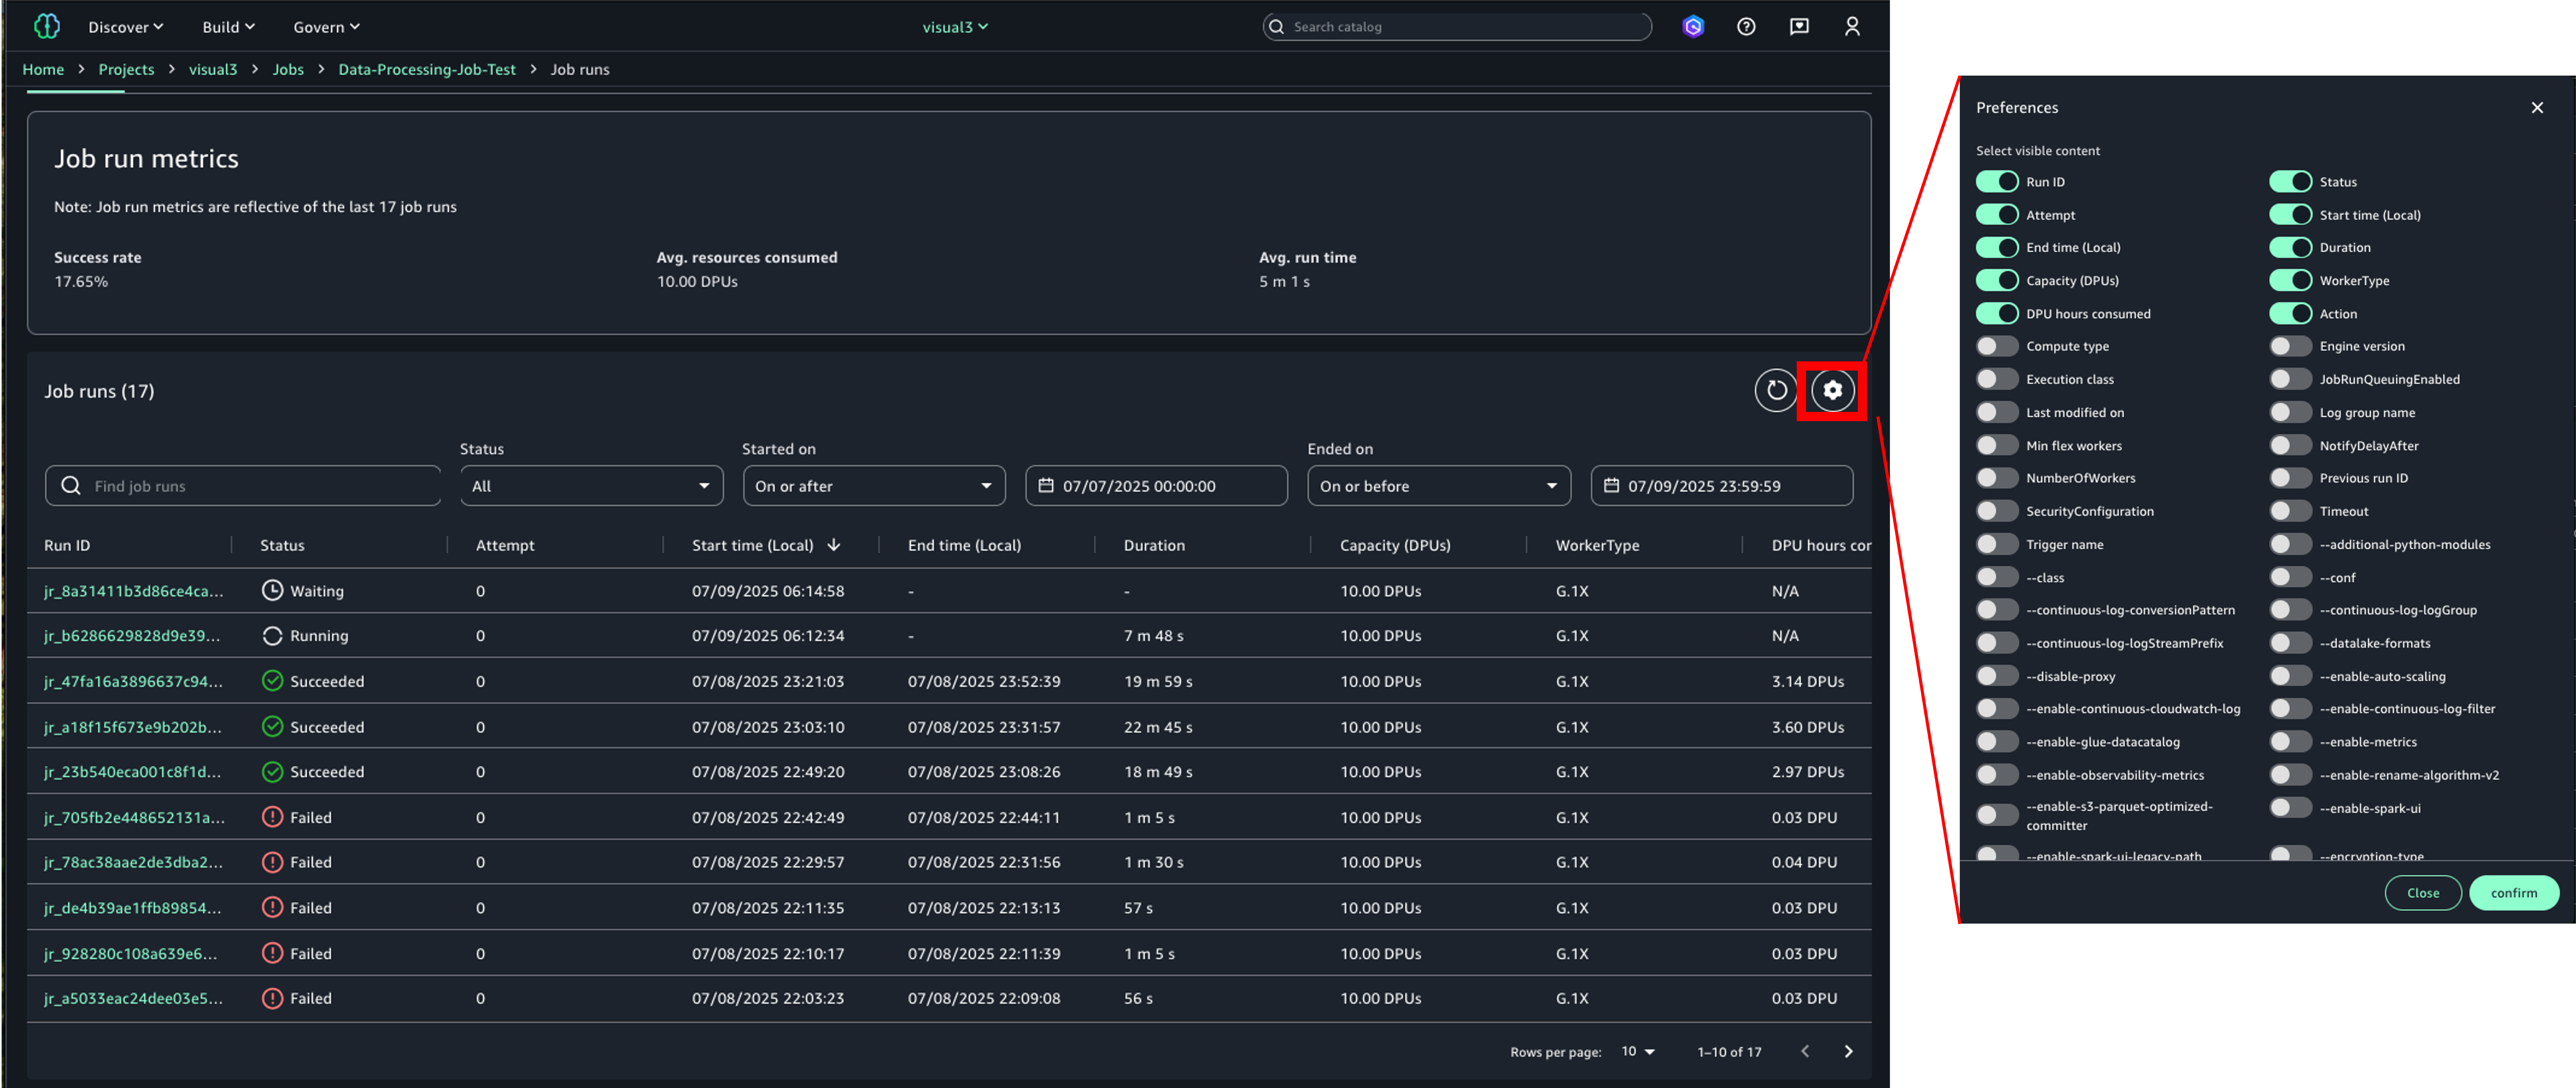
Monitor job runs
On each job’s detail page, you can view a list of job runs in the Job runs tab. You can filter activities by job run ID, status, start time, and end time. The Job runs list shows basic attributes such as duration, resources consumed, and instance type, along with log group names and various job parameters. You can list, compare, and explore job runs history based on various attributes.
On the individual job run details page, you can view job properties and output logs from the run. When a job fails because of an error, you can see the error message at the top of the page and examine detailed error information in the output logs.
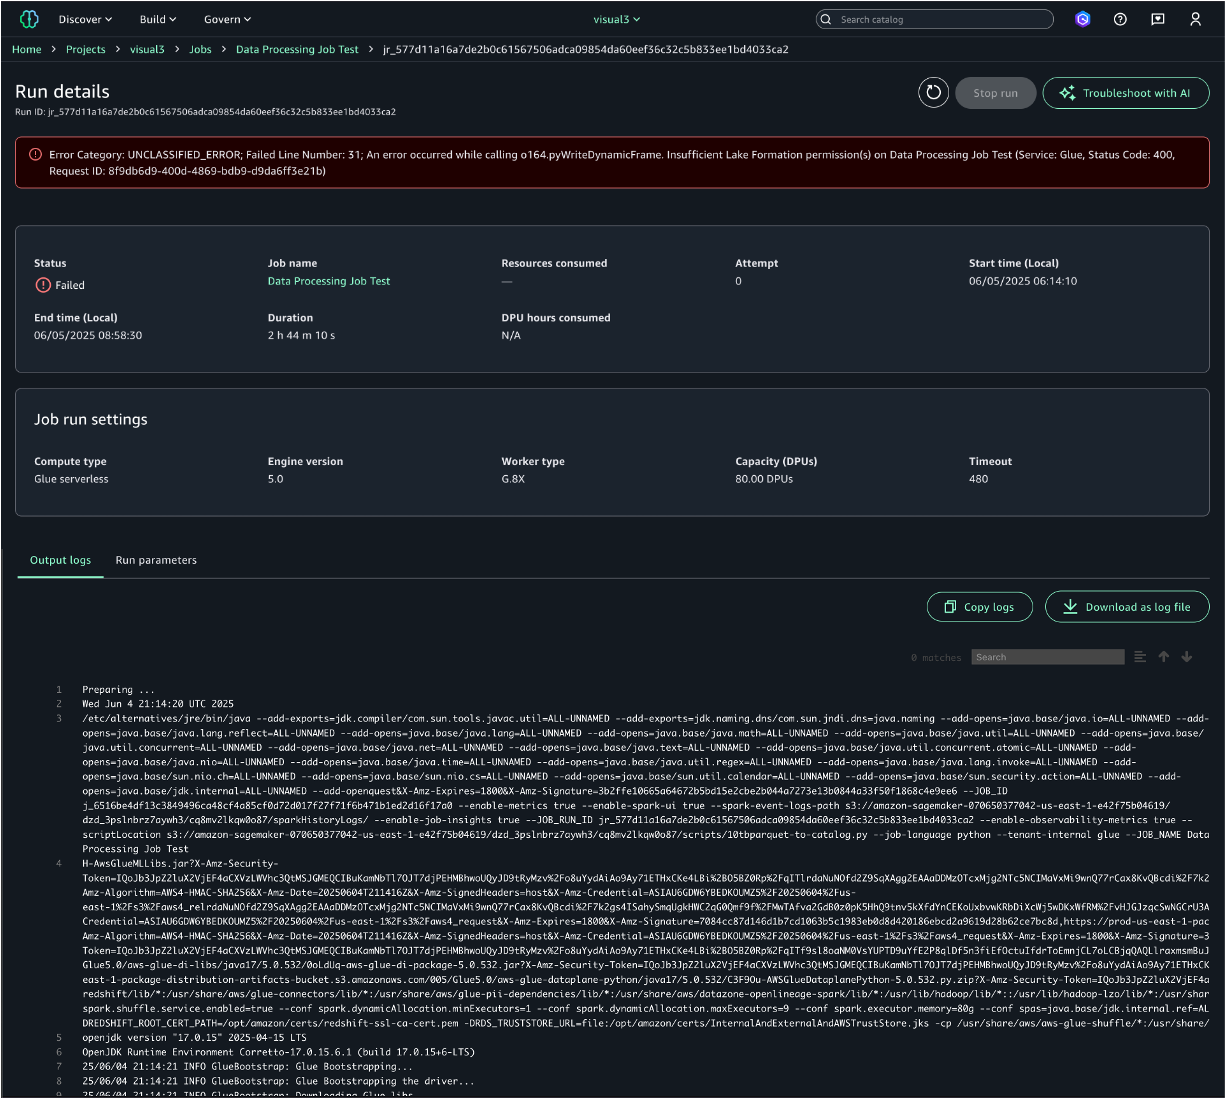
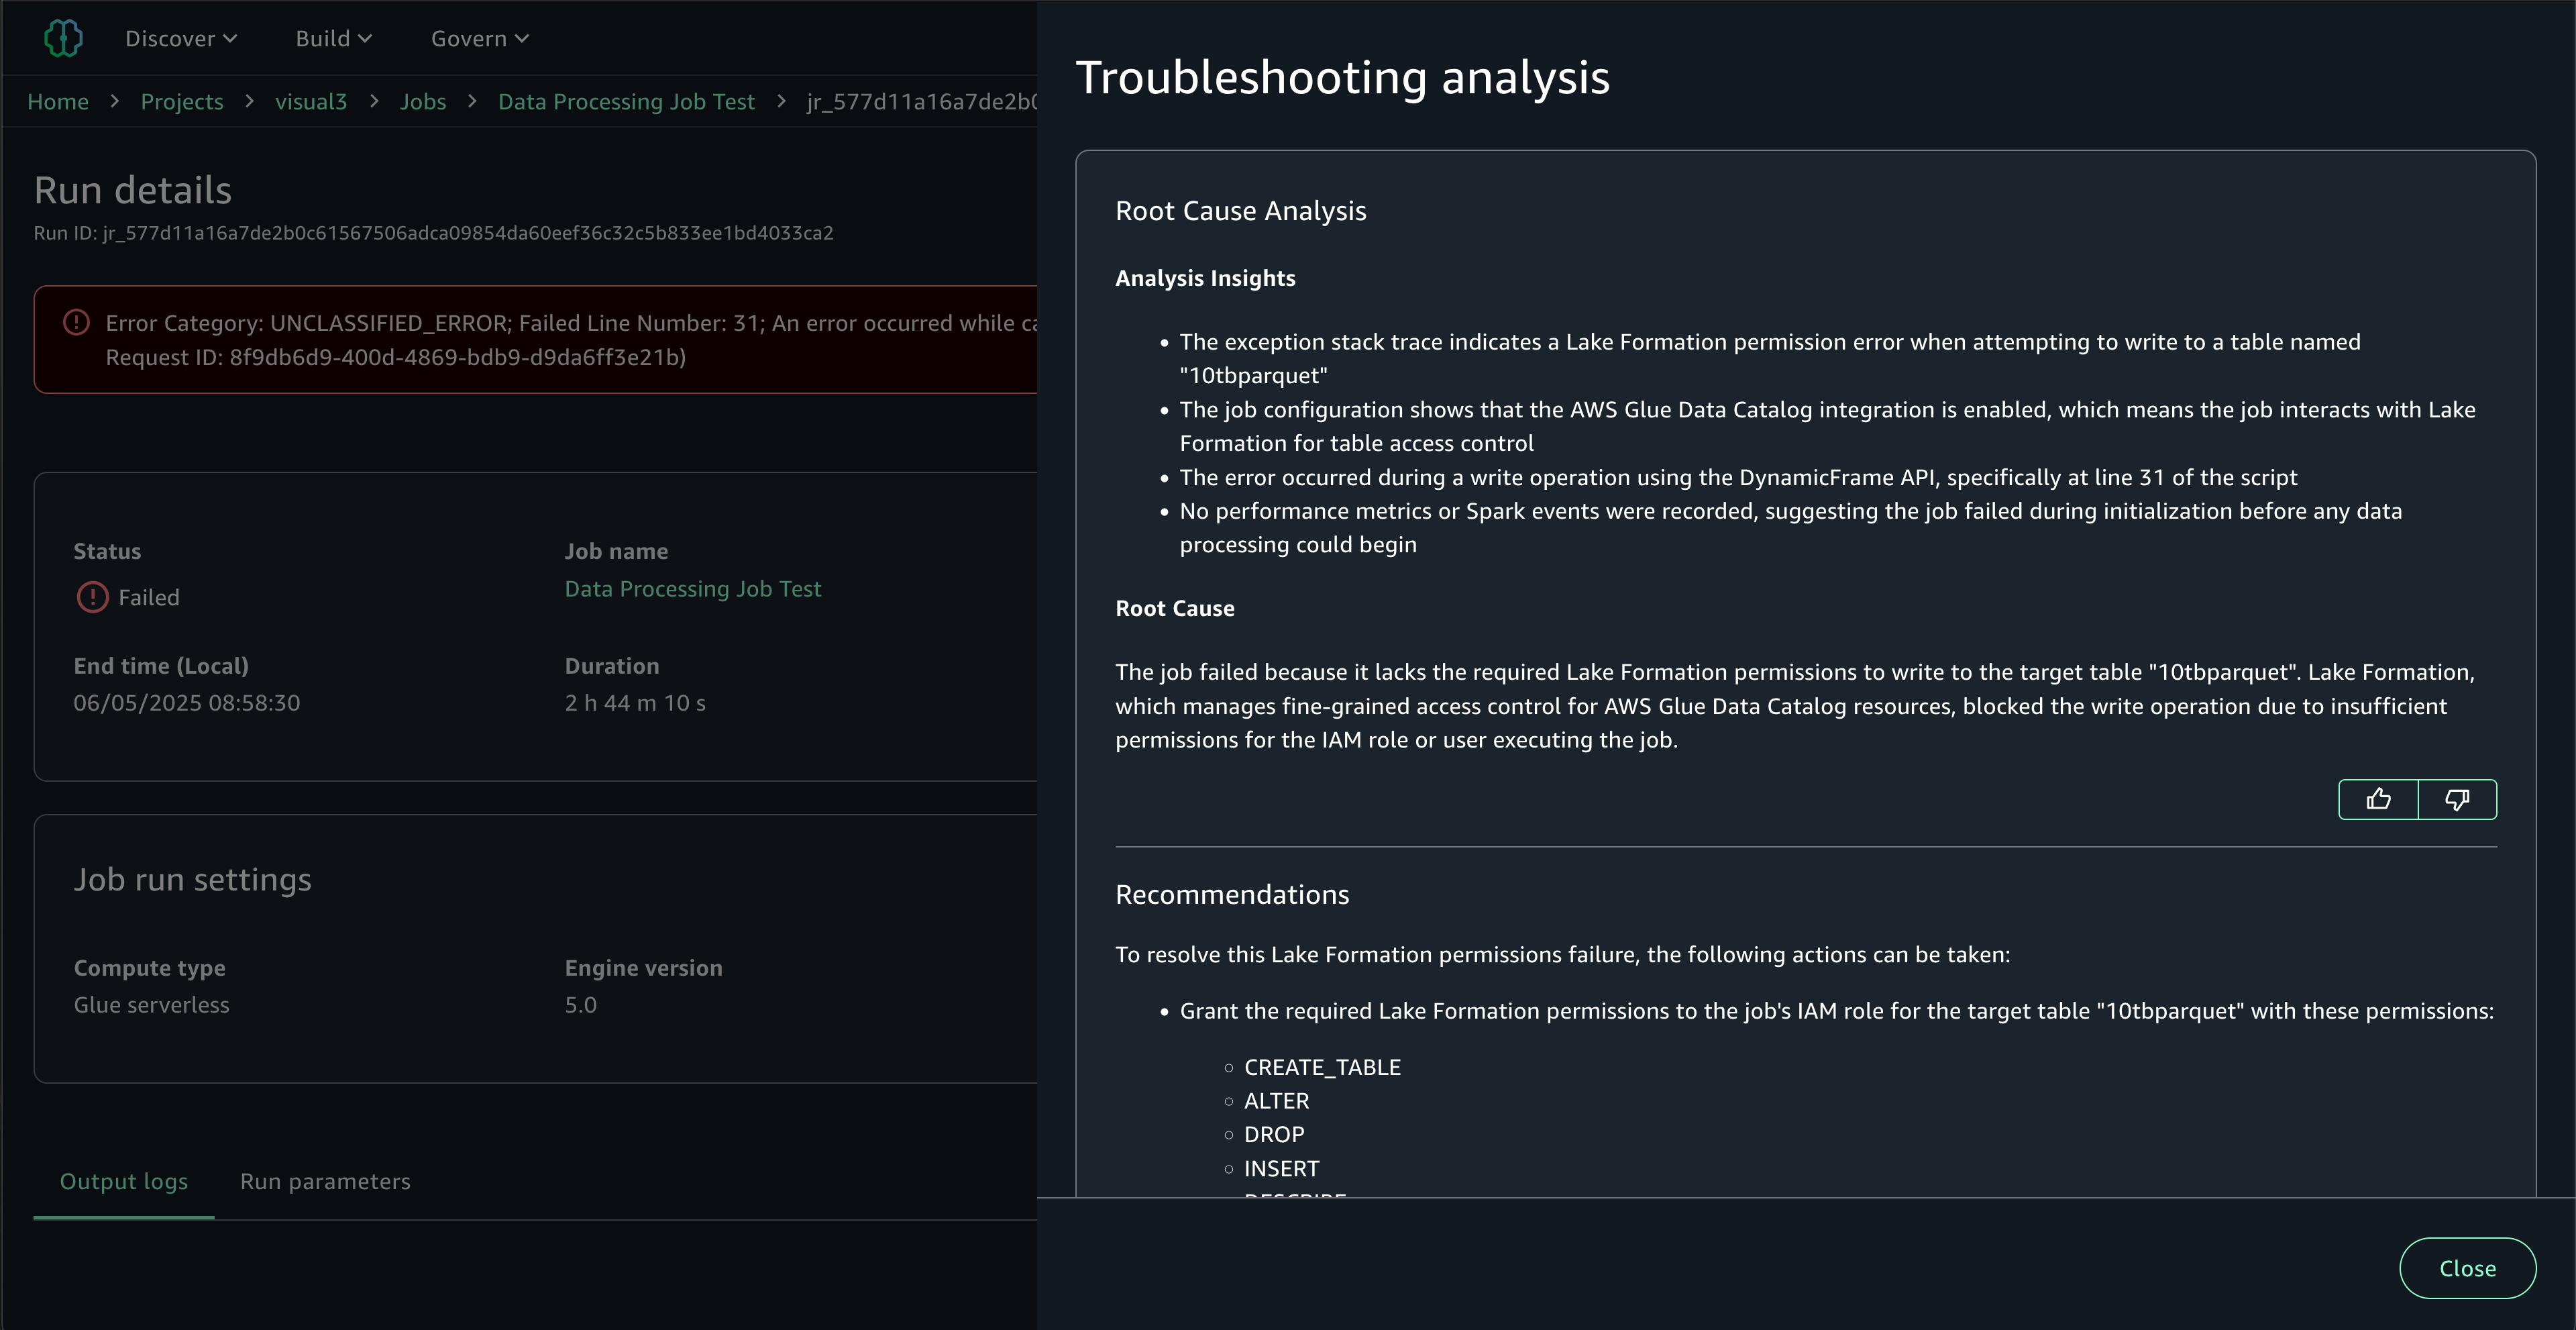
Intelligent troubleshooting with generative AI: When jobs fail, you can take advantage of generative AI troubleshooting to resolve issues quickly. SageMaker Unified Studio’s AI-powered troubleshooting automatically analyzes job metadata, Spark event logs, error stack traces, and runtime metrics to identify root causes and provide actionable solutions. It handles both simple scenarios like missing S3 buckets, and complex performance issues such as out-of-memory exceptions. The analysis explains not just what failed, but why it failed and how to fix it, reducing troubleshooting time from hours or days to minutes.
To start the analysis, choosing Troubleshoot with AI at the top right. The troubleshooting analysis provides Root Cause Analysis identifying the specific issue, Analysis Insights explaining the error context and failure patterns, and Recommendations with step-by-step remediation actions. This expert-level analysis makes complex Spark debugging accessible to all team members, regardless of their Spark expertise.
Clean up
To avoid incurring future charges, delete the resources you created during this walkthrough:
- Delete Visual ETL flows in Visual ETL editor.
- Delete Data processing jobs, including Visual ETL and Code-based jobs.
- Delete Output files in the S3 bucket.
Conclusion
In this post, we explored the new job experience in Amazon SageMaker Unified Studio, which brings a familiar and consistent experience for data processing and data integration tasks. This new capability streamlines your workflows by providing enhanced visibility, cost management, and seamless migration paths from AWS Glue.With the ability to create both visual and code-based jobs, monitor job runs, and set up scheduling, the new jobs experience helps you build and manage data processing and data integration tasks efficiently. Whether you’re a data engineer working on ETL processes or a data scientist preparing datasets for machine learning, the job experience in SageMaker Unified Studio provides the tools you need in a unified environment.Start exploring the new job experience today to simplify your data processing workflows and make the most of your data in Amazon SageMaker Unified Studio.
About the authors
 Chiho Sugimoto is a Cloud Support Engineer on the AWS Big Data Support team. She is passionate about helping customers build data lakes using ETL workloads. She loves planetary science and enjoys studying the asteroid Ryugu on weekends.
 Noritaka Sekiyama is a Principal Big Data Architect at the AWS Analytics product team. He’s responsible for designing new features in AWS products, building software artifacts, and providing architecture guidance to customers. In his spare time, he enjoys cycling on his road bike.
 Matt Su is a Senior Product Manager on the AWS Glue team. He enjoys helping customers uncover insights and make better decisions using their data with AWS Analytics services. In his spare time, he enjoys skiing and gardening.