AWS Big Data Blog
Implement secure hybrid and multicloud log ingestion with Amazon OpenSearch Ingestion
Running applications across hybrid or multicloud environments creates a common challenge: fragmented logs scattered across different platforms. This fragmentation complicates monitoring, slows troubleshooting, and reduces operational visibility. To address this, many organizations seek to implement secure log ingestion from all environments into a centralized platform.
Amazon OpenSearch Service provides a unified solution for real-time search, analytics, and log management across your entire infrastructure. Amazon OpenSearch Ingestion, a fully managed data collector, simplifies data processing with built-in capabilities to filter, transform, and enrich your logs before analysis.
However, securely sending logs from non-AWS environments presents a challenge. Every request to OpenSearch Ingestion requires AWS Signature Version 4 (AWS SigV4) authentication, traditionally requiring long-term credentials that introduce security risks. AWS Identity and Access Management Roles Anywhere solves this problem by providing temporary credentials for workloads running outside AWS.
In this post, we demonstrate how to configure Fluent Bit, a fast and flexible log processor and router supported by various operating systems, to securely send logs from any environment to OpenSearch Ingestion using IAM Roles Anywhere. This approach alleviates the need for long-term credentials while providing a comprehensive view of your application logs across all environments—improving security, simplifying operations, and enhancing your ability to quickly resolve issues.
Solutions overview
The solution in this post uses Fluent Bit to collect logs, retrieve temporary credentials from IAM Roles Anywhere, and sign HTTP log ingestion requests with AWS SigV4 before sending them to the OpenSearch Ingestion pipeline. The following diagram shows the architecture.
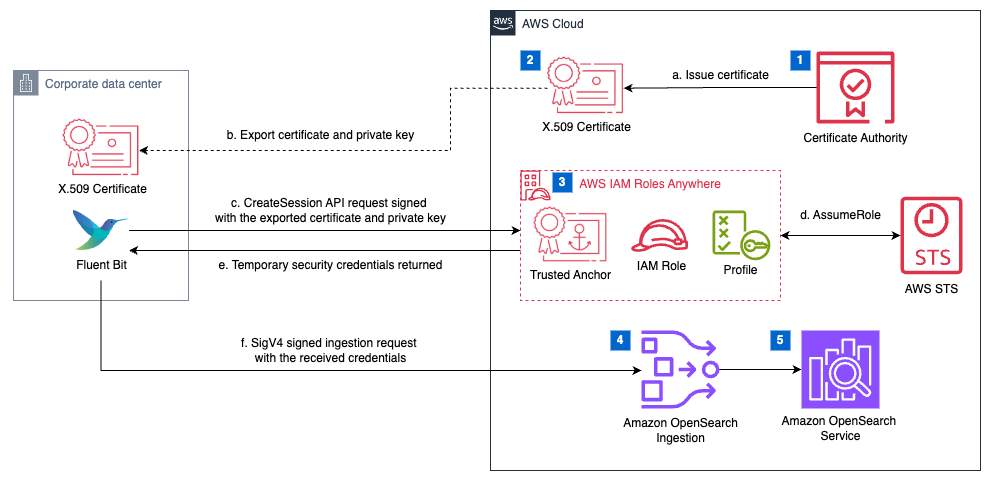
This solution provisions the following key components:
- Certificate authority – For this post, we use AWS Private Certificate Authority (AWS Private CA) as the certificate authority (CA) source. Alternatively, you can integrate with an external CA; for more details, see IAM Roles Anywhere with an external certificate authority. Certificates issued from public CAs can’t be used as trust anchors for IAM Roles Anywhere.
- X.509 Certificate – We use a sample private certificate stored in AWS Certificate Manager (ACM) and issued by AWS Private CA.
- IAM Roles Anywhere configuration – This includes the following:
- Trust anchor – Establishes trust between IAM Roles Anywhere and the specified CA.
- IAM role – Grants permissions for log ingestion and trusts the IAM Roles Anywhere service principal. At minimum, this role must be granted permission for the
osis:Ingestaction. - Profile – Defines which roles IAM Roles Anywhere can assume and the maximum permissions granted with the temporary credentials.
- OpenSearch Service domain – For this post, we use an OpenSearch Service domain, which is an AWS provisioned equivalent of an open source OpenSearch cluster. We create the domain within a virtual private cloud (VPC); see VPC versus public domains for more information. Alternatively, you can use an Amazon OpenSearch Serverless collection, which is an OpenSearch cluster that scales compute capacity based on your application’s needs.
- OpenSearch Ingestion – This is configured to receive logs over HTTP as the pipeline source and forward them to the OpenSearch Service domain as the pipeline sink.
Connectivity between AWS and your hybrid or multicloud environments
You can access your OpenSearch Ingestion pipelines using an interface VPC endpoint with push-based HTTP source, which provides private IP address connectivity. For production environments, we recommend using these private connections through interface endpoints for enhanced security.
Setting up this connectivity requires additional configuration, such as creating an AWS Site-to-Site VPN connection with your hybrid and multicloud network. Although this post focuses on the log ingestion solution, you can find detailed guidance on network connectivity in the following resources:
- Hybrid connectivity – Learn about different methods to connect your on-premises networks to AWS
- Configuring VPC access for Amazon OpenSearch Ingestion pipelines – Set up secure private access to your ingestion pipelines
- Access Amazon OpenSearch Service using an OpenSearch Service-managed VPC endpoint (AWS PrivateLink) – Configure private endpoints for your OpenSearch Service domain
How Fluent Bit retrieves temporary credentials using IAM Roles Anywhere
Using the HTTP output plugin, Fluent Bit can send logs to the OpenSearch Ingestion pipeline. The following diagram is a simplified view of how Fluent Bit retrieves AWS credentials.
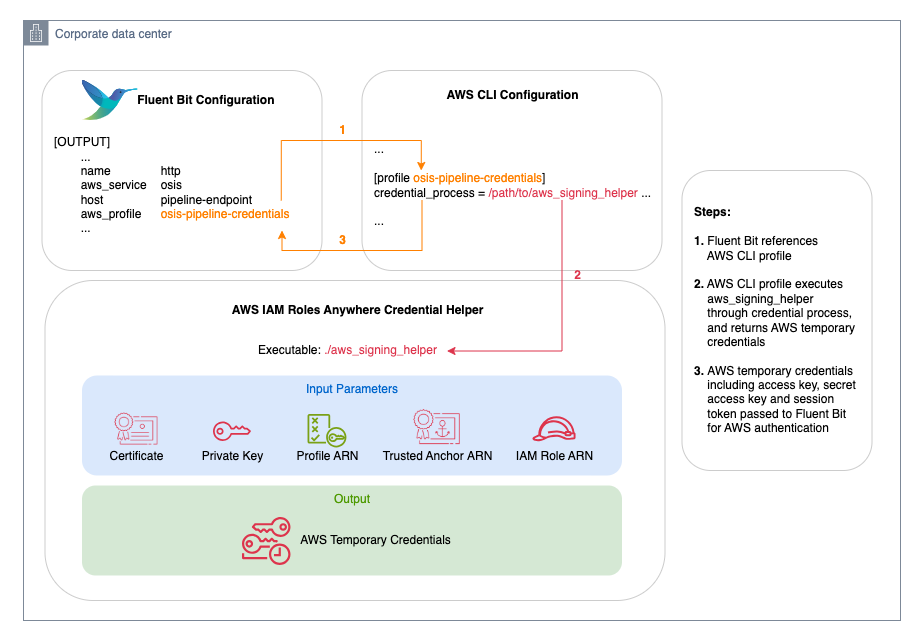
On Linux systems, Fluent Bit can use an AWS Command Line Interface (AWS CLI) profile that uses the credential_process parameter to trigger an external process. This external process is invoked to generate or retrieve credentials not directly supported by the AWS CLI.
The following are two common mechanisms for the external process:
- IAM Roles Anywhere – Uses X.509 certificates to authenticate and returns temporary IAM credentials through IAM Roles Anywhere
- OpenID Connect (OIDC) federation – Exchanges an OIDC authentication token for temporary AWS credentials
Although both options are viable, this post focuses on IAM Roles Anywhere. In this setup, the AWS IAM Roles Anywhere Credential Helper is executed to handle the signing process for the CreateSession API. This returns credentials in a JSON format that Fluent Bit can consume.
As of this writing, the Fluent Bit aws_profile configuration is supported only on Linux. It is untested on other Unix-based systems (such as macOS) and is not implemented for Windows.
Prerequisites
Before you begin this walkthrough, make sure you have the following:
- AWS account requirements – This includes:
- An AWS account with permissions to deploy AWS CloudFormation templates.
- Access to AWS CloudShell for exporting a sample private certificate we will create using AWS CloudFormation in a later step.
- Remote (hybrid or multicloud) environment – You must have a remote machine with Linux-based operating system. This solution was tested on Ubuntu 24.04 with the following additional tooling installed:
Deploy AWS resources with AWS CloudFormation
Follow these steps to deploy AWS resources required for this solution:
- Choose Launch Stack:

- Enter a unique name for Stack name. The default value is
osis-with-iamra. - Configure the stack parameters. Default values are provided in the following table.
| Parameter | Default value | Description |
CACommonName |
example.com |
Common Name for the CA |
CACountry |
US |
Organization for the CA |
CAOrganization |
Example Org |
Country for the CA |
CAValidityInDays |
1826 |
Validity period in days for the CA certificate |
VPCCIDR |
10.0.0.0/16 |
IPv4 CIDR range for the VPC used for OpenSearch Service domain |
PublicSubnetCIDR |
10.0.0.0/24 |
IPv4 CIDR range for public subnet |
PrivateSubnet1CIDR |
10.0.1.0/24 |
IPv4 CIDR range for private subnet |
PrivateSubnet2CIDR |
10.0.2.0/24 |
IPv4 CIDR range for private subnet |
DomainName |
test-domain |
Name of the OpenSearch Service domain |
PipelineName |
test-pipeline |
Name of the OpenSearch Ingestion pipeline |
PipelineIngestionPath |
/test-ingestion-path |
Ingestion path for the OpenSearch Ingestion pipeline |
- Select the acknowledgement check box and choose Create Stack.
Stack deployment takes about 30 minutes to complete. - When stack creation is complete, navigate to the Outputs tab on the AWS CloudFormation console and note down the values for the resources created.
The following table summarizes the output values.
| Output | Description | Example value |
ACMCertificateArn |
Amazon Resource Name (ARN) of the ACM certificate. You will use this for exporting certificate and private key files using the AWS CLI in a later step. | arn:aws:acm:aa-example-1:111122223333:certificate/a1b2c3d4-5678-90ab-cdef-EXAMPLE11111 |
CertificateAuthorityArn |
ARN of the Private CA. | arn:aws:acm-pca:aa-example-1:111122223333:certificate-authority/a1b2c3d4-5678-90ab-cdef-EXAMPLE22222 |
TrustAnchorArn |
ARN of the IAM Roles Anywhere profile. You will use this value for configuring credential_process for IAM Roles Anywhere in a later step. |
arn:aws:rolesanywhere:aa-example-1:111122223333:trust-anchor/a1b2c3d4-5678-90ab-cdef-EXAMPLE33333 |
IngestionRoleArn |
ARN of the OpenSearch Ingestion role. You will use this value for configuring credential_process for IAM Roles Anywhere in a later step. |
arn:aws:iam::111122223333:role/role-name-with-path |
ProfileArn |
ARN of the IAM Roles Anywhere profile. You will use this value for configuring credential_process for IAM Roles Anywhere in a later step. |
arn:aws:rolesanywhere:aa-example-1:111122223333:profile/a1b2c3d4-5678-90ab-cdef-EXAMPLE44444 |
OpenSearchDomainEndpoint |
Endpoint of the VPC OpenSearch domain. You will use this public endpoint for querying your index after ingestion. | vpc-my-domain-123456789012.aa-example-1.es.amazonaws.com |
PipelineEndpoint |
Endpoint of the OpenSearch Ingestion pipeline. You will use this public endpoint in the Fluent Bit configuration. | my-pipeline-123456789012.aa-example-1.osis.amazonaws.com |
PipelineIngestionPath |
Ingestion path for the OpenSearch Ingestion pipeline. | /test-ingestion-path |
Export a sample private certificate using CloudShell
Follow these steps to export the sample private certificate created by the CloudFormation stack:
- Open CloudShell. For more details, see Navigating the AWS CloudShell interface.
- Export the certificate ARN from the CloudFormation outputs. If you changed the stack name in the previous step, use that value for <stack-name>, otherwise use the default value
osis-with-iamra.
- Extract the certificate and private key files:
- Download the extracted certificate and private key files from CloudShell:
/home/cloudshell-user/certificate.pem/home/cloudshell-user/private_key.pem
Configure an AWS CLI profile
Follow these steps to configure an AWS CLI profile for your log ingestion environment:
- Store the downloaded certificate and private key to your environment. For an automated approach to generate and rotate certificates, see Set up AWS Private Certificate Authority to issue certificates for use with IAM Roles Anywhere.
- Create a new profile named
osis-pipeline-credentialsthat invokes the credential process. Replace the placeholders with your specific values. Find the values for trusted-anchor-arn, profile-arn, and ingestion-role-arn in your CloudFormation stack outputs.
- Verify your configuration. Open the
~/.aws/configfile and confirm it contains a profile namedosis-pipeline-credentialssimilar to the following:
Configure Fluent Bit
Run the following command to create a Fluent Bit configuration. Replace the placeholders with your specific values. Find the osis-pipeline-endpoint and pipeline-ingestion-path values in your CloudFormation stack outputs.
This example configuration includes the following:
- Uses the tail input plugin to monitor the
/var/log/syslogfile - Uses the http output plugin to flush log records to the OpenSearch Ingestion pipeline endpoint
- Uses the
osis-pipeline-credentialsprofile to obtain temporary AWS credentials for SigV4 authentication (aws_authset totrue)
Test the solution
Follow these steps to test the setup:
- Start the Fluent Bit client with the configuration file
fluent-bit.confthat you created in the previous step. Replace the placeholder with the value applicable to your environment. For Ubuntu 24.04, the default path of the Fluent Bit client is/opt/fluent-bit/bin/fluent-bit. Adjust the path if using other distributions.
sudo AWS_CONFIG_FILE=~/.aws/config <path-to-fluent-bit> -c ~/fluent-bit.conf
- Because the solution in this post launched the OpenSearch Service domain within a VPC, you will need an environment that has connectivity to the VPC. For this post, we create a CloudShell VPC environment to run the commands in the next step. Find the VPC, subnet, and security group to use from your CloudFormation stack outputs.
- The solution that you deployed through AWS CloudFormation dynamically creates indexes based on ingestion timestamps, format
logs-%{yyyy.MM.dd}. You can specify your preferred naming using OpenSearch Ingestion index management. You can query your OpenSearch index using your preferred tool to see the ingested logs from Fluent Bit. We use awscurl in a CloudShell environment as shown in the following example. Replace the placeholders with your specific values. Find the opensearch-domain-endpoint value in your CloudFormation stack outputs.
The following is an example of the expected output:
Clean up
To avoid future charges, remove the deployed resources:
- Delete the CloudFormation stack.
- Remove generated files from CloudShell:
rm cert_export.json encrypted_private_key.pem certificate.pem private_key.pem
Conclusion
In this post, we demonstrated how to obtain temporary credentials from IAM Roles Anywhere and securely ingest logs from hybrid or multicloud environments into OpenSearch Service using OpenSearch Ingestion. This approach minimizes the risk of credential exposure while enabling centralized log collection from distributed workloads. This solution is particularly valuable for organizations managing complex infrastructures across multiple environments and looking to consolidate observability data in OpenSearch Service. For additional details, refer to the following resources:
- AWS IAM Roles Anywhere User Guide
- Overview of Amazon OpenSearch Ingestion
- Planning for your IAM Roles Anywhere deployment
If you have questions or feedback about this post, please leave them in the comments section.
About the Authors
 Xiaoxue Xu is a Solutions Architect for AWS based in Toronto. She primarily works with financial services customers to help secure their workload and design scalable solutions on the AWS Cloud.
 Simran Singh is a Senior Solutions Architect at AWS. In this role, he assists our large enterprise customers in meeting their key business objectives using AWS. His areas of expertise include artificial intelligence and machine learning, security, and improving the experience of developers building on AWS.