背景
大语言模型(LLM)在自然语言处理、任务自动化和智能决策等领域展现了非凡的潜力。然而,其有限的上下文窗口常常成为复杂任务的瓶颈。特别是在需要调用大量外部工具时,例如通过模型上下文协议(MCP)管理的工具,将所有工具描述嵌入提示词会导致“提示词膨胀”(Prompt Bloat)。这不仅挤占了宝贵的上下文空间,限制模型推理能力,还增加了工具选择的决策复杂性,降低准确性和性能。
AWS Bedrock Knowledge Bases 通过结合检索增强生成(RAG)和模型上下文协议(MCP),提供了一种优雅的解决方案。RAG-MCP 架构将工具描述存储在向量数据库中,利用语义检索动态选择最相关的工具,从而大幅减少提示词长度,提升推理效率和工具调用的精准性。本文将深入探讨 RAG-MCP 的架构设计、 Ascendancy 实现步骤、性能优势、实际案例和故障排除指南,为开发者和架构师提供全面的实践参考。
本实现基于”RAG-MCP:通过检索增强生成缓解 LLM 工具选择中的提示膨胀”论文中描述的方法,该方法解决了 LLMs 访问众多工具时面临的”提示膨胀”挑战。
RAG 与 MCP 的核心概念
检索增强生成(RAG)
RAG 是一种通过检索外部知识库增强大语言模型生成能力的框架。它将用户查询与存储在向量数据库中的知识进行语义匹配,提取最相关的内容作为上下文,从而提升模型生成结果的准确性和相关性。在 Amazon Bedrock 中,Knowledge Bases提供了完全托管的 RAG 功能,支持高效的向量存储和检索。
模型上下文协议(MCP)
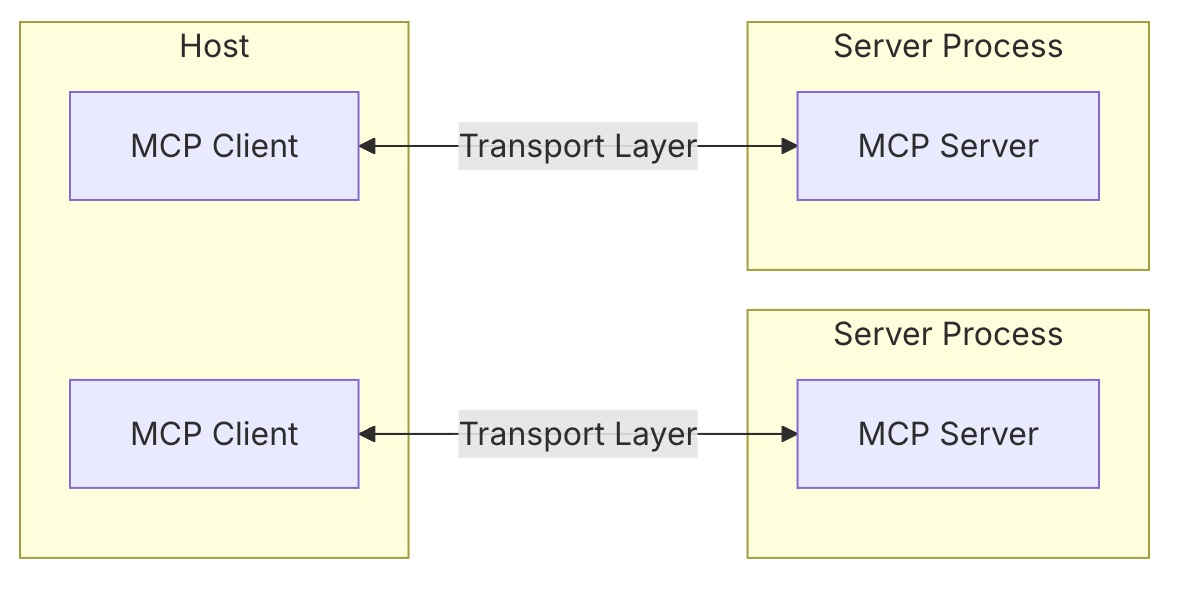
MCP(Model Context Protocol)是一种标准化协议,用于管理大语言模型与外部工具的交互。它通过定义工具的元数据(如名称、描述、参数)实现模型与工具的无缝集成。MCP Server 负责提供工具列表和执行工具调用,而 MCP Client 则负责与服务器交互并将工具信息传递给模型。
什么是 MCP Tools
MCP Server 中 Tools 是允许 Servers 暴露可执行函数,这些函数可以被 Clients 调用,并被 LLMs 用于执行操作。Tools 的关键方面包括:
- Discovery(发现):Clients 可以通过
tools/list endpoint 列出可用的 tools
- Invocation(调用):Tools 使用
tools/call endpoint 调用,其中 servers 执行请求的操作并返回结果
- Flexibility(灵活性):Tools 的范围可以从简单的计算到复杂的 API 交互
- Tool 定义结构:每个 Tool 都使用以下结构定义,从结构定义中可以看到,description 和 inputSchema 都可能包含大量的文本提供给大语言模型,以方便大语言模型更精确地找到需要调用的 Tool 和传递的参数
{
  name: string;          // Tool 的唯一标识符
  description?: string;  // 供人阅读的描述
  inputSchema: {         // Tool 参数的 JSON Schema
    type: "object",
    properties: { ... }  // Tool 特定的参数
  }
}
下面我们选取一个 MCP Server 并获取到它的 Tools 进行查看。
Filesystem MCP Server 是一个用来管理本地文件夹的 MCP Server,我们通过列出来其中的 Tools 可以发现,一个 MCP Server 中的 Tools 如果不进行预筛选而直接发送给大语言模型需要耗费大量的 Token,如果 Tool Use 过程出现多次,那么每次的 Token 花费会成倍数增长。
=== All Available Tools (11 tools) ===

1. 🔧 get_file_info
   Description: Retrieve detailed metadata about a file or directory. Returns comprehensive information including size, creation time, last modified time, permissions, and type. This tool is perfect for understanding file characteristics without reading the actual content. Only works within allowed directories.
   Parameters: path

2. 🔧 write_file
   Description: Create a new file or completely overwrite an existing file with new content. Use with caution as it will overwrite existing files without warning. Handles text content with proper encoding. Only works within allowed directories.
   Parameters: path, content

3. 🔧 move_file
   Description: Move or rename files and directories. Can move files between directories and rename them in a single operation. If the destination exists, the operation will fail. Works across different directories and can be used for simple renaming within the same directory. Both source and destination must be within allowed directories.
   Parameters: source, destination

4. 🔧 edit_file
   Description: Make line-based edits to a text file. Each edit replaces exact line sequences with new content. Returns a git-style diff showing the changes made. Only works within allowed directories.
   Parameters: path, edits, dryRun

5. 🔧 read_multiple_files
   Description: Read the contents of multiple files simultaneously. This is more efficient than reading files one by one when you need to analyze or compare multiple files. Each file's content is returned with its path as a reference. Failed reads for individual files won't stop the entire operation. Only works within allowed directories.
   Parameters: paths

6. 🔧 create_directory
   Description: Create a new directory or ensure a directory exists. Can create multiple nested directories in one operation. If the directory already exists, this operation will succeed silently. Perfect for setting up directory structures for projects or ensuring required paths exist. Only works within allowed directories.
   Parameters: path

7. 🔧 read_file
   Description: Read the complete contents of a file from the file system. Handles various text encodings and provides detailed error messages if the file cannot be read. Use this tool when you need to examine the contents of a single file. Only works within allowed directories.
   Parameters: path

8. 🔧 directory_tree
   Description: Get a recursive tree view of files and directories as a JSON structure. Each entry includes 'name', 'type' (file/directory), and 'children' for directories. Files have no children array, while directories always have a children array (which may be empty). The output is formatted with 2-space indentation for readability. Only works within allowed directories.
   Parameters: path

9. 🔧 list_allowed_directories
   Description: Returns the list of directories that this server is allowed to access. Use this to understand which directories are available before trying to access files.

10. 🔧 search_files
   Description: Recursively search for files and directories matching a pattern. Searches through all subdirectories from the starting path. The search is case-insensitive and matches partial names. Returns full paths to all matching items. Great for finding files when you don't know their exact location. Only searches within allowed directories.
   Parameters: path, pattern, excludePatterns

11. 🔧 list_directory
   Description: Get a detailed listing of all files and directories in a specified path. Results clearly distinguish between files and directories with [FILE] and [DIR] prefixes. This tool is essential for understanding directory structure and finding specific files within a directory. Only works within allowed directories.
   Parameters: path

Total 11 tools
RAG-MCP 的协同作用
通过结合 RAG 和 MCP,我们可以:
- 动态工具检索:将 MCP 工具描述存储在向量数据库中,仅检索与用户查询语义最相关的工具,减少提示词中的冗余信息。
- 上下文增强:通过检索到的工具描述构建增强提示(Augmented Prompt),为模型提供精准的上下文,提升推理能力。
- 可扩展性:支持大规模工具集,无需频繁修改提示词结构,适合动态更新的工具环境。
提示词膨胀的挑战
提示词膨胀是指在提示词中嵌入过多信息,导致上下文窗口被过度占用。主要挑战包括:
- 上下文窗口限制:大语言模型的上下文窗口通常在几千到几十万 Token 之间。嵌入所有工具描述会显著减少模型处理任务的可用空间。
- 决策开销:当工具数量较多时,模型需要从大量选项中选择合适的工具,增加计算复杂度和错误率。
- 性能下降:过长的提示词可能导致推理速度变慢,甚至因上下文溢出而无法处理复杂任务。
- 维护复杂性:工具集频繁更新时,需要手动调整提示词,增加了开发和维护成本。
RAG-MCP 通过动态检索和上下文增强解决了这些问题,使得模型能够专注于推理而非工具选择。
下面的图片详细描述了 RAG-MCP 在使用过程中和传统的 MCP 使用的区别:
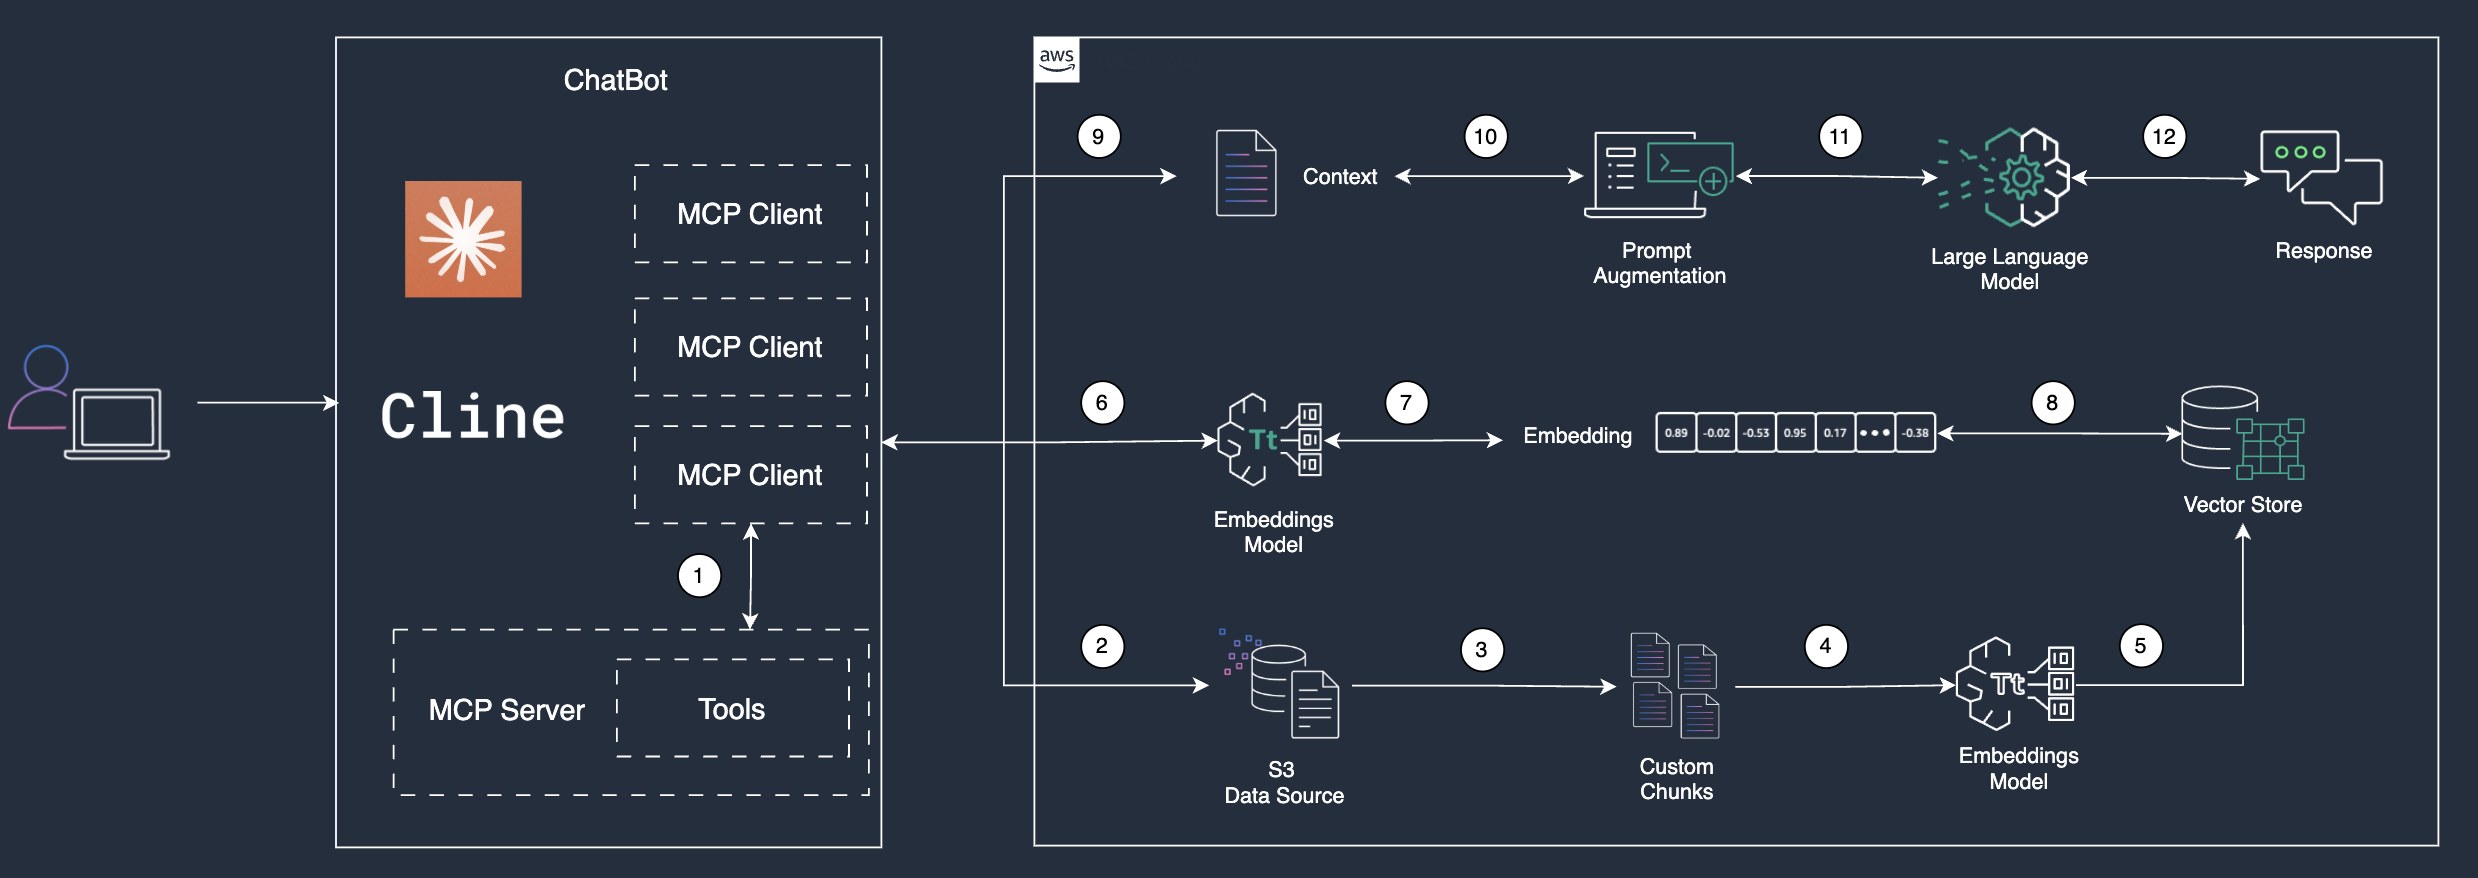
结合 Amazon Bedrock Knowledge Bases,我们可以将上面的架构设计具象化成下面的可执行流程:
根据上面的流程,总结出如下的步骤:
- MCP client 读取所有已启用的 MCP Server 的 tools,并将 tools 保存成 jsonl(JSON Lines)文件
- 将生成的 jsonl 文件上传到 Knowledge Bases 的 Data Source 中
- 使用自定义的 Chunking 方式,将 jsonl 文件切分成 chunk 文件
- 提取的数据被分割成自定义块(Custom Chunks),以便于后续的嵌入(Embedding)处理
- 数据块通过嵌入模型(Embeddings Model)转换为向量表示(Embeddings)。这一过程将文本或其他数据映射为高维向量,为后续的语义搜索或匹配奠定基础
- 用户发起 Tools 检索,检索信息会输入给嵌入模型(Embeddings Model)
- 嵌入模型(Embeddings Model)将检索内容转换成高维向量表示
- 系统根据用户输入的语义特征,从向量数据库中检索出与输入最相似的嵌入向量。这一过程通过向量相似性计算完成,确保检索到的内容在语义上与用户需求高度相关
- 根据检索到的嵌入向量,系统构建上下文(Context),为后续的提示(Prompt)生成提供背景信息
- 系统基于上下文对提示进行增强(Augmented Prompt),也就是将检索到的 Tools 当做提示词发送给大语言模型,以提高大语言模型的理解和生成能力
- 增强后的提示输入到大语言模型中,该模型根据输入选择是否有能够调用的 Tool
- 大语言模型生成的响应返回给客户端工具
在上面的步骤中,6-12 会根据执行结果选择是否调用多次。
逐步指南:MCP Server Tools RAG 检索
以下是在 Amazon Bedrock 中实现 RAG-MCP 工具检索功能的完整流程,涵盖环境准备、数据处理、配置和检索优化。
前提条件
1. 技术背景:
- 熟悉 MCP 协议及其架构,参考 Model Context Protocol 文档。
- 了解 AWS Lambda、S3 和 Bedrock Knowledge Bases 的基本操作。
- 熟悉 AWS 管理控制台和AWS CLI。
2. 环境准备:
- 配置 AWS 账户并授予 Bedrock、S3、Lambda 和 OpenSearch Serverless 的权限。
- 安装 Python 3.8+及相关库(如 boto3、mcp)。
- 配置 MCP Server 并确保可访问。
3. 工具与依赖:
- AWS SDK for Python(boto3):用于与 AWS 服务交互。
- MCP Python SDK:用于与 MCP Server 通信。
- Logging 库:用于记录操作日志。
1. 获取 MCP 工具列表
使用 MCP Client 从 MCP Server 获取工具列表,并将其转换为 JSON Lines(JSONL)格式存储至本地临时文件。JSONL 格式每行包含一个独立的 JSON 对象,适合大规模数据处理。确保工具描述包含关键元数据,如工具名称、功能、参数和调用方式。
- 注意事项:验证 MCP Server 的连接状态,确保返回的工具列表完整且符合 JSON Schema 规范。
- 建议:记录工具获取日志,便于调试和监控。
"""
MCP (Model Context Protocol) client for tool integration.
"""

import logging
from typing import Dict, List, Any, Optional
from mcp import ClientSession, StdioServerParameters
from mcp.client.stdio import stdio_client
from mcp.types import TextContent

from .config import MCPConfig
from .exceptions import MCPToolError

logger = logging.getLogger(__name__)


class MCPClient:
    """MCP client for handling tool interactions."""

    def __init__(self, config: MCPConfig):
        """Initialize MCP client with configuration."""
        self.config = config
        self._session = None
        self._tools = None

    async def __aenter__(self):
        """Async context manager entry."""
        await self.connect()
        return self

    async def __aexit__(self, exc_type, exc_val, exc_tb):
        """Async context manager exit."""
        await self.disconnect()

    async def connect(self):
        """Connect to MCP server."""
        try:
            server_params = StdioServerParameters(
                command=self.config.command,
                args=self.config.args,
                env=self.config.env
            )

            self._stdio_context = stdio_client(server_params)
            self._read, self._write = await self._stdio_context.__aenter__()

            self._session_context = ClientSession(self._read, self._write)
            self._session = await self._session_context.__aenter__()

            # Initialize the connection
            await self._session.initialize()
logger.info("Successfully connected to MCP server")

        except Exception as e:
            logger.error(f"Failed to connect to MCP server: {str(e)}")
            raise MCPToolError(f"Failed to connect to MCP server: {str(e)}")

    async def disconnect(self):
        """Disconnect from MCP server."""
        try:
            # Close session first
            if hasattr(self, '_session_context') and self._session_context:
                try:
                    await self._session_context.__aexit__(None, None, None)
                except Exception as session_error:
                    logger.warning(f"Error closing session: {str(session_error)}")
                finally:
                    self._session_context = None
                    self._session = None

            # Then close stdio connection
            if hasattr(self, '_stdio_context') and self._stdio_context:
                try:
                    # Use asyncio.wait_for to add timeout protection
                    import asyncio
                    await asyncio.wait_for(
                        self._stdio_context.__aexit__(None, None, None),
                        timeout=5.0  # 5 second timeout
                    )
                except asyncio.TimeoutError:
                    logger.warning("MCP stdio disconnect timed out")
                except Exception as stdio_error:
                    logger.warning(f"Error closing stdio: {str(stdio_error)}")
                finally:
                    self._stdio_context = None

logger.info("Disconnected from MCP server")
        except Exception as e:
            logger.warning(f"Error during MCP disconnect: {str(e)}")

    async def list_tools(self):
        """List available tools from MCP server."""
        if not self._session:
            raise MCPToolError("MCP session not initialized")

        try:
            tools_response = await self._session.list_tools()
            self._tools = tools_response.toolslogger.info(f"Retrieved {len(self._tools)} tools from MCP server")
            return tools_response
        except Exception as e:
            logger.error(f"Failed to list MCP tools: {str(e)}")
            raise MCPToolError(f"Failed to list MCP tools: {str(e)}")

    async def call_tool(self, tool_name: str, arguments: Dict[str, Any]):
        """
        Call a specific tool with given arguments.

        Args:
            tool_name: Name of the tool to call
            arguments: Arguments to pass to the tool

        Returns:
            Tool execution result

        Raises:
            MCPToolError: If tool call fails
        """
        if not self._session:
            raise MCPToolError("MCP session not initialized")

        try:
logger.info(f"Calling tool {tool_name} with arguments: {arguments}")
            result = await self._session.call_tool(tool_name, arguments=arguments)
logger.info(f"Tool {tool_name} result: {result}")

            if result.isError:
                error_msg = f"Tool {tool_name} execution failed"
                logger.error(error_msg)
                raise MCPToolError(error_msg)

            return result

        except Exception as e:
            logger.error(f"Failed to call tool {tool_name}: {str(e)}")
            raise MCPToolError(f"Failed to call tool {tool_name}: {str(e)}")

    def convert_tools_to_bedrock_format(self, tools: List[Any]) -> Dict[str, Any]:
        """
        Convert MCP tools to Bedrock toolSpec format.

        Args:
            tools: List of MCP tools

        Returns:
            Bedrock-compatible tool configuration

        Raises:
            MCPToolError: If conversion fails
        """
        try:
            bedrock_tools = []
            for tool in tools:
                tool_spec = {
                    "toolSpec": {
                        "name":tool.name,
                        "description": tool.description,
                        "inputSchema": {
                            "json": tool.inputSchema
                        }
                    }
                }
                bedrock_tools.append(tool_spec)

            return {"tools": bedrock_tools}

        except Exception as e:
            logger.error(f"Failed to convert tools to Bedrock format: {str(e)}")
            raise MCPToolError(f"Failed to convert tools to Bedrock format: {str(e)}")

    def extract_text_content(self, result) -> Optional[str]:
        """
        Extract text content from MCP tool result.

        Args:
            result: MCP tool result

        Returns:
            Extracted text content or None
        """
        for content in result.content:
            if isinstance(content, TextContent):
                return content.text
        return None
2. 上传工具数据至 Amazon S3
将 jsonl 文件上传至 Amazon S3,作为 Amazon Bedrock Knowledge Bases 的数据源。配置 S3 存储桶以支持加密(使用 AWS Key Management Service,KMS)和最小权限访问(通过 IAM 策略)。上传完成后,启动 Knowledge Bases 的数据提取任务,将工具数据导入向量数据库。
- 注意事项:确保 S3 存储桶的 URI 格式正确(s3://<bucket-name>/<prefix>/<object>),并检查 IAM 权限以允许 Bedrock 访问。
- 建议:为数据源添加元数据文件(如工具类别、优先级),以增强后续检索效果。
def write_tools_to_knowledge_base(self, tools_data: Dict[str, Any]) -> IngestionJobResult:
        """
        Clear Knowledge Base and write new tools data.

        Args:
            tools_data: Dictionary containing tool definitions in format {"tools": [...]}

        Returns:
            IngestionJobResult with job information

        Raises:
            KnowledgeBaseError: If writing fails
            ValueError: If tools_data format is invalid
        """
        # Validate input
        if not isinstance(tools_data, dict) or "tools" not in tools_data:
            raise ValueError("Invalid tools_data format: must contain 'tools' key")

        if not tools_data["tools"]:
            raise ValueError("Invalid tools_data format: 'tools' list cannot be empty")

        try:
            # Clear existing chunks
            if not self.clear_knowledge_base_chunks():
                raise KnowledgeBaseError("Failed to clear Knowledge Base chunks")

            # Create temporary JSONL file
            temp_file_path = self._create_temp_jsonl_file(tools_data["tools"])

            try:
                # Upload to S3
                s3_key = self._upload_to_s3(temp_file_path)

                # Start ingestion job
                response = self._start_ingestion_job()
                ingestion_job_id = response["ingestionJob"]["ingestionJobId"]

logger.info(f"Started ingestion job: {ingestion_job_id}")

                # Wait for completion
                status = self.wait_for_ingestion_job(ingestion_job_id)

                return IngestionJobResult(
                    job_id=ingestion_job_id,
                    status=status,
                    response=response
                )

            finally:
                # Clean up temporary file
                self._cleanup_temp_file(temp_file_path)

        except Exception as e:
            logger.error(f"Error writing tools to Knowledge Base: {str(e)}")
            raise KnowledgeBaseError(f"Failed to write tools to Knowledge Base: {str(e)}")

  def _start_ingestion_job(self) -> Dict[str, Any]:
        """Start an ingestion job."""
        try:
            response = self.bedrock_agent_client.start_ingestion_job(
                knowledgeBaseId=self.knowledge_base_id,
                dataSourceId=self.data_source_id
            )
            return response

        except Exception as e:
            raise KnowledgeBaseError(f"Failed to start ingestion job: {str(e)}")
3. 配置 Amazon Bedrock Knowledge Bases
在 Amazon Bedrock 管理控制台中创建并配置 Knowledge Base,确保工具数据正确存储和向量化:
- 向量存储选择:推荐使用 Amazon OpenSearch Serverless,支持高并发和低延迟,适合生产环境。也可选择 Amazon Aurora with pgvector 以降低成本,适用于小型项目。
- 数据源配置:指定 S3 存储桶的 URI,并确保文件路径正确。可选:上传元数据文件以支持高级检索。
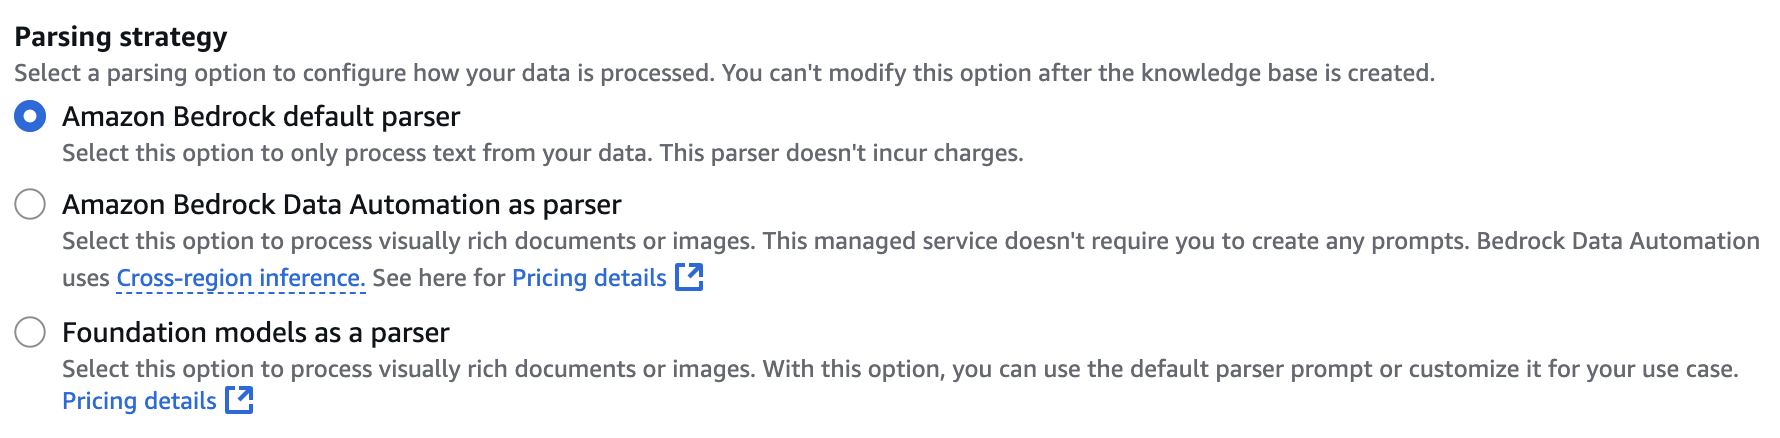
- 解析策略:默认解析器:适用于 jsonl 等纯文本数据,简单高效。
- 自定义解析器:通过 AWS Lambda 实现特定格式的解析逻辑,适合定制化需求。
- 向量化配置:
- 选择嵌入模型(如 Amazon Titan Text Embeddings V2)将工具描述转换为高维向量。
- 配置分块策略,使用自定义 Chunk,平衡检索精度和性能。
- 可选:启用混合检索(语义+关键词)以提高复杂查询的准确性。
- 注意事项:验证嵌入模型是否适配工具描述的语言特性(如中文支持)。
- 建议:使用 Amazon CloudWatch 监控数据提取任务的状态和性能。
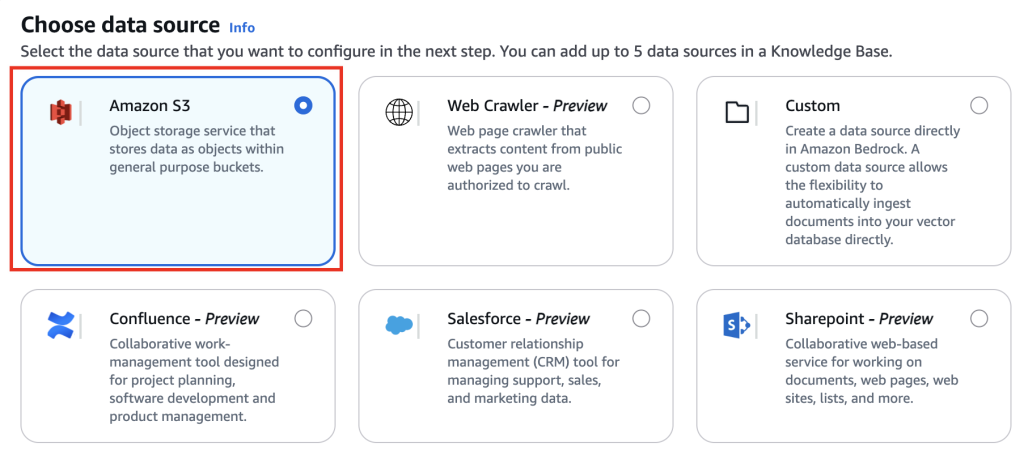
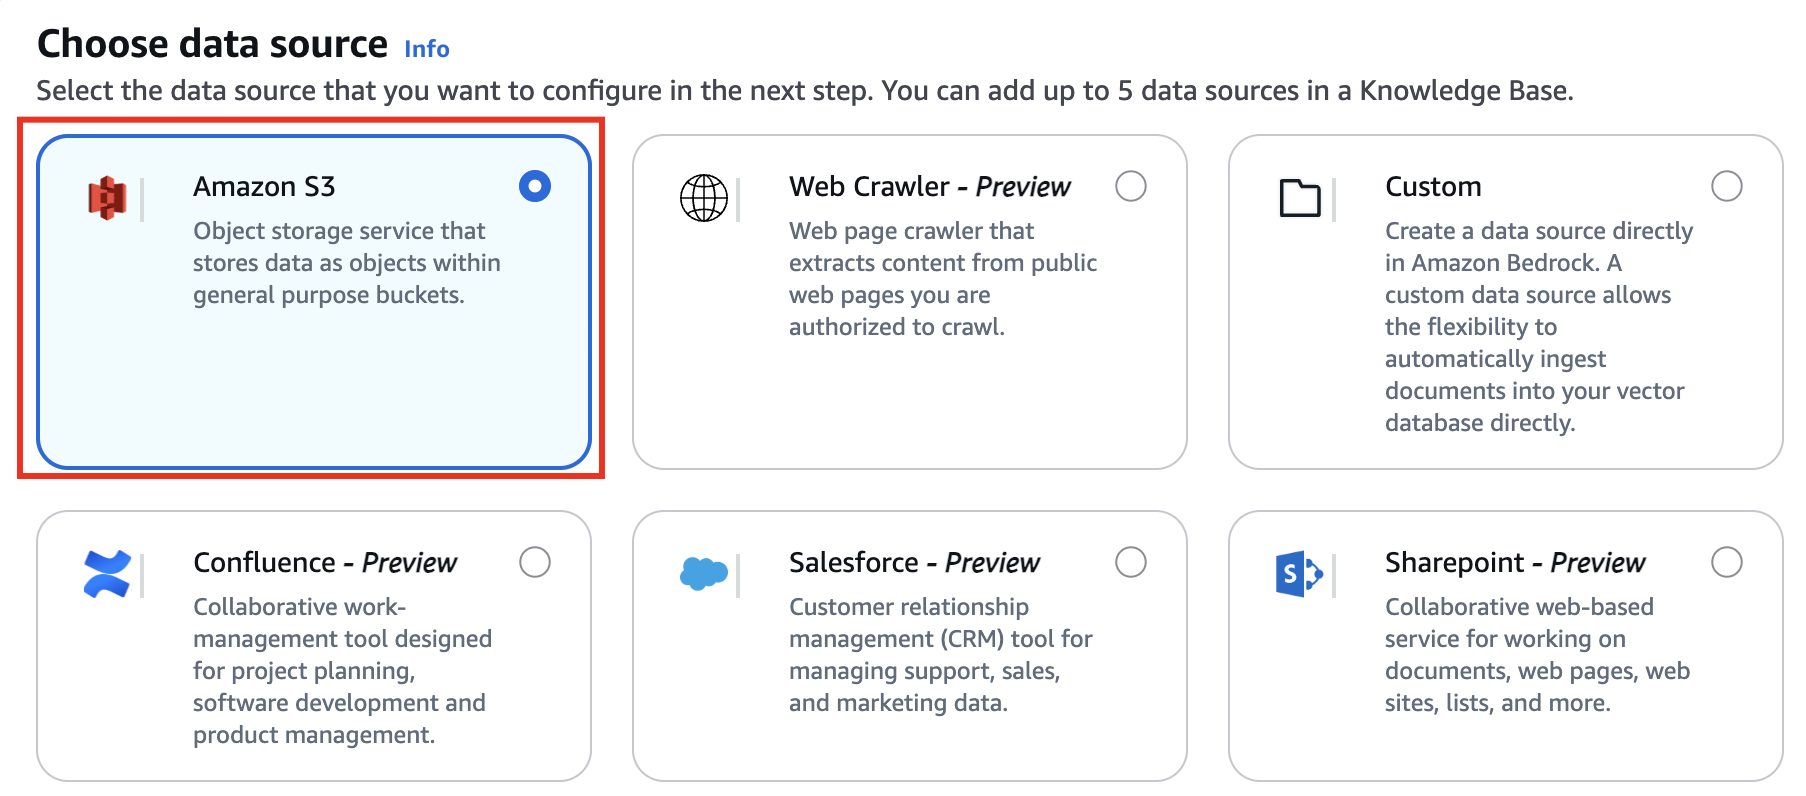
下面是创建截图:
 |
- 在选择数据源中,我们使用 S3 做为数据源
- 接下来选择配置数据源,选择配置好的 S3 bucket
- 选择转换策略,在这里,我们选择默认的转换策略,因为我们上传的都是文本,如果有对多模态的需求,可以详细查看 Data Automation 的功能
- 接下来,在 Chunking strategy 中,我们选择 No chunking,目的是为了使用自定义的 chunking 策略
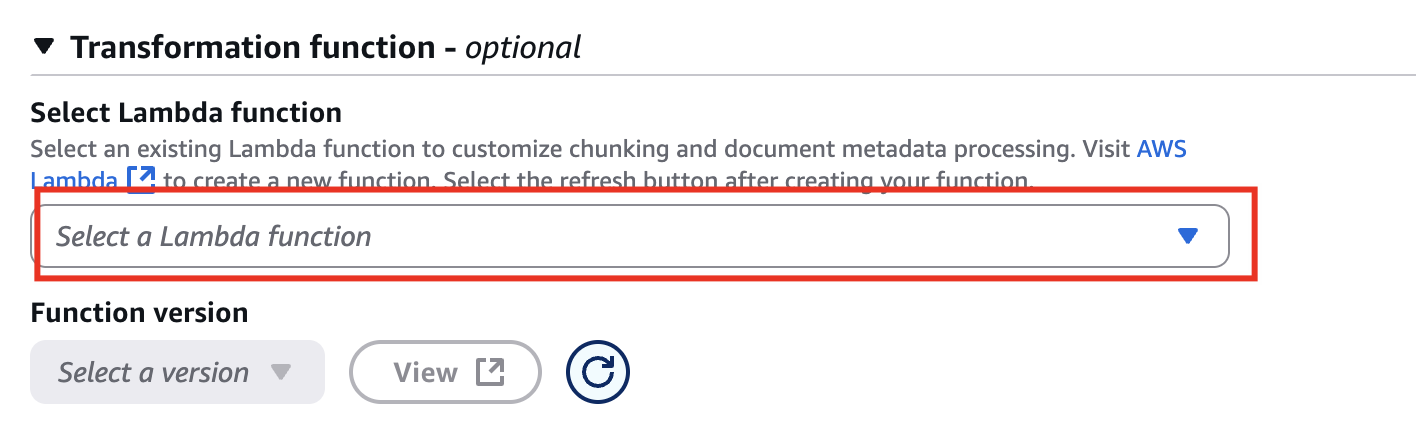
- 选择自定义 Chunking 的 Lambda,这样我们可以自定义 Chunking 后的结果,目的是将每一个 Tool 作为一个 Chunk 进行存储,查询的时候能够查到一个完整的 Tool
- 自定义 Chunking,使用 Lambda 进行切分,并将切分块进行保存,在下面的代码中,我们通过获取 Tools 列表,并将所有的 Tools 保存成一个 jsonl 文件,每个 tool 一行,这样我们会在 Lambda 中根据换行符进行切分,每一个 Tool 作为一个 Chunk
import json
from abc import abstractmethod, ABC
from typing import List
import boto3
import logging

logger = logging.getLogger()
logger.setLevel(logging.DEBUG)

class Chunker(ABC):
    @abstractmethod
    def chunk(self, text: str) -> List[str]:
        raise NotImplementedError()

class SimpleChunker(Chunker):
    def chunk(self, text: str) -> List[str]:
        # Split text by newline and filter out empty lines
        return [line for line in text.split('\n') if line.strip()]

def lambda_handler(event, context):
    logger.debug('input={}'.format(json.dumps(event, ensure_ascii=False)))
    s3 = boto3.client('s3')

    # Extract relevant information from the input event
    input_files = event.get('inputFiles')
    input_bucket = event.get('bucketName')

    if not all([input_files, input_bucket]):
        raise ValueError("Missing required input parameters")

    output_files = []
    chunker = SimpleChunker()

    for input_file in input_files:
        content_batches = input_file.get('contentBatches', [])
        file_metadata = input_file.get('fileMetadata', {})
        original_file_location = input_file.get('originalFileLocation', {})

        processed_batches = []

        for batch in content_batches:
            input_key = batch.get('key')

            if not input_key:
                raise ValueError("Missing uri in content batch")

            # Read file from S3
            file_content = read_s3_file(s3, input_bucket, input_key)

            # Process content (chunking)
            chunked_content = process_content(file_content, chunker)

            output_key = f"Output/{input_key}"

            # Write processed content back to S3
            write_to_s3(s3, input_bucket, output_key, chunked_content)

            # Add processed batch information
            processed_batches.append({
                'key': output_key
            })

        # Prepare output file information
        output_file = {
            'originalFileLocation': original_file_location,
            'fileMetadata': file_metadata,
            'contentBatches': processed_batches
        }
        output_files.append(output_file)

    result = {'outputFiles': output_files}
    logger.debug('output={}'.format(json.dumps(result, ensure_ascii=False)))
    return result

def read_s3_file(s3_client, bucket, key):
    try:
        response = s3_client.get_object(Bucket=bucket, Key=key)
        content = response['Body'].read().decode('utf-8')

        # Try to parse as JSON first (for structured JSON input)
        try:
            return json.loads(content)
        except json.JSONDecodeError:
            # If not valid JSON, assume JSONL or plain text and return as-is
            return {'fileContents': [{'contentBody': content, 'contentType': 'text/plain', 'contentMetadata': {}}]}
    except Exception as e:
        logger.error(f"Error reading S3 file {bucket}/{key}: {str(e)}")
        raise

def write_to_s3(s3_client, bucket, key, content):
    try:
        s3_client.put_object(Bucket=bucket, Key=key, Body=json.dumps(content, ensure_ascii=False).encode('utf-8'))
    except Exception as e:
        logger.error(f"Error writing to S3 {bucket}/{key}: {str(e)}")
        raise

def process_content(file_content: dict, chunker: Chunker) -> dict:
    chunked_content = {
        'fileContents': []
    }

    for content in file_content.get('fileContents', []):
        content_body = content.get('contentBody', '')
        content_type = content.get('contentType', 'text/plain')
        content_metadata = content.get('contentMetadata', {})

        # Chunk the content body by newlines
        chunks = chunker.chunk(content_body)

        for chunk in chunks:
            chunked_content['fileContents'].append({
                'contentType': content_type,
                'contentMetadata': content_metadata,
                'contentBody': chunk
            })

    return chunked_content
- 创建完成后,我们就可以保存并调用了
4. 语义检索与提示增强
将用户查询通过嵌入模型转换为向量,在向量数据库中检索最相关的工具描述。检索结果用于构建增强提示(Augmented Prompt),并发送至大语言模型进行推理。推荐设置最大检索结果为 5-10 个,以优化提示词长度和推理效率。
- 注意事项:确保查询语言与嵌入模型兼容,避免语义偏差。
- 建议:启用混合检索以提高复杂查询的覆盖率,并记录检索日志以分析结果相关性。(在下面代码中我们使用的是语意检索,混合检索请参考文档)。
def query_semantic(self, query_text: str, max_results: int = 10) -> QueryResult:
        """
        Perform semantic query on the Knowledge Base.

        Args:
            query_text: Semantic query text, e.g., "get weather in Suzhou"
            max_results: Maximum number of results to return (top-k)

        Returns:
            QueryResult containing matching tool definitions and metadata

        Raises:
            KnowledgeBaseError: If query fails
        """
        try:
            logger.info(f"Performing semantic query: {query_text[:100]}...")

            response = self.bedrock_client.retrieve(
                knowledgeBaseId=self.knowledge_base_id,
                retrievalQuery={"text": query_text},
                retrievalConfiguration={
                    "vectorSearchConfiguration": {"numberOfResults": max_results}
                }
            )

            results = []

            for result in response["retrievalResults"]:
                try:
                    content = json.loads(result["content"]["text"])
                    results.append(content)
                    logger.debug(f"Parsed query result: {content.get('toolSpec', {}).get('name', 'unknown')}")
                except json.JSONDecodeError as e:
                    logger.warning(
                        f"Failed to parse result content: {result['content']['text'][:100]}... "
                        f"Error: {e}"
                    )
                    continue

            logger.info(f"Query returned {len(results)} valid results")

            return QueryResult(
                tools=results,
                total_results=len(results)
            )

        except Exception as e:
            logger.error(f"Error querying Knowledge Base: {str(e)}")
            raise KnowledgeBaseError(f"Failed to query Knowledge Base: {str(e)}")
至此,我们可以将 Tools 存储到 RAG 中,并通过 SDK 读取 Tools 的流程梳理清楚,详细代码请参考 https://github.com/memoverflow/rag-mcp。
下面我们会进行使用 RAG-MCP 和不使用 RAG-MCP 在多维度对比,包括 Token 节省、准确性、花费时间和完整性等,请查看第二篇文章。
*前述特定亚马逊云科技生成式人工智能相关的服务仅在亚马逊云科技海外区域可用,亚马逊云科技中国仅为帮助您了解行业前沿技术和发展海外业务选择推介该服务。
参考资料
本篇作者